ARTHUR MARTIN ELECTROLUX LT0963-1 User manual

Type
User manual

This manual is also suitable for

129 0875 00
INSTRUCTION
MANUAL
Washing machine
LT 0963
ARTHUR MARTIN LT 0963
Before first use, remove the internal packing of your
washing machine !
Technical data
Dry clothes loading capacity : cotton 5 kg
synthetics 2,5 kg
wool 1 kg
Dimensions : height with panel : 895 mm
height without panel : 850 mm
width : 450 mm
depth : 600 mm
Voltage : 220 V
Heater rating : 1950 W
Power absorbed : 2200 W
Spinning speed : 300 to 800 rpm
Your washin machine
Programmes
• • • •
• • • •
• (•) •
• (• ) •
• (• ) •
• (•) •
(•) •
Max.
load
End of
prog.
Products
Temp.
°C
Spinning
SYNTHETICS
COTTON - LINEN
Prog.
Before each wash, make sure that :
the drain hose is correctly placed
the water tap is turned on (fully open)
the plug is in the wall socket
the "on/off" pushbutton is on the "off" position (pressed out)
Your washing machine is ready to
operate :
lift up the lid of the machine
open the drum with your two hands by pres-
sing the button A and the two flapdoors till they
disengage
introduce the laundry into the drum ; close the
drum and the lid of the machine
Be careful : before closing the lid of your ma-
chine, make sure that the drum flapdoors are
correctly closed :
- the two flapdoors fastened
- the button A pressed out
The detergent dispensers :
1 prewash compartment ( )
2 main wash compartment ( )
3 bleach compartment ( )
4 softener compartment (
)
If you wish to use liquid detergent :
choose a programme without prewash
pour the recommended quantity of liquid deter-
gent into the main wash compartment (b ).
90-60-40
e (60)
90-60-40
e (60)
60-40
40 -
60-40
60-40
40 -
40 -
40
1
1
2
2
3
4
5
6
7
8
9
10
11
12
13
14
15
5 kg
2,5 kg
1 kg
2,5 kg
5 kg
Spinning
Whites with prewash
Economical whites with prewash
Whites without prewash
Economical whites
Slightly soiled whites
Delicate whites
Rinsing
Long spinning
Resistant synthetics with prewash
Resistant synthetics without prewash
Delicates
Rinsing
Delicate textiles
Woolmark
Rinsing
Short spinning
Draining
Draining
When the selected programme is over, the machine stops automatically. The timer knob
stops on the position "I".
If the pushbutton "rinse hold" has been used, the wash programmes for synthetics will end
automatically by a rinse hold to avoid the creasing of the laundry if it is not taken away
from the drum just after the wash. You can end these programmes by pressing in the
pushbutton "rinse hold" or by a draining (programme 15).
Be careful : the lid can only be opened 1 or 2 minutes after the machine has stopped.
After each wash :
press out the "on/off" pushbutton ; the control lamp lights off.
press out the other pushbuttons if necessary.
unplug the machine from the wall socket and turn off the water tap.
Control panel
LT 0963
prélavage
essorage
rinçage
lavage
prélavage
lavage
rinçage
essorage
lavage
rinçage
essorage
vidange
e
coton 450 900
synth. 300 450
800
essorage - tr/min
2
programme
60
°C
température
CAPACITE VARIABLE
AUTOMATIQUE
prewashing
spinning
rinsing
washing
prewashing
washing
rinsing
spinning
washing
rinsing
spinning
draining
2
programme
60
°C
temperature
choose the programme according
to the nature and the degree of soil
of the laundry.
turn the timer knob clockwise to
select the chosen programme.
Never turn the timer knob
anticlockwise.
choose the temperature which cor-
responds to the chosen programme
(see the programme table) according
to the nature of the laundry and to the
fastness of the colours.
Saving pushbutton "e" used with the pro-
grammes 1 and 2, the thermostat knob on
"e", the wash duration is the same as the
programmes 1 and 2 at 90°C, but the wash
temperature is limited at 60°C.
"Rinse hold
" pushbutton : if pressed in at
the beginning of the programmes for
delicate laundry (synthetics), the water of
the last rinse remains in the tub. It avoids the
creasing of the laundry if it is not taken away
from the drum just after the wash.
If this pushbutton is not used, these program-
mes end with a short spinning.
This pushbutton has no effect on the pro-
grammes for resistant laundry (cotton-linen).
The "on/off" pushbutton : This pushbutton
allows to start the washingmachine. The
control lamp lights on. To the end of the
programme, press in the pushbutton to stop
the washing machine.The control lamp lights
off.
This variator allows to select the
spinning speed corresponding best to
the nature of your laundry.
Resistant fibers (cotton-linen) : from 450
to 900 rpm.
Delicate fibers : from 300 to 450 rpm.
cotton450 900
synth. 300 450
800
spinning - rpm
The programme starts. The control
lamp lights on.
2 Select the temperature1 Select the programme
Press the pushbuttons
if necessary
3
4
Spinning speed variator
Press the "on/of"
pushbutton
5
e
The products
Follow the manufacturer's instructions for recommended quantities.
If the water is soft, decrease the quantity.
If the water is hard or if the laundry is very soiled or stained, increase the detergent quantity
a little.
For information regarding the degree of hardness in your area, enquire with your local
authorities.
Bleach
You may use a bleach agent in all the washing programmes. However, make sure that
the fabric withstands the treatment. Bleach is automatically washed down into the drum.
Pour 1/4 to 1 glass of 12° chl bleach into compartment "c
" before switching the machine
on.
Make sure that the level of the liquid never exceeds the grid.
Softener
Compartment allows automatic addition to the last rinse of a liquid softener.
Follow the quantities recommended on the bottle.
Make sure that the level of the liquid never exceeds the grid.
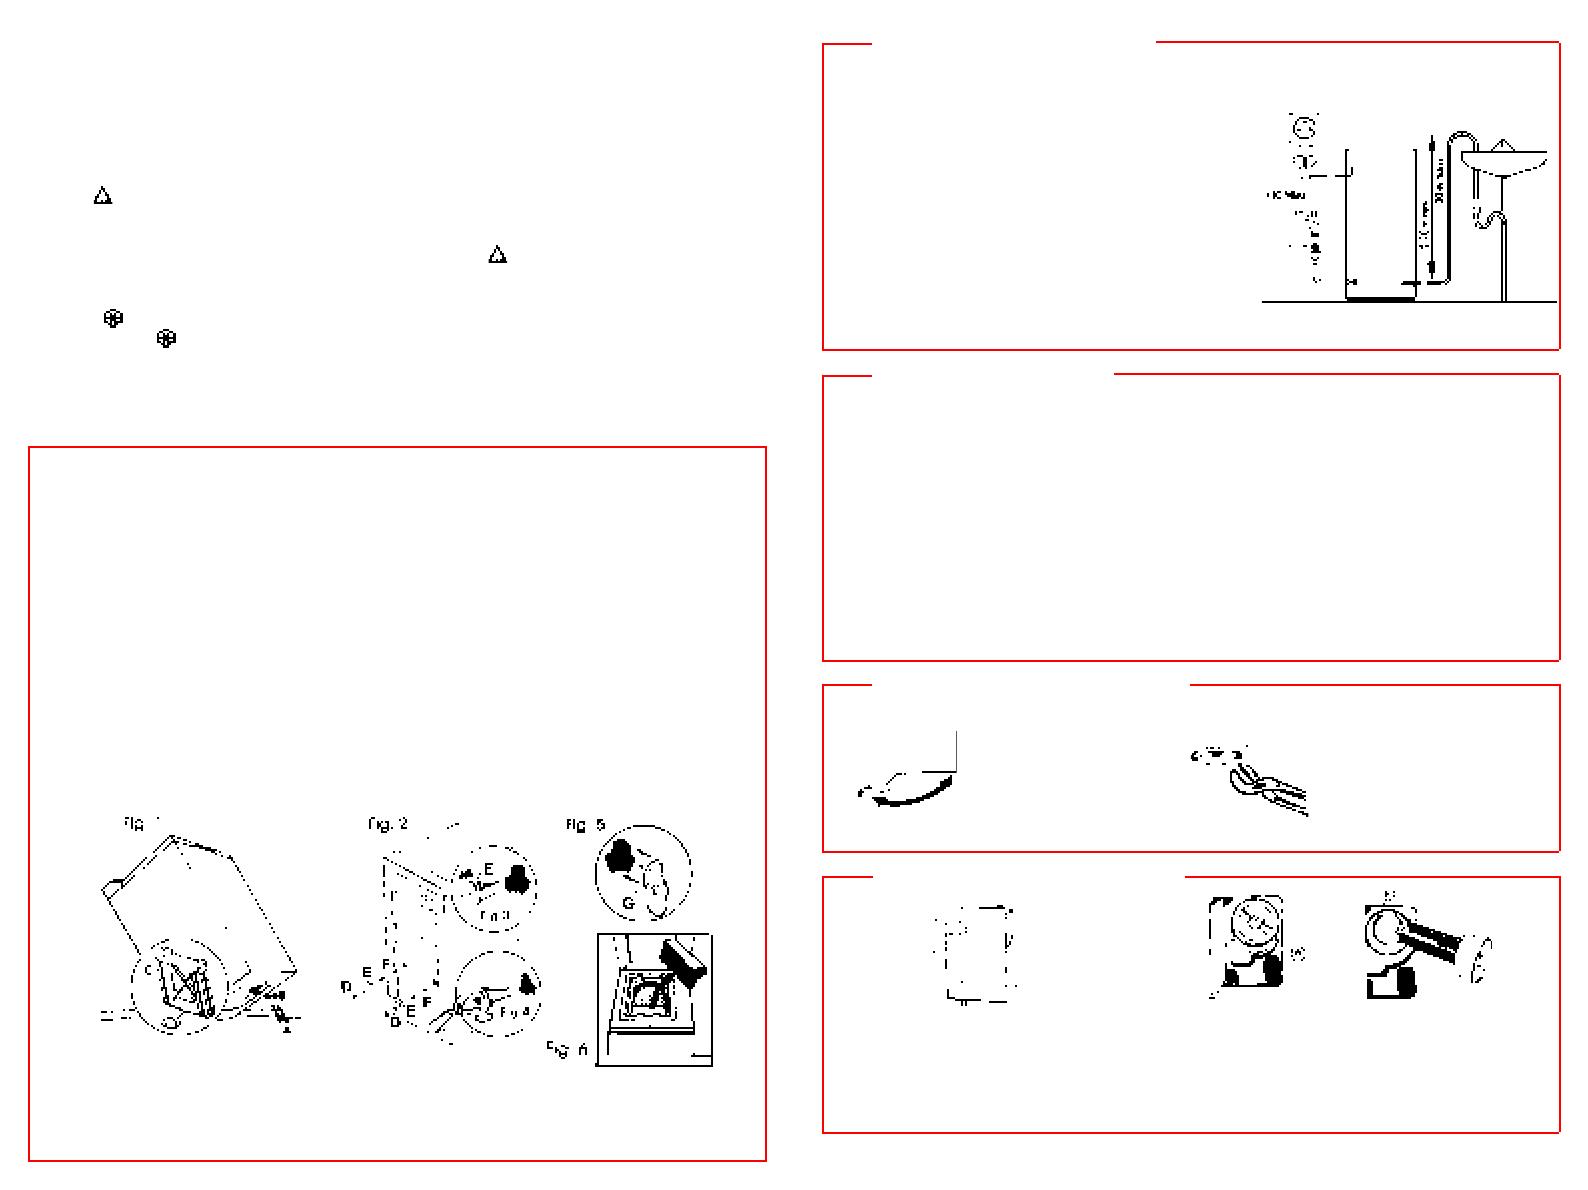
Removal of internal packing
The parts protecting the inner components of the machine during transit are red. They
must all be removed before using your machine for the first time. These parts and their
securing means should be kept in case the machine has to be transported again.
1. Tilt the machine backwards (fig. 1).
2. Unscrew and remove the 2 screws A and the 2 red washers B situated under the
washing machine, then pull on the red plastic ring to take part C out of the machine
(fig. 1).
3. Straighten up the machine.
4. After removing the 4 nuts D, the 4 washers (fig. 2), remove the 4 red plastic sleeves
E : pull the ring, rotating it at the same time leftwards and rightwards (fig. 3).
If you do not manage to take the red socket off, use a wrench and turn it anticlockwise
as shown on the picture (fig. 3 et 4).
5. Unscrew and remove the 4 threaded pins F.
6. Plug the holes left by pins F with plugs G (to be found in the plastic bag with the
instruction manual) taking care to shut down the central part as shown on drawing (fig.
5) and take the polystyrene block away (fig. 6).
Your washing machine is now ready to be operated.
Be careful : when the machine is installed on carpeted floor, ensure that the carpet
do not obstruct the openings, located at the base of the machine, which are provided
for ventilation.
Electrical connection
Before you plug the appliance into the wall socket, make sure that :
The supply voltage of the domestic wiring system
does not fluctuate by more than 10% plus or minus
from the value shown on the rating plate.
The meter, the fuses, the supply line and the wall
socket are all suitable to carry the maximum load
required by the washing machine (2,2 kW).
The existing safety rules call for the appliance to be
connected to an efficient ground wire.
The manufacturer disclaims any liability whatsoever
if this accident prevention rule is not complied with.
This appliance complies with E.E.C. directive n° 87-308
of 06.1987 relative to radio interference suppression
and with E.E.C. directive n° 73-23 relative to electrical safety.
Water connection
The end of the water inlet hose must be connected to a cold water tap having 3/4" gas
thread spout or to a water tap having a quick-coupling connector after having introduced
in the hose ring nut a rubber sealing washer also provided with the machine.
The curved end of the outlet hose should be inserted into a drain pipe not less than 70 cm
and not more than 1,0 m from floor level.
Make sure that the drain hose is always safely secured so that it will not become loose or fall
down from its position.
The water should drain freely and consequently, the drain hose should not be chocked or
placed in such a way as to obstruct the normal water flow.
If an extension is required, remember that it might cause a malfunction in the drain pump,
particularly if the extension has a length in excess of 1 meter or if the diameter of the extension
is smaller than the diameter of the original drain hose.
Water pressure : minimum : 5 N/cm
2
(0,5 kg/cm
2
) - maximum : 80 N/cm
2
(8 kg/cm
2
)
Positioning and levelling
Cleaning the drain filter
To enable the ap-
pliance to be moved
with ease, it is provided
with two fixed wheels
located at the rear of
the base.
Subject to technical alterations.
The machine is equipped with a drain filter
located at the front bottom behind a small
flapdoor.
This filter should be cleaned regularly as follows:
open the flapdoor of the filter compartment
by pressing it inwards with a finger at the
Level the appliance very
carefully by adjusting the
levelling feet located at
the front of the base. Then
tighten the lock nuts at the
top of the feet, using a
spanner.
hinged side
pull the extractable gutter (A) and turn the
filter knob anticlockwise ; pull the filter out
clean the filter thoroughly
refit the filter in the guides (E) and turn the
knob clockwise.
  • Page 1 1
  • Page 2 2
  • Page 3 3
  • Page 4 4

ARTHUR MARTIN ELECTROLUX LT0963-1 User manual

Type
User manual
This manual is also suitable for

Ask a question and I''ll find the answer in the document

Finding information in a document is now easier with AI