Page is loading ...
Owners Manual
Mounting instructions Öhlins rear suspension kit
POS8B00 for Porsche Boxster rear
© Öhlins Racing AB. All rights reserved. Any reprinting or unauthorized use without the
written permission of Öhlins Racing AB is prohibited. Printed in Sweden.
Öhlins suspension Car Road & Track
Your new Öhlins suspension features adjustable
damping forces, both compression and rebound.
The adjuster has a right hand thread and when
turned clockwise to stop, it is fully closed. The
damping is then of an absolut maximum.
CAUTION!
Using too much force when closing the adjuster,
will destroy important sealing surfaces.
NOTE!
If you have turned the adjuster without counting
the number of clicks you must go back to the
recommended settings by closing the adjuster
and count the clicks when turning it counter-
clockwise.
With the adjuster you optimize the suspension
for your driving style and the road conditions.
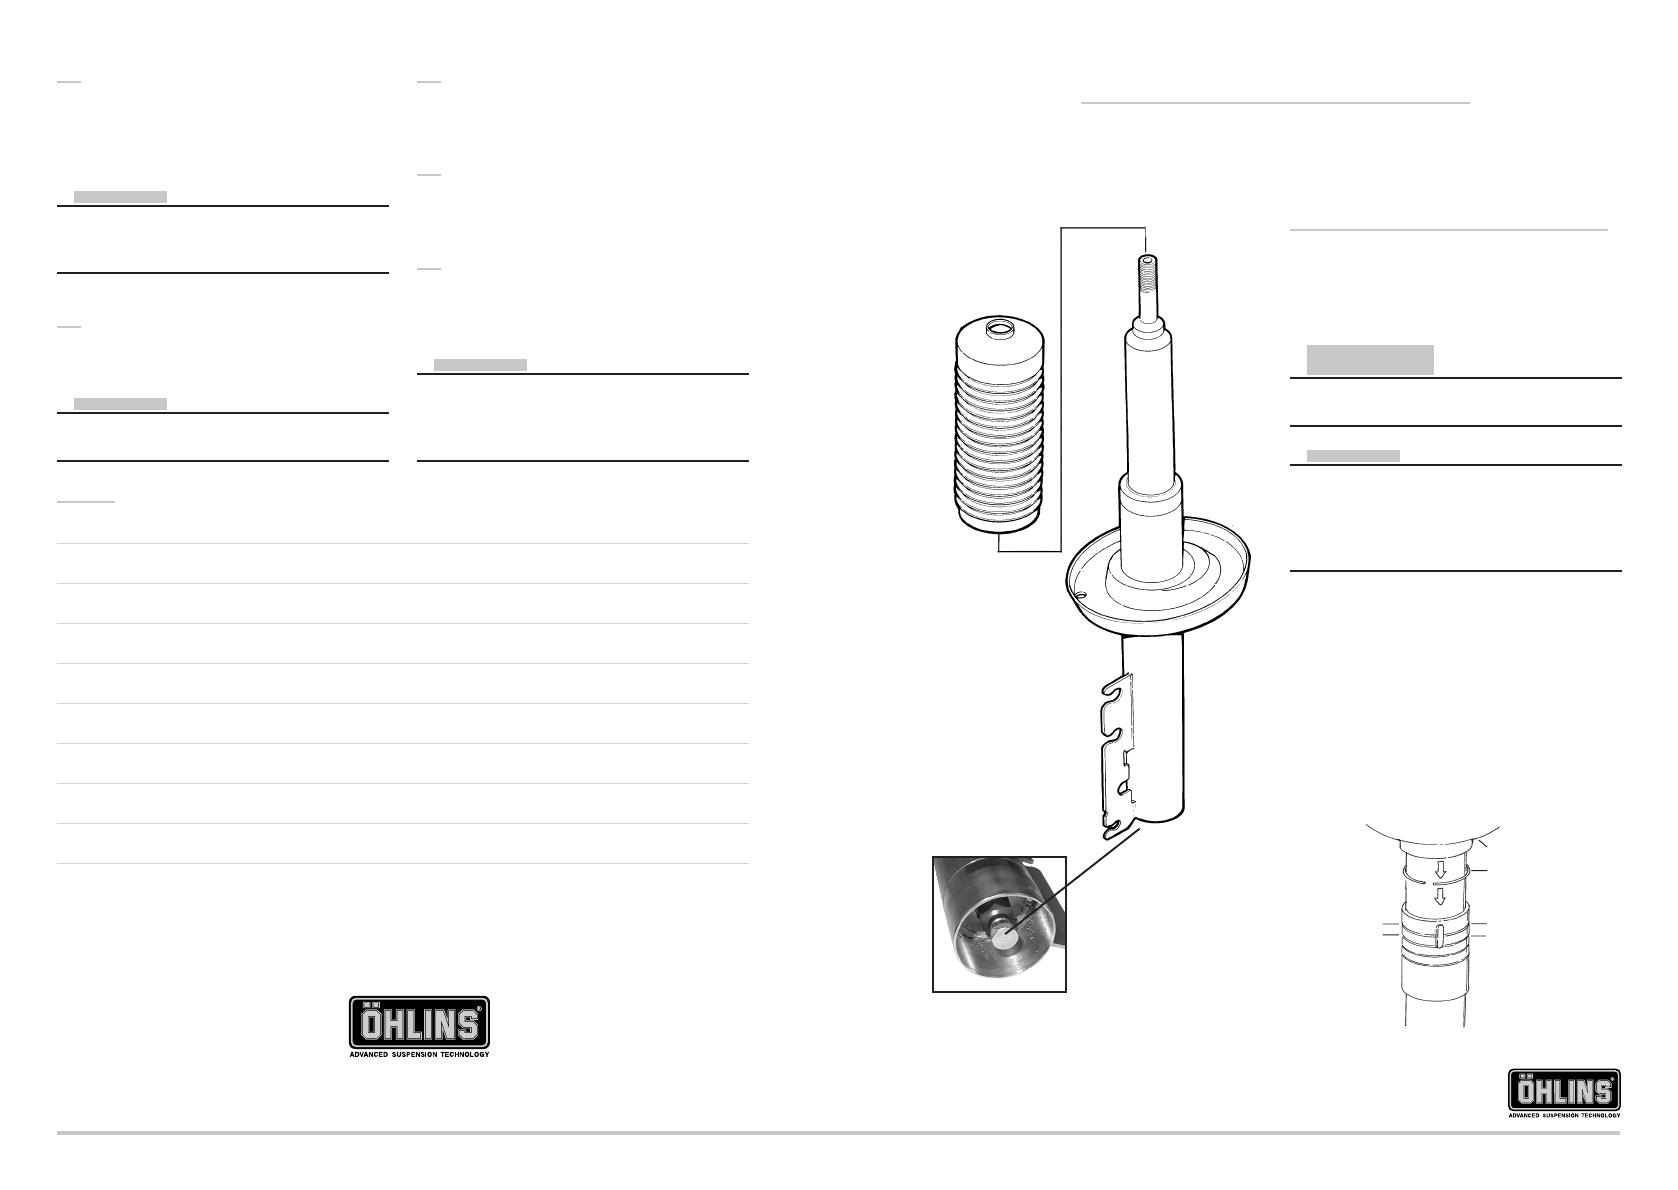
Sping preload adjuster
The spring pre-load can be adjusted by having
the spring seat in four different positions, by fit-
ting the circlip in grooves on four different heights
of the shock absorber body.
Spring seat
Circlip
Groove
Use position 2 for
original ride height
8 mm
Damping force adjuster
When adjusting, simply use
your fingers, avoid tools.
Öhlins Racing AB, Box 722, S-194 27 Upplands Väsby, Sweden.
Phone +46 8 590 025 00. Fax +46 8 590 025 80.
www.ohlins.com
POS8B00, issued 02 01 22
NOTE!
Make sure that all bolts are tightened to the correct
torque and that nothing fouls or restricts movement
of the shock absorber when the suspension is
being fully compressed or extended.
11
Fit the lower spring seat, the dust cover and the
spring to the Öhlins strut. Fit the original top
mount: use the nut provided. (Tightening torque,
see the car’s owners manual.)
NOTE!
When tighening the top mount nut the shock
absorber shaft must be hold in position with a
5 mm allen key.
12
Refit the strut to the lower bracket. Lift the disc
back in position so the lower trailing link is attached.
NOTE!
First put the drive shaft back in position. This will
help fitting the bracket to the trailing link.
13
Fit the upper mounting and strut to the car. Use
the original nuts to the upper mounting. For tight-
ening torque see the car's owner's manual.
14
Refit the trailing link, tie rod and electrical con-
nections. (tightening torque see the car's own-
ers manual). Bolt the drive shaft to the gearbox.
15
Continue your work according to Öhlins Owners
manual.
Notes

Before installation
Öhlins Racing AB can not be held responsible for
any damage whatsoever to shock absorber or
vehicle, or injury to persons, if the instructions for
fitting and maintenance are not followed exactly.
Similarly, the warranty will become null and void
if the instructions are not adhered to.
WARNING!
1. Installing a shock absorber, that is not
approved by the vehicle manufacturer, may
affect the stability of your vehicle. Öhlins
Racing AB cannot be held responsible for
any personal injury or damage whatsoever
that may occur after fitting the shock
absorber. Contact an Öhlins dealer or other
qualified person for advice.
2. Please study and make certain that you
fully understand all the mounting instructions
and the owners manuals before handling this
shock absorber kit. If you have any questions
regarding proper installation procedures,
contact an Öhlins dealer or other qualified
person.
3. The vehicle service manual must be
referred to when installing the Öhlins shock
absorber
Safety signals
Important information concerning safety is
distinguished in this manual by the
following notations:
The Safety alert symbol means:
Caution! Your safety is involved.
WARNING!
Failure to follow warning instructions
could result in severe or fatal injury
to anyone working with, inspecting or
using the suspension, or to bystanders.
CAUTION!
Caution indicates that special pre-
cautions must be taken to avoid dam-
age to the suspension.
NOTE!
This indicates information that is of
importance with regard to procedures.
Öhlins products are subject to continual improve-
ment and development. Consequently, although
these instructions include the most up-to-date
information available at the time of printing, there
may be minor differences between your suspen-
sion and this manual. Please consult your Öhlins
dealer if you have any questions with regard to
the contents of the manual.
NOTE!
During storage and transportation, espe-
cially at high ambient temperature, the oil
and grease used for assembling may run out
inside the packing and damage the
expanded polystyrene packing material. This
is not unusual and is in no way detrimental
to the shock absorber.
Kit contents
Before installing the shock absorber, please
check the contents of the kit, listed below. If
anything is missing, contact your Öhlins dealer.
Description Pcs.
Strut 2
Dust cover 2
Nut 2
Tie-rap 2
Sticker 1
Owners manual 1
Set-up data
Damping force adjustment 17 clicks*
*From closed position
WARNING!
1. It’s advisable to have an Öhlins dealer or other
qualified person to fit your shock absorber.
2. Instructions in the vehicle service manual are
to be followed when changing the shock
absorber.
3. When working on a lifted vehicle it must be
securely supported to prevent it from falling.
Mounting instructions
1
Lift the car up so the wheels arefree of the ground.
2
Remove the wheel.
3
Remove the electrical cables and the brake hose
from the wheel and from the attachments on the
standard struts. To unplug the electrical junction
on the rear side of the strut bracket the metal
sheet cover must be bent outwards.
8
Loosen the top mount. The nuts are located un-
der the cab.
9
Pull the strut and bracket upwards to free it from
the trailing link. Turn the disc outwards and remove
the strut by pulling it out from the lower bracket.
10
Remove the spring by compressing it and dis-
mantle the upper strut mounting.
CAUTION!
Do not try to remove the spring without using a
correct spring compressing tool. The com-
pressed spring can cause damages on persons
and equipment.
4
Remove the brake caliper from the disc. Hang it
in a steel wire to relieve the brake hose.
5
Loosen the anti sway bar from the strut. At the same
time the lower end of the strut will be loosened.
6
Loosen the tie rod end and the lower trailing link
from the strut bracket.
NOTE!
Support the disc and caliper with a jack or a suit-
able piece of wood.
7
Loosen the drive shaft from the gearbox by
removing the six allen bolts.
Trailing link
Top nut
Top mount
Strut
Dust
cover
Spring
Spring seal
/