Electrolux EI27BS26JW7 Installation guide
- Category
- Fridges
- Type
- Installation guide

Installation Instructions for
_Please refer to your Use _t Care Ouide for more details.
Pro arin For Installation
Besureto coordinatesite preparation and installationwith your kitchen
contractor•
Includethese minimum guidelines in yoursite preparation:
®
®
®
®
®
®
Chooseaplace near agroundedelectrical outlet.
Do not useanextension cord or anadapter plug.
Avoid direct sunlight andclose proximity to a range,dishwasher or
other heatsource.
Floorshould belevelandable to support afully loaded refrigerator.
Therefrigerator's Ice Dispenserrequires
water supply access.
Planfor easyaccessto counter tops when
removing food.
For complete accesstodrawers and freezer
baskets,doors must beableto fully open.
Loadrefrigerator from side of cabinet only.
Do not run retainingstraps over handles nor overtightenstraps.
Neveruse refrigerator handlesto movethe refrigerator.
Allow thefollowing clearancesfor easeof installation, proper air circulation, and plumbing and electrical
connections: Sides & Top:3/8inch/ Rear:1 inch
ConnectWaterSu I
BeforeInstallingTheWaterSupplyLine, YouWillNeed:
* BasicTools:adjustablewrench, flat-bladescrewdriver,
andPhillipsTuscrewdriver
* Accessto a household cold water linewith water
pressure between30 and 100psi.
* Awater supply line madeof 1Ainch (6 ram) OD,copper
or stainless steeltubing. Todeterminethe length of
tubing needed,measure thedistancefrom the ice maker
inletvalve at the backofthe refrigerator to your cold
water pipe.Then addapproximately 7 feet,so the refrigerator can bemovedout for cleaning.
* Ashutoff valve to connect the water supply line to your household watersystem. DONOTusea self-
piercing type shutoff valve.
, A compressionnutandferrule(sleeve)for connectingacopperwatersupplylinetothe icemaker inletvalve.
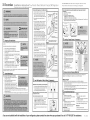
French Door Bottom Freezer/Refrigerator
To Connect Water Supply Line To Ice Maker Inlet VaNe
1. Disconnectrefrigerator from electric power source.
2. Placeendof water supply lineinto sink or bucket.
TurnON water supply andflush supply line until
water isclear.Turn OFFwater supply atshutoff valve.
3. Removeplasticcap from water valve inletand
discardcap.
4. If you use copper tubing - Slidebrass compression
nut,then ferrule (sleeve)onto watersupply line.
Pushwater supply lineinto watervalve inlet asfaras it will go (1Ainch). Slideferrule (sleeve)into valve
inletandfinger tighten compression nut ontovalve.
Tightenanother half turn with a wrench; DONOT
overtighten.See Figure 1,
Ifyou usestainlesssteeltubing - Thenutand
ferrule arealreadyassembledonthetubing. Slide
compressionnutontovalve inletand finger tighten
compressionnutontovalve.Tightenanotherhalf turn
with awrench; DONOTovertighten.SeeFigure 2.
5. Withsteelclamp andscrew,securewater supply line
(coppertubing only) to rearpanelof refrigeratoras
shown•
6. Coilexcesswater supply line (copper tubing only),
about 2Y2turns, behind refrigerator as shown and
arrangecoils so they do not vibrate or wear against
anyother surface.
7. TurnONwater supply atshutoff valve andtighten
connections that leak.
8,
9.
Reconnect refrigerator toelectrical power source.
Toturn icemaker on, lowerwire signal arm (freezer
icemaker) or set the icemaker's On/Offpower switch
tothe "ON" position (fresh food ice maker).
Compression
Not
Ferrule
(Sleeve)
water line
_ Water Valve
Bracket
_vaiVei,iei
Valve
Copper water line
from household water supply
(include enough tubing in loop to allow
moving refrigerator out for cleaning.)
Figure 1
Sta o ess
steel
water line
/// _, ;_.>_ "----Bracket
/// 1) voVe"e,
III /I/ 2_':,_
Ill///_ _ ---_ate,Va!ve
_ 6 ft. Stainless Steel water line
from household water supply
F guie2
LeveIRefri erator&Ad'ustDoors ifnecessar
GuideJinesfor final positioningofyourrefrigerator °_i o
* Allfour corners ofthe cabinetmust restfirmly onthefloor. _r-_-1:1
. Thesides should tilt 1Ainch (6 ram) from front to back
(to ensure that doors close and seal properly).
* Doors should align with each other and belevel.
,os,oft,..o.,,,,ousca.bemetb,ra,s,u,or,o.r,u,.... oo
t,ea,iustuble.outrollers.
_{,oe
Tolevel the cabinet using the front rollers:
1 Youcan raise or lower eachdoor. Use a% inchsocket
wrenchto turn theadjustment screws (1 perside).
Toraise:turn adjustment screw clockwise.
Tolower: turn adjustment screw counterclockwise.
2 Ensure both doors are bind-free with their seals
touching the cabinet on all four sides and thatcabinet is
stable.
3 After unit is leveled, lower anti-tip leg until itcontacts
thefloor.
DO NOT REMOVE this label until the refrigerator has been leveled.
Please follow all instructions for leveling your refrigerator.
Doors final adjustment using the adjustable lower hinge (select models, if
necessary):
1 Open doors to 90 degrees.
2 Remove screw.
3 Lift the door while adjusting the washer.
To raise the door: rotate washer clockwise.
To lower the door: rotate washer counterclockwise.
4 Replace the screw, ensuring it is between the spokes of the hinge washer. Screw will not be
tight, just insert until it is flush with the hinge.
Bottom of Door
Remove Screw
Raising/Lowering Door
Levelin Freezer Drawer ifnecessar
1. Check gasket seal around top,
bottom, and sides of freezer drawer.
2. If gasket is not sealed, open drawer
and slightly loosen 4 drawer screws
(2 on each side) to allow drawer to
rotate.
3. Close drawer and recheck the seal
on the gasket (A). Open the drawer
grabbing by the sides in the center
(B). Be careful not to rotate the
drawer.
4. Tighten 4 drawer screws.
5. Recheck gasket seal.
6. install the toe grille by fitting into
place.
iiiii
Push Against [
Freezer Drawer[
A I
II¸
Ih_
Remove InternaIShi in Materials .....................................
Electrolux uses packing foam and tape to secure the internal parts of your refrigerator for
shipping. Once the refrigerator is in position, you can remove this material.
What's Next?
Congratulations! You are ready to begin enjoying your new Electrolux refrigerator.
. For important safety instructions and to learn how to operate your refrigerator, please read
the entire Use & Care Guide.
. You may want to start with the "Normal Operating Sights & Sounds" section of the Guide to
learn what to expect during typical operation.
• Please register your product. You can register online at www.electroluxappliances.com, or
you can simply send in the Registration Card.
[] Installation Check List
Doors
[] Handles are secure and tight
[] Door seals completely to cabinet on all sides
[] Fresh food doors are level
[] Refrigerator is level, side to side and tilted
1Ainch (6 ram) front to back
[] Toe grille is properly attached to refrigerator
[] Cabinet is sitting solid on all corners
Electrical Power
[] House power turned on
[] Refrigerator plugged in
Ice Maker
[] House water supply connected to
refrigerator
[] No water leaks present at all connections
[] Ice Maker is turned ON.
[] Ice & Water Dispenser operates correctly
[] Select "Water" and fill a glass of water.
Final Checks
[] Shipping material removed
[] Fresh Food and Freezer temperatures set
If you are not satisfied with the installation of your refrigerator, please contact the store where you purchased it or call 1-877-435-3287 for assistance. P/N:24 94o o2
-
 1
1

Electrolux EI27BS26JW7 Installation guide
- Category
- Fridges
- Type
- Installation guide
Ask a question and I''ll find the answer in the document
Finding information in a document is now easier with AI
Related papers
-
Electrolux EI23BC80KS2 Installation guide
-
Electrolux EI27BS26 Installation guide
-
Electrolux EI23BC51IW1 Installation guide
-
Electrolux EI23CS35KS4A Owner's manual
-
Electrolux EW23CS65GB0 Owner's manual
-
-
-
Frigidaire WRT15MG4BQ5 Owner's manual
-
Electrolux EI28BS55IW1 Owner's manual
-
Other documents
-
Crosley CRT182IQW0 Installation guide
-
Kenmore 46-60502 Installation guide
-
Frigidaire FFHT2032TP Owner's manual
-
Frigidaire FGTR1842TD User guide
-
Frigidaire FFTR2021TS User manual
-
Frigidaire FFTR1614QW Owner's manual
-
Crosley FGHN2844LE7 Installation guide
-
Kenmore Elite 25357113601 Owner's manual
-
Kenmore Elite 25374225700 Owner's manual