
ge. COrn
Safety Instructions ....... 9-4
Operating Instructions
Clock and Timer ........... 13
Control Lockout ........... 13
Controls ................... 5
Oven ................. 11, 19
Sabbath Feaun_e .......... 9, 10
Self-Cleaning Oven ...... 16, 17
Special Features ........... 6-8
Thermostat ............... 15
Timed Baking and Roasting . .14
Care and Cleaning
Broiler Pan and Grid ........ 19
Control Panel ............. 18
Glass Snrfaces ............. 9]
Heating Element ........... 91
IKa_ol) .................... 18
Lift-Off Oven Door ...... 18, 19
Light Bull) ................ 90
Oven Inmrior. ............. 91
Packaging _pe ............ 18
Painmd Surfaces ........... 91
Shelves ................... 19
Stainless Smel Surfaces ...... 91
Troubleshooting Tips .... 92-24
Consumer Support
Consumer Support . . Back Cover
Product Registration ..... 95, 96
Vearranty ................. 97
JI@20-27" Sir,gle Wall (kJen
JTP20-30" Sirg@ Wall Oven
JI_25-27" Single Wall (kJen
JTP25-3d" Single Wall (kJen
JIGr_28-27" Double Wall (kJen
fl'P28-30" Double Wall (kJen
JIGr_48-27" Double Wall (kJen
fl'P48-30" Double Wall (kJen
JIGrUO-27" Double Wall (kJen
fl'P50-30" Double Wall (kJen
Write the model and serial
numbershere:
Model #
Serial #
You can find them on a label
on the side trim or on the front
of the (lower) oven behind the
oven door.
49-80341 11-05Jfl

iMPORTANTSAFETYiNFORMATiON.
READALLiNSTRUCTiONSBEFOREUSING.
For your safeN the information in this manual must be followed to minimize the risk of fire or
explosion, electric shock, or to prevent property damage, personal injury, or loss of fife.
IMPORTANTSAFETYNOtiCE
The California Safe Drinking Water and ToxicEnforcement Act requires the Governor of California to
publish a list of substances known to the state to cause cancer, birth defects or other reproductive
harm, and requires businesses to warn customers of potential exposure to such substances.
The fiberglass insulation in self-clean ovens gives off a very small amount of carbon monoxide during
the cleaning cycle. Exposure can be minimized by venting with an open window or using a ventilation
fan or hood.
SAFETYPRECAUtiONS
When using electrical appflances, basic safety precaufions should be followed, including the following:
_?{_;Use d/is appliance only %r its intended
• (
purpose as described in tins )wner s
Manual.
_:::Be sure your appliance is properly
installed and grounded by a qualified
technician in accordance with the
provided installation instructions.
_?{::Do not atmmpt to repair or replace any
part of your ox.en unless it is specifically
recommended in tiffs manual. All otimr
servicing should be refeiTed to a qualified
technician.
;_;Haxe tile installer show you the location
of tile circuit breaker or fllse. Mark it for
easy reference.
_i:,:Before performing any service, disconnect
ti_e ox.en power supply at the household
disu-ibudon panel by removing tile fuse or
switching off tile circuit breaken
_?{::Do not lem.e children alone--<hildren
should not be left alone or unattended in
an area where an appliance is in use. They
should nex.er be allowed to sit or stand on
any part of the appliance.
_?{::Do not allow anyone to climb, stand or
hang on the doon They could damag.e the
oven, or cause sex.ei.e personal iIIjni>
_]{:_Be sure tile ox.en is secm.ely installed in a
cabinet that is firmly attached m file house
strnctnre. Never allow anyone m climb, sit,
stand or hang on tile oven door
_:_Nex.er leave tim oven door open when yon
are not watching tile ox.en.
;fi:,:Alwws kee I) combustible wall cox.erings,
curtains or drapes a sad distance flom
yonI" ox.en.
_{;_Alwws kee I) dish towels, dish cloti_s, pot
holders and other linens a sad distance
fFonl vonT ox.en.
_]_;Always kee I) wooden and plastic nmnsils
and canned food a safe distance awW flom
vonI" ox.en.
q?{::Teach children not to pl W witi_ the
controls or any other part of tile oven.
_fi:,ii,arg.e scratches or impacts m glass doors
can lead to broken or shatmi.ed glass.
2

ge.com
WARNING!
SAFETYPRECAUTIONS
_; Do not store flammable mateiia]s in
an oxen,
_ CAUTION:Items of interest to
children should not be stored in cabinets
above an oven; children climbing on the
oven to reach items could be seIiouslv
ii_nred.
_; Never wear loose-fitting or hanging
gaI_nents while using die appliance. Be
careflll when reaching fbr imn/s stored
in cabinets oxer file oven. Flamnlable
mateiial could be ignited if brought in
contact with hot snrl_aces or heating
elements and may cause sex>re bnrns.
E:,IUse only d U pot llolders--moist or damp
pot holders on hot snil_aces iI_ay Iesult in
bums from smam. Do not let pot holders
touch hot heating elements. Do not use a
towel or other bulky cloth.
q?{:_For your safely, nexer use your appliance
for wam/ing or heating tile room.
_{;:Do not let cooking giease or other
flamnlable mamrials accumulam in
or Ileal tile oxen.
_{;:Do not use water on gTease fires. Nexer
pick/l I) a flaming pan. Turn tile controls
oK
Flame in die oven can be smothered
completely by closing tile oven door and
turning tile oven off"orby using a mnlfi-
puq)ose dU chemical or foam-type fire
extinguisher
E:,INever leax>jars or cans of fi_t drippings in
or ileal vonr oxen.
_]{;_Stand away from tile oven when opening
the ox>n doon Hot air or smam which
escapes can cause bnrrls to hands, Pace
and/or eyes.
E:,IDo not heat unopened food containers.
Pressure could build/l I) and the container
could burst, causing an irljni>
_i:,:Kee I) the oxen x_nt nnobstrncted.
E:,IKee I) the oven flee flom gTease buildup.
E:,IPlace the ox>n shelf in tile desired position
while tile oven is cool. If sheh>s must be
handled when hot, do not let pot holder
contact file heating elements.
E:,:_Allen using cooking or roasting bags
in tile oven, follow file manufitcturer's
directions.
;:i_::_!Do not touch die heating elements or the
interior snrl_ace of die oven. These surl_aces
may be hot enougtl to burn even thongtl
they are dark in colon During and after
use, do not touch, or let clothing or other
flammable materials contact any interior
aiea of tile oxen; allow sufficient fin/e for
cooling first.
Potentially hot surfaces include oven x>nt
openings, surPaces near the openings,
crevices around tile oxen dooi, the edg>s
of tile window and metal trin/parts above
the door
REMEMBER:The inside surPace of tile oxen
may be hot when tile door is opened.
_{;_Do not store or use combustible mamrials,
gasoline or other flammable vapors and
liquids in tile vicinity of this or any other
appliance.
3

IMPORTANTSAFETYINFORMATION.
READALLINSTRUCTIONSBEFOREUSING.
WARNING'!
SAFETYPRECAUTIONS
Pulling out the shelf to rite stop-lock is a
convenience in lifting beax_' %ods. It is
also a precaution against burns from
touching hot snrfaces of the door or
oxen walls.
Do not use the oxen to d_T newspapers.
If oxerheated, they can catch on fire.
Do not use the oxen foi a storage area.
hems stored in an oxen can iga_ite.
Do not leaxe paper products, cooking
utensils or food in the oxen when not
in rise.
_{::After broiling, always rake the broiler pan
out of rim oxen and clean it. Leftoxer
gTease in the broiler pan can catch fire
next time you use the pan.
_:;Clean only parts listed in this Owner's
Manual.
_fi:,iDo not use aluminum foil to line oxen
bottoms, except as suggested in this
manual, hnproper installation of
aluminum foil may result in a iisk
of elecuic shock or fire.
COOKMEATANDPOULTRYTHOROUGHLY...
Cookmeatandpoultry thoroughly--meat to at leastanINTERNALtemperatureof 160°Fandpoultry
toat leastan INTERNALtemperatureof 180°ECookingto thesetemperaturesusuallyprotectsagainst
foodboroeillness.
SELF-CLEANINGOVEN
_{_Do not clean rite door gvtsket. The door
gasket is essential for a g_od seal. Care
should be taken not to rub, damage or
moxe the gasket.
_i:,iDo not use oxen cleaners. No commetvial
oxen cleaner or oxen liner protective
coating of arty kind should be used in or
around arty part of the oxen. Residue from
oxen cleaners will damag_ the inside of the
oxen when the self-<iean cycle is used.
_?{:_Before self-cleaning fire oxen, remoxe the
broiler pan, gild attd other cookware.
_fi:,:Be sure to wipe up excess spillage before
starting the selt¥1eaning operation.
_?{:_If the self-cleaning mode malfunctions,
turn the oxen off attd disconnect rite
power supply. Haxe it serviced by a
qualified technician.
READANDFOLLOWTHISSAFETYINFORMATIONCAREFULLY.
SAVETHESEINSTRUCTIONS
4

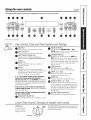
Usingthe ovencontrols, gecom
Throughout this manual, features and appearance may vary from your model.
????
Double oven control shown
OvenControl Clockand TimerFeaturesandSettings
0 BAKE Pad
Press this pad to select tile bake function.
A BROILHI/LOPad
Press this pad to select the broil flmcfion.
0 SELFCLEAN STD/LOWPad
Press fl/is pad to select die selfk'leaning
fimction. See tile Using the self-cleaning oven
section.
STARTPad
]_/]t/st be pressed to start an} cooking or
deaning flmction.
Display
Shows the time of day o_en temperature,
whether the oven is in the bake, broil or self:
cleaning mode and tile times set for tile
tiIller or }ltltoii/}ltic oven ol)eI'}ltions.
If "T--and a number or letter" flash in the display
and the oven control signals, this indicates a
function error code.PresstheCLEAR/OFFpad Allow the
oventocoolforonehour.Putthe ovenbackinto operation.If
the function errorcoderepeats,disconnectthe power to the
ovenandcarl forservice.
If your oven was set fora timed oven operation and
apower outage occurred, theclock andall programmed
functionsmust be reset
The time ofday will flash in the display when there
has been a power outage.
OVENLIGHT ON/OFFPad
Press this pad to turn tile o_en light on or off.
DELAYSTARTPad
Use along _dtl/ COOKING TIME or SELF
CLEAN pads to set tile oxen to start and stop
automatically at a time you set.
J_ COOKINGTIME Pad
Press this pad and then press tile HOURand
MIN + and -pads to set die amount of time
you w;int VOtli" t()od to cook. Tile oven will
shut offautomafically when tile cooking time
has mn out unless the Cook and Hold
t_attlI'e W;IS set.
CLEAR/OFFPad
Press this pad to cancel ALL oxen
operations except tile clock and fime_:
TEMP + and- Pads
Press these pads to set tile cooking
teilll)erattlre yOtl _%'_lilt to tlse.
CLOCKPad
Press this pad before setting tile clock.
HOUR and MIN + and- Pads
Press these pads to set times up to 9 hom_
and 59 minutes--for example, tile time of
day on the dock, the time_; the strafing and
length of cooking time for timed bake and
the sta_ing and length of deaning time
for self-clean.
KITCHEN TIMER ON/OFFPad
Press this pad to select tile timer teatm'e.
Lower OvenControl Settingsonmodels with a knob
OVENKnob
Turn this knob to
tile temperature
setting you want.
OFF LOWER TheOVENCYCLEh_?htglows until the ovenreachesyour
selected temperature,thengoesoff and on with theoven
element(s)dunbg cooking.
OVEN CYCLE 0 jF

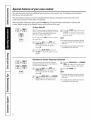
Special featuresofyour ovencontrol.
Yournew touch pad control has additional features that you may choose to use. The following are the features
and how you may activate them.
Thespecial feature modes can only be activated while the display is showing the time of day. They remain
in the control's memory until the steps are repeated.
When the display shows your choice, press the STARTpad. Thespecial features will remain in memory after
a power failure, except for the Sabbath feature, which will have to be reset.
START
12-Hour Shut-Off
VViththisfeature,shouldyouforgetandfe,avethe
ovenon,thecontrolwi//automat/2allyturnoff the
ovenafter12hoursdunbgbak/bgfunctionsor
after3 hoursdunbga broilfunction.
If )ou wish to turn OFFthis feature, fidlow
tile steps below.
[] Press tile upper oxen BAKE mid
BROILI/I/tO p:Ns at tile same time
for 3 seconds until tile displa}
sho_s SF.
[] Press tile BELAYSTARTp;M until
nOshdfl (no shut-oLf) appem5 in tile
displ;_y.
[]
Press tile STARTpad to lock in the
no shdn (no shut-oil) feature and
leave tile control set in this special
f_attlres n/ode.
NOTE'.
!i_:Onmodelswithtouchpadcontrolsforboth
ovens,thisactivatesthisspecblfeaturefor
bothovens.
iJi::Onmodelswithovenknob(s),thisfeatureis
notavai/abfefortheloweroven.
Fahrenheit or Celsius Temperature Selection
Yourovencontrol isset touse the Fahrenheit
temperatureselectionsbut youmay changethis
touse the Celsiusselections.
[] Press the upper oven BAKE "and
BROILHI/LO pads at the same time
for 3 seconds until the displa}
shows SE
[] Press the BROILHI/LO and COOKING
TIME pads at the saine time. The
display will show F (Fahrenheit).
[] Press the BROILHI/LO"and COOKING
TIME pads again at the same tim e.
The displa)will show C (Celsius).
[] Press the START pad.
NOTE."
!i_:Onmodels with touchpad contro/sforboth
ovens,the new sembg will be displayedfor
both ovens.
iJi::Onmodelswithovenknob(s),thisfeatureis
notavai/abfefortheloweroven.

ge.com
Tonesat the End of a Timed Cycle
At theendofa timedcycle,3shortbeepswill
soundfollowedbyonebeepevery6secondsuntil
theCLEAR/OFFpadispressedThiscontinuous
6-secondbeepmaybecanceled
To cancel the ()-second beep:
[]
Press tile upper oven BAKE and
BROIL HI/LO pads at the same time
fin 3 seconds until the displa}
shows SF.
[]
[]
Press tile KITCHEN TIMER ON/OFF
pad. The display shows CON BEEP
(continuous beep). Press the
KITCHEN TIMER ON/OFF pad again.
The display shows BEEP.(This
cancels tile one beep every 6
seconds.)
Press the START pad.
NOTE:
!i_:Onmodels with touchpad controlsforboth
ovens,thiscancels the endof cycle tone for
both ovens.
iJi::Onmodelswithovenknob(s),thisfeatureis
notavailablefortheloweroven.
12-Hour, 24-Hour or Clock Black-Out
Yourcontrol is set to usea 12-hourclock.
If you would prefi_r to have a 24-hour
militnx_' time clock or black out the clock
displa 5 follow the steps below.
[] Press the upper o;en BAKE and
BROILHI/LO pads at the same time
for 3 seconds, tmtil the display
sho_:s SF.
[]
Press the CLOCKpad once. The
display will show 12hr. If this is
the choice you want, press the
STARTpad.
Press the CLOCKpad again to
change to the 24-hour military time
clock. The display will show 24 hr. If
this is the choice you want, press the
STARTpad.
Press the CLOCKpad again to black
out the clock displa}: The display
will show OFF If this is the choice
you want, press the START pad.
NOTE."If the clock isin the Mack-outmode, you
will not beable touse theDelay Start function.

Special featuresofyourovencontrol.
Ceek and Held
Yournewcontrolhasacookandholdfeaturethat
keepscookedfoodswarmforupto3hoursafter
TbTedBakingor Roasting/shn/shed.
NOTE"Thisfeaturecanonlybeprogrammedto
workwith TkeedBakingorRoasting.{Seethe
Usingthetintedbakingandroastingfeatures
section.}After timedBakingorRoastinghas
automaticallystopped,theprogrammedCook
andHoldwillautomaticallystart.
To acti_te this feature fbr use after
Timed B'ddno, _ o_ Roasting, follo_ the
steps below.
[]
Both touch pad ovens fi>llow tile
same step l. Filet piess tile upper
()\ell BAKE and BROIL/'///tO pads at
the same time tbr 3 seconds tmtil
the display shows SF. Then proceed
with steps 2 through 3, using the
pads for tile upper or lower _wen,
[] Press tile COOKING TIME pad. Tile
displa} _dll show Hid OEE
Press die COOKING TIME pad again
u> actixate file feature. Tile disp]a}
will show Hid ON.
[] Press tile STARTpad to acdvate tile
cook and hold feature and leaxe tile
control set in this spedal features
l/lode.
NOTE:Onmodelswithovenknob{s},thl} feature
i_notavailablefortheloweroven.
&
OR
START
ChangingtheSpeedofthe + or- Pads
Asyouusethe+or- pads whensetfl)_ga time
or temperature,youmaynoticethedisplay
changesslowlyThbspecialfeatureallowsyouto
changethespeecLTosetthespeedyouprefer,
followthestepsbelow
[] Press the upper oven BAKE and
BROILHI/LO pads at tile sanle time
for 3 seconds, tmtil the display
shows SE
[] Press any + pad. Tile displa) _dll
show }ou a set speed between 1
and 5.
[] Press any + pad to increase tile
speed up to tile number 5.
Press any - pad to decrease the
speed down to tile number 1.
[] Press START to actixate the setting
and leaxe the control set in this
special teatm'es mode.
8

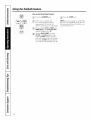
Usingthe SabbathFeature.
(Designed for use on the Jewish Sabbath and Holidays.) (on some models)
ge.com
The Sabbath feature can be used for baking/roasting only. It cannot be used for broiling, self-cleaning
or Delay Start cooking.
NOTE: The oven light comes on automatically(on some models) when the door is opened and goes off when the
door is closed. Thebulb maybe removed. See the OvenLight Replacement section. Onmodels with a light switch on
the control panel, the oven light may be turned on and left on.
i i i i
/ii illi!iiifilliP( I!i!ii iiiii
TEMP
When the display shows D the
oven is set in Sabbath. When the
display shows D C the oven is
bakflTg/roasting.
How to Set Sabbath Feature for Regular Baking/Roasting
NOTE: Tounderstandflow theoven control works,
practice using regular baking(non-Sabbath)before
entering Sabbathmode.
Make sure tile clock shows tile correct time
of da;_
] Press and hold both the BAKE and BROIL
HI/LO pads, at the same time, m/dl ttle
display sl/o_s SE
] "[:al) the DELaYSTARTpad/ultil
SAb bAtHapl)ears ill the (tislllay.
] Press the START pad and D will appear
ill the (list)Ira.
] Press the BAKE tlad. No sig31al will
be gi_,en.
] The })reset startillg tel//peratllre will
autolilati(allv lie s t to o50 °. Tap the
TEMP + or - pads to illcrease or decrease
the telnperature in 5 ° illcreHlelltS. (The
TEMP + or -pad should be tapped/klr
ea(h temlle_;mu'e ( hange; pressing and
holding tllese pads will not allow
[]
accurate ten/perattn:e setting.) Tlle
temperature call be set between 170 °
and 550 °. No signal or tenllle_mlre will
be _,rivel 1.
Press tile STARTtlad.
[_ ,\tier a random dehly t)eriod of
approximately 30 se(onds to 1 millute,
D C will appear in the dist)la } illdicatillg
tllat the o_t'n is baking/roastillg. I/D C
does not appear in tile (/isplay, start
again at step 4.
"Ii) adjust tile oven ten/perature, press tile
BAKEpad and tap tlle TEMP + or - pads to
increase or decrease the t('nlperature ill 5'_
increments. (The TEMP+ or- pad should be
tapped J[)l" e;-i(h tel/lpel:atllre (hal/ge; llI'essil/g "
and holding tllese pads will not allow accm_lte
te*lllle_lt/lre settillg.) Press the STARTpad.
NOTE:The CLEAR/OFEand COOKING rIME
pads are active d/uJng the Salfl)ath tcature.
HOUR MIN
TEMP
START
Whel7 HTe CIISDlal SlTOWS D [lTo
oven is set in Sabbath. When the
display shows D C the oven is
bakfl?g/roasting.
How to Set Sabbath Feature for Timed Baking/Roasting
- Immediate Start and Automatic Stop
NOTE"Tounderstand how theovencontrol works,
practice using regular(non-Sabbath)ImmediateStart
andAutomatic Stop before entering the Sabbathmode,
Make sure theclock shows thecorrect time
of fla}z
r_] Press alld hold both th_ BAKE and BROIL
I,,I
HI/LO l/ads, at the same time, until the
dislllay shows SE
_] Tall the OEMYSTARTpad In/Ill SAb bAtH
_l 1earsin ll_ ( stilt }
] Press the STARTIlad anti D will appear
in the disllla }
[] Press the COOKING TIME pad.
Press tile HOUR al/d MIN+ or - pads to
] s(t the desired lellgth of cooking- time
between ] iilinute and 9 hours and 5{)
millutes. Ttle cooking time that )70/1
entered will be displayed.
Press tile STARTllad.
[]
[]
[]
Press the BAKEpad. No sig31al will
be giv_n.
Tile tlreset starlil/g- telllllel;ttltr( will
a/ttomFdicallx b( set to 350:'. "['ap the
TEMP 4-or -liads to 111( Tease or de(r( ase
[]
tile tel//perattlre ill _o i]lcreille_lts.
('File TEMP4.or - pad should be uq)lled
lOT each telni/erature change; l)r_ ssing
and llolding th_se pads will not allow
accurat_ t_mpemtm:e setting.) "Fl/_
temperature call be set between 170'
and 550 °. No sigllal or tenlperature
will be g%en.
Press tile STARTllad.
] ,\ller Ft raIldol//dehly period of
at)i)_ oxilllatelx O0 se(oll(ls to 1 l//ii//lle,
D C will Nlpear in the (lispla} indicating
that the oven is baking/_x/asting.
IfD C does not kq)llear ill the display,
start ag;dn at step 7.
"['t) a([j/lSt tile ox ell tel/ll)el_tttlre, pr(ss tile
BAKEpa(1 and tap tile TEMP4-or -llads to
increase or decrease th( t(l/l]_)(]'_ttlre ill _o
increlnents. (The TEMP4-or-pad sllould be
tapped lilt each t(inp(l;mlre ctlange; pr(ssing
an(1 hol(ling these pads will not allow ace/irate
ten/tlerature setting.) Press tile SYARrpad.
Wllen cooking is finished, the display will
chang,(' l}'om D C to D and 0:00 will ai/t/em;
indicating that the o_en has turned OFF
t)//t is still s(t ill Sal/bath. b'.enlove tile
cooked I_)o(1.

Usingthe Sabbathfeature.
How to Exit the Sabbath Feature
[] Press the CLEAB/OFFpad.
[] Press the STARTpad.
[] If the oxen is cooldng, wait
for a random delay period of
approximately 30 seconds to 1
mimlte, mltil only D is in the displa?.
[] P_ess and hold boththe BAKE and
BROIL HI/LO pads, at the same time,
m_til the displa_ shows SE
[] _q_ the DELAY STARTpad m_til
12shdn or no shdnappears in the
display. 12shdn indicates that the
oven will automatically tm'n off atte_
12 horns, n0 shdn indi'cates that the
oven will not automatically mrn ofl_
NOTE."If a power outage occmTed while
the o\en was in Sabbath mode, the o\ en
will automatically tm'n off and the oven
COll[I'O] I/]lISt be reset,
10

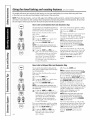
Usingthe oven. geoom
Toavoid possible bums, place the shelves in the desired posifion before you turn the oven on.
SJJ[]
Before you begin...
The shelves have stop-loc k_, so that when
placed correctly on the supports, they will
stop before coming completely out, and
will not tilt.
x3q/en placing and removing cookware,
pull the shelf out to the bump on the
shelf support.
Toremove a shelf, pull it toward you, tilt
the fl'ont end up and pull it out.
Toreplace, place the end of the shelf
(StOlMOCkS) on the support, tilt up the
fi'ont and push the shelf in.
NOTE:30" ovens(shown)have6 shelfpositions.
27"ovens have 4shelf positions.
How to Set the Oven for Baking or Roasting
[] Press the BAKE pad.
[] Press the TEMP+ or - pads to set
the desired temperature.
[] Press the START pad.
[] (_heck fi>od fiw doneness at
minimum time on recii_e. Cook longer
i[" IleC_lI_ _.
[] Press the CLEAR/OFFpad when
cooking is complete.
NOTE:Onsomemodels, the lowerovenIs
controlledwith a knob.Toset the ovenfor
baking,turn theknobto the desiredsettlbg or
temperature.Turntheknob to OFFwhen baking
/s complete.
Oven Shelf Positions
Typeof Food 27" 30"
Frozenpies BorC CorD
(oncookiesheet)
Angelfoodcake A B
Bundtorpoundcakes B B
Biscuits,muffins, BorC CorD
brownies,cookies,
cupcakes,layer
cakes,pies
Casseroles BorC CorD
NOTE:A coolingfanmayautomaticallyturnon
andoff tocoolintemalparts.Thisisnormal,and
thefanmaycontinuetorunevenaftertheovenis
turnedoK
Preheating and Pan Placement
Preheat the oven if the recipe calls fi',r it.
To preheat, set the oven at the correct
temperature. Preheating is necessm y for
good results when baking cakes, cookies,
pastry and breads.
Forovenswithout apreheat indicatorl/)ht or
tone,preheat 10minutes.
Baking results will be better if'baking
pans are centered in the oven as inuch as
possible. Pans should not touch each
other or the walls of the oven. If you
need to use two shelves, stagger the pans
so one is not direct.Iv above the othe_;
and leave approMmately 1½" between
pans, fl'om the fl'ont, back and sides of
the wall.
Cut slits in the foil just like the grid.
Aluminum Foil
Ym can use ahmfinum fifil m line the
broiler pan and broiler grid. Howe\'e_;
um must mold the f0il tightly to the grid
and cut slits in it just like the g6d.
Alumlbumfoil mayalso be usedto catch a
spillover
Never entirely cover a shelf with
aluminum toil. This will disturb the heat
circulation and result in poor baking.
A smaller sheet of foil may be used to
catch a spillover by placing it on a lower
shelf several inches below the food.
11

Usingthe oven.
How to Set the Oven for Broiling
Leavethedooropento thebroil stopposition.
Thedoorstaysopenbyitself, yet theproper
ternperatureis maintained/btheoven.
NOTE:Foodcanbe broiledwith thedoor
closedbutit maynotbrownaswell because
theovenheatingelementwill cycleonandoff.
[] Place the meat or fish on the broiler
g_id in the broiler pan.
[] Follow suggested shelf positions in
the Broiling Guide.
guide is based on meats at refrigerator
tel//]Dei';lttll'e.
[] Press the BROILHi/tO pad once fi)r
HIBroil.
To change, to tO Broil, press the
BROIL HI/tO pad again.
[] Press the STARTpad.
[] _]len broiling is finished, press the
CLEAR/OFFpad.
NOTE: On some rnodels, the/oweroven is
controlledwitha knob.Tosettheovenforbroi/bg,
turntheknobtoBROIL.fiJrntheknobtoOFF
ff your oven is connected to208 volts,
rare steaks may be broiled by
preheating the broiler andpositioning
tbeoven shelf oneposition highe_ The size, weioht,_, thickness, starting
telllpel';fftll'e ;/lid } o[/1" pl'efk_l'ellce ot
(|oneness will affect broiling times. This
Broiling Guide when broi//bg /s cornp/ete
27" 27" Ovens 27" Ovens 30" Ovens
Quantity and/ Ovens Shelf First Side Second Side Shelf
Food or Thickness Position Time (rain.) Time (rain.) Position Comments
GroundBeef 1lb. (4patties) C 10 7 E Spaceevenly.Up
WellDone 1/2to 3/4" thick E to 8 pattiestake
about thesame
time.
Beef Steaks
Raret
Medium
WellDone
Raret
Medium
WellDone
Chicken
LobsterTails
FishFillets
1" thick
1to 1½ Ibs.
Pork Chops
WellDone
LambChops
Medium
WellDone
Medium
WellDone
1½" thick
2 to21/LIbs.
1whole
2 to21/zIbs.,
split lengtbwise
24
6 to 8oz.eacb
1/4to 1/2" thick
C
C
C
C
C
C
A
6
8
12
10
15
25
35
13 16
5
6
11
78
14 16
20_5
10 15
Do not
turn over.
E
E
E
E
E
E
C
HamSlices 1" thick B 8 8 D
(precooked)
2 (1/2" thick) C 10 10 E
2(1"thick)about1lb. B 13 13 D
Slashfat.10
12
14
17
9
10
12
12 14
C
C
C
B
2 (1"thick)about 10
to 12oz.
2(1½"tbick)about1lb.
E
E
E
E
12
30" Ovens 30" Ovens
First Side Second Side
Time(rain.) Time(rain.)
10 7
10 9
8 6
10 8
12 10
10 8
15 14 16
25 20_5
25 10
13 16 Donot
turn over.
5 5
8 8
10 10
15 15
10 9
12 10
14 12
17 12 14
SteaksJessthan
1" thickcook
throughbefore
browning.
Panfrying is
recommended.
Slashfat.
Reducetimeabout
5to 10minutes
persideforcut-up
chicken.Brush
eachsidewith
meltedbutter.
Broil skin-side-
downfirst.
Cuttbroughbackof
shell.Spreadopen.
Brushwitb melted
butter before
broilingandafter
half ofbroiling
time.
Handleandturn
verycarefully.
Brushwith lemon
butter beforeand
duringcooking,if
desired.Preheat
broiler to increase
browning.
Increasetime 5to
10minutesper
sidefor 1½"tbick
orhome-curedham.
Slashfat.
t The US. l)_j)amne**l o] Ag'ricull u_, scOs "!,'a_, b¢,e]is pv/)ula_; but you shouM l_zo,, that cookb_g it to o_(v 140°F mean_ somefi_od #oiso_b_g
mgct_lis_*__nctysurefire. " (.Soupy:e:Sctfi,t.}_odBooh. }{mrKit_he_z (;uide. {1%1)Aleer..]tz_ze 19,'_5.)

Usingthe clock andtimer, ge.com
Make sure the clock is set to the
correct time of da,f
To Set the Clock
The clock must be set to tile correct time
of day fin" tile automatic oven tinting
tractions to work properly: Tile time ot
day cannot be changed dm'ing a timed
baking or self:cleaning cycle.
[] Press tile CLOCKpad.
[] Press tile HOUR and MIN + or
- pads to set tile time of day,
[] Press tile STARTpad.
The timer is a minute timer onl_
The timer does not control oven
operations. The maximum se_ting on
the timer is 9 hours and 59m&utes.
To Set the timer
[]
[]
Press tile KITCHEN TIMER
ON/OFF pad.
Press tile HOUR and MIN + or
- pads tmtil tile amo/mt of time
you want sho_vs in tile display.
Tile nlaximum time you can enter
in minutes is 59. Cooking times
more than 59 minutes should be
changed to hom_ and minums.
For example, enter 90 minutes as
1 horn; 30 mimltes.
If you make a mistake, press
KITCHENTIMERON/OFFand
begin again.
[] Press tile STARTpad.
After pressingthe STARTpad, SETdisappears,
this tells you the time b counting down,although
the displaydoesnot changeuntil one minute
has passe_ Secondswill not be shown in the
displayuntil the/astminute iscountingdown.
[] "_ hen tile timer reaches :00, tile
control will beep 3 times followed
by one beep eveI T 6 seconds until
tile KITCHENTIMERON/OFFpad
is pressed.
The&second tonecanbe canceledby following
the stepsin the Specialfeaturesof youroven
control sectionunder Tonesat the Endofa
TimedCycle.
ToReset the Timer
If tile display is still showing tile time
remaining, you may change it by pressing
tile KITCHEN TIMER ON/OFF pad, then
press tile HOUR ",rod MIN + or- pads
tmtil tile time you want appea_ in tile
display:
If tile remaining time is not in tile display
(clock, delay start or cooking time are in
the display), recall the remaining time b)'
pressing tile KITCHEN TIMER ON/OFFpad
and then pressing tile HOUR and MIN+
OI" -- pads to entei" tile new tillle veil
want.
ToCancel the Timer
Press KITCHEN TIMER ON/OFF pad twice.
Control Lockout
Yourcontrol wi// a/low you tolock out the touch
padsso theycannot beactivated whenpressed.
NOTE:On models with touch pad controls
for both ovens, this activates this feature for
both ovens.
To lock/unlod< tile controls:
[] Press tile HOUR and MIN-pads at
tile same thne fi)r 3 seconds until
tile display shows LOCON.
[] To unlock tile control, press tile
HOUR and MIN-pads at the same
time fin" 3 seconds until tile display
shows LOCOFF.
When this tbature is on and tile touch
pads are pressed, tile control will beep
and tile display will show LOC ON.
::J_::Thecontrol/ockoutmode affectsaft touch
pads.No touchpads will work when this
featureis activated
iJi::Onmodels with ovenknob{s),thisfeature is
not available for the lower oven.
!i> Thisadjustment will beretained in memory
after a power failure.
13

Usingthe timed bakingand mastingfeatures, somemodelst
On models with touch pad controls for both ovens, you can use timed baking in one oven while using self-clean
in the other; you can also use timed baking in both ovens atthe same time.
NOTE." Foods that spoil easily--such as milk, eggs, fish, stuffings, poultry and pork--should not be allowed to s# for
more than I hour before or after cooking. Room temperature promotes the growth of harmful bacteria. Be sure that
the oven light is off because heat from the bulb will speed harmful bacteria growth.
TEMP
i( i iii!iii i
_o_L_c_ _OLOaS_CONOS
How to Set an Immediate Start and Automatic Stop
Theoven will turn on i)?Tmedlate/yandcook fore Tile oven temi)erature and the cooking
sebcted langth of t/hTe.At the end of thecooklag
time the ovenwi// turn off automat/2a/ly
Make sine the clock shows the correct
time of day.
[] Press the BAKE pad.
[] Llsing tile TEMP+ or - pads, enter
tile (iesired temperatm'e.
[] Press the COOKING TIME pad.
NOTE: If yourrec/)e requkespreheatbg you
mayneed toadd additiona/ t/hTeto the/ength of
the cook/hgtime.
[] Llsing tile HOUR and MIN + or -
pads', enter the desired baking time.
Tile lXla_IXltlIXl time vou call enter
in minutes is 59. Cooldng dines
Ixlore than 59 minutes shoxfld be
changed to houm and minutes.
D_r example, enter 90 minutes as
1 hotm 30 minutes.
time that you entered will be displayed,
[] Press the START pad.
Tile display shows the oven telnperature
that you set and the cooldng time
countdown. The display stalqts changing
once the tempeiature reaches 100°K
NOTE"Whenuslagboth ovensat thesame
time,,the timesshowlagb the d/splaywill
be forthe last oven set. Tod/splay the time
set forthe fkst ovenset, pressthe COOKING
TIME pad for that oven.
The (wen will continue to cook for the
programmed alxlOtlllt of dixie, then shut
off automatically, mfless the (ook and
Hokl teamre was set. See tile Special
features of your oven control section.
Press tl_e CLEAR/OFFpad to clear the
display.
14
TEMP
HOUR MIN
&&
HOUR MIN
mc_Nmcx _Dma sE_0_0s
START
How to Set a Delayed Start and Automatic Stop
Youcanset the ovencentre/to delay-startthe
oven,cook fora specific lengthof t/meand then
turn off automat/caiig
Make sure the clock shows the correct
time of day
[] Press the BAKEpad.
[] Using tile TEMP+ or - pads, enter
the (iesired temperature.
[] Press the COOKING TIME pad.
NOTE:ff yourreciperequkespreheating, you
mayneed toadd additional time to the length of
the cookingtime.
[] Using the HOUR and MIN + or -
padsl enter the desired baking time.
The maximum time you can enter
in minutes is 59. Cooking times
more than 59 minutes should be
changed to horus and minutes.
For example, enter 90 minutes as
1 hem; 30 minums.
The oven mmperamre and the cooking
time that you entered will be displayed.
[] Press the DELAYSTART pad.
[] Lrsing the HOUR and MIN + or -
padsl enter the time of day _ou
%;IIXEtile ovelx 1o ttllIX oix and
stmt cooking.
[] Press the STARTpad.
NOTE"An attention tone will soundif you are
using timedbakingand donot press theSTART
pad afier entenbg the bakingtemperature.
If you would like to check the times you,
ha'_e set, press the DELAYSTARTpad to
check the start time you have set or press
the COOKING TIME pad to check the
length of cooking time you haxe set.
X._hen the oxen turIxs oIx at the time of
da) you haxe set, the displa) will show the
chan(,ino,.,_ temi)erature (starting, at 100°F)
and the cooking time countdown. The
displa_ starts changing once the
temperature reaches IO0°E
NOTE"Whenusingboth ovensat thesame
t/ine, the t/inesshowing in the displaywill
be forthe last oven set. Todisplay the t/?ne
set for the fkst ovenset, pressthe COOKIN6
TIME pad for that oven.
Tile oveIx will ('olxtilxtle to cook for tile
programmed am punt of time, then shut
off automadcall); unless the Cook and
Hold teature was set. See the Special
features of your oven control section.
Press the CLEAR/OFFpad to clear the
display.

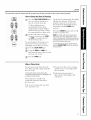
Adjust the oven thermostat--Do it yourself! ge.com
Youmay find that your new oven cooks differently than the one it replaced. Use your new oven for a few weeks to
become more familiar with it. If you still think your new ovenis too hot or too cold, you can adjust the thermostat yourself.
Do not use thermometers, such as those found in grocery stores, to check the temperature setting of your oven.
These thermometers may vary 20_40 degrees.
NOTE,"This adjustment will only affect baking and roasting temperatures; # does not affect broiling or self-cleaning
temperatures. Theadjustment will be retained in memory after apower failure.
ToAdjust the Oven Thermostat (onsomemodels)
same step 1. Filet press the upper
oven BAKE and BROILHI/LO pads at
tire stone time for 3 seconds until
tire display sho_vs SF. Then proceed
with steps 2 through 4, using tire
pads fin" tire upper o1"lower oven.
TEMP
g
START
Tile o_,en [ei//pei'attli'e can be
a(!justed up to (+) 35°F hottei oi
(-) 35°F cooler Press the TEMP +
pad to increase the temperature in
1-degree increments. Press the
TEMP- pad to decrease the
temperature in 1-degree increments.
[] Press the BAKEpad. A two-digit
immber shows in the display:
[] X._q_enyou haxe made the
a(!justment, press the STARTpad to
go back to the time of day display:
Use _Otli"oxen as _Otl WoIIld
nolinallv:
Turn the disk counterclockwise to
increase the oven temperature.
ToAdjust the Oven Thermostat (onsomemodels)
Pull the OVEN knob off the shaft, look
at the back ot the knob and note the
current setting before making am'
a(!jusnnent. The knob is tactorv set with
the top screw directly trader the pointer
[] Pull off the OVEN knob.
] ix)osen both screws on back of
the knob.
_4m will hear and teel the notches as
wm turn the knob, Each notch changes
temperature about l0 ° Fahrenheit.
[] Tighten the screws.
[] Return the OVEN knob to the oven.
Re-checkovenperformancebeforemaklbgany
additional adjustments.
[]
Hold both parts of the knob as
shown in the ilhlstration of the back
of the OVEN knob and ttlI'n so the
lower screw moxes in the desired
direction.
Turn the disk clockwise to decrease
the over temperature.
Thetype ofmargarine will affect bakingperformance!
Most recipes for baking have been developed using high-fat products such as butter or margarine (80% fat). If you
decrease the fat, the recipe may not give the same results as with a higher-fat product.
Recipe failure can result if cakes, pies, pastries, cookies or candies are made with Iow-fat spreads. The lower the fat
content of a spread product, the more noticeable these differences become.
Federal standards require products labeled "margarine" to contain at least 80% fi_t by weight. Ixm_li_t spreads, on the
other hand, contain less ti_t and mine water Tile high moisture content of these spreads aftect the textm'e and flavor
of baked goods. For best results with wmr old ti_vorite redpes, use mmgarine, butter or stick spreads containing
at least 70% vegetable oil.
15

Usingthese/f-c/eani.g oven. so,,emo e/sI
The oven door must be closed and all controls must be set correctly for the cycle to work properly.
Wipe up heavy soil onthe oven
bottom. (appearance may vary)
Before a Clean Cycle
We _ecommend venting your kitchen
with all open window or using a
ventilation tim or hood during tile
first sell'clean cycle.
Retool e tile broiler pan, broiler grid, all
cookware and an} ahmfinum foil fl'om
tile ovelL
Tile oxen shell es can be sell'cleaned, but
the', will darken lose theh" luster and
be(olne hard to slide.
DO not rise abrasives or (),,'ell cleanei_.
Clean tile top, sides and outside of tile
o``vn door with soap and waten
Make sure tile oven light bulb cover
(on some models) is in place and tile
o``vn light is ofl_
IMPORTANT'.Tile health ot some birds
is extrelnelv sensitive to tile fumes given
off during tile selt:cleaning cycle of any
o``en. Move birds to another well
ventilated room.
::Ji::On models with touch pad controls
tor both ovens_ vo/i can set a clean
cycle ill both ovens at the salne filne.
The last oven set will automatically
delay its stall until tile end of tile filst
oven's clean cycle.
::Ji::On Inodels with touch pad controls lbr
both ovens, you can rise flirted baking
ill one oven and sel6clean the other at
tile salne dine.
!i_:On inodels xfith a knob, tile lower
oxen does not haxe tile sell'clean
teature.
&&
HOUR MIN
(START
<=#
How to Set the Oven for Cleaning
[] Press tile SELFCLEAN STD/LOW pad
on(e tor a 4-hotlr clean time (5i"
twice fi)I a 3-houI clean tilne.
A 3-hour seltklean tilne is
i'eCOll/illended I(1i" t/se when
cleaning small, contained spills. A
selfXclean tilne of 4 houI_ or longer
is recolnlnended fi)r a dirtier (),,'ell.
V2] If a time other than 4 houI_ or
ix.-i
3 houI5 is needed, use tile HOUR
and MIN + or - pads and enter
tile desired clean tilne.
You can change tile clean tilne to am
tilne between 3 houi_ and 5 houI_,
dei)ending on how dirt)' )our oxen is.
[] Press tile START pad.
Tile door locks automatically. Tile display
will show tile clean time remaining. It Mll
not be possible to open tile oven door
until tile telni)erature drops below tile
lock teml)eramre and tile LOCKEDlight
goes off'.
When the LOCKEDlight goes off, you will
be able to open tile (looI:
i_:Tile word LOCKwill flash and tile oven
control will signal if you set tile clean
cycle and torget to close tile oven dooi:
?_:To stop a clean cycle, press tile
CLEAR/OFFpad. _4'hen tile LOCKEDlight
goes off indicating tile oven has cooled
below tile locking teml)eramre, you
will be able to open tile (looi:
16

ge.com
The oven door must be closed and all controls must be set correctly for the cycle to work properly.
HOUR MIN
HOUR MIN
START
How to Delay the Start of Cleaning
[] Presstl_e SELFCLEANSTD/LOWpad
once toI" a 4-hotli" (lean [iil/e oi"
twice fi)r a 3-horn clean time.
A 3-horn selt_clean time is
i'ecoilli/l ended fi)r rise when
cleaning small, contained spills. A
seltklean time of 4 horns or longer
is recommended t0r a dirtier o',en.
[21 lfa time other than 4 hom_ or
3 l/ores is needed, rise tile HOUR
and MIN + or- pads and enter
tile desired clean time.
_m can change the clean time to any
tlIlle" between .3 hotli_ and 5 hotli_,
del_ending, on how dirt))our oxen is.
[] Press tile DELAYSTARTpad.
[] Using the HOUR and MIN + or -
pads, enter the time of day }ou want
the clean cycle to start.
Tile door locks automatically: Tile display
will show tile start time. It will not be
possible to open tile oven door/mfil
the temperature drops below the lock
temperature and tile LOCKEDlight
goes off.
X,_]/en tile LOCKED light goes off, you will
be able to open tile doo_;
NOTE:Onmodelswithtouchpadcontro/sfor
bothovens,youcanseta delaydeaninboth
ovensatthesamet/_ne.Thesecondovensetwi//
automaticallydelaythestartofc/eanlbguntilthe
endof thefkstoven'sdeancycle.
Torecaflthestarttimeofthesecondovenset,
presstheDEL4YSTARTpadonthecontrolsfor
the second oven.
[] Press tile STARTpad.
After a Clean Cycle
You may notice some white ash in tile
oven. Wipe it 1117with a damp cloth after
tile oven cools,
If whitespotsremain,removethemwitha
soap-filledscouringpadandrinsethoroughlywith
a wnegarand watermlxture.
These deposits are usually a salt
residue that cmmot be removed by
tile clean cycle.
If the oven is not clean after one clean
wcle, repeat the cycle.
!i_:Y(m cannot set tile o_en fi)r cooking
tmfil tile oxen is cool enou_*h for tile
door to unlock.
iJi::If tile shelves become hard to
slide, xdpe tile shelf sui)ports with
cooking oil.
17

Careand cleaning oftheoven.
Be sure electrical power is off and aft surfaces are cool before cleaning any part of the oven.
How toRemoveProtectiveShippingFilmand Packaging Tape
Careflflly grasp a corner of tile protective
shipping film with your finge_ and slowly
peel it ti'om tile appliance surtilce. Do
not use any shaI 1) iteIns to reinove tile
film. Rem()ve all of tile fihn betore using
tile appliance tot tile fi_t time.
To }lSS/lI'e no d}llll}lOe is done to tile
finish of tile product, tile satest way to
remove tile adhesive fl'om packaging
tape on new appliances is an application
ot a household liquid dishwashing
detergent. Apply with a sott cloth and
allow to soak.
/VOTE:Theadhesivemustberemovedfromall
parts.Itcannotberemovedif itisbakedon.
Control Panel
It's a good idea to wipe tile control
panel after each use. Clean with mild
soap and water or vinegar and wateI;
rinse with clean water and polish dry
with a soft cloth.
Do not use abrasive cleansers, strong
liquid cleansers, plastic scouting pads or
oven cleaners on the control panel--they
will damage the finish. A 50/50 solution
of vinegar and hot water works well.
Moldedrib Control Knob (onsomemodels)
The control knobs may be removed for easier
cleanbg
Make sure tile knobs are in tile OFF
positions and pull them straight off tile
stems for cleaning.
Tile knobs can be cleaned in a
dishwasher or they may also be washed
with soap and water: Make sure the inside
of the knobs are (h_' befi)re replacing.
Replace tile knobs in tile Off position to
ensure proper placement.
SI0t
Hingelock
Pull hinge locks down to unlock
Removalposition
18
Lift-Off Oven Door
Thedoorisveryheavy.Becarefulwhen
removingandliftingthedeer.
Donothfithedoorbythehandle.
Toremovethedoor:
[]
[]
[]
[]
Fully open tile do(m
Pull tile hinge, locl_s down toward
the door fl'ame, to the unlocked
position. A tool, such as a small
fiat-blade screwdHxe_; max be
required.
[]
Fimllv,_,*raso._both sides of tile door []
at tile top.
Close door to tile door remox d
posit.ion, which is half Win between
tile broil stop position m_d fifllv
closed.
[] IJft door up and out until tile hinge
aml is clear of tile slot.
Toreplace the door:
[] Fi_mlv,_oraso._both sides ot tile door
at tile top.
[]
X&qtl/tile Bottom _arm
door at tile edge
same angle as ofsloQ
tile remo\:fl
position, seat tile
indentation ot
the hinge aHn
into tile bottom
edge of the hinge
slot. The notch in the hinge am/
nlust be flfllv seated into tile bottom
of tile slot. '
Full) open tile doo_: If tile door will
not fifll_ open tile indentation is
not seated correctl_ in tile bottom
edoe of the slot,
Push tile hinge, locks uI) aoainstm tile
fl'ont fl'ame of tile oxen caxitv to tile
locked position.
!
Hinge.,.
arm
Hingelock
Pushhingelocks uptolock
F_] Close tile oxen doo_:
lal

ge.com
I I
Do not rub or clean the door gasket--
it has an extremely tow resistance to
abrasion.
If you notice the gasket becoming worn,
frayed or damaged in any way or if it has
become displaced on the door, you should
have it replaced.
Door (onself-clean evens)
Toclean the inside ofthe door:
i'll:Because tile area inside tile gasket is
cleaned during tile self:clean cycle, you
(lo not need to clean this l_whand.
_: The area outside the gasket and
the door liner can be cleaned with a
soap-filled scouring or plastic pad,
hot water and detergent. Rinse well
with a vinegar and water sohlfion.
Toclean the outsideof the door:
::Ji::Use soap and water to thoroughly
clean tile top, sides and ti'ont of tile
oven (l(:,o_: Rinse well. Y_:,/:Imay also
use a glass cleaner to clean tile glass
on tile outside of tile dora: Do not let
water drip into tile vent openings.
::Ji::If anv stain on tile door vent trim is
persistent, use a soft abrasive cleaner
and a sponge-scrubber fi)r best results.
::Ji::Spillage of marinades, fl'uitjuices,
tomato sauces and basting materials
containing acids may cause
discoloration and should be wil)ed up
immediately. _]/en surtace is cool,
clean and rinse.
::Ji::Do not use oven cleane_, cleaning
l)ow(le_ or ha_h abrasives on tile
outside of tile (loo_:
Donot allow food spills with a high
sugar or acid content (such as
tomatoes, sauerkraut, fruit juices or
pie filling) to rema& on thesurface.
Theymay cause a dull spot even
after cleanhTg.
Door (onmodelswith a knob for the lower oven)
Toclean the inside ofthe door'.
?_:Soap and water will nommlly do tile
job. Heavy spattering or spillove_s may
require cleaning with a mild abrasive
cleane_: Soap-filled sco/wing pads may
also be tlsed.
If necessa_ youmay usean ovencleaner Follow
thepackagedirections.
::Ji::Clean tile inside of tile oven window
with a mild non-scratching cleaner and
a damp cloth.
Toclean the outsideof the door:
?_:Lrse soap and water to thoroughly
clean tile top, sides and ti'ont ot tile
oven doo_: Rinse well. You may also use
a glass cleaner to clean the glass on the
outside of tile (loo_: Do not let water
drip into tile vent openings.
_: Spillage (ff marinades, fl'uit
juices, tomato satlces and basting
materials containing acids may cause
discoloration and should be wiped
up immediately. \._l/en sm'ti_ce is
cool, clean and rinse.
::Ji::D() not use oven cleane_, cleaning
I)ow(le_ or hmM/abrasives on tile
outside el tile doo_:
Oven Shelves
(3ean tile (wen shelves with an abrasive
cleanser or soap-filled sco/wing pad.
_Mter cleaning, rinse the shelves with
clean water and dry with a clean cloth.
NOTE."Theovenshelvesmay becleaned in the
self-c/eamngoven.However,the shelveswill
darkenin color,lose thek /usterand becomehard
to shdeif cleanedduringthe self-cleaningcycle.
Youcan wipe theshelf supportswith cookl)vg
oil after seff-c/eaningto makethe shelvesslide
more easl/_
(0'q
After broiling remove the broiler
pan from the oven.
Donot store a soiledbroiler pan and
gridanywhere & llTeoven.
Broiler Pan & Grid
Donot c/eanthebroi/erpanor gnd /na
self-cleaningoven.
_Mtel"broiling, remove tile broiler pan
fl'om tile oven. P,emove tile grid fl'om tile
pan. Careflflly pore" out tile gt ease fl'om
tile pan into a proper containe,:
Wash and rinse the broiler pan and grid
in hot water with a soap-filled or plastic
scouting pad.
If Ibod has bm'ned on, spfinlde tile grid
with detergent while hot and cover with
wet paper towels or a dishcloth. Soaking
tile pan will remove burned-on fi)ods.
Both tile broiler pan and grid may be
cleaned with a commercial oven cleanel:
Both tile broiler pan and grid can also be
cleaned in a dish_lsher.
19

Careandc/eaMngoftheoven.
i |
1_'/2 ,]_\
I Maximumf "'_,
Ile"_th _ :
Oven Light Bulb (onsomemodels)
NOTE" Theglasscover(on somemodels)should
be removedon/ywhenco/cLWeanbg/atexg/oves
may offer abetter grip.
getore replacing the bulb, disconnect
electrical power to the oven at the main
tuse or circuit breaker panel. I,et the
bulb cool completely betore removing it.
For your sate_', do not touch a hot bulb
with a damp cloth. If you do, the bulb
will break.
Glasscover Toremove:
Turn the glass cover counterclockwise
1/4 turn until the tabs ot the glass cover
clear the grooves ot the socket. Remove
the bulb.
Toreplace:
Put in a new 40-watt appliance bulb.
Place the tabs of the glass cover into the
grooves ot the socket. Tm'n the glass
cover clockwise 1/4 turn.
NOTE:
_:A 40-wattappliancebulbissmallerthana
standard40-watt householdbulb.
_:Instaflandtightenthecoverclockwise.
iJGReconnectelectricalpowerto theoven.
iJGFor/?nproved//ght/bginsidetheoven,dean
theglasscoverfrequent/;/usinga wetcloth.
Thisshouldbedonewhentheovenis
completelycool.
Recegtacle Sockel
BUlB
/
Glasscovel
Oven Light Bulbs (onsomemodels)
NOTE,"The glass cover(on somemod.s shou/dberemovedonlywhen
better grip.C°ld"Wearing latox gloves may offor a
CAUTlON.Beforereplacingvour Rece to ,o
oven light bulb, disconnect the electrical >
power to the oven at the main fuse or
circu# breaker panel
Be stlI'e to let the light cover and bulb
cool completely.
For your sateU, do not touch a hot bull)
with bare hands or a damp cloth.
Toremove:
[] Turn the glass (o_er
counterclockwise 1/4 turn until the
tabs of the glass cover clear the
grooves of the socket.
[] Using glo_es or a dry cloth, remoxe
the bulb by pulling it straight out.
Toreplace:
[] Use a new 130-xolt Halogen 1)ulb,
not to exceed 50 watts.
[] Using., mdoves,or a dry, cloth, remove
the bulb fl'om its I)acka°ing,_, . Do not
touch the bulb with bare fin *e_s
Usegloves
orcloth
[] Push the bulb straight into the
receptacle all the way.
[] Place the tabs of the glass coxer into
the grooxes of the socket. Turn the
glass cover clockwise 1/4 turn.
D)r improved lighting inside the
oven, clean the glass cover
fl'equenfly using a wet cloth. This
should be done when the oven is
completely cool.
[] ]_.e('onne('t ele('t_i(-al power to
the o_, en.
2O
Page is loading ...
Page is loading ...
Page is loading ...
Page is loading ...
Page is loading ...
Page is loading ...
Page is loading ...
Page is loading ...
-
 1
1
-
 2
2
-
 3
3
-
 4
4
-
 5
5
-
 6
6
-
 7
7
-
 8
8
-
 9
9
-
 10
10
-
 11
11
-
 12
12
-
 13
13
-
 14
14
-
 15
15
-
 16
16
-
 17
17
-
 18
18
-
 19
19
-
 20
20
-
 21
21
-
 22
22
-
 23
23
-
 24
24
-
 25
25
-
 26
26
-
 27
27
-
 28
28


Ask a question and I''ll find the answer in the document
Finding information in a document is now easier with AI
Related papers
Other documents
-
Hotpoint RA620F1CT Owner's manual
-
AMERICANA Model ABS300 Owner's Manual and Installation Instructions
-
-
-
-
-
-
Monogram ZDP36N4D Owner's manual
-
-