Page is loading ...

Massage Chair | MC-1000
Instruction Manual
Your Personal Masseuse

MC-1000 Massage Chair Operation Manual
Experience the latest in high-tech luxury with the truMedic® InstaShiatsu+ MC-1000
Massage Chair. We’ve combined the benefits of an ergonomic design with a soothing
full body massage to give you a spa experience in the comfort of your own home. The
MC-1000 Massage Chair includes the following features:
• Several Massage Techniques: A combination of kneading, shiatsu, pressing,
knocking, and tapping sensations bring relief to every area of your body.
• Acupressure Functionality: This massage function targets pressure points
throughout your body to relieve tension and ease stress.
• Custom Adjustment Capabilities: Shi the seat, backrest, and leg rest in
increments to find the perfect position or relax in a zero gravity position and
experience the feeling of weightlessness. The custom adjustment function caters to
your individual preference.
• Forward sliding functionality: Move the seat 4 inches from the wall before
starting your massage session. This allows you to store your massage chair in a
more compact space without sacrificing the ability to enjoy a full body massage.
• Rolling and Pressurized Foot Massage Functionality: Initiate a foot massage
that will provide relief to your whole body by targeting specific pressure points
throughout your feet.
• Proprietary Airbag Pressure-Massage Functionality: Strategically located
airbags grip, twist, and gently stretch your muscles. Sit back and relax as airbags in
the seat provide additional relief to your waist and hips.
• Custom Height Adjustment Capabilities: The leg rests extend and retract within a
range of 8 inches to accommodate users of all heights.
• High-Quality Remote Control: The MC-1000 uses a variable frequency drive LCD
remote control that features a new, cutting-edge design.
INTRODUCTION

A Quick Note from truMedic
®
As you install and begin to use your new massage chair, keep the following
recommendations in mind:
• Read the operation manual in full before you attempt to install or use your massage
chair.
• Store your operation manual in a convenient place for quick reference.
• Carefully read all warnings and cautionary notes provided in your manual.
truMedic® reserves the right to change the design specifications of the MC-1000
without notice. Use the images provided here as a guide and not an exact replica of
your chair. Always refer to your massage chair as you read through the instructions.
Before Using the MC-1000 Massage Chair 1
Warnings and Notes of Caution 2
Getting to Know the Parts of Your Chair 6
Installation Guide 11
Adjusting Your MC-1000 Massage Chair 16
MC-1000 Remote Control Usage Guide 19
Operating Your MC-1000 Massage Chair 24
Cleaning and Maintaining the MC-1000 28
Troubleshooting the MC-1000 30
Technical Specications 32
TABLE OF CONTENTS

1
Before Using the MC-1000 Massage Chair
Please note all symbols and signs outlined in this operation manual and follow the
instructions listed for an eective and safe operating experience. Throughout this
manual, we will use several symbols to indicate important areas:
If you see this symbol, the
accompanying language will
describe a warning for serious
bodily injury or death.
The caution symbol denotes
something that may cause an
injury or property damage.
Avoid engaging in the listed
behaviors associated with
this symbol.
Do not disassemble any part on
your chair featuring this symbol.
Doing so may increase the risk of
harm or void any accompanying
warranty.
You must adhere to these
guidelines when operating
your new massage chair.
This symbol will provide
directions on how to use a
particular cable during
assembly and use.
This chair is not waterproof, avoid
contact with any liquids.
This symbol denotes any fire
or environmental hazards.
SAFETY INSTRUCTIONS

WARNING
2
People Who Should Not Use the MC-1000
• Those with osteoporosis.
• Those who have a pacemaker implant or other electrical medical implant.
• Those who are pregnant or in poor health should discuss use with a physician.
• Children under the age of 12.
• Anyone under the influence of alcohol or recreational drugs.
• Anyone who may fall asleep while using the chair (this chair is not meant for
sleeping).
Accident and injury warnings
• Do not allow children, pets, or any objects in or around the chair while it is in an
adjusted position or in operation.
• Immediately discontinue use and speak with a medical professional if you
experience any strange symptoms while using your massage chair.
• Do not sleep in the chair.
• Do not sit or stand on the armrests.
• Avoid excessively targeting any one area of the body to reduce the risk of injury.
• Closely monitor any user who suers from mobility diiculties.
Fire and electrocution warnings
• Always insert the plug into an appropriate power outlet.
• Never leave a plug sticking partly out of an outlet.
• Always turn o and unplug the chair when it is not in use.
Fire and electrocution avoidance
• Do not use a plug, cord, or outlet if you identify a poor or broken contact.
• Only use power sources that support the recommended voltage to reduce the risk
of fire or electric shock.
• Do not use any damaged, twisted, knotted, or constricted power cords.
Accident avoidance
• Do not fold massage chair cushions if you plan to store the chair.
• Do not run this massage chair for long, uninterrupted periods. Follow all run-time
recommendations listed in this manual.
Warnings and Notes of Caution

3
Notes on User disassembly and Maintenance
• Contact a professional if your chair experiences water damage or begins to function
improperly. Do not modify, disassemble, or perform unspecified maintenance.
• Do not attempt to repair or replace a damaged power cord or plug. Contact the
service team at truMedic® or a professional dealer to receive a replacement.
• Do not remove or open any part of the chair for any reason.
• Contact a professional for repair if you notice any irregularities or damage in the
cloth and leather coverings on your massage chair.
WARNING (CONT.)
CAUTION
Avoiding Falls
• Always operate your chair on a flat and even surface.
Preventing Wall and Chair Damage
• Always place the chair at least 4 inches from all walls to allow for proper
positioning.
Avoiding Injuries Associated With Excessive Use
• The maximum recommended massage time is 20 minutes. Try to change massage
settings and positions every 5 minutes for best results. Failing to change positions
frequently could result in discomfort.
Avoiding Accidents and Injuries
• Check the power switch before plugging the massage chair into the outlet. The
power switch should sit in the OFF position any time you unplug or plug in the
chair.
• Fully insert the plug into the outlet before turning the chair ON.
• Turn o all controls and switches before unplugging the chair.
Avoiding Electrocution
• Look for cord and wire damage before using the massage chair.
• Follow all instructions for proper ground wire connectivity. The wire should not
have any irregularities.
SAFETY INSTRUCTIONS

4
Avoiding Accidents and Injuries
• Do not press into or step on the massage heads.
• Do not place your hands or feet in between gaps in the massage heads.
• Do not put your hands or feet in between spaces in mechanical components.
• Do not drop or purposefully insert objects into the massage chair slot.
• Do not sit, stand, or place heavy objects on chair components, including the
armrests, leg rests, and backrests.
• Never stand on the chair.
• Do not attempt to move a chair white it’s operating.
• Do not use massage areas for unintended body parts (e.g., do not put your head in
the leg rest).
• Do not put unusual amounts of pressure on the backrest while the chair is reclined.
• Avoid using the chair with exposed skin or while wearing sheer fabrics. Using the
chair with improper clothing could lead to skin irritation.
• Empty your pockets before sitting in the chair.
Avoiding Chair Damage, Discoloration, and Deterioration
• Do not place the chair in humid or wet environments, around sharp things, or near
heat sources, including stoves.
• Never use an electric heating pad, blanket, or other heated device while using the
chair.
• Do not use the chair in high-temperature areas.
• Do not use the chair in an outdoor environment.
Avoiding Leaks and The Potential for Electrocution Injuries
• Do not use or store your chair in a wet, humid, or exposed environment such as a
swimming pool area or bathroom.
• Both the chair and the accompanying remote control must remain dry at all times.
• Do not sit in the chair with wet or damp clothes.
Avoiding electrocution Injuries
• Follow all directions for installing the ground wire or contact a professional
electrician for assistance.
• Never use a plug adapter. Contact a professional electrician if you do not have the
appropriate outlet for installation.
Avoiding Electrocution Injuries or Fire
• Unplug the chair before cleaning.
• Unplug the chair if you notice any power damage or the potential for power-related
damage (i.e., during thunderstorms).
• To unplug the chair, firmly grasp the plug (not the cord) to release the prongs from
the outlet.

Fuse Location
CAUTION (CONT.)
5
Avoid accidents:
• Always turn OFF and unplug your chair aer a massaging session.
• Avoid power-related damage:
• Always turn the switch to the OFF position and unplug your chair during electrical
outages.
Special Notes
Grounding Note
• This chair features a cord with a grounding conductor. Only use the appropriate outlet to power
your massage chair.
Fuse Replacement Note
• If a fuse burns out in your chair, turn the switch to the OFF position and unplug the chair. Locate
the switch box and identify the dysfunctional fuse. Only replace a burned out fuse with a
matching fuse. Contact a professional electrician for further assistance if needed.
Ground Wire Placement Warning
Do not place the ground wire near a gas pipe, phone wire, lightning
rod, or water pipe. These areas present high risks for fire, electric
shock, and damage.
SAFETY INSTRUCTIONS

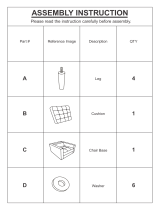
Getting to Know the Parts of Your Chair
Take the time to review the graphics available in this section and familiarize yourself
with the distinctive parts of your new massage chair. Throughout this operation
manual, you will notice that we use these terms to help you through the installation
process. We have outlined the exterior and interior parts you will need to know to
install and maintain your chair.
As soon as you unbox your massage chair, use the components listing to verify that
you have all necessary parts. Contact truMedic® at service@truMedic.com if you are
missing any pieces.
Quick
relaxation
Emergency
off
Menu
OK
Auto
On/Off
Air
pressure
Zero
Intensity
6
1. Remote Control
2. Right Armrest
3. Seat Cushion
4. Leg Rest
5. Footrest
6. Head Padding
7. Back Padding
8. Shoulder Massager
9. Le Armrest
10. LED Light
11. Castor
1
2
3
4
5
6
7
8
9
External Structure
UNDERSTANDING YOUR CHAIR

7
1. Backrest
2. Power Case
3. Power Cord Socket
4. Fuse Socket
5. Power Switch
External Structure (Cont.)
1
2
3 4 5
UNDERSTANDING YOUR CHAIR

8
1. Massage Heads (Under Cushion)
2. Shoulder Airbags
3. Lower Back Airbags
4. Armrest Airbags
5. Side Seat Airbags
6. Leg Airbags
7. Calf Airbags
8. Foot Airbags
9. Shiatsu Foot Rollers
Internal Structure
1
2
2
3
3
4
5
5
6
6
7
7
8
8
9
9

9
UNDERSTANDING YOUR CHAIR

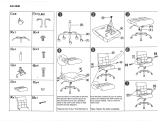
10
1. Remote Control 1
2. Right Side Fender 1
3. Electric Magnetic Valve 1
4. Leg Rest & Footrest 1
5. Air Pump Case 1
6. Seat Frame 1
7. Electric Actuator 1
8. Le Side Fender 1
9. Le Armrest Assembly 1
10. Power Case Assembly 1
11. Back Cover Assembly 1
12. Back Frame Assembly 1
13. Plastic Front Cover 1
14. Back Cushion 1
15. Pillow 1
16. Massage Machine 1
17. Seat Cushion 1
18. Right Armrest Assembly 1
Mechanical Components List
Name# Qty

11
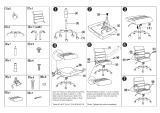
Installation Guide
You now have all the knowledge you need to start assembling your new massage
chair. This section features a step-by-step guide to unboxing and setting up your
chair. Follow the instructions closely, as this product contains several important
components.
1. Unbox the Chair:
A. Ask someone to help you li the main body of the chair out of the box. Grab the
metal frame on the le and right sides of the body and li. Set the main body of
the chair aside as you unbox the remaining pieces. Remove the head pad, back
cushion, seat cushion, and power cord.
B. NOTE: Keep the foam piece located between the backrest and seat in place
during this part of the installation, removing it could scratch the leather.
A
B
Foam Piece
Metal Frame
Power Cord
Seat Cushion
Back Cushion
Head Cushion
INSTALLATION

12
C
Right Armrest Le Armrest
C. Remove the armrests from their box. Each one is positioned upside down. Grab
each armrest with one hand on each side and li gently. Set the armrests on a
flat surface for now.
2. Position the backrest:
D. Li the back of the chair up 120 degrees. You should hear a click when the
backrest is in the appropriate position. Remove the foam insert before you move
on to the next step.
D

13
3. Attach the Armrests:
Before you install the armrests, locate the remote control in the middle of the leg rest.
E. Locate and unscrew the M6 bolts on the main seat frame using a Phillips head
screwdriver. Set aside. Locate the fixed hole on the back interior of the armrest. Press the
button located on the hole and insert it into the fixed bolt located on the backrest.
F. Connect the square metal tube into the corresponding piece on the seat frame.
G. Align the armrest with the bolt hole on the interior of the main seat frame and screw
the M6 bolts you set aside into the holes. You should screw in 2 bolts for each corner
(4 bolts total).
H. Connect the armrest air hose to the main seat frame air hose and make sure the
connection is secure.
I. Connect the LED wire located on the armrest to the main seat frame LED wire.
Note: Do not compress air hoses or LED wires during assembly.
Note on Disassembly: If you need to disassemble the armrests for any reason, remove
the shoulder device and the airbags located on the seat first. Then, reverse the
assembly process outlined above starting with detaching the seat, air hose and LED
wire.
Bolts
Fixed Bolt
Fixed Bolt
LED Wire
Fixed Hole
Side of
Metal Frame
Button (Press to Insert/Release)
E
F
G
INSTALLATION

14
4 Bolts (One in Each Corner)
LED Wire
Backrest
Head cushion
connects to the
backrest with
Velcro
Back cushion connects
to the backrest with
a zipper
Purple Air tube
Black Air tube
H
I
4. Attach the Head Pad and Back Cushion:
J. The back cushion attaches to the backrest with a zipper. The head pad attaches
to the backrest with Velcro.
Massage Setup Tip: Your massage chair features a body test function designed to
customize massage settings to your needs. For precise measurement, sit in the chair
and make sure the edge of the head pad aligns with your ears before you zipper the
pad into place.
Head Cushion
Back Cushion
Back cushion also
features a zipper
connection on each side
Back cushion connects
to the seat with Velcro

a
15
5. Connect Seat Air Tubes:
For the air pressure massage features, connect each color-coded air tube to the
corresponding tubes on the main body of the chair. Aer you connect the air tubes,
Velcro the seat cushion into place.
The Seat Area
Gray Air Tube
Dark Brown Air Tube
O
On
Seat Cushion
6. Turning On Your Chair for the First Time:
A. Insert the power cord into hole “a,” located on the power box.
B. Insert the other end of the power cord into a power source, such as an
electrical outlet.
C. Press the “1” switch to turn on the power to the chair.
D. Grab your remote control and enjoy your first at-home luxury massage.
Always double-check the switch and make sure the power is OFF before you plug or
unplug the chair from your power source.
INSTALLATION

16
Adjusting Your MC-1000 Massage Chair
CAUTION
Do not place your chair near any areas that may
suer from moisture or wetness.
Avoid placing your chair in direct sunlight or near
heating appliances.
Always place your chair on an even and supported
surface to avoid accidents and injuries.
Placing Your Massage Chair
What to Do Before Using Your Chair:
• Check the clearance by fully extending your chair in all directions. Make sure there
are no obstacles in your way such as pets, children or side tables.
• Monitor the power plug and source. Clean the plug and cord routinely to avoid dust
buildup. Make sure the plug rests comfortably and protected between the power
source and the chair. The cord should never sit under a heavy object or appear to
have kinks, stretching or knots.
• Place the chair away from walls. The chair should sit out at least 4 inches from the
wall starting from the backrest and at least 12 inches from the front of the leg rest.
4in
12in
Distance from Wall (Front and Back)
PREPARATION

17
Tips for moving your massage chair
Moving Your Chair to the Right Place Easily and Successfully
• Wrap and place all cables in the seat of your chair to keep them out of the way and
free from damage.
• Avoid trying to plump up the cushions of the chair during use or when you try to
move it.
• Do not slide the chair on its castors it may damage the floor. Instead, ask someone
to help you li or move it.
• Keep the power o and the plug/power cord away from the floor until you are
ready to plug the chair back into an outlet. Leave the chair standing in a safe
position to prevent the back from falling to the floor.
CAUTION
Do not move your chair when the power is ON or
the chair is plugged in.
Movement Examples
• Example: One person can li up from behind the leg rest until the chair falls onto
its castor. Once in position, the individual may push the chair to a new position and
set it back down. Never allow the chair to fall down to the floor on the backrest,
as this may result in damage. Use the diagram above as an example of how you
should move the chair.
Push using the rear wheels
PREPARATION
/


![truMedicInstaShiatsu+ Foot Massager [IS-4000i]](http://vs1.manuzoid.com/store/data/001794306_2-7ec22c38ace363f5ee00cd5093b53a2a-160x210.png)