Page is loading ...

Write the model and serial numberhere:
E
GE
Model #
Serial #
These numbers can be found insideonthe leftof the
refrigerator.
R'S TALLATION
CONTENTS
SAFETY WARNING SIGNS ...............................................................2
OPERATINGINSTRUCTIONS........................................................4
SETTINGUPTHE REFRIGERATOR........................................................4
MAJORFEATURES.....................................................................................4
CONTROLPANEL........................................................................................5
DIGITALPANEL............................................................................................6
TEMPERATURECONTROL.......................................................................7
ICEandCOLDWATERDISPENSER.........................................................7
SHELVESandBINS.....................................................................................8
FOODSTORAGEGUIDE...........................................................................9
REMOVINGTHE FREEZERACCESSORIES..........................................11
REMOVINGTHE FRIDGEACCESSORIES.............................................11
CAREANDCLEANING.............................................................................12
CHANGINGTHE INTERIORLIGHT.........................................................13
WATERFILTER..........................................................................................14
DOORS.......................................................................................................14
INSTALLATION INSTRUCTIONS................................................is
INSTALLATIONOFTHEREFRIGERATOR.............................................15
REMOVINGTHE REFRIGERATORDOORS..........................................16
REATTACHINGTHEREFRIGERATORDOORS....................................19
LEVELINGTHEREFRIGERATOR............................................................22
ADJUSTINGTHEHEIGHTBETWEENTHE DOORS.............................23
CHECKINGTHEWATERDISPENSERLINE...........................................24
INSTALLATIONOFTHEWATERDISPENSERLINE...............................25
BEFOREYOUCALL FORSERVICE........................................................28
CONSUMER SUPPORT ....................................................................30
WARRANTY...............................................................................................30
In the U.S.A, for questions about features,
operation/performance, parts, accessories or service, call:
1=800=726=7864 (I=800=SAMSUNG)
www.samsung.com
DA68-O1606A REV(O.O)

/k
WARNING
• Beforeoperatingthe appliance,please readthis manualthoroughly and retainitforyour reference.
•The applianceisnotintendedfor usebychildrenor infirmpersonswithoutadultsupervision.
• Childrenshouldbesupervisedtoensurethattheydo notplaywiththeappliance.
CAUTION/_NARNINGSIGNS USED OTHERSIGNS USED
Q Represents something you must NOT do.
iRepresents something you must NOT
(_) disassemble.
Represents something you must NOT touch.
O Represents something you must follow.
_, Indicates that you must disconnect the
ipower plug from the socket.
Represents a ground is needed to prevent
O electric shock.
It is recommended that this action be
handled by a service person.
/k
WARNING
/k
CAUTION
Indicates that a danger of
death or serious injury exists.
Indicates that a risk of
personal injury or material
damage exists.
Please follow the warning signs to prevent injury to users or other persons.
After reading the warning signs, keep them in a safe place for future reference.
//_ WARNING SIGNS
®
Donot plugseveralappliances intothe same
receptacle.
Thiscouldcauseoverheatingandthe riskoffire.
Makesure that the powerplugis not squashedor dam-
aged bythe back of the refrigerator.
• A damagedpowerplugmayoverheatandcausefire.
Do not directlyspraywater inside or outside the refrig-
erator/freezer.
• Thereisa riskof electricshock.
Do not use aerosols nearthe refrigerator.
• Thereisa riskof explosionorfire.
Donot bend the power cordexcessively or place
heavyarticles on it.
• Thisconstitutesafire hazard.If the powercordisdam-
aged,haveit replacedimmediatelybythemanufacturer
or its serviceagent.
Do notinsertthe power plug with wet hands.
• Youmayreceivean electricshock.
Do not put acontainer filled with water on the refrigera-
tor.
• Ifspilled,there isa risk offire orelectricshock.
Donot installthe refrigerator ina damp place or a
place where it may comein contact with water.
• Deterioratedinsulationof theelectricalpartsmaycause
electricshockor fire.
Donot store volatile or flammablesubstancesinthe
refrigerator.
• The storageof benzene,thinner,alcohol,ether,LPgas
andothersuchproductsmaycauseexplosions.
(_ Donotdisassemble or repair the refrigerator byyour-
self.
• Yourunthe riskofcausinga fire,malfunctionsand/or
personalinjury.
Pullthe power plugout of the socket before changing
_, the interiorlight of the refrigerator.
• Otherwise,thereis ariskof electricshock.
_; ifyou wish to dispose of the refrigerator/ freezerthrow
itawayafter first removingthe doors and seals.
• Doso inaway thatit isnot possiblefora childto remain-
trappedinside.
O Therefrigerator must be grounded.
• Youmustgroundthe refrigeratortopreventanypower
leakagesor electricshockscausedby currentleakage
fromthe refrigerator.
O ever usegaspipes, telephone lines orotherpotential
lightning rods as ground.
• Improperuseofthegroundplugcan resultin ariskof
electricshock.If itis necessarytousean extensioncord,
useonlya 3-wireextensioncordthathasa3-bladeround
pluganda 3-slotreceptaclethatwill acceptthe plugon
the appliance.Themarkedratingof theextensioncord
shouldbeAC 115V~120V,10A,or more.ifa grounding
adapterisused,makesurethe receptacleboxisfully
grounded.

CAUTIONSIGNS
Do not overfill the refrigerator with food.
°Whenyou open the door, an item mayfallout and
causepersonal injuryor matedaldamage.
Do not put bottles or glass containers in the freezer
•When the contentsfreeze, the glassmay break and
causepersonal injury.
If the wall socket is loose, do not insert the power
plug.
•There isa riskof electric shockor fire.
Q Donot disconnect the powercord by pulling on it.
• Damagetothe cordmaycausea short-circuit,fire
and/orelectricshock.
• Ifthepowercordis damaged,it mustbereplacedby
the manufacturer,acertifiedserviceagentor qualified
servicepersonnel.
Do not store articles onthe top of the appliance.
•Whenyouopenorclosethedoor,thearticlesmayfall
andcausepersonalinjuryand/ormaterialdamage.
Do not store pharmaceutical products,scientific
materialsand temperature-sensitive products inthe
refrigerator.
• Productswith requirestricttemperaturecontrolsmust
notbe storedinthe refrigerator.
Donot letchildren hangon the door, aserious injury
may occur.
if you senseastrange smell or smoke, pull out the
power plug immediatelyandcontact your SAMSUNG
Electronics service center.
@
Donot touch the insidewallsof the freezeror prod-
ucts stored in thefreezerwith wet hands.
• Itmaycausefrostbite.
Do not insertyour hands intothe bottom areaunder
the appliance.
•Any sharpedgesmaycausepersonalinjury.
Neverput fingers or otherobjectsintothe
dispenser hole and icechute. It may cause personal
injuryor materialdamage
• In refrigeratorswithautomatic icemakers,avoidcon-
tact withmoving parts.Do not placefingers or hands
on the automaticicemaking mechanismwhilethe
refrigerator ispluggedin.
• Keepfingers out of the "pinch point"areas;clear-
ancesbetween the doors and betweenthe doors
andcabinet are necessarilysmall. Becareful closing
doors whenchildrenare in the area.
• Do not refreezefrozen foodsthat have thawedcom-
pletely.
@
@
Donot useawet ordamp cloth whencleaningthe
plug. Removeanyforeign matteror dust from the
power plug pins.
• Otherwisethereis a risk offire.
• Ifthe refrigeratorisdisconnectedfromthe powersupply,
you shouldwait forat leastfiveminutesbeforepluggingit
backin.
3
If the refrigeratoris notto be used for a long period of
time, pull out the power plug.
• Deteriorationinthe insulationmaycausefire.
•The applianceisnot intendedforusebyyoungchildren
or infirmpersonswithoutsupervision.
Youngchildrenshouldbesupervisedto ensurethatthey
do notplaywiththeappliance.
• Donot placethe equipmentdirectlyunderthesunlight.
etc
•The appliancemustbepositionedsothatthe plugis
accessibleafterinstallation.
• Ifthe powercordisdamaged,it mustbe replacedby
manufacturer,a certifiedserviceagentor qualifiedser-
vice personnel.
BeforeYouThrowAwayYourOld Refrigerator or
Freezer:
• Takeoffthe doors.
• Leavethe shelvesin placeso thatchildrenmaynot easi-
lyclimbinside.
CFCDisposal
• Youroldrefrigeratormayhavea coolingsystemthat
usedCFCs(chlorofluorocarbons).CFCsarebelievedto
harm stratosphericozone.
• Ifyou arethrowingawayyouroldrefrigerator,makesure
the CFCrefrigerantis removedforproperdisposalbya
qualifiedservicer.Ifyou intentionallyreleasethisCFC
refrigerantyoucanbe subjecttofinesand imprisonment
underprovisionsofenvironmentallegislation.
Service warranty section
• Any changes or modifications performed by a 3rd
party on a finished product is not covered under
Samsung warranty service
Safety Caution section
• Samsung does not recommend 3rd party modifica-
tion, therefore Samsung is not responsible for safety
issuesthat result from 3rd party modifications.
DANGER
Risk of child entrapment. Before you throw away
your old refrigerator or freezer
° Takeoff the doors
° Leave the shelves in places so that children may not
easily climb inside.

Onceyou havepe#ormed the following steps,your refrigerator shouldbe fully operational, if not,check
the powersupply and electricitysource, ifyou haveany questions,contact yourSAMSUNG
service center.
Placethe refrigeratorin an appropriate
locationwithreasonableclearancebetween
the walland the refrigerator.
(referto installationinstructionsin this
manual)
When the refrigerator is plugged in,
the interior light should come on when
you open the doors.
Setthe temperaturecontrolto the coldest
temperatureandwaitfor an hour.The
freezershould getslightlychilledand the
motor shouldrun smoothly.
Cable tie
Oncethe refrigeratortemperatureis suffi-
cientlylow,youcan store food inthe
refrigerator.Afterstartingthe refrigerator,it
takes a few hoursto reachthe appropriate
temperature.
Youcan arrangethe Powercablewith this
Cabletie, afteryou plug in the refrigerator.
Twin X AirFlow
,,Cool air circulates through side vents on every shelf
level.This provides even distribution of cooling
inside cabinets to keep your food fresh longer.
Xtra Space TM
,,Vertical room next to the ice maker in the freezer
provides space for pizza etc.
Door Alarm
Beep sound reminds you the door is open.
Vegetable Crisper
Optimized humidity control keeps vegetables &
fruits fresh.

POWER FREEZEBUTTON
Speeds up the freezingprocess inthe freezer.
_/t FREEZERTEMP.BUTTON
Tosetthe freezer temperature,press the button
repeatedlyto change the settemperature in
sequencebetween cold and coldest.
iCETYPE BUTTON
Use thisbutton to choose Cubedor Crushed ice
or Ice off.
CHILD LOCK BUTTON
When thisbuttonis pressed for 3seconds,all
functionsare locked and can notbe modified.
The waterand ice dispenserare locked.
FRIDGETEMP.BUTTON
Tosetthe fridge temperature,pressthe button
repeatedlyto change the settemperature in
sequencebetween cool and coolest.
1
FILTERRESET BUTTON |
When the waterfilter isreplaced, resetthe indica-
ltot by pressing thebutton for 3 seconds.

f
J
@
• This light goes on when you press the Power Freezer button.
Power Freeze speeds up the freezing process.
• If you select Power Freeze, the interior temperature of the freezer will decrease
for 2 hr.30 min.
• Press the Power Freeze button again to cancel the Power Freeze function.
• This feature enables you to get ice faster.
O If you use this function, energy consumption will increase.
e, Crushed Ice and Ice Off
Ice Type • Press the Ice Type button in sequence to choose
Cubed Ice, Crushed Ice or Ice Off to stop making ice.
• An indicator will light to show the ice type currently
Cubed Crushed ice Off chosen.
Fi icator
b
• When the green light changes to orange, it is time to replace the water filter.
If the indicator is red, quick replacement is strongly recommended.
• When the water filter is replaced, reset the indicator by pressing the filter reset
buttons for 3 seconds.
• Toturn off this indicator off, press the filter reset buttons for 3 seconds.

Cool Down Period
• To ensuresafefood storage,allowthe refrigeratorto operatewith the doorsclosedfor 8 to 12 hoursbeforeload-
ing it withfood.
Temperature Adjustment
• After 24 hours, adjustthe controlsas needed.Adjusttemperaturegradually:pushthe button in small increments,
allowingthe temperatureto stabilize.
• Pressthe button(FreezerTemp or FridgeTemp)repeatedlyuntilthe desiredtemperatureisset.
• For lowertemperature,pressthe button(FreezerTemp or FridgeTemp)untilmore LEDs light(coldest).
• For highertemperature,pressthe button(FreezerTemp or FridgeTemp)until lessLEDs light(cold).
For example:
HigherTemperature(cold)_,i _ Normal _ _ LowerTemperature(coldest)
freeze _ freeze _ freeze _ freeze _ freeze
I Step1 ] I Step2 I I Step3 I I Step4 I I Step5 I
/k
WARNING
• when icecream isstored ata highei tempeiature thanSetting2 in the Freezei,it maymelt
Whenyou put icecream backintothe freezer compartmentafter it has beenexposed toroom
temperature,it mayharden.
Ice Dispenser
The ice maker produces 8 cubes at once and about
120 cubes a day automatically. This quantity may be
influenced by factors such as the freezer temperature,
Power Freeze function and the number of door open-
ings. When your refrigerator is plugged in, the Cubed
ice mode is automatically selected.
Pressthe iceType button to selectthe type of ice:
oCubedice _ /N _ .
For Cubed ice
• Crushed ice
• No ice
ForCrushed ice
_ _ o_, Noice
L
For ice off
Push the ice dispenser lever with a cup.
• Place a cup to the dispenser lever line to
prevent ice from dropping out.
Push
(_= Neverput fingers or any other objects in the
NOTE dispenser opening. It may cause injury.
7
Water Dispenser
The capacity ofthe watertank is approximely0.3
gal.
Cold Water
• Push the water dispenser lever with a cup.
• If you have just installed the refrigerator,
throw away the first six glassfuls of water to
flush out impurities in the water supply sys-
tem.
/k
CAUTION
If you won't use the water or ice
dispensers for a long period of
time (long vacation or business
trip), close the water valve and
shut off the water supply to the
refrigerator.
Otherwise, water leakage may
OCCUr.
/k
CAUTION
Preparing for Vacation
Set the Ice Type to the ICE OFF
position and shut off the water
supply to the refrigerator.

Freezer
Fridge
DoorBin
Ice Chute
DoorBin
li iitii!iii!!
Xtra SpaceTM
Ice Maker
Light
Wire Shelf
Drawers
FrontLegCover
LightSwitch
Dell Bin
Spill-proofglass Shelf
Vegetable& Fruit Drawer(upper)
Vegetable& FruitDrawer (lower)
Dairy Compartment
Egg Container
I
-- GallonDoor Bins
/k
CAUTION
Preparing to Move
Secuie all loose itemsSuch as shelves and drawers bytaping them secuiely in place toprevent
damagel When using a hand truck to move the refrigerator,do not rest the front or back
of the refrigerator against the hand truck:This could damage the refrigerator, Handleonly from the
sides of the refrigerator, Be sure the refrigerator staysin an upr!ght position when moving,
8

FROZEN FOOD STORAGE iN FREEZER
Xtra SpaceTM
• Canbe usedforfrozenfoodssuch aspizza, pasta,burritos,
and fajitas.
• inorder to preventodorpenetrationto the ice,storedfood
shouldbe wrappedsecurely.
WireShelf
• Canbe usedto store alltypes offrozen food.
/k
WARNING
Door Bin
• Canbe usedforsmall packagesoffrozen food.
Drawer
• Can be usedto store meat and dry foods.Storedfood should
be wrappedsecurelyusingfoil or othersuitablewrapping
materialsor containers.
Ice chute
Donot putyourfingers, handsorany other insuitableobjectsin the Chuteor ice:maker buCket:
This may reSUltin personalinjuiy oi matedaldamagel

CHILLED FOOD STORAGE iN FRIDGE
))))))_DeliBin
• Can be usedto store all types of chilledfood.
Tempered Spill ProofGlass Shelf
• Can be usedto store all types of chilledfood.
• Safeand break resistant.
• Circular markson the glass surfaceare a normalphenomenon.
8 .......
NOTE
Fruit & Vegetable Drawer (Upper and Lower)
• Used to storefruits and vegetables.
• The drawerisairtight.Optimizedhumiditycontrol designhelpsto pre-
servethe freshnessofstored vegetablesand fruits.
• Adjustthe "Optimizedhumiditycontrol",as needed.
- Tokeepvegetablesand fruitsfresher and to help preventdrying,set the
"Optimizedhumiditycontrol"to"High".
- Toreducethe time ittakesto lowerthe temperatureinthe drawer,set
the "Optimizedhumiditycontrol"to "Low".
Storage Drawers
Excess water that may accumulate inthe bottom of the ......
drawers should be wiped dry.
Dairy Compartment
• Can be usedto store butter,margarine.
Gallon Door Bins
• Canbe usedto store foods in packages,such as milk andyogurt.
Bottles should be st0red tightlytogethei so that they do not
fall OuL
lJ Egg Container
• Puteggs in thecontainer and placethem on the shelf.
10

iii iiii 8.............
WireShelf
• Pullthe shelfoutas far as
itgoes.Then lift it up and
removeit.
Door Bin
• Holdthe door bin with both
handsandthen lift itup.
Drawer
• Removethe drawerby
pulling it out and liftingit up _ i_ _, II
slightly.
/
/
IceMakerBucket
• Removethe bucketby lift-
ing up and pullingout.
Front Leg Cover
• Open the freezerand fridge
doors, removethreescrews
and detach the cover.
•To reattachthe front leg
cover,putit back to original
position andtighten the threescrews.
(_= o Do not useexcessiveforce when
NOTE removing the covei.It causean
InjUry.
Spill ProofGlass Shelf
• Pullthe shelfout asfar as itwill go.Then liftit up and gently removeit.
2 Vegetable & Fruit Drawer
• Removethe drawerby holdingthe handle,pullingthe drawerout, andthen
liftingupthe back sideof the drawerbottomsmoothlywith the otherhand.
Deli Bin
• Removethe drawerby holdingthe handle,pullingthe drawerout, andthen
liftingupthe back sideof the drawerbottomsmoothlywith the otherhand.
@
NOTE
/
Gallon Door Bin
• Holdthe bin with both handsand removeit by liftingit up.
; Befo[e removingthefreezer and fridgeaccessories,please removethe stored food&
11

Interior
• Cleantheaccessorieswithamilddetergent,thenwipeoutwithadrycloth.
• Afterwashingtheaccessories,makesurethattheyaredrybeforeusingthemagain.
Exterior
• Wipethedigitalpanelanddisplaypanelwithacleancloth.
• Cleanthesurfaceofdoors,handlesandcabinetwithamilddetergentandsoftcloth,then
wipeoffthesurfacewithadrycloth.
- Donot use Benzene,Thinnerand CloroxTM forcleaning
- Donot spraywater directlyon the surfaceof refrigeratorwhilecleaning.
• The exteriorpart of refrigeratorshouldbe polishedonce or twicea year.
Rear
• Use a vacuumcleanerto removedustonce or twice ayear.
Ice and water dispenser
• Beforecleaning, lockthe dispensorbypressingthe Child lockbutton.Use a damp clothto
clean the iceand water dispenser.Then wipe itout with a dry cloth.
eTo keepthe drainagegriddry, do nottouch the ice and water dispenserwithouta cup or glass
in place.
Rubber door seals
• Ifthe rubberdoor seals are dirty,the doorwill not close properly,The refrigeratorwill notbe
ableto functionefficiently.Cleanthe doors with a milddetergentanddampcloth.Thenwipe
with a dry cloth.
//_ :,Do notspraythe refiigeratoi Withwate[i it maycausean electricshocL
, Do notclean itWithbenzene,thinner0r cardetergenLIt may causeafirel
WARNING
12

/k
WARNING
/k
CAUTION
Before changing the interior lights, unplug the refrigerator from the power supply, if you
have difficulty in changing the lights; contact your service center.
iNTERiORLIGHTiNTHE RIDGE
Place a flat screwdriver under .....
the light cover hooks and ." ",
remove it by pushing and °*
lifting in the direction of the
arrow.
2 ...........After changing the bulb. reattach
the light cover.
A15
40W
@
NOTE
• Replacement bulbs for both the freezer and fridge are at available retail outlets sUchas waFmart,
The Home Dep0t and Lowe,&
Use replacement bulb size A15 ;max! mum 40watts:
INTERIORLIGHTINTHE FREEZER
The freezer light is located in the bottom of the auger motor case.
Use a screwdriverto remove ............Replace the bulb with a new
the light cover ((_). _ one (@)
W
iiii!i!i_.............
Reattach the light cover.
' Replacementbulbsfor both;thefreezer and fridgeare at availablereta outletssuch asWal,mart
The Home Depotand Lowes:
Use replacementbulb sizeA! 5, maximum40 watts;
13

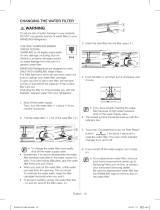
The water "Filter Indicator" light
• "Filter Indicator" light lets you know when it is time to change your water filter cartridge. The light
will change from green to orange. This tells you that it is almost time to change the current cartridge.
It is recommended that you replace the cartridge when the light changes to red or every six months.
(see "Install the water filter" section on the page 26 for more information.)
Using the dispenser without the water filter
, You can not use the water and ice dispenser without a water filter cartridge because the water line
blocks at the water supply.
Ordering replacement filters
• To order more water filter cartridges, call 1-800-SAMSUNG and ask for accessory Part # DA29-
00003A or contact your authorized Samsung dealer.
The refrigerator doors have a special door opening and closing feature to make sure they close all the
way and are securely sealed.
When opening the door, it will only open so far. After reaching a certain point, it will remain open.
When the door is partially open, it will close automatically.
14

Checking the Dimensions of your Entrance Door
Check the dimensions of your entrance door to determine whether the refrigerator can pass
through it.
Capacity (Cu. Ft)
Case Height
Dimension
(inches)
Depth
Width
without hinge
with hinge
with handle
without door
24.8
35.9"
68.7"
70"
34.8"
28.9"
NOTE
Selecting the Location for the Refrigerator
Select a location with easy access to the water supply.
Select a location with enough space for the refrigerator.
Select a location without direct exposure to sunlight.
,,Before disassembling the freezer door,the water supply line needs to be disconnected,
(if not, the water Supply line may be damaged.)
, See !'Separating the WatersuPply line from the refrigerator Onthe next pagel
AlJowsufficient space to circulate the air at the internalcoolingsystem.
=Whenthe refrigeratordoesn'thaveenough space,the internalcoolingsystem may notwork correctly.
1 inch _
...._lllllllllllllllllllllllllllllllllr_
1/8 inch
1 inch
• AllowClearancetothe rightl ieftl baCkandtopwhen installing therefrigerator:
This hasthe advantageof reducingpowerconsumption. ........................
e Donot install the refrigeratorwherethe temperaturewill go below50°F(10_C)I
15

Removing the Front Leg Cover
Open the freezer and fridge doors, and then take off the front leg cover by turning the
three screws counter-clockwise.
FRONT LEG COVER
Separating the Water Supply Line from the Refrigerator
Remove the water tube by pressing the coupler (@)and pulling the water tube (d_)away.
@
NOTE
Be careful not tOcut thewater tubewhen separatingit fromthe coupler,
16

NOTE
Uftthedoorstraightup:
.Be carefulnottopinchthewatertubingandwireharnessonthedoor,
,,Placedoorsonaprotectedsurface...................................
Removing the Freezer Door
//_ Unplug the refrigerat0r before removing the dOorsl
CAUTION
1) With the door closed, remove the upper hinge cover (dP)using a screwdriver, and then disconnect the
wires (@)
2) Remove hinge screws ((3_)and ground screw (@)counter-clockwise, and take off the upper hinge (_-sb)
in the direction of the arrow (®). Be careful when removing the door to ensure that it does not fall on
yOU,
3) Remove the door from the lower hinge (®) by
carefully lifting the door (®).
4) Remove the lower hinge (®) from the bracket
lower hinge (®) by lifting the lower hinge (_) in
the direction of the arrow.
...._lllllllllllllllllllllllllllllllllf_
db-
NOTE
Be carefulnot to pinchthe watertubing andthewire harness atthe bottomof the door:
17

/k
CAUTION
Removing the Fridge Door
Unplug the iefrigeratoi before removing the doOiS;
1) With the door closed, remove the upper hinge cover (@) using a screwdriver
2) Remove hinge screws ((2})and ground screw (@)counter-clockwise, and take off the upper hinge
(@)in the direction of the arrow (@).Be careful when removing the door to ensure that it does not
fall on you.
3) Remove the door from the lower hinge (@)by
lifting the door (@).
4) Remove the lower hinge (@)from the bracket
(@)by lifting the lower hinge (@).
f
--@
18

Reattaching the Freezer Door
1) insert the lower hinge (_) in the bracket lower
hinge ((27).
2) Before reattaching the freezer door, insert the
hose ((37)in the lower side of the door into the hole
Jnthe lower hinge (@)and pull the hose down.
Lower the door onto the lower hinge (@).
3) Insert the upper hinge shaft (@)into the hole on the top of the door (@).After levelling between the upper
hinge hole (@)and cabinet hole (@),reattach the hinge screws (@)and ground screw (@) Jna clockwise
direction.
4) Connect the wires.
. --'=r_-%,I
5) Put the front part of the upper hinge cover (@) on
the front part of the upper hinge (@) and reattach
from the front part of the upper hinge cover first.
...._lllllllllllllllllllllllllllllllllr_
19

Reattaching the Fridge Door
1) insert the lower hinge (_) in the bracket lower
hinge (@).
2) Place the hole in the fridge door (@)over the
lower hinge (@).
Lower the door onto the hinge.
@.
3) insert the upper hinge shaft (®) into the hole at the top of the door(®). After levelling between the
upper hinge hole (_t_)and cabinet hole(®), reattach the hinge screws (@)and ground screw (@) in
the clockwise direction.
4) Connect the wire.
_i'
5) Put the front part of the upper hinge cover (@)on
the front part of the upper hinge (@) and reattach
itfrom the front part of the upper hinge cover first.
20
/