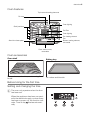
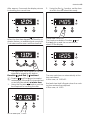
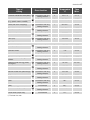
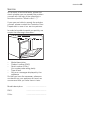
Electrolux EHL4-4SW offers a variety of cooking options with its multiple functions, including convection heating for even baking on three levels, pizza setting for crispy bases, conventional baking, bottom heat for pastry, defrost function, grilling, and convection grilling. It also features a dual fry/cook area, a cooling fan, and an oven light. The device ensures safety with a child lock, residual heat indicator, overheating protection, and a safety switch-off.
Electrolux EHL4-4SW offers a variety of cooking options with its multiple functions, including convection heating for even baking on three levels, pizza setting for crispy bases, conventional baking, bottom heat for pastry, defrost function, grilling, and convection grilling. It also features a dual fry/cook area, a cooling fan, and an oven light. The device ensures safety with a child lock, residual heat indicator, overheating protection, and a safety switch-off.


-
 1
1
-
 2
2
-
 3
3
-
 4
4
-
 5
5
-
 6
6
-
 7
7
-
 8
8
-
 9
9
-
 10
10
-
 11
11
-
 12
12
-
 13
13
-
 14
14
-
 15
15
-
 16
16
-
 17
17
-
 18
18
-
 19
19
-
 20
20
-
 21
21
-
 22
22
-
 23
23
-
 24
24
-
 25
25
-
 26
26
-
 27
27
-
 28
28
-
 29
29
-
 30
30
-
 31
31
-
 32
32
-
 33
33
-
 34
34
-
 35
35
-
 36
36


Electrolux EHL4-4SW User manual
- Category
- Ovens
- Type
- User manual
Electrolux EHL4-4SW offers a variety of cooking options with its multiple functions, including convection heating for even baking on three levels, pizza setting for crispy bases, conventional baking, bottom heat for pastry, defrost function, grilling, and convection grilling. It also features a dual fry/cook area, a cooling fan, and an oven light. The device ensures safety with a child lock, residual heat indicator, overheating protection, and a safety switch-off.
Ask a question and I''ll find the answer in the document
Finding information in a document is now easier with AI
Other documents
-
AEG COMPETENCE E4140-1 User manual
-
Tiba EHELEGA07 User manual
-
AEG E4100-1-MJPE User manual
-
-
Aeg-Electrolux E4101-5-M EU R08 User manual
-
-
Nordmende DOI414IX User manual
-
Bartscher A120788 Operating instructions
-
Steba VG 120 Datasheet