Philips QC5380/15 User manual

Category
Hair trimmers & clippers
Type
User manual

This manual is also suitable for

6
Introduction
Congratulations on your purchase and welcome to Philips! To fully
benet from the support that Philips offers, register your product at
www.philips.com/welcome.
General description (Fig. 1)
1 Cutting element
2 On/off button
3 Turbo button
4 Handle
5 Charging light
6 Socket for appliance plug
7 Hair length settings window
8 Buzz comb
9 Setting selector
10 Large comb
11 Cleaning brush
12 Barber comb (QC5380/80 only)
13 Scissors (QC5380/80 only)
14 Adapter
15 Appliance plug
16 Pouch (QC5380/80 only)
Preparing for use
Note: You can also use the appliance directly from the mains when the battery
is empty.
Charging
Charge the appliance for at least 1 hour before you use it for the rst time
and after a long period of disuse.
When the appliance is fully charged, it has an operating time of up to
75 minutes.
When the charging light lights up orange, the battery is running low
(approx. 10 minutes of operating time left) and you need to recharge
the appliance.
1 Switch off the appliance before you charge it.
2 Insert the appliance plug into the socket of the appliance and put the
adapter in the wall socket.
, The charging light starts to ash green to indicate that the appliance
is charging.
, When the batteries are fully charged, the charging light lights up
green continuously. After 30 minutes the charging light goes out to
save energy.
ENGLISH
Using the appliance
Note: You can also use the appliance directly from the mains when the battery
is empty.
Clipping with comb
The appliance comes with 2 combs for different hair lengths.
The hair length settings are indicated in millimetres on the comb.
The settings correspond to the remaining hair length after clipping.
1 Select the comb you want to use.
The buzz comb cuts the hair to a length of 1mm.
The large comb cuts the hair to a length of 3mm to 21mm.
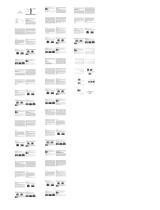
2 Slide the comb straight into the guiding grooves on both sides of the
handle (‘click’).
3 To set the comb to the desired setting, press the setting selector (1)
and slide the comb to the desired hair length setting (2).
, The settings in the window show the selected hair length in
millimetres after cutting.
Tip: Write down the hair length settings you selected to create a certain
hairstyle as a reminder for future clipping sessions.
4 Press the on/off button to switch on the appliance.
5 Move the appliance through the hair slowly.
Tips
- To clip most effectively, move the appliance against the hair growth
direction.
- Since all hair does not grow in the same direction, you need to move
the appliance in different directions (upwards, downwards and across).
- Make sure that the at part of the comb is always fully in contact with
the scalp to obtain an even result.
- Make overlapping passes over the head to ensure that you cut all the
hair that needs to be cut.
6 Regularly remove cut hair from the comb.
If a lot of hair has accumulated in the comb, remove the comb from the
appliance and blow and/or shake the hair out of it.
3
5
7
9
11
15
17
19
21
ENGLISH 7
Contouring without comb
You can use the appliance without comb to trim hair very close to the skin
(0.5mm) or to contour the neckline and the area around the ears.
Be careful when you clip without comb because the cutting
element removes every hair it touches.
1 Press the setting selector and slide the comb up, to remove the
comb off the appliance.
2 Before you start to contour the hairline around the ears, comb the
hair ends over the ears.
3 Press the on/off button to switch on the appliance.
Note: During trimming, you can use the turbo function for extra suction power
and trimming speed (see section ‘Turbo function’ below).
4 Tilt the appliance in such a way that only one edge of the cutting
element touches the hair ends when you shape the contours around
the ears.
Only cut the hair ends. The hairline should be close to the ear.
5 To contour the neckline and sideburns, turn the appliance and make
downward strokes.
Move the appliance slowly and smoothly. Follow the natural hairline.
Turbo function
You can use the turbo function to increase the cutting speed.
1 Switch on the appliance.
2 Press the turbo button.
When you switch off the appliance, the turbo function is deactivated
automatically.
ENGLISH8
Cleaning
Clean the appliance every time you have used it with the cleaning brush
and with warm water (max. 40°C).
Never use compressed air, scouring pads, abrasive cleaning agents or
aggressive liquids such as petrol, acetone or ethereal oils to clean the
appliance.
Note: The appliance does not need any lubrication.
1 Switch off the appliance and disconnect it from the mains.
2 Remove the comb from the appliance and rinse it under the tap.
3 Brush the outside of the shaving unit with the brush supplied.
4 Push the centre top end of the cutting element upwards with your
thumb until it opens.
5 Use the cleaning brush to remove the cut hair.
6 Clean the appliance under a warm running tap to ush out the
cut hair.
ENGLISH 9
  • Page 1 1
  • Page 2 2
  • Page 3 3
  • Page 4 4
  • Page 5 5
  • Page 6 6
  • Page 7 7
  • Page 8 8
  • Page 9 9
  • Page 10 10
  • Page 11 11
  • Page 12 12
  • Page 13 13
  • Page 14 14
  • Page 15 15
  • Page 16 16
  • Page 17 17
  • Page 18 18
  • Page 19 19
  • Page 20 20
  • Page 21 21
  • Page 22 22
  • Page 23 23
  • Page 24 24
  • Page 25 25
  • Page 26 26
  • Page 27 27
  • Page 28 28
  • Page 29 29
  • Page 30 30
  • Page 31 31
  • Page 32 32
  • Page 33 33
  • Page 34 34
  • Page 35 35
  • Page 36 36
  • Page 37 37
  • Page 38 38
  • Page 39 39
  • Page 40 40
  • Page 41 41
  • Page 42 42
  • Page 43 43
  • Page 44 44
  • Page 45 45
  • Page 46 46
  • Page 47 47
  • Page 48 48
  • Page 49 49
  • Page 50 50
  • Page 51 51
  • Page 52 52
  • Page 53 53
  • Page 54 54
  • Page 55 55
  • Page 56 56
  • Page 57 57
  • Page 58 58

Philips QC5380/15 User manual

Category
Hair trimmers & clippers
Type
User manual
This manual is also suitable for

Ask a question and I''ll find the answer in the document

Finding information in a document is now easier with AI