Page is loading ...

SX1819T: Parts Breakdown & Operating Manual 04/19/10
Operating Instructions • Warning Information • Parts Break down
Rivet Capacity ..............................1/4"
Traction Power................ 3,960 ft. lbs.
Air Pressure ....................... 70-100 psi
Stroke Length ...............................3/4"
SX1819T
1/4" HEAVY
DUTY RIVET
GUN
Height .................................... 12-9/16"
Weight ...................................... 5.5 lbs
Minimum Hose Size ..............3/8" I.D.
Air Inlet ................................. 1/4" NPT
SPECIFICATIONS
•Alwaysreadinstructionmanualcarefully
beforeuse.
•Alwayswearsafetygoggles
(Userandbystanders).
•Alwayswearhearingprotection
(Userandbystanders).
•Avoidprolongedexposuretovibration.
•Alwaysdisconnectairsupplybeforeproceeding
withanyassemblyordisassemblyprocedures.
•Donotexceed100psimax.airpressure.
•Inspecthydraulicsectionpriortouse.
Donotuseifcracked.
•Alwaysfollowpropermaintenanceprocedures.
•Keepexhaustportpointedawayfromface.
Somedustcreatedbypowersanding,sawing,grinding,
drilling,andotherconstructionactivitiescontainschemicals
knowntocausecancer,birthdefectsorotherreproductive
harm.Someexamplesofthesechemicalsare:
• leadfromlead-basedpaints,
• crystallinesilicafrombricksandcement
andothermasonryproducts,and
• arsenicandchromiumfrom
chemically-treatedlumber.
Yourriskfromtheseexposuresvaries,dependingonhow
oftenyoudothistypeofwork.Toreduceyourexposureto
thesechemicals:workinawellventilatedarea,andworkwith
approvedsafetyequipment,suchasthosedustmasksthatare
speciallydesignedtofilteroutmicroscopicparticles.
WARNING
WARNING

SX1819T: Parts Breakdown & Operating Manual 2 04/19/10
WARNING!
FAILURE TO OBSERVE THESE WARNINGS
COULD RESULT IN INJURY.
This Instruction Manual Contains
Important Safety Information.
READ THIS INSTRUCTION MANUAL
CAREFULLY AND UNDERSTAND ALL
INFORMATION BEFORE OPERATING
THIS TOOL.
• Always operate, inspect and maintain this
toolin accordancewithAmericanNational
StandardsInstituteSafetyCodeofPortable
Air Tools (ANSI B186.1) and any other
applicablesafetycodesandregulations.
• For safety, top performance and maximum
durability of parts, operate this tool at 90
psi/6.2 bar max air pressure with 3/8"
diameterairsupplyhose.
• Alwayswearimpact-resistanteyeandface
protection when operating or performing
maintenance on this tool. Always wear
hearingprotectionwhenusingthistool.
• High sound levels can cause permanent
hearing loss. Use hearing protection as
recommended by your employer or OSHA
regulation.
• Keep the tool in efficient operating
condition.
• Operators and maintenance personnel
mustbephysicallyabletohandlethebulk,
weightandpowerofthistool.
• Airunderpressurecancausesevereinjury.
Never direct air at yourself or others.
Always turn off the air supply, drain hose
of air pressure and detach tool from air
supply before installing, removing or
adjusting any accessory on this tool, or
beforeperforminganymaintenanceonthis
tool.Failuretodosocouldresultininjury.
Whip hoses can cause serious injury.
Alwayscheckfordamaged,frayedorloose
hosesandfittings,andreplaceimmediately.
Donotusequickdetachcouplingsattool.
Seeinstructionsforcorrectset-up.
• Air powered tools can vibrate in use.
Vibration, repetitive motions or
uncomfortable positions over extended
periods of time may be harmful to your
handsandarms.Discontinueuseoftoolif
discomfort,tinglingfeelingorpain occurs.
Seekmedicaladvicebeforeresuminguse.
• Place the toolonthe workbeforestarting
the tool. Do not point or indulge in any
horseplaywiththistool.
• Slipping, tripping and/or falling while
operating air tools can be a major cause
of serious injury or death. Be aware of
excess hose left on the walking or
worksurface.
• Keep body working stance balanced and
firm. Do not overreach when operating
thetool.
• Anticipateandbealertforsuddenchanges
inmotionduring startupand operationof
anypowertool.
• Donot carry tool by the hose.Protectthe
hosefromsharpobjectsandheat.
• Tool shaft may continue to rotate briefly
after throttle is released. Avoid direct
contact with accessories during and after
use. Gloves will reduce the risk of cuts
orburns.
• Keep away from rotating end of tool.
Do not wear jewelry or loose
clothing. Secure long hair. Scalping can
occur if hair is not kept away from tool
and accessories. Choking can occur if
neckwear is not kept away from tool
andaccessories.
• Donotexceed100psimaxairpressure.
• Always disconnect air supply before
proceeding with any assembly or
disassemblyprocedures.
• Keepexhaustportpointedawayfromface.
• Inspect the hydraulic section prior to use.
Donotuseifcracked.Contactthedistributor
forrepairorreplacement.
• Donotpoundonthenosepieceortheendof
theheadorforcetherivetintotheholeofthe
nosepieceasthiswilldamagethetool.
• Makesureallpartsarecorrectlyandsecurely
fastened.
• Always follow proper maintenance
procedures.
• Do not lubricate tools with flammable or
volatile liquids such as kerosene, diesel
orjetfuel.
• Donotforcetoolbeyonditsratedcapacity.
• Do not remove any labels. Replace any
damagedlabels.
• Use accessories recommended by
SunexTools®.
WARNING

SX1819T: Parts Breakdown & Operating Manual 3 04/19/10
SX1819T
1/4" HEAVY DUTY RIVET GUN
DESCRIPTION
DESCRIPTION
DESCRIPTION
PART
NO.
PART
NO.
PART
NO.
REF.
NO.
REF.
NO.
REF.
NO.
QTY.
QTY.
QTY.
1 RS819101 HydraulicSection 1
1A RS819108 PlungerRodGuide 1
1D RSOR1823 O-Ring 1
1E RSOR2227 O-Ring1
2 RSBR1217 Back-upRing 4
3 RSOR1217 O-Ring 4
4 RS721301 HydraulicPlunger 1
5 RSBR2431 Back-upRing 1
6 RSOR2431 O-Ring 2
7 RS721309 ReturnSpring 1
8 RS721112 RearGland1
8A RS214103 GuideTube 1
9 RSOR3034 O-Ring 1
10 RS214306 Nut 1
10A RSWW1317 WaveWasher 1
11 RS214308 Spring 1
12 RS214302 JawPusher 1
13 RS819303 Jaw"L" 2
14 RS819304 JawHousing 1
14A RS721305 JawHousingCoupler 1
15 RS819105 Head 1
15A RS819106 LockNut 1
16 RS721401 AirCylinderBody 1
17 RS918109 LockNut 1
17A RSOR2832 O-Ring 1
18 RS721502 PackingRing 1
18A RS721503 FrontHeadDisc 1
18B RS721504 RearHeadDisc 1
18C RSOR0509 O-Ring 1
18D RS918504 RearDisc 1
19 RS819501 PlungerRod 1
20 RSPW0512 Washer 1
21 RS508020 LockScrew 1
22 RS612505 BumperRing 1
22A RS819500 PistonAssy(incl.#18-#22) 1
23 RS721402 AirCylinderCap 1
23A RSOR8591 O-Ring 1
23B RSCH8084 RetainingRing 1
24 RS918207 ThrottleValve 1
25 RS656204 ThrottleValveSpring 1
26 RSOR1417 O-Ring 2
27 RS612206 ValvePlug 1
28 RS918200 ValveTubeAssy 1
28A RS918204 ValveTubeSpring 1
28B RS618605 BrassCollar 1
28C RSOR0914 O-Ring 1
28D RSOR0812 O-Ring 1
29 RS612611 Trigger 1
29A RS918602 Linkage 1
29B RS721603 RockerArm 1
29C RSSP3006 RollPin 2
29P RSSP3018 RollPin 2
30 RS612706 NosePiece3/16"(4.8mm) 1
RS612708 NosePiece1/4"(6.4mm) 1
31 RS922100 SwivelJointAssy
(incl.#31A-#31D) 1
31A RS92201S MaleInletBody 1
31B RS922A01 FemaleInletBody 1
31C RSCS1316 SnapRing 1
31D RSOR1015 O-Ring 2
32 RS612901 Deflector 1
33 RS612904 Multi-Wrench(A) 1
34 RS918905 Multi-Wrench(B) 1
35 RS721403 RubberBoot 1
15
30
12
11
26
28D
28
28B
28C
29C
29P
16
29B
31B
31C
31D
31D
31A
24
25
26
27
28A
29C
29A
29
29P
14A
10A
10
2
3
2
3
1
4
6
20
21
23A
23
23B
18C
19
17
17A
1D
1E
1A
3
2
3
2
22
35
18A
18
18B
18D
6
5
7
8A
9
8
32
33
34
15A
14
13

SX1819T: Parts Breakdown & Operating Manual 4 04/19/10
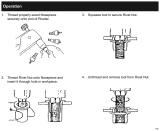
3. Jaw Opening Adjustment:
Toobtainthemaximumstrokeofthetool,properdistancesettingbetween
thejaw housingandtheheadisveryimportant.Firstloosen thelocknut.
A rivet is then inserted into the nosepiece which should be selected to
matchthe rivetsize to beset.While screwingor unscrewing thehead to
achievetheminimum opening ofthejaws,checkif the rivetmandrelcan
beremovedandinsertedfreely.Fastenthelocknutaftertheadjustment.
Maintenance...
1. Checkthetightnessoftheconnectionsbetweenthejawhousingcoupler,
nut,jawhousing,andthehydraulicplunger,thenosepiece,theheadand
thelocknut.
2. If the jaws show excessive wear and/or are dirty, follow the steps
providedintheservicingproceduressection.
Troubleshooting...
1. Rivet mandrel is gripped by the jaws but the rivet can not be set
and mandrel can not be bro ken:
CAUSE:Lowairpressureorlossofhydraulicfluid.
REMEDY:Increaseairpressureto7bar(100psi)maximumattool.Make
sureallfittingsincludingrearglandandheadaretight.Ifmalfunction
persists,callauthorizedSunexTools
®
warrantycenter.
2. Mandrel does not fit completely into nosepiece or fails to eject:
CAUSE:JawHousingdistanceincorrect.
REMEDY:Loosentheheadandchecktheratedstrokelength.
Ifshorter,searchforwornordamagedO-ringsandreplaceit.
CAUSE:Jawsaredirtyordamaged.
REMEDY:Cleanorreplacethejaws.
CAUSE:Fatiguedjawpusherspring.
REMEDY:Replacethejawpusherspring.
CAUSE:FatiguedReturnSpring.
REMEDY:Replacethereturnspring.
CAUSE:Airleakageinvacuumsystem.
REMEDY:Searchforwornordamagedsealsinthevacuumsystemand
replaceit.
3. Tool takes more than two strokes under ideal con di tions to set rivet
and break mandrel:
CAUSE:Lowairpressure.
REMEDY: IncreaseairpressurebutdoNOTexceed7bar(100psi)
attool.
CAUSE:LooseNosepieceorimpropersizeofnosepiece.
REMEDY: Tightennosepieceoruserightsize.
CAUSE:Rivetbodytoolongforthethicknessofthejoint.
REMEDY:Therivetbodyshouldbe3-6mmlongerthanthethicknessof
jointonly.
Ifmalfunctionpersists,callanauthorizedSunexTools
®
warrantycenter.
Air Supply...
Toolsofthisclassoperateonawiderangeofairpressures.Itisrecommended
thatairpressureofthesetoolsmeasures90psiatthetoolwhilerunningfree.
Higher pressure (over 90 psi;6.2 bar)raisesperformance beyondthe rated
capacity ofthe tool whichwill shorten toollife because of faster wear and
couldcauseinjury.
Alwaysuse clean,dryair.Dust,corrosivefumesand/or waterinthe air line
willcausedamagetothetool.Draintheairtankdaily.Cleantheairinletfilter
screenonatleastaweeklyschedule.Therecommendedhookupprocedurecan
beviewedinabovefigure.
The air inlet used for connecting air supply has standard 1/4" NPT. Line
pressureshouldbeincreasedtocompensateforunusuallylongairhoses(over
25feet).Minimumhosediametershouldbe3/8"I.D.andfittingsshouldhave
thesameinsidedimensionsandbetightlysecured.
Lubrication...
Lubricatetheairtoolwithqualityairtooloil.Ifnoairlineoilerisused,run1/2
ounceofairtooloilthroughthetoolbysquirtingoilintothetool'sairinletor
intothenearestconnectiontotheairinlet,reconnectingairsupply,andthen
runningtool.Donotusemorethan1/2ounceofoil,asoverfillingwillreduce
theperformanceofthetool.
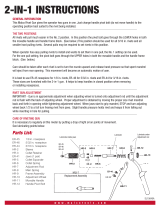
Operation...
When the Lever/Trigger is depressed, the throttle valve is moved down off
its seat bythe valve tube. Air enters the bottom ofthe air cylinder, forcing
thepistonassemblyup.Asthepistonassemblyrises,theplungerrodforces
hydraulic fluid in to the upper part of the hydraulic section, retracting the
hydraulicplunger. Meanwhile, thejawsgripthemandreloftherivet, pulling
untiltherivetissetandbreakingthemandrelintheprocess.
Whentheleverisreleased,thethrottlevalveresetsandshutsofftheairsupply.
Thevalvetubespringthenliftsthevalvetubeandexhauststheairthroughout
thehollowofthevalvetube.Thereturnspringreturnsthehydraulicplungerto
itsoriginalposition.Thisopensthejaws,releasesthemandrel,andretractsthe
pistonassemblybacktoitsoriginalstaticsite.
Servicing Procedures...
1. Changing Nosepieces:
Hookupthetooltotheairlineanddepressthelever.Whilecontinuingtohold
theleverdown,usethemaintenancetooltoremovetheunwantednosepiece
andtightenthenewnosepieceinplaceagain.Whentheleverisreleasedand
thetoolisatrest,acircularopeningshouldbevisiblewhenlookingthrough
thehydraulicsectionfromtherearglandtothenosepiece.
2. Cleaning and Changing of the Jaws:
Disconnect the tool from the air line and then remove the head with the
maintenancetool. Hold thejawhousingcouplerfirmlyandremovethe jaw
housing. Clean the jaws with either a steel brush or solvent. If excessive
wearisapparent,replacethemwithnewjaws.Beforereassembling,applya
thincoatofoiltotheslidingsurfaceofthejaws.Reassemblethetoolinthe
reverseorderwhilemakingsurethatthechamferedendofthejawpusheris
incontactwiththejawsproperly.
Operating Instructions • Warning Information • Parts Break down

SX1819T: Parts Breakdown & Operating Manual 5 04/19/10
Limited Warranty...
SUNEX INTERNATIONAL, INC. WARRANTS TO ITS CUSTOMERS THAT THE COMPANY’S SUNEX TOOLS
®
BRANDED
PRODUCTS ARE FREE FROM DEFECTS IN WORKMANSHIP AND MATERIALS.
Sunex International, Inc. will repair or replace its Sunex Tools
®
branded products which fail to give satisfactory service due to defective workmanship
or materials, based upon the terms and conditions of the following described warranty plans attributed to that specific product. This product carries a
ONE-YEARwarranty.Duringthiswarrantyperiod,SunexTools
®
willrepairorreplaceatouroptionanypartorunitwhichprovestobedefectiveinmaterialor
workmanship.
Other important warranty information...
Thiswarrantydoesnotcoverdamagetoequipmentortoolsarisingfromalteration,abuse,misuse,damageanddoesnotcoveranyrepairsorreplacementmade
byanyoneotherthanSunexTools
®
oritsauthorizedwarrantyservicecenters.TheforegoingobligationisSunexTools
®
soleliabilityunderthisoranyimplied
warrantyandundernocircumstancesshallwebeliableforanyincidentalorconsequentialdamages.
Note: Somestatesdonotallowtheexclusionorlimitationofincidentalorconsequentialdamages,sotheabovelimitationorexclusionmaynotapplytoyou.
ReturnequipmentorpartstoSunexTools
®
,oranauthorizedwarrantyservicecenter,transportationprepaid.Becertaintoincludeyournameandaddress,
evidenceofthepurchasedate,anddescriptionofthesuspecteddefect.
Ifyouhaveanyquestionsaboutwarrantyservice,pleasewritetoSunexTools
®
.Thiswarrantygivesyouspecificlegalrightsandyoumayalsohaveotherrights
whichvaryfromstatetostate.RepairkitsandreplacementpartsareavailableformanyofSunexTools
®
productsregardlessofwhetherornottheproductis
stillcoveredbyawarrantyplan.
SHIPPING ADDRESS: Sunex Tools • 315 Hawkins Rd. • Travelers Rest, SC 29690
MAILING ADDRESS: Sunex Tools • P.O. Box 1233 • Travelers Rest, SC 29690
/