Page is loading ...

Operating instructions
Radio alarm clock
Item no. 1383425
Intended use
This radio alarm clock displays the time, date, day of the week and indoor temperature. The time
is set automatically by a built-in DCF receiver. The radio alarm clock features a dual alarm and
a °Celsius/°Fahrenheit temperature display option and switches automatically between daylight
saving time and standard time.
It is intended for indoor use only. Do not use it outdoors. Contact with moisture, e.g. in bathrooms,
must be avoided under all circumstances.
For safety and approval purposes (CE), you must not rebuild and/or modify this product. If you
use the product for purposes other than those described above, the product may be damaged.
In addition, improper use can cause hazards such as short circuiting, re, electric shock etc. Read
the instructions carefully and keep them. Make this product available to third parties only together
with its operating instructions.
This product complies with the statutory national and European requirements. All company names
and product names are trademarks of their respective owners. All rights reserved.
Delivery content
• Radio alarm clock
• Operating instructions
Safety instructions
Read the operating instructions carefully and especially observe the safety
information. If you do not follow the safety instructions and information on proper
handling in this manual, we assume no liability for any resulting personal injury or
damage to property. Such cases will invalidate the warranty/guarantee.
• The device is not a toy. Keep it out of the reach of children and pets.
• Do not leave packaging material lying around carelessly. This may become
dangerous playing material for children.
• Protect the product from extreme temperatures, direct sunlight, strong jolts, high
humidity, moisture, ammable gases, vapours and solvents.
• Do not place the product under any mechanical stress.
• If it is no longer possible to operate the product safely, take it out of operation and
protect it from any accidental use. Safe operation can no longer be guaranteed if
the product:
- is visibly damaged,
- is no longer working properly,
- has been stored for extended periods in poor ambient conditions or
- has been subjected to any serious transport-related stresses.
• Please handle the product carefully. Jolts, impacts or a fall even from a low height
can damage the product.
• Do not open/dismantle the product (except for inserting/changing the battery as
described in these instructions).
• Correct polarity must be observed while inserting the battery.
• The battery should be removed from the device if it is not used for a long period of
time to avoid damage through leaking. Leaking or damaged batteries might cause
acid burns when in contact with skin, therefore use suitable protective gloves to
handle corrupted batteries.
• Batteries must be kept out of reach of children. Do not leave batteries lying around,
as there is a risk that children or pets may swallow them.
• Batteries must not be dismantled, short-circuited or thrown into re. Never recharge
non-rechargeable batteries. There is a risk of explosion!
• Consult an expert when in doubt about operation, safety or connection of the device.
• Maintenance, modications and repairs are to be performed exclusively by an
expert or at a qualied shop.
• If you have questions which remain unanswered by these operating instructions,
contact our technical support service or other technical personnel.
Operating elements
3
7 8 9 11 1210
13
1
2
6
45
1 Time 8 SET button
2 Seconds 9 ALARM button
3 Temperature display 10 button
4 Day of the week 11 button
5 Date 12 RCC button
6 Alarm time 13 Battery compartment
7 SNOOZE/LIGHT button
Symbols on the LCD display
Symbol Meaning Symbol Meaning
Alarm symbol for weekdays
(days 1-5)
Snooze function symbol
Alarm symbol for weekends
(days 6-7)
DCF symbol
HH Temperature over +50 °C AM Time (before midday)
LL Temperature under -10 °C PM Time (after midday)
GE
EN
IT
FR
German
English
Italian
French
DU
SP
HU
SL
Dutch
Spanish
Hungarian
Slovenian
Days of the week in dierent languages
GE EN IT FR DU SP HU SL
MO MO LU LU MA LU H PO
DI TU MA MA DI MA KE TO
MI WE ME ME WO MI SE SR
DO TH GI JE DO JU CS CE
FR FR VE VE VR VI PE PE
SA SA SA SA ZA SA SO SO
SO SU DO DI ZO DO VA NE
Operation
a) Inserting a battery
• Remove the battery compartment cover (13) on the back of the radio alarm clock.
• Insert a 1.5 V AA battery (not included) with correct polarity into the battery compartment
(observe plus/+ and minus/-).
• Replace the battery compartment cover.
b) Installation
• Place the radio alarm clock on a horizontal, stable and suciently large surface.
• Use suitable padding to protect the surfaces of valuable furniture against scratches.
• To ensure optimal DCF reception, the radio alarm clock should not be placed next to other
electronic devices, cables and metal objects etc.
c) DCF reception
• After inserting the battery, all display elements on the LCD display will turn on and you will hear
an alarm. The alarm clock will start to search for a DCF signal. This is indicated by the ashing
DCF symbol ( ) on the display.
• This synchronisation process normally takes about 10 minutes. The exact time will be displayed
as soon as the DCF signal has been decoded. will be shown on the display.

It takes a few minutes for the alarm clock to detect and analyse the DCF signal. Do not
move the alarm clock during this time. Do not press any buttons or switches!
Poor DCF reception should be expected when the alarm clock is near to metal-coated
insulated glass windows, reinforced concrete, coated wallpapers, electrical devices
or when the alarm clock is placed in a cellar.
If the correct time is not displayed after 10 minutes, change the position of the alarm
clock and restart the DCF reception process manually (see "Manual DCF reception").
The alarm clock will automatically attempt to synchronise with the DCF
time every day at 01:00, 02:00, 03:00, 04:00 or 05:00 until the time signal
has been successfully received. This is sucient to keep the time
deviation to within one second per day.
The DCF signal is sent from a transmitter in Mainingen (near Frankfurt
am Main, Germany). The signal has a range of up to 1500 km, rising
to 2000 km in ideal reception conditions. The DCF signal contains
information such as the exact time and date (with a theoretical time
deviation of one second every one million years!). There is no need to
set the summer and winter time manually.
Manual DCF reception
• To search for the DCF signal manually (e.g. when you have changed the position of the alarm
clock), press and hold the RCC button (12) for approximately 3 seconds. The ashing DCF
symbol ( ) will appear on the display.
• The alarm clock attempts to receive a signal. Wait for the current time to be displayed, as
described above. The DCF symbol ( ) will stop ashing and stay constant on the display
when a signal has been received.
• To end the DCF signal reception process, briey press the RCC button.
Settings
The time/alarm setting process will be interrupted if you do not press any buttons for
approx. 20 seconds. The alarm clock then reverts to the normal display.
Hold down the button (10) or button (11) to move through the digits faster.
a) Setting the date, time, time mode and time zone
You only need to set the time manually if the alarm clock is used outside of the DCF
reception area, in a time zone other than the German time zone or when DCF reception
is impaired due to the surroundings.
• Keep the SET button (8) pressed until the language setting for the day of the week (4) starts to
ash.
• Press the button (10) or button (11) to change the language setting. Conrm your selection
with the SET button. The time display mode (12/24 h) starts to ash. Press the or button to
set the time display mode. Conrm your selection with the SET button.
• Repeat these steps for all other settings. You can set the year (2000-2099) > month > day > hour
> minute > time zone in this order.
• Conrm the last setting using the SET button. The alarm clock then reverts to the normal display.
b) Setting the alarm time
There are two symbols for alarm times:
- Alarm symbol 1 for weekdays (1-5)
- Alarm symbol 2 for weekends (6-7)
• Press and hold the ALARM (9) button. The hour value for alarm 1 (days 1-5) (6) starts to ash.
• Press the button (10) or button (11) to change the hour value. Conrm your selection with the
ALARM button. The minute value ashes.
• Press the button (10) or button (11) to change the minute value. Press the ALARM button to
conrm the setting.
• Repeat these steps immediately after conguring alarm 1 (days 1-5) to congure alarm 2
(days 6-7) (6).
c) Displaying the alarm time and enabling/disabling the alarm
• Press the ALARM button (9) once to display the alarm time for 1-5 (6) > 6-7 (6) (or vice versa).
Press the button twice to go back to the initial display.
• Press the button (10) once to enable the alarm 1-5. The alarm 1 symbol ( ) appears on the
display.
• Press the button again to disable the alarm 1-5. The alarm 1 symbol ( ) disappears from the
LCD display.
• Press the button once to enable the alarm 6-7. The alarm 2 symbol ( ) appears on the display.
• Press the button again to disable the alarm 6-7. The alarm 2 symbol ( ) disappears from the
LCD display.
d) Turning o the alarm tone and using the snooze function
• An alarm tone is played and the alarm symbol ashes when the set alarm time is reached. The
alarm tone can be stopped for approx. 8 minutes by briey pressing the SNOOZE/LIGHT button (7).
The symbol ashes in the LCD display. The alarm goes o again after approx. 8 minutes
(snooze function). The alarm can be interrupted as often as you like.
• To turn o the alarm completely, press any other button.
• If the alarm is not turned o manually, it will turn o automatically after approximately two
minutes and go o again on the following day at the set time.
e) Resetting the alarm
• To reset the radio alarm clock, remove the battery and then reinsert it into the battery
compartment,
f) Turning on the backlight
• Press the SNOOZE/LIGHT button (7) to turn on the backlight for approx. 10 seconds.
g) Selecting the temperature unit
• Press the SET button (8) to change the temperature unit (°C or °F) on the display.
h) Temperature display
• The temperature in the immediate vicinity of the alarm clock is displayed on the temperature
display (3).
• HH is displayed if the temperature exceeds +50 °C.
• LL is displayed if the temperature drops below -10 °C.
The alarm clock measures the temperature every 30 seconds. The temperature is not
measured when the alarm clock is receiving a DCF signal or when the alarm goes o.
Maintenance and cleaning
Never use aggressive and abrasive detergents, rubbing alcohol or other chemical
solutions, as these could damage the casing or even impair the functioning of the
product.
• The product does not require any maintenance apart from changing the battery, therefore do
not dismantle it.
• Remove the battery before cleaning. Only clean the product using a clean, soft and dry cloth.
Dust can be easily removed using a clean and soft brush.
Declaration of Conformity (DOC)
We, Conrad Electronic SE, Klaus-Conrad-Straße 1, D-92240 Hirschau, hereby declare that this
product conforms to the fundamental requirements and the other relevant regulations of the
directive 1999/5/EC.
The Declaration of Conformity for this product can be found at www.conrad.com.
Disposal
a) Product
Electronic devices are recyclable waste and must not be disposed of in the household
waste.
At the end of its service life, dispose of the product according to the relevant statutory
regulations.
Remove any inserted battery and dispose of it separately from the product.
b) (Rechargeable) batteries
You as the end user are required by law (Battery Ordinance) to return all used batteries/
rechargeable batteries. Disposing of them in the household waste is prohibited.
Contaminated (rechargeable) batteries are labelled with this symbol to indicate that
disposal in the domestic waste is forbidden. The designations for the heavy metals
involved are: Cd = Cadmium, Hg = Mercury, Pb = Lead (name on (rechargeable)
batteries, e.g. below the trash icon on the left).
Used (rechargeable) batteries can be returned to collection points in your
municipality, our stores or wherever (rechargeable) batteries are sold.
You thus full your statutory obligations and contribute to the protection of the environment.
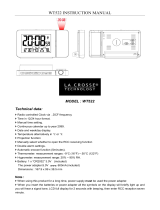
Technical data
Power supply ................................................................... 1 x 1.5 V/DC AA battery
Current consumption ...................................................... 30 mA
Time protocol ................................................................... DCF77
Temperature display range ........................................... -10 to +50 °C
Operating conditions ...................................................... 0 to +50 °C, 20 - 90 % RH
Storage conditions.......................................................... 0 to +50 °C, 20 - 90 % RH
Dimensions (W x H x D).................................................. 93 x 93 x 36 mm
Weight ...............................................................................100 g (without battery)
This is a publication by Conrad Electronic SE, Klaus-Conrad-Str. 1, D-92240 Hirschau (www.conrad.com).
All rights including translation reserved. Reproduction by any method, e.g. photocopy, microlming, or the capture in electronic data
processing systems require the prior written approval by the editor. Reprinting, also in part, is prohibited. This publication represent the
technical status at the time of printing.
© Copyright 2015 by Conrad Electronic SE. V1_1015_02-DS
/