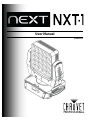
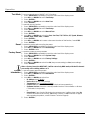
Chauvet NEXT User manual
- Category
- Stroboscopes & disco lights
- Type
- User manual
This manual is also suitable for

User Manual
Firmware V1.2

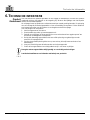
Edition Notes
NEXT NXT-1 User Manual Rev. 7
Edition Notes
The NEXT NXT-1 User Manual Rev. 8 covers the description, safety precautions, installation,
programming, operation, and maintenance of the NEXT NXT-1. Chauvet
released this edition of
the NEXT NXT-1 User Manual in April 2016.
Trademarks
CHAUVET, the Chauvet logo and NEXT NXT-1 are registered trademarks or trademarks of
Chauvet & Sons, LLC
. (d/b/a Chauvet and Chauvet Lighting) in the United States and other
countries. Other company and product names and logos referred to herein may be trademarks
of their respective companies.
Copyright Notice
The works of authorship contained in this manual, including, but not limited to, all design, text
and images are owned by Chauvet.
© Copyright 2016 Chauvet & Sons, LLC. All rights reserved.
Electronically published by Chauvet in the United States of America.
Manual Use
Chauvet authorizes its customers to download and print this manual for professional information
purposes only. Chauvet expressly prohibits the usage, copy, storage, distribution, modification,
or printing of this manual or its content
for any other purpose without written consent from
Chauvet.
Document
Printing
For better results, print this document in color, on letter size paper (8.5 x 11 in), double-sided. If
using A4 paper (210 x 297 mm), configure your printer to scale the content accordingly.
Intended
Audience
Any person in charge of installing, operating, and/or maintaining this product should completely
read through the guide that shipped with the product, as well as this manual, before installing,
operating, or maintaining this product.
Disclaimer
Chauvet believes that the information contained in this manual is accurate in all respects.
However, Chauvet assumes no responsibility and specifically disclaims any and all liability to
any party for any loss, damage or disruption c
aused by any errors or omissions in this
document, whether such errors or omissions result from negligence, accident or any other
cause. Chauvet reserves the right to revise the content of this document without any obligation
to notify any person or company of such revision, however, Chauvet has no obligation to make,
and does not commit to make, any such revisions.
Document
Revision
The NEXT NXT-1 User Manual Rev. 8 supersedes all previous versions of this manual. Discard
any older versions of this manual and replace with this version. Go to
www.chauvetprofessional.com for the latest version.

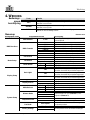
Table of Contents
NEXT NXT-1 User Manual Rev. 8 -i-
Table of Contents
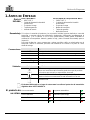
1. Before You Begin ................................................................................................................................................... 1
What Is Included ....................................................................................................................................................................1
Claims .................................................................................................................................................................................................... 1
Manual Conventions .............................................................................................................................................................................. 1
Symbols ................................................................................................................................................................................................. 1
Product At A Glance ..............................................................................................................................................................1
Safety Notes ..........................................................................................................................................................................2
Personal Safety...................................................................................................................................................................................... 2
Mounting And Rigging ............................................................................................................................................................................ 2
Power And Wiring .................................................................................................................................................................................. 2
Operation ............................................................................................................................................................................................... 2
Expected LED Lifespan .........................................................................................................................................................2
2. Introduction ............................................................................................................................................................ 3
Description .............................................................................................................................................................................3
Features .................................................................................................................................................................................3
Overview ................................................................................................................................................................................3
Dimensions ............................................................................................................................................................................4
3. Setup ....................................................................................................................................................................... 5
AC Power ...............................................................................................................................................................................5
AC Plug.................................................................................................................................................................................................. 5
Fuse Replacement ................................................................................................................................................................................. 5
Power Linking ........................................................................................................................................................................................ 5
Mounting ................................................................................................................................................................................6
Orientation ............................................................................................................................................................................................. 6
Signal Connections ................................................................................................................................................................7
Art-Net™ Connection ............................................................................................................................................................................. 7
Kling-Net Connection ............................................................................................................................................................................. 7
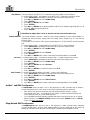
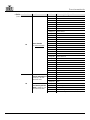
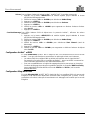
4. Operation ................................................................................................................................................................ 8
Control Panel Description ......................................................................................................................................................8
Menu Map ..............................................................................................................................................................................8
Menu Map (cont.) ................................................................................................................................................................................... 9
Protocol Configuration .........................................................................................................................................................10
DMX Configuration ............................................................................................................................................................................... 10
Art-Net™ Configuration ........................................................................................................................................................................ 10
Art-Net™ and DMX Configuration ........................................................................................................................................................ 11
Kling-Net and DMX Configuration ........................................................................................................................................................ 11
Pixel-Mapping Configuration ................................................................................................................................................12
Zones for DMX/Art-Net™ Control ......................................................................................................................................................... 12
Alphanumeric Shapes .......................................................................................................................................................................... 12
Virtual Gobos ....................................................................................................................................................................................... 13
DMX Values .........................................................................................................................................................................15
<119CH> ............................................................................................................................................................................................. 15
<106CH> ............................................................................................................................................................................................. 21
< 81CH> .............................................................................................................................................................................................. 24
< 23CH> .............................................................................................................................................................................................. 26
< 13CH> .............................................................................................................................................................................................. 30
< 10CH> .............................................................................................................................................................................................. 31
< 9CH> ............................................................................................................................................................................................... 31
Operating Settings Configuration .........................................................................................................................................32
Home Screen ....................................................................................................................................................................................... 32
Pan/Tilt Orientation .............................................................................................................................................................................. 32
Motor Offset ......................................................................................................................................................................................... 32
Display Time Out ................................................................................................................................................................................. 32
Display Backlight Dimmer .................................................................................................................................................................... 32
Display Orientation ............................................................................................................................................................................... 32
White Balance ...................................................................................................................................................................................... 33
Dimmer Speed Mode ........................................................................................................................................................................... 33
Temperature Setting ............................................................................................................................................................................ 33
Page is loading ...
Page is loading ...
Page is loading ...
Page is loading ...

Before You Begin
NEXT NXT-1 User Manual Rev. 8 -1-
1. BEFORE YOU BEGIN
What Is
Included
1-Pack NEXT NXT-1
• NEXT NXT-1
• Neutrik® powerCON® power cord
• 2 Omega brackets
• Warranty card
• User Manual
2-Pack Road Case NEXT NXT-1
• 2 NEXT NXT-1
• 2 Neutrik® powerCON® power cords
• 4 Omega brackets
• Road case
• Warranty card
• User Manual
Claims
Carefully unpack the product immediately and check the box to make sure all the parts are in
the package and are in good condition.
If the box or the contents (the product and included accessories) appear damaged from
shipping or show signs of mishandling, notify the carrier immediately, not Chauvet
. Failure to
report dam
age to the carrier immediately may invalidate your claim. In addition, keep the box
and contents for inspection.
For other issues, such as missing components or parts, damage not related to shipping, or
concealed damage, file a claim with Chauvet within 7 days of delivery.
Manual
Conventions
Convention
Meaning
1–512
A range of values in the text
50/60
A set of mutually exclusive values in the text
<SET>
A button on the product’s control panel
Settings
A product function or a menu option
MENU>Settings
A sequence of menu options
ON
A unique value to be entered or selected in a menu
Symbols
Symbols
Meaning
Critical installation, configuration, or operation information. Failure to
comply with this information may cause the product not to work,
damage third-party equipment, or cause harm to the operator.
Important installation or configuration information. Failure to comply
with this information may keep the product from working.
Useful information.
The term “DMX” used throughout this manual refers to the USITT DMX512-A digital data
transmission protocol.
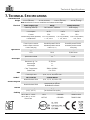
Product At A
Glance
Use on Dimmer
x
Auto Programs
P
Outdoor Use
x
Auto-Ranging Power Supply
P
Master/Slave
x
Replaceable Fuse
P
DMX
P
User-Serviceable
x

Before You Begin
-2- NEXT NXT-1 User Manual Rev. 8
Safety Notes
Read all the following Safety Notes before working with this product. These notes include
important information about the installation, usage, and maintenance of this product.
This product contains no user-serviceable parts. Any reference to servicing in this User
Manual will only apply to properly trained Chauvet certified technicians. Do not open the
housing or attempt any repairs.
All applicable local codes and regulations apply to proper installation of this product.
Personal Safety
• Avoid direct eye exposure to the light source while the product is on.
• Always disconnect this product from its power source before servicing.
• Always connect this product to a grounded circuit to avoid the risk of electrocution.
• Do not touch this product’s housing during operation because it may be very hot.
Mounting And
Rigging
• This product is not intended for permanent installation.
• This product is for indoor use only! To prevent risk of fire or shock, do not expose this
product to rain or moisture. (IP20)
• CAUTION: When transferring product from extreme temperature environments, (e.g. cold
truck to warm humid ballroom) condensation may form on the internal electronics of the
product. To avoid causing a failure, allow product to fully acclimate to the surrounding
environment before connecting it to power.
• Mount this product in a location with adequate ventilation, at least 20 in (50 cm) from
adjacent surfaces.
• Make sure there are no flammable materials close to this product while it is operating.
• When hanging this product, always secure to a fastening device using a safety cable.
• Never carry the product by the power cord or any moving part.
Power And
Wiring
• Make sure the power cord is not crimped or damaged.
• Always make sure you are connecting this product to the proper voltage in accordance
with the specifications in this manual or on the product’s specification label.
• To eliminate unnecessary wear and improve its lifespan, during periods of non-use
completely disconnect the product from power via breaker or by unplugging it.
• Never connect this product to a dimmer pack or rheostat.
• Make sure to replace the fuse with another of the same type and rating.
• Never disconnect this product by pulling or tugging on the power cable.
Operation
• Do not operate this product if you see damage on the housing, lenses, or cables. Have the
damaged parts replaced by an authorized technician at once.
• Do not cover the ventilation slots when operating to avoid internal overheating.
• The maximum ambient temperature is 113 °F (45 °C). Do not operate this product at a
higher temperature.
• In case of a serious operating problem, stop using this product immediately!
In the unlikely event that your Chauvet product may require service, contact Chauvet
Technical Support.
Expected LED
Lifespan
LEDs gradually decline in brightness over time, primarily due to heat. Packaged in clusters,
LEDs exhibit higher operating temperatures than in ideal, single-
LED conditions. For this
reason, using clustered LEDs at their fullest intensity significantly reduces the LEDs’ lifespan.
Under normal conditions, this lifespan can be 40,000 to 50,000 hours. If extending this lifespan
is vital, lower the operating temperature by improving the ventilation around the product and
reducing the ambient temperature to an optimal operating range. In addition, limiting the overall
projection intensity may also help to extend the LEDs’ lifespan.

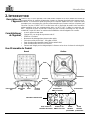
Introduction
NEXT NXT-1 User Manual Rev. 8 -3-
2. INTRODUCTION
Description
The NEXT NXT-1 is a moving head panel with twenty-five 10 watt RGBW LEDs that brilliantly
display pixel mapped images and punch through haze. The fast movement of th
e panel and
rapid response of the narrow-
beam LEDs let designers create engaging eye candy that
enhances any live production, and the NEXT NXT-1 comes with built-in patterns and alpha-
numeric characters for easy programming. The NEXT NXT-1 runs on Art-Net™, Kling-
Net, and
DMX protocols, and can be controlled with lighting consoles or media servers, providing the
ultimate in flexible control integration options.
Features
• 25 RGBW 10 W Osram LEDs
• Each LED has a 6° beam angle
• 22,780 lux at 5 meters
• Ultra-fast pan/tilt movement
• Control options include Art-Net™, Kling-Net, and DMX
• Neutrik® powerCON® and etherCON® In and Out ports
• DMX 3- and 5-pin In and Out ports
• Built-in web server for remote diagnostics and firmware upgrades
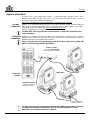
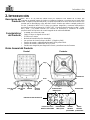
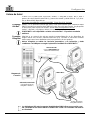
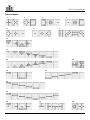
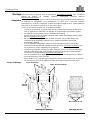
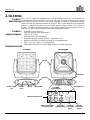
Overview
Rear View
Display
Menu
Buttons
LED
Indicators
Yoke
Handles
Rubber Foot
(x4)
Fans
Neutrik® etherCON®
Through Ports
3-pin DMX
In/Out
5-pin DMX
In/Out
Neutrik®
powerCON®
In
Neutrik®
powerCON®
Out
Fuse-Holder
Ethernet LED Indicators
Front View

Introduction
-4- NEXT NXT-1 User Manual Rev. 8
Dimensions
2 in
50 mm
11.3 in
288 mm
10.6 in
270 mm
14.9 in
378 mm
18.6 in
472 mm
3.9 in
100 mm
3.9 in
100 mm
15.4 in
391 mm

Setup
NEXT NXT-1 User Manual Rev. 8 -5-
3. SETUP
AC Power
Each NEXT NXT-1 has an auto-ranging power supply that works with an input voltage range of
100 to 240 VAC, 50/60 Hz. To determine the power requirements for each NEXT NXT-1
, refer
to the label affixed to the product. You can also refer to the Technical Specifications
chart in this
manual.
The listed current rating indicates the maximum current draw during normal operation. For mor
e
information, download Sizing Circuit Breakers from the Chauvet website
:
www.chauvetprofessional.com.
• Always connect this product to a protected circuit with an appropriate electrical
ground to avoid the risk of electrocution or fire.
• Never connect this product to a rheostat (variable resistor) or dimmer circuit, even if
the rheostat or dimmer channel serves only as a 0 to 100% switch.
• To eliminate unnecessary wear and improve its lifespan, during periods of non-use
completely disconnect the product from power via breaker or by unplugging it.
AC Plug
The NEXT NXT-1 comes with a power input cord terminated with a Neutrik® powerCON® A
connector on one end and an Edison plug on the other end (U.S. market). If the power input
cord that came with your product has no plug, or if you need to change the Edison plug, use the
table below to wire the new plug.
Connection
Wire (U.S.)
Wire (Europe)
Screw Color
AC Live
Black
Brown
Yellow or Brass
AC Neutral
White
Blue
Silver
AC Ground
Green/Yellow
Green/Yellow
Green
Fuse
Replacement
Disconnect this product from the power outlet. 1.
Using a flat-head screwdriver, unscrew the fuse holder cap from the housing. 2.
Remove the blown fuse and replace with another fuse of the same type and rating 3.
(T 5 A, 250 V).
Screw the fuse holder cap back in place and reconnect power. 4.
Make sure to disconnect the product’s power cord before replacing a blown fuse. Always
replace the blown fuse with another of the same type and rating.
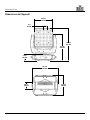
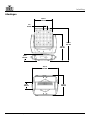
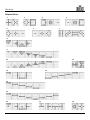
Power Linking
The NEXT NXT-1 supports power linking. You can power link up to 5 products at
120 V; up to 9 at 208 V; or up to 10 at 230 V.
This product comes with a power input cord. Power linking cables are available from Chauvet
for purchase.
Power Linking
Diagram
Power
Source
1
st
Product
2
nd
Product
3
rd
Product
Additional Products

Setup
-6- NEXT NXT-1 User Manual Rev. 8
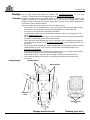
Mounting
Before mounting this product, read and follow the Safety Notes. For our CHAUVET
Professional line of mounting clamps, go to http://trusst.com/products/.
Orientation
Always mount this product in a safe position and make sure there is adequate room for
ventilation, configuration, and maintenance. The NEXT NXT-
1 can be suspended upright or
upside down using the 2 Omega brackets included, or it can be placed o
n its rubber feet on a
flat level surface.
Chauvet recommends using the following general guidelines when mounting this product:
• When selecting an installation location, consider easy access to this product for operation,
programming adjustments, and routine maintenance.
• The product is not intended for permanent installation.
• Make sure to mount this product away from any flammable material as indicated in the
Safety Notes.
• Never mount in places where rain, high humidity, extreme temperature changes, or
restricted ventilation may affect the product.
• If hanging this product, make sure that the mounting location can support the product’s
weight. See the Technical Specifications for the weight-bearing requirements of this
product.
• When hanging this product, always secure to a fastening device using a safety cable. For
our CHAUVET Professional line of safety cables, go to http://trusst.com/products/.
• When mounting the product on the floor, make sure that the product and cables are away
from people and vehicles.
• Place the NEXT NXT-1 so that it can move freely without hitting anything or anybody.
• Leave enough slack on the cables to prevent tension and pull on the plugs.
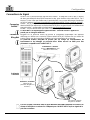
Mounting Diagram
Safety
Cable
Overhead Mounting
Floor Mounting
Rubber Feet (x4)
Mounting Clamps
Omega Brackets

Setup
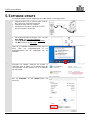
NEXT NXT-1 User Manual Rev. 8 -7-
Signal Connections
The NEXT NXT-1 can receive DMX, Art-Net™, or Kling-Net signal. The NEXT NXT-1 has 2
Neutrik® etherCON® through ports, and 3- and 5-pin DMX In and Out ports.
For more
information about DMX, read the DMX primer at:
http://www.chauvetlighting.com/downloads/DMX_Primer_Rev9_ML_WO.pdf
Art-Net™
Connection
Art-Net™ is an Ethernet protocol that uses TCP/IP which transfers a large amount of DMX512
data using an Neutrik® etherCON® RJ45 connection over a large network. An Art-Net™
protocol document is available from www.chauvetprofessional.com.
Art-Net™ designed by and copyright Artistic Licence Holdings Ltd.
The NEXT NXT-1 will only respond to unicast Art-Net™ signals. The product does not
support multicast.
Kling-Net
Connection
Kling-Net is a network protocol that allows auto configuration of display devices using a
Neutrik® etherCON® RJ45 Ethernet connection. Refer to the ArKaos software manual for
detailed instructions on programming this product.
ArKaos Kling-Net does not support the pan and tilt functions, and must be paired with
DMX for full functionality with the NEXT NXT-1.
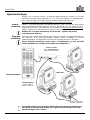
Connection
Diagram
The three LED indicators in between the Neutrik® etherCON® ports indicate a connection
to a network and activity on that network. They do not indicate whether or not the
NEXT NXT-1 is receiving a signal from a controller.
Switch or Router
(such as the NET-Switch
from CHAUVET Professional)
NEXT NXT-1
Computer/Controller
(running Kling-Net or
Art-Net™ protocol)
To other Kling-Net or
Art-Net™ Devices

Operation
-8- NEXT NXT-1 User Manual Rev. 8
4. OPERATION
Control Panel
Description
Button
Function
<MENU/ESC>
Exits from the current menu or function or cycles through the main level
of the menu
<UP>
Navigates upward through the menu list or increases the numeric value
when in a function
<DOWN>
Navigates downward through the menu list or decreases the numeric
value when in a function
<ENTER>
Enables the currently displayed menu or sets the currently selected value
in to the current function
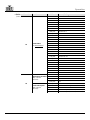
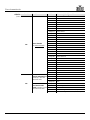
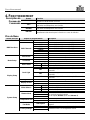
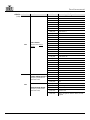
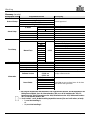
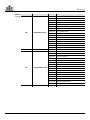
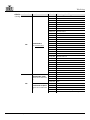
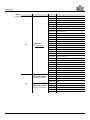
Menu Map
Main Level
Programming Levels
Description
DMX Functions
DMX Address
1–xxx*
DMX address, limit set by DMX personality
DMX Channels
< 9CH>
9-channel DMX personality (*1–504)
< 10CH>
10-channel DMX personality (*1–503)
< 13CH>
13-channel DMX personality (*1–500)
< 23CH>
23-channel DMX personality (*1–490)
< 81CH>
81-channel DMX personality (*1–432)
<106CH>
106-channel DMX personality (*1–407)
<119CH>
119-channel DMX personality (*1–394)
Motor Setup
Pan Inverse
No
Normal panning
Yes
Inverted panning
Tilt Inverse
No
Normal tilting
Yes
Inverted tilting
Motor Offset
Pan
0–255
Offset pan motor
Tilt
0–255
Offset tilt motor
Display Setup
Back Light
On
Display backlight remains on
10S
Display backlight turns off after 10 seconds of
inactivity
20S
Display backlight turns off after 20 seconds of
inactivity
30S
Display backlight turns off after 30 seconds of
inactivity
Back Light Dimmer
1–100
Brightness of display backlight
Display Inverse
No
Normal display
Yes
Inverted display
System Setup
White Balance
Red
125–255
Red value in the white balance
Green
125–255
Green value in the white balance
Blue
125–255
Blue value in the white balance
Dimmer Mode
Off
Dimmer mode off
Dimmer 1
Dimmer mode from fast (Dimmer 1)
to slow (Dimmer 3)
Dimmer 2
Dimmer 3
Temperature Unit
°C
Displays temperature in degrees Celsius
°F
Displays temperature in degrees Fahrenheit
Fan Mode
Auto Speed
Fan speed according the product temperature
High Speed
Fan speed set on high
Factory Settings
No
Resets product to factory default settings
Yes
Firmware V1.2

Operation
NEXT NXT-1 User Manual Rev. 8 -9-
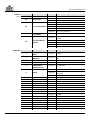
Menu Map (cont.)
Main Level
Programming Levels
Description
Protocol Setup
Only DMX
Operating protocol
Only ArtNet
ArtNet+DMX
KlingNet+DMX
Artnet Setup
IP Mode
<Static>
Static IP mode
< DHCP >
DHCP IP mode
<Manual>
x**.xxx.xxx.xxx
Manual IP mode
Net
0–127
Art-Net™ net address
Subnet
0–15
Art-Net™ subnet address
Universe
0–15
Art-Net™ universe
Start Channel
1–512
DMX start address
Test Setup
Auto Test
Runs auto test
Manual Test
Pan
0–255
Test pan movement
Pan Fine
Test pan fine movement
Tilt
Test tilt movement
Tilt Fine
Test tilt fine movement
P/T Speed
Test pan/tilt speed
Dimmer
Test dimmer
Shutter
Test shutter
Red
Test red color
Green
Test green color
Blue
Test blue color
White
Test white color
Reset Setup
Auto Reset
Restarts the product
Information
IP Address
x.xxx.xxx.xxx
Displays current IP address
Device ID
xxxxxxxxx
Displays device ID
Temperature
XX
Displays current product temperature
Fixture Time 0–9999
Displays number of hours the product has
been powered
Software Version
CPU-A xxx
Current software versions
CPU-B xxx
CPU-C xxx
Reset States
CPU-B Error
No
Displays Yes to any one of these items if the
Auto Reset found errors.
CPU-C Error
No
Pan Sensor Error
No
Pan Encode Error
No
Tilt Sensor Error
No
Tilt Encode Error
No
Temp Sensor Error
No
* - The highest value to which the DMX address can be set is determined by the DMX
personality. For 9-channel mode: 504; for 10-channel mode: 503, 13-channel mode: 500;
23-channel mode: 490; 81-channel mode: 432; 106-channel mode: 407; and
119-channel mode: 394.
** - In Art-Net™ modes, the beginning of the IP address is set by the Net setting, to either:
• 2, for Net setting 0,
or
• 10, for Net setting 1.

Operation
-10- NEXT NXT-1 User Manual Rev. 8
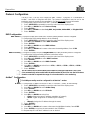
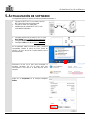
Protocol Configuration
The NEXT NXT-1 can be set to respond to DMX, Art-Net™, Kling-Net, or a combination of
Art-Net™ and DMX or Kling-Net and DMX
. The protocol configuration must be set for the
product to respond correctly to the controller(s). See the Menu Map for more information.
To configure the protocol for the NEXT NXT-1, follow the instructions below:
Press <MENU/ESC> repeatedly to reach the main level of the display menu. 1.
Use <UP> or <DOWN> to select Protocol Setup. 2.
Press <ENTER>. 3.
Use <UP> or <DOWN> to select Only DMX, Only ArtNet, ArtNet+DMX, or KlingNet+DMX. 4.
Press <ENTER>. 5.
DMX Configuration
DMX Address
For protocol modes that include DMX, the DMX starting address must be configured.
To configure the DMX starting address, do the following:
Press <MENU/ESC> repeatedly to reach the main level of the display menu. 1.
Use <UP> and <DOWN> to select DMX Functions. 2.
Press <ENTER>. 3.
Use <UP> or <DOWN> to select DMX Address. 4.
Press <ENTER>. 5.
Use <UP> or <DOWN> to increase or decrease the starting address, from 1–504. 6.
Press <ENTER>. 7.
DMX Personality
For all protocol modes except for KlingNet+DMX, the DMX personality must be configured.
To configure the DMX personality, follow the instructions below:
Press <MENU/ESC> repeatedly to reach the main level of the display menu. 1.
Use <UP> and <DOWN> to select DMX Functions. 2.
Press <ENTER>. 3.
Use <UP> or <DOWN> to select DMX Channels. 4.
Press <ENTER>. 5.
Use <UP> or <DOWN> to select from < 9CH>, < 10CH>, < 13CH>, <23CH>, < 81CH>, 6.
<106CH>, or <119CH>.
Press <ENTER>. 7.
The 81-channel and 9-channel DMX personalities are designed with Auto Color. Auto
Color automatically mixes and blends the white emitted by the LEDs into the RGB values
from the controller to expand the range of color and enhance color rendering.
Art-Net™ Configuration
The DMX personality must be configured for all Art-Net™ modes.
IP Mode
To configure the IP address for the NEXT NXT-1 in Art-Net™ modes, do the following:
Press <MENU/ESC> repeatedly to reach the main level of the display menu. 1.
Use <UP> or <DOWN> to select ArtNet Setup. 2.
Press <ENTER>. 3.
Use <UP> or <DOWN> to select IP Mode. 4.
Press <ENTER>. 5.
Use <UP> or <DOWN> to select from: 6.
• <Static> (keeps the same IP address regardless of network),
• < DHCP > (gets assigned an IP address by the network),
or
• <Manual> (assign the IP address through the menu)
Press <ENTER>. 7.
For <Manual> mode:
Use <UP> or <DOWN> to increase or decrease the highlighted number, from 0–255. 8.
Press <ENTER> to cycle to the next number in the IP address. 9.
Repeat steps 8-9 until the IP address is set as desired. 10.

Operation
NEXT NXT-1 User Manual Rev. 8 -11-
Net Address
The Net setting on the NEXT NXT-1 determines the first number in the IP address.
To configure the Art-Net™ Net address for the NEXT NXT-1, follow the instructions below:
Press <MENU/ESC> repeatedly to reach the main level of the display menu. 1.
Use <UP> or <DOWN> to select ArtNet Setup. 2.
Press <ENTER>. 3.
Use <UP> or <DOWN> to select Net. 4.
Press <ENTER>. 5.
Use <UP> or <DOWN> to set the Net address to 0 (for an IP address beginning with 2) or 1 6.
(for an IP address beginning with 10).
Press <ENTER>. 7.
Net addresses higher than 1 have no function and are reserved for future use.
Subnet Address
The Subnet address in Art-Net™ adds 16 to the Universe address for each Subnet integer. To
calculate the actual Universe setting, take the Subnet value, multiply it
by 16, and add the
Universe value.
For example, to set Universe 200, set the Subnet address to 12 (12x16=192) and the Universe
to 8.
To configure the Art-Net™ Subnet address for the NEXT NXT-1, do the following:
Press <MENU/ESC> repeatedly to reach the main level of the display menu. 1.
Use <UP> or <DOWN> to select ArtNet Setup. 2.
Press <ENTER>. 3.
Use <UP> or <DOWN> to select Subnet. 4.
Press <ENTER>. 5.
Use <UP> or <DOWN> to increase or decrease the Subnet address, from 0–15. 6.
Universe
To configure the Art-Net™ Universe for the NEXT NXT-1, follow the instructions below:
Press <MENU/ESC> repeatedly to reach the main level of the display menu. 1.
Use <UP> or <DOWN> to select ArtNet Setup. 2.
Press <ENTER>. 3.
Use <UP> or <DOWN> to select Universe. 4.
Press <ENTER>. 5.
Use <UP> or <DOWN>. to set the Universe, from 0–15. 6.
Press <ENTER>. 7.
Start Channel
To set the DMX starting address in Art-Net™ modes, do the following:
Press <MENU/ESC> repeatedly to reach the main level of the display menu. 1.
Use <UP> or <DOWN> to select ArtNet Setup. 2.
Press <ENTER>. 3.
Use <UP> or <DOWN> to select Start Channel. 4.
Press <ENTER>. 5.
Use <UP> or <DOWN> to increase or decrease the starting address, from 1–512. 6.
Art-Net™ and DMX Configuration
In ArtNet+DMX mode, the NEXT NXT-1 will respond to a DMX controller and an Art-Net™
console simultaneously. For this to work correctly, the following must be observed:
• DMX values from the DMX controller must not interfere with the Art-Net™ signal.
For example: if Art-Net™ is controlling the LED output, no DMX channel that affects the
LEDs should be set to any value other than zero.
• For compatibility with pixel mapping software that does not account for pan, tilt, or master
dimmer functions, the DMX Personality must be set to either <106CH> mode or < 81CH>
mode. (See DMX Personality.)
Kling-Net and DMX Configuration
In KlingNet+DMX mode, the NEXT NXT-1 will respond to a DMX controller and a Kling-Net
console simultaneously. Only the DMX starting address must be configured for this mode. All
settings and functions other than pan and tilt will be controlled by the Kling-Net console.

Operation
-12- NEXT NXT-1 User Manual Rev. 8
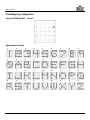
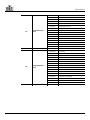
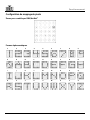
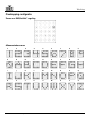
Pixel-Mapping Configuration
Zones for DMX/Art-Net™ Control
Alphanumeric Shapes
0
1
2
3
4
5
6
7
8
9
A B C D E F G H
I
J
K
L
M
N
O
P
Q
R
S T U V W X
Y
Z

Operation
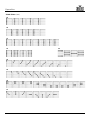
NEXT NXT-1 User Manual Rev. 8 -13-
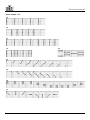
Virtual Gobos
1
2
3
4
5
6
7
8
9
10 11
12
13
14
15
16
17
18

Operation
-14- NEXT NXT-1 User Manual Rev. 8
Virtual Gobos (cont.)
19
20
21
22
23
24
25
26
27

Operation
NEXT NXT-1 User Manual Rev. 8 -15-
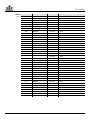
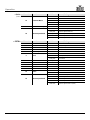
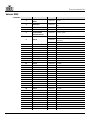
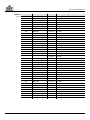
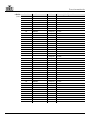
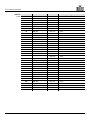
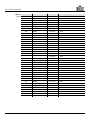
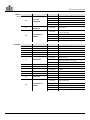
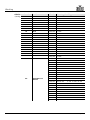
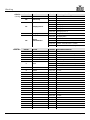
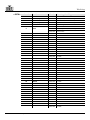
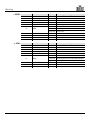
DMX Values
<119CH>
Channel
Function
Value
Percent/Settings
1
Pan
000ó255
0–540°
2
Pan Fine
000ó255
Fine (16-bit) pan control
3
Tilt
000ó255
0–270°
4
Tilt Fine
000ó255
Fine (16-bit) tilt control
5
Pan/Tilt Speed
000ó255
Fast to slow
6 Reset
000ó199
No function
200ó209
Resets product (hold for 3 seconds)
210ó255
No function
7
Red 1
000ó255
0–100%
8
Green 1
000ó255
0–100%
9
Blue 1
000ó255
0–100%
10
White 1
000ó255
0–100%
11
Red 2
000ó255
0–100%
12
Green 2
000ó255
0–100%
13
Blue 2
000ó255
0–100%
14
White 2
000ó255
0–100%
15
Red 3
000ó255
0–100%
16
Green 3
000ó255
0–100%
17
Blue 3
000ó255
0–100%
18
White 3
000ó255
0–100%
19
Red 4
000ó255
0–100%
20
Green 4
000ó255
0–100%
21
Blue 4
000ó255
0–100%
22
White 4
000ó255
0–100%
23
Red 5
000ó255
0–100%
24
Green 5
000ó255
0–100%
25
Blue 5
000ó255
0–100%
26
White 5
000ó255
0–100%
27
Red 6
000ó255
0–100%
28
Green 6
000ó255
0–100%
29
Blue 6
000ó255
0–100%
30
White 6
000ó255
0–100%
31
Red 7
000ó255
0–100%
32
Green 7
000ó255
0–100%
33
Blue 7
000ó255
0–100%
34
White 7
000ó255
0–100%
35
Red 8
000ó255
0–100%
36
Green 8
000ó255
0–100%
37
Blue 8
000ó255
0–100%
38
White 8
000ó255
0–100%
39
Red 9
000ó255
0–100%
40
Green 9
000ó255
0–100%
41
Blue 9
000ó255
0–100%
42
White 9
000ó255
0–100%
Page is loading ...

Operation
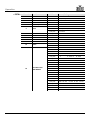
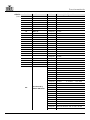
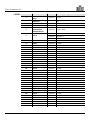
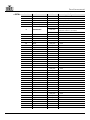
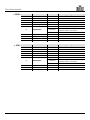
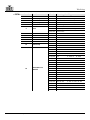
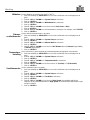
NEXT NXT-1 User Manual Rev. 8 -17-
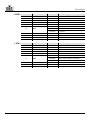
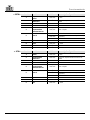
<119CH>
(cont.)
Channel
Function
Value
Percent/Settings
87
Red 21
000ó255
0–100%
88
Green 21
000ó255
0–100%
89
Blue 21
000ó255
0–100%
90
White 21
000ó255
0–100%
91
Red 22
000ó255
0–100%
92
Green 22
000ó255
0–100%
93
Blue 22
000ó255
0–100%
94
White 22
000ó255
0–100%
95
Red 23
000ó255
0–100%
96
Green 23
000ó255
0–100%
97
Blue 23
000ó255
0–100%
98
White 23
000ó255
0–100%
99
Red 24
000ó255
0–100%
100
Green 24
000ó255
0–100%
101
Blue 24
000ó255
0–100%
102
White 24
000ó255
0–100%
103
Red 25
000ó255
0–100%
104
Green 25
000ó255
0–100%
105
Blue 25
000ó255
0–100%
106
White 25
000ó255
0–100%
107
Color Macro and
White Balance
000ó010
No function
011ó030
R: 100%
G: 0–100%
B: 0
031ó050
R: 100%–0
G: 100%
B: 0
051ó070
R: 0
G: 100%
B: 0–100%
071ó090
R: 0
G: 100%–0
B: 100%
091ó110
R: 0–100%
G: 0
B: 100%
111ó130
R: 100%
G: 0
B: 100%–0
131ó150
R: 100%
G: 0–100%
B: 0–100%
151ó170
R: 100%–0
G: 100%–0
B: 100%
171ó200
R: 100%
G: 100%
B: 100%
W: 100%
201ó205
White 1 R: 255 G: 128 B: 0 W: 253
206ó210
White 2 R: 255 G: 141 B: 046 W: 230
211ó215
White 3 R: 255 G: 154 B: 069 W: 207
216ó220
White 4 R: 255 G: 167 B: 092 W: 184
221ó225
White 5 R: 255 G: 180 B: 115 W: 161
226ó230
White 6 R: 255 G: 193 B: 138 W: 138
231ó235
White 7 R: 255 G: 206 B: 161 W: 115
236ó240
White 8 R: 255 G: 219 B: 184 W: 092
241ó245
White 9 R: 255 G: 232 B: 207 W: 069
246ó250
White 10 R: 255 G: 245 B: 230 W: 046
251ó255
White 11 R: 255 G: 255 B: 255 W: 0

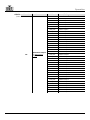
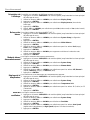
Operation
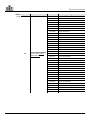
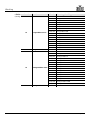
-18- NEXT NXT-1 User Manual Rev. 8
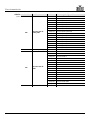
<119CH>
(cont.)
Channel
Function
Value
Percent/Settings
108
Foreground Color
Macro
000ó010
No function
011ó027
Foreground color R
028ó043
Foreground color G
044ó059
Foreground color B
060ó076
Foreground color W
077ó092
Foreground color RG
093ó108
Foreground color RB
109ó124
Foreground color RW
125ó141
Foreground color GB
142ó157
Foreground color GW
158ó173
Foreground color BW
174ó189
Foreground color RGB
190ó206
Foreground color RGW
207ó222
Foreground color RBW
223ó238
Foreground color GBW
239ó255
Foreground color RGBW
109
Foreground Dimmer
000ó255
0–100%
110
Background Color
Macro
000ó010
No function
011ó027
Background color R
028ó043
Background color G
044ó059
Background color B
060ó076
Background color W
077ó092
Background color RG
093ó108
Background color RB
109ó124
Background color RW
125ó141
Background color GB
142ó157
Background color GW
158ó173
Background color BW
174ó189
Background color RGB
190ó206
Background color RGW
207ó222
Background color RBW
223ó238
Background color GBW
239ó255
Background color RGBW
111
Background Dimmer
000ó255
0–100%
Page is loading ...
Page is loading ...
Page is loading ...
Page is loading ...
Page is loading ...
Page is loading ...
Page is loading ...
Page is loading ...
Page is loading ...
Page is loading ...
Page is loading ...
Page is loading ...
Page is loading ...
Page is loading ...
Page is loading ...
Page is loading ...
Page is loading ...
Page is loading ...
Page is loading ...
Page is loading ...
Page is loading ...
Page is loading ...
Page is loading ...
Page is loading ...
Page is loading ...
Page is loading ...
Page is loading ...
Page is loading ...
Page is loading ...
Page is loading ...
Page is loading ...
Page is loading ...
Page is loading ...
Page is loading ...
Page is loading ...
Page is loading ...
Page is loading ...
Page is loading ...
Page is loading ...
Page is loading ...
Page is loading ...
Page is loading ...
Page is loading ...
Page is loading ...
Page is loading ...
Page is loading ...
Page is loading ...
Page is loading ...
Page is loading ...
Page is loading ...
Page is loading ...
Page is loading ...
Page is loading ...
Page is loading ...
Page is loading ...
Page is loading ...
Page is loading ...
Page is loading ...
Page is loading ...
Page is loading ...
Page is loading ...
Page is loading ...
Page is loading ...
Page is loading ...
Page is loading ...
Page is loading ...
Page is loading ...
Page is loading ...
Page is loading ...
Page is loading ...
Page is loading ...
Page is loading ...
Page is loading ...
Page is loading ...
Page is loading ...
Page is loading ...
Page is loading ...
Page is loading ...
Page is loading ...
Page is loading ...
Page is loading ...
Page is loading ...
Page is loading ...
Page is loading ...
Page is loading ...
Page is loading ...
Page is loading ...
Page is loading ...
Page is loading ...
Page is loading ...
Page is loading ...
Page is loading ...
Page is loading ...
Page is loading ...
Page is loading ...
Page is loading ...
Page is loading ...
Page is loading ...
Page is loading ...
Page is loading ...
Page is loading ...
Page is loading ...
Page is loading ...
Page is loading ...
Page is loading ...
Page is loading ...
Page is loading ...
Page is loading ...
Page is loading ...
Page is loading ...
Page is loading ...
Page is loading ...
Page is loading ...
Page is loading ...
Page is loading ...
Page is loading ...
Page is loading ...
Page is loading ...
Page is loading ...
Page is loading ...
Page is loading ...
Page is loading ...
Page is loading ...
Page is loading ...
Page is loading ...
Page is loading ...
Page is loading ...
Page is loading ...
Page is loading ...
Page is loading ...
Page is loading ...
Page is loading ...
Page is loading ...
Page is loading ...
Page is loading ...
Page is loading ...
Page is loading ...
Page is loading ...
Page is loading ...
Page is loading ...
Page is loading ...
Page is loading ...
Page is loading ...
Page is loading ...
Page is loading ...
Page is loading ...
Page is loading ...
Page is loading ...
Page is loading ...
Page is loading ...
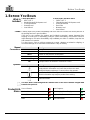
-
 1
1
-
 2
2
-
 3
3
-
 4
4
-
 5
5
-
 6
6
-
 7
7
-
 8
8
-
 9
9
-
 10
10
-
 11
11
-
 12
12
-
 13
13
-
 14
14
-
 15
15
-
 16
16
-
 17
17
-
 18
18
-
 19
19
-
 20
20
-
 21
21
-
 22
22
-
 23
23
-
 24
24
-
 25
25
-
 26
26
-
 27
27
-
 28
28
-
 29
29
-
 30
30
-
 31
31
-
 32
32
-
 33
33
-
 34
34
-
 35
35
-
 36
36
-
 37
37
-
 38
38
-
 39
39
-
 40
40
-
 41
41
-
 42
42
-
 43
43
-
 44
44
-
 45
45
-
 46
46
-
 47
47
-
 48
48
-
 49
49
-
 50
50
-
 51
51
-
 52
52
-
 53
53
-
 54
54
-
 55
55
-
 56
56
-
 57
57
-
 58
58
-
 59
59
-
 60
60
-
 61
61
-
 62
62
-
 63
63
-
 64
64
-
 65
65
-
 66
66
-
 67
67
-
 68
68
-
 69
69
-
 70
70
-
 71
71
-
 72
72
-
 73
73
-
 74
74
-
 75
75
-
 76
76
-
 77
77
-
 78
78
-
 79
79
-
 80
80
-
 81
81
-
 82
82
-
 83
83
-
 84
84
-
 85
85
-
 86
86
-
 87
87
-
 88
88
-
 89
89
-
 90
90
-
 91
91
-
 92
92
-
 93
93
-
 94
94
-
 95
95
-
 96
96
-
 97
97
-
 98
98
-
 99
99
-
 100
100
-
 101
101
-
 102
102
-
 103
103
-
 104
104
-
 105
105
-
 106
106
-
 107
107
-
 108
108
-
 109
109
-
 110
110
-
 111
111
-
 112
112
-
 113
113
-
 114
114
-
 115
115
-
 116
116
-
 117
117
-
 118
118
-
 119
119
-
 120
120
-
 121
121
-
 122
122
-
 123
123
-
 124
124
-
 125
125
-
 126
126
-
 127
127
-
 128
128
-
 129
129
-
 130
130
-
 131
131
-
 132
132
-
 133
133
-
 134
134
-
 135
135
-
 136
136
-
 137
137
-
 138
138
-
 139
139
-
 140
140
-
 141
141
-
 142
142
-
 143
143
-
 144
144
-
 145
145
-
 146
146
-
 147
147
-
 148
148
-
 149
149
-
 150
150
-
 151
151
-
 152
152
-
 153
153
-
 154
154
-
 155
155
-
 156
156
-
 157
157
-
 158
158
-
 159
159
-
 160
160
-
 161
161
-
 162
162
-
 163
163
-
 164
164
-
 165
165
-
 166
166
-
 167
167
-
 168
168
-
 169
169
-
 170
170
-
 171
171
-
 172
172
-
 173
173
-
 174
174
-
 175
175


Chauvet NEXT User manual
- Category
- Stroboscopes & disco lights
- Type
- User manual
- This manual is also suitable for
Ask a question and I''ll find the answer in the document
Finding information in a document is now easier with AI
in other languages
- français: Chauvet NEXT Manuel utilisateur
- español: Chauvet NEXT Manual de usuario
- Nederlands: Chauvet NEXT Handleiding
Related papers
-
Chauvet Professional STRIKE Reference guide
-
Chauvet Professional WELL Gobo Quick start guide
-
CHAUVET DJ Gobo Zoom LED 2.0 Reference guide
-
Chauvet 2x2 User manual
-
Chauvet Professional Net-X User manual
-
Chauvet Professional COLORdash Accent Quad Reference guide
-
Chauvet Professional Nexus User manual
-
-
Chauvet Professional Rogue User manual
-
Other documents
-
FOS Artnet Controller PRO User manual
-
-
-
 Ibiza Light MHSPOT30-FX Owner's manual
-
-
ADJ Ultra Kling Bar 18 User manual
-
-
CHAUVET DJ Freedom Par Quad-4 IP User manual
-
-
