Page is loading ...

1
USA/Canada 1-800-231-9786
Mexico 01-800-714-2503
www.prodprotect.com/applica
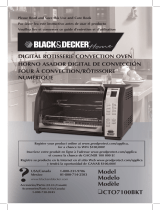
MODELO/MODEL/MODÈLE
❍ TO4000SD
Servicio para el cliente:
México 01-800 714-2503
Accesorios/Partes (EE.UU)
1-800-738-0245
Para servicio al cliente y para
registrar su garantía, visite
www.prodprotect.com/applica
Customer Care Line:
USA 1-800-231-9786
Accessories/Parts (USA)
1-800-738-0245
For online customer service
and to register your product, go to
www.prodprotect.com/applica
HORNO de CONVeCCIóN
CONVeCTION OVEN
FOUR À CONVeCTION
Service line à la clientèle:
Canada 1-800-231-9786
Accessoires/Pièces (Canada)
1-800-738-0245
Pour accéder au
service à la clientèle
en ligne ou pour inscrire votre produit
en ligne, rendez-vous à
www.prodprotect.com/applica

2
Please Read and Save this Use and Care Book.
IMPORTANT SAFEGUARDS
When using electrical appliances, basic safety precautions should always be
followed, including the following:
❍Read all instructions.
❍Do not touch hot surfaces. Use handles or knobs.
❍To protect against electrical shock do not immerse cord, plugs or appliance
in water or other liquid.
❍Close supervision is necessary when any appliance is used by or near
children.
❍Unplug from outlet when not in use and before cleaning. Allow to cool
before putting on or taking off parts.
❍Do not operate any appliance with a damaged cord or plug, or after the
appliance malfunctions or has been damaged in any manner. Return
appliance to the nearest authorized service facility for examination, repair
or adjustment. Or, call the appropriate toll-free number on the cover of
this manual.
❍The use of accessory attachments not recommended by the appliance
manufacturer may cause injuries.
❍Do not use outdoors.
❍Do not let cord hang over edge of table or counter, or touch hot surfaces.
❍Do not place on or near a hot gas or electric burner, or in a heated oven.
❍Extreme caution must be used when moving an appliance containing hot oil
or other hot liquids.
❍Always attach plug to appliance first, then plug cord into the wall outlet.
To disconnect, press Start/Stop to turn the unit of. Then remove plug from
wall outlet.
❍Do not use appliance for other than intended use.
❍Use extreme caution when removing tray or disposing of hot grease.
❍Do not clean with metal scouring pads. Pieces can break off the pad and
touch electrical parts, creating a risk of electric shock.
❍Oversized foods or metal utensils must not be inserted in a toaster oven, as
they may create a fire or risk of electric shock.
❍A fire may occur if the toaster oven is covered or touching flammable
material including curtains, draperies, walls and the like, when in
operation. Do not store any item on top of the appliance when in operation.
❍Extreme caution should be exercised when using containers constructed of
other than metal or glass.
❍Do not store any material, other than manufacturer's recommended

3
accessories, in this oven when not in use.
❍Do not place any of the following materials in the oven: paper, cardboard,
plastic, and the like.
❍Do not cover crumb tray or any part of this oven with metal foil. This will cause
overheating of the oven.
❍ This appliance is not intended for use by persons (including children) with
reduced physical, sensory or mental capabilities, or lack of experience and
knowledge, unless they have been given supervision or instruction concerning
use of the appliance by a person responsible for their safety.
❍ Children should be supervised to ensure that they do not play with the
appliance.
SAVE THESE INSTRUCTIONS.
This product is for household use only.
GROUNDED PLUG
As a safety feature, this product is equipped with a grounded plug, which will
only fit into a three-prong outlet. Do not attempt to defeat this safety feature.
Improper connection of the grounding conductor may result in the risk of electric
shock. Consult a qualified electrician if you are in doubt as to whether the outlet
is properly grounded.
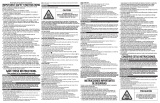
TAMPER-RESISTANT SCREW
Warning : This appliance is equipped with a tamper-resistant screw to prevent
removal of the outer cover. To reduce the risk of fire or electric shock, do not attempt
to remove the outer cover. There are no user-serviceable parts inside. Repair should
be done only by authorized service personnel.
ELECTRICAL CORD
a) A short power-supply cord is to be provided to reduce the risk resulting from
becoming entangled in or tripping over a longer cord.
b) Longer extension cords are available and may be used if care is exercised in
their use.
c) If an extension cord is used,
1) The marked electrical rating of the cord set or extension cord should be
at least as great as the electrical rating of the appliance, and
2) The cord should be arranged so that it will not drape over the
countertop or tabletop where it can be pulled on by children or tripped
over unintentionally.
If the appliance is of the grounded type, the extension cord should be a grounding-
type 3-wire cord.
Note: If the power supply cord is damaged, it should be replaced by qualified
personnel; in Latin America, by an authorized service center.

4
GETTING FAMILIAR WITH YOUR UNIT MAIN FEATURES
Product may vary slightly from what is illustrated.
1. Curved glass door
2. Extra-deep curved interior
3. Door handle
4. Digital display
5. Electronic control panel
(See B)
6. Slide rack
7. Slide-out crumb tray
8. Bake/broil pan
A
3
4
5
1 2
6 7
8

5
B
ELECTRONIC CONTROL PANEL FUNCTIONS
1. Backlit display.
2. Toast shade level (1 - 7).
3. Bagel shade level (1 - 7).
4. Bake (350˚F)*.
5. Broils (450˚F)*.
6. Pizza (400˚F)*.
7. Keep Warm.
8. Reheat.
9. Convection.
10. Increases temperature.
11. Decreases temperature.
12. Start/Stop functions.
13. Increases time and
toast/bagel shade level.
14. Decreases time and
toast/bagel shade level.
* All preset times/tempertures
can be adjusted as desired.
REHEAT
RECALENTAR
RÉCHAUFFER
KEEP WARM
CALENTAR
CHAUD
IN THE EVENT OF FOOD FLARE-UP KEEP DOOR CLOSED AND UNPLUG POWER CORD. FOR BEST RESULTS PREHEAT 5 MINUTES.
EN CASO DE LLAMARADA, DESCONECTE EL CABLE Y MANTENGA CERRADA LA PUERTA DEL HORNO.
PARA MEJORES RESULTADOS PRECALIENTE EL HORNO POR LO MENOS 5 MINUTOS.
TOAST
TOSTAR
GRILLAGE
BROIL
ASAR
GRILLER
BAKE
HORNEAR
CUISSON
BAGEL
PANES
PAINS
PIZZA
CONVECTION
CONVECCIÓN
CONVECTION
STAY ON
ENCENDIDO
EN MARCHE
SI LES ALIMENTS S’ENFLAMMENT, GARDER LA PORTE FERMÉE ET DÉBRANCHER LE CORDON ÉLECTRIQUE.
AFIN D’OPTIMISER LES RÉSULTATS DE CUISSON RÉCHAUFFER LE FOUR PENDANT 5 MINUTES
1
10 13
11 14
12
2
3
4
5
6
7
8
9

6
How to Use
This product is for household use only.
GETTING STARTED
• Remove all packing material and any stickers; peel off clear protective film from
control panel.
• Please go to www.prodprotect.com/applica to register your warranty.
• Wash all removable parts as instructed in CARE AND CLEANING section of this
manual.
• Select a location where this unit is to be used allowing enough space for back of
the unit and the wall to allow heat to flow without damage to cabinets and walls.
• Insert crumb tray below lower heating elements.
• Remove tie from cord and unwind.
• Plug unit into electrical outlet. The digital display shows 0:00
• This oven gets hot. When in use, always use oven mitts or potholders when
touching any outer or inner surface of the oven.
Note: Before first use, run this oven empty for
15 minutes to remove/burn off any possible residues from manufacturing. You may
notice some slight smoke and odor escaping from the oven. This is normal and will
disappear with use of oven.
HELPFUL INFORMATION ABOUT YOUR OVEN
• There is a 2 minute delay allowed between selecting functions and setting
temperature and time. If not done within this time the oven goes into sleep mode
and selections must be made again. Press any button to wake unit up.
• Once the selected temperature has been reached both the time and temperature
can be changed at anytime during the cooking.
• When using convection it is not necessary to change the temperature from
that suggested by the package or the recipe. However, the baking time may be
shorter; check foods frequently during baking to check for doneness.
• The oven is preset for temperature and time for medium toast (4 setting). Use
this for your first cycle then adjust lighter or darker to suite your taste.
C A UT IO N
THIS OVEN GETS HOT. WHEN
IN USE, ALWAYS USE OVEN
MITTS OR POT HOLDERS
WHEN TOUCHING ANY OUTER
OR INNER SURFACE OF THE
OVEN
THIS OVEN GETS HOT.
WHEN IN USE, ALWAYS USE OVEN
MITTS OR POTHOLDERS WHEN
TOUCHING ANY OUTER OR INNER
SURFACE OF THE OVEN.
CAUTION

7
• What is convection? Convection uses an internal fan that provides continuous
circulation of hot air around the cooking food; the food is more evenly cooked and in
some cases, is cooked faster.
SLIDE RACK POSITIONS
There are 2 possible positions for the slide racks. There is an upper (Broil only) and a
lower slot.
TO BEGIN COOKING
1. Select type of food to be cooked: a digital display will show a preset temperature.
Press and hold the two TEMP buttons for 3 seconds to change from °F to °C.
2. To see preset temp: press the TEMP (▲) or (▼). To change temp press (▲) or (▼)
(TEMP) button.
Note:
• Tap button for temperature to change in 5 degree increments
• Press and hold to change faster.
• The minimum temperature is 150 °F.
• The maximum temperature is 450 °F.
3. To see preset time: press the TIME (▲) or (▼). To change time press (▲) or (▼)
(TIME) button.
Note:
• Tap button for time to change in 1 minute increments
• Press and hold to change faster
• The minimum time is 1 minute
• The maximum time is 2 hours
4. To cook longer then 2 hours, select STAY ON by pressing (▼) (TIME) button passed (0)
until the digital display shows (
REHEAT
RECALENTAR
RÉCHAUFFER
KEEP WARM
CALENTAR
CHAUD
IN THE EVENT OF FOOD FLARE-UP KEEP DOOR CLOSED AND UNPLUG POWER CORD. FOR BEST RESULTS PREHEAT 5 MINUTES.
EN CASO DE LLAMARADA, DESCONECTE EL CABLE Y MANTENGA CERRADA LA PUERTA DEL HORNO.
PARA MEJORES RESULTADOS PRECALIENTE EL HORNO POR LO MENOS 5 MINUTOS.
TOAST
TOSTAR
GRILLAGE
BROIL
ASAR
GRILLER
BAKE
HORNEAR
CUISSON
BAGEL
PANES
PAINS
PIZZA
CONVECTION
CONVECCIÓN
CONVECTION
STAY ON
ENCENDIDO
EN MARCHE
SI LES ALIMENTS S’ENFLAMMENT, GARDER LA PORTE FERMÉE ET DÉBRANCHER LE CORDON ÉLECTRIQUE.
AFIN D’OPTIMISER LES RÉSULTATS DE CUISSON RÉCHAUFFER LE FOUR PENDANT 5 MINUTES
).
5. CONVECTION is automatically selected for the BAKE, PIZZA, KEEP WARM, and
REHEAT functions. To turn off press CONVECTION button and indicator light
will go off.
6. Press the START/STOP button to start cooking. The oven starts pre-heating
and the display will blink until the selected temperature is reached. The oven
will beep 3 times.
7. To see the TIME or TEMP while cooking, press
(▲) or (▼) or (TEMP) buttons
8. At end of cooking cycle oven turns off and there are 2 beeps.
9. If using STAY ON turn the oven OFF when the cooking cycle is completed.
10. Time and temperature can be changed throughout the cooking phase.
11. End the cooking cycle at any time by pressing the START/STOP button.
12. CONVECTION can be turned on or off at any time, during the cooking phase.
Note:
Keep oven unplugged when not in use.

8
BAKE FUNCTION
Preset temperature: 350°F
Preset Time: 30 minutes
Rack position: lower slot
This function is ideal for baking casseroles, fresh or frozen pies and roasting meats and
poultry.
1. Place rack in lower slot.
2. Press BAKE button.
3. On indicator light blinks, YOU HAVE 2 MINUTES TO PROCEED.
4. Preset temperature flashes on digital display. To change temperature press (▲) or
(▼) (TEMP) button.
5. To see or change time press (▲) or (▼) (TIME) button.
6. Press START/STOP button to begin cooking.
7. Oven begins preheating; the display will blink until the selected temperature is
reached; the oven will beep 3 times.
8. At end of cooking cycle, unit beeps and oven turns off.
CONVECTION FUNCTION
This function uses an internal fan to distribute the heat evenly.
The CONVECTION button can be selected anytime once the BAKE, PIZZA, KEEP WARM,
or REHEAT functions have been selected. The indicator light will turn on.
Note: Some foods will bake faster than expected; watch cooking time.

9
PIZZA:
Preset temperature: 400˚F
Preset Time: 20 minutes
Rack position: lower slot
For crisp crust bake pizza directly on oven rack. For softer crust place pizza on double
layer of heavy duty foil. For even browning, turn pizza quarter turn half way through
baking.
BROIL FUNCTION
Preset temperature: 450˚ F
Preset Time: 20 minutes
Rack position: upper slot
1. Press BROIL button.
2. The digital display shows the preset temperature 450˚ F. To change temperature
press (▲) or (▼) (TEMP).
3. To change time press (▲) or (▼) (TIME) button.
4. Place food on cooking rack, and place back pan under cooking rack either in
the same rack slot or one below.
5. Allow at least 1,5" (3.81 cm) between top of food and top heating elements.
6. Close oven door.
7. Press START/STOP button to begin cooking.
8. At end of cooking cycle, unit beeps and oven turns off.
TOASTING BREAD AND BAGELS
Preset : 4 Medium
Rack position: lower slot
The oven is preset for temperature and time for medium toast (4 setting). Use this for
your first cycle then adjust lighter or darker to suite your taste.
Note: The BAGEL function toasts the cut side and gently warms the outside .
1. Preheating is not necessary.
2. Place up to 6 slices of bread or 6 bagels halves (cut side up) on slide rack.
3. Close oven door.
4. Press Toast or BAGEL button.
5. The indicator light blinks and the digital display shows “4”.
6. To change the shade level press (▲) or (▼) (TOAST) buttons.
7. Press START/STOP button to begin toasting.
8. At end of toasting cycle the appliance beeps and the oven turns off.
Tip for multiple toasting cycles:
For best results when making consecutive batches of toast, allow a short
cooldown period between toasting cycles.

10
Care and Cleaning
This product contains no user serviceable parts. Refer service to qualified service
personnel.
1. Turn off unit, unplug from wall outlet and let it cool before cleaning.
2. Clean the glass door with a nylon pad and sudsy water. Do not use a spray
glass cleaner.
3. To remove slide rack, open the door, pull the rack forward and out. Wash
in warm, sudsy water or in a dishwasher. To remove stubborn spots, use a
polyester or nylon pad. To replace the slide rack, open the door completely
and slide into the rail and close the door.
4. Wash the bake pan, broil rack, in warm, sudsy water. To minimize scratching,
use a polyester or nylon pad.
5. To remove the crumb tray, pull it out. Dispose of crumbs and wash the tray in
warm, sudsy water. Remove stubborn spots with a nylon mesh pad. Be sure to
dry thoroughly before inserting the tray back into the oven.
EXTERIOR SURFACES
Important: The oven surface gets hot; be sure the oven has cooled completely
before cleaning.
Let the oven cool completely before cleaning any outer surface. Wipe with a damp
cloth or sponge and dry with paper towel or soft cloth.
COOKING CONTAINERS
• Metal, ovenproof glass or ceramic bake ware without glass lids can be used
in your oven. Follow manufacturer’s instructions.
• Be sure the top edge of the container is at least 1.5" (3.81 cm) away from the
upper heating elements.

11
NEED HELP?
For service, repair or any questions regarding your appliance, call the appropriate 800
number on cover of this book. Please DO NOT return the product to the place of purchase.
Also, please DO NOT mail product back to manufacturer, nor bring it to a service center.
You may also want to consult the website listed on the cover of this manual.
Two-Year Limited Warranty
(Applies only in the United States and Canada)
What does it cover?
• Any defect in material or workmanship provided; however, liability will not exceed the
purchase price of product.
For how long?
• Two years after date of purchase.
What will we do to help you?
• Provide you with a reasonably similar replacement product that is either new or factory
refurbished.
How do you get service?
• Save your receipt as proof of date of sale.
• Visit the online service website at www.prodprotect.com/applica, or call toll-free
1-800-231-9786, for general warranty service.
• If you need parts or accessories, please call 1-800-738-0245.
What does your warranty not cover?
• Damage from commercial use
• Damage from misuse, abuse or neglect
• Products that have been modified in any way
• Products used or serviced outside the country of purchase
• Glass parts and other accessory items that are packed with the unit
• Shipping and handling costs associated with the replacement of the unit
• Consequential or incidental damages (Please note, however, that some states do
not allow the exclusion or limitation of consequential or incidental damages, so this
limitation may not apply to you.)
How does state law relate to this warranty?
• This warranty gives you specific legal rights. You may also have other rights that vary
from state to state or province to province.

36
2012-10-30_186 E/F Rev.01
Made and Printed in People’s Republic of China
Fabricado e Impreso en la República Popular de China
Fabriqué et Imprimé en République populaire de Chine.
© 2013 Applica Consumer Products, Inc.
a subsidiary of Spectrum Brands, Inc.
una subsidiaria de Spectrum Brands, Inc.
Une filiale de Spectrum Brands, Inc.
BLACK & DECKER and the BLACK & DECKER Logo are registered trademarks of The Black & Decker
Corporation, or one of its affiliates, and used under license.
BLACK & DECKER y el logo BLACK & DECKER son marcas registradas de The Black & Decker Corporation o
de una de sus compañias afiliadas y se utilizan bajo licencia.
Le nom et le logo BLACK & DECKER sont des marques déposées de The Black & Decker Corporation, ou une
de ses sociétés affiliées, et sont utilisés sous licence.
/