Tiger JBX-B User manual

Category
Rice cookers
Type
User manual
JBX-B
JBX-B10U
JBX-B18U
炊飯ジャー
取扱説明書
は、ガー炊飯お買い上げい
使用に前にの取扱説明書を最後お読い。
いつでも参照できるように保管してください。
家庭
전기밥솥
취급 설명서
타이거 전기밥솥을 구매해 주셔서 대단히 감사합니다.
사용하시기 전에 본 취급설명서를 끝까지 자세히 읽어주시기 바랍니다.
언제든지 볼 수 있도록 보관해 주십시오.
가정
炊飯電子鍋
使用說明書
家庭
感謝您購買TIGER(虎牌)炊飯電子鍋。
使用前請務必仔細閱讀本操作說明書的全部內容。
並將本說明書妥善保管,以便隨時參閱。
Pour usage domestique
Cuiseur à riz réchaud
MODE D'EMPLOI
Utilisation sur 120 V uniquement
Nous vous remercions d'avoir fait l'achat d'un cuiseur à riz/chauffe-riz TIGER.
Veuillez lire ces instructions avant d'utiliser le produit et les conserver pour référence
ultérieure.
Rice Cooker / Warmer
OPERATING INSTRUCTIONS
For household use
120 V Usage Only
Thank you for purchasing a TIGER rice cooker/warmer.
Please read these instructions prior to use and save them for future reference.
120V專用
120V 전용
120V専用
3
2
GARANTIES DE SÉCURITÉ IMPORTANTES
Lors de l’utilisation d’appareils électriques, vous devez suivre les précautions de sécurité de
base à tout moment y compris les points suivants :
1. Lire toutes les instructions.
2. Ne pas toucher les surfaces chaudes. Utiliser des poignées ou des boutons.
3. Pourseprotégercontretouteélectrocution,nepasimmergerlecordon,leschesou
l’appareil dans l’eau ou dans tout autre liquide.
4. L’utilisation de l’appareil par des enfants ou à proximité d’eux doit être sous stricte
supervision.
5. Débrancher l’appareil de la prise murale lorsqu’il n’est pas utilisé ou avant de le nettoyer. Le
laisser refroidir avant d’ajouter ou d’enlever des pièces.
6. Ne pas utiliser d’appareil avec un cordon ou une prise endommagés ou après un mauvais
fonctionnement ou s’il a été endommagé de quelque manière que ce soit. Porter l’appareil
auserviceaprès-venteautoriséleplusprochepourvérication,réparationouréglage.
7. L’utilisation d’accessoires supplémentaires non recommandés par le fabricant de l’appareil
risque de provoquer des blessures.
8. Ne pas utiliser l’appareil à l’extérieur.
9. Ne pas laisser le cordon pendre sur le bord d’une table ou d’un comptoir ou toucher des
surfaces chaudes.
10. Ne pas placer sur ou à proximité d’une cuisinière à gaz ou électrique, ou dans un four
chaud.
11. Faire très attention en déplaçant un appareil contenant de l’huile ou tout autre liquide
chauds.
12.Toujoursbrancherenpremierlapriseaucuiseuràriz,puislacheducordonàlaprise
murale.Pourdébrancher,mettretouslesboutonssur“o”,puisretirerlachedelaprise
murale.
13. Ne pas utiliser le cuiseur à riz pour tout autre fonction que celle à laquelle elle est destinée.
14. Risque d’électrocution, cuire uniquement dans le récipient amovible.
15. Ne pas utiliser ailleurs que sur un comptoir.
16. AVERTISSEMENT: Les aliments renversés peuvent causer de graves brûlures. Gardez
l’appareil et le cordon hors de portée des enfants. Ne jamais laisser reposer le cordon sur
le rebord du comptoir, ne jamais utiliser la prise sous le comptoir et ne jamais l’utiliser avec
une rallonge.
17.SAUVEGARDER CES INSTRUCTIONS.
Touteréparationdoitêtreeectuéeparunréparateurautorisé.
Cet appareil est destiné à un usage domestique.
Uncordond’alimentationcourtestutiliséanderéduirelerisquequedesenfantsl’attrapent,s’y
emmêlent ou trébuchent sur un cordon plus long.
L’appareil n’est pas conçu pour être utilisé par des personnes (y compris des enfants) ayant
unedéciencephysique,sensorielleoumentaleréduite,ouunmanqued’expérienceetde
connaissances, à moins qu’elles soient sous surveillance ou qu’elles aient reçu des instructions
concernant l’utilisation de l’appareil par une personne responsable de leur sécurité. Les enfants
doivent être surveillés pour s’assurer qu’ils ne jouent pas avec l’appareil.
Les instructions suivantes sont applicables à 120V seulement.
IMPORTANT SAFEGUARDS
When using electrical appliances, basic safety precautions should always be followed including
the following:
1. Read all instructions.
2. Do not touch hot surfaces. Use handles or knobs.
3. To protect against electrical shock do not immerse cord, plugs, or appliance in water or
other liquid.
4. Close supervision is necessary when any appliance is used by or near children.
5. Unplug from outlet when not in use and before cleaning. Allow to cool before putting on or
takingoparts.
6. Do not operate any appliance with a damaged cord or plug or after the appliance
malfunctions or has been damaged in any manner. Return appliance to the nearest
authorized service facility for examination, repair, or adjustment.
7. The use of accessory attachments not recommended by the appliance manufacturer may
cause injuries.
8. Donotuseoutdoors(thisitemmaybeomittediftheproductisspecicallyintendedfor
outdoor use).
9. Do not let cord hang over edge of table or counter, or touch hot surfaces.
10. Do not place on or near a hot gas or electric burner, or in a heated oven.
11. Extreme caution must be used when moving an appliance containing hot oil or other hot
liquids.
12.Alwaysattachplugtoappliancerst,thenplugcordintothewalloutlet.Todisconnect,turn
anycontrolto“o”,thenremoveplugfromwalloutlet.
13. Do not use appliance for other than intended use.
14. Risk of electric shock, cook only in removable container.
15. Intended for countertop use only.
16. WARNING: Spilled food can cause serious burns. Keep appliance and cord away from
children. Never drape cord over edge of counter, never use outlet below counter, and
never use with an extension cord.
17. SAVE THESE INSTRUCTIONS.
Servicing should be performed by an authorized service representative.
This appliance is intended for household use.
A short power-supply cord is used to reduce the risk resulting from it being grabbed by chil-
dren, becoming entangled in, or tripping over a longer cord.
The appliance is not intended for use by persons (including children) with reduced physical,
sensory or mental capabilities, or lack of experience and knowledge, unless they have been
given supervision or instruction concerning use of the appliance by a person responsible for
their safety.
Children should be supervised to ensure that they do not play with the appliance.
The following instructions are applicable to 120V only.
55
4
English
Contents
1 Important Safeguards ................................................................................................. 5
2 Names and Functions of Component Parts ........................................................... 10
Menu options and features ...................................................................................... 12
Tips on making delicious rice .................................................................................. 13
3 Before Cooking Rice ................................................................................................. 15
4 How to Cook Rice ..................................................................................................... 17
Cooking time guidelines .......................................................................................... 18
5 Once Rice Is Finished Cooking ............................................................................... 19
6 Using the Timer Function ......................................................................................... 20
7 Keeping Rice Warm .................................................................................................. 22
8 Cooking Rice and Side Dishes Together ................................................................ 23
9 Slow Cooking ............................................................................................................ 26
10 Steaming Food in the Cooking Plate ...................................................................... 28
11 Cleaning and Maintenance ....................................................................................... 31
12 Rice Does Not Cook Properly ................................................................................. 36
13 Synchro-Cooking Does Not Work Properly ............................................................ 38
14 Cooking and Steaming Does Not Work Properly ................................................... 39
15 Troubleshooting ....................................................................................................... 40
If this indication appears .......................................................................................... 41
Setting the current time ............................................................................................ 42
Specications ............................................................................................................ 43
When a power outage occurs or the appliance plug is disconnected ................. 43
Purchasing consumables and optional accessories ............................................ 43
Use only the rated voltage.
Use of any other power supply voltages
maycausereorelectricshock.
Use an electrical outlet rated for 15 A
or higher and do not plug in other
devices at the same time.
Connecting other devices to the same
outlet may cause the outlet to overheat,
resultinginre.
Do not use a damaged power cord.
Do not damage the power cord.
Topreventreandelectricshock,do
not modify, forcefully bend, pull, twist or
fold the cord. Do not place the cord near
high temperature surfaces or under/
between heavy objects.
Wipe the power plug thoroughly if
dust or other foreign objects are
collected on it.
Failuretodosomaycausere.
If the power cord is damaged,
purchase a replacement cord from an
authorized service representative.
Otherwise, a malfunction or accident
may occur.
Insert the power plug completely into
the outlet.
Failure to do so may cause electric
shock,shortcircuits,smokeorre.
Read and follow all safety instructions before using the rice cooker.
• The WARNINGS and CAUTIONS described below are intended to protect the user and other individuals
from physical and property damage. To ensure safety, please follow them carefully.
• Do not remove the caution/warning labels attached to the rice cooker.
Thesafetyinstructionsareclassiedanddescribedaccordingtothelevelofharmanddamagecausedby
improper use, as shown below.
WARNING
1
Important Safeguards
WARNING
This symbol indicates there is
a possibility of serious injury or
death
*1
when the product is handled
improperly.
CAUTION
This symbol indicates there is a
possibility of minor or moderate injury
*2
or damage to property
*3
when the
product is handled improperly.
*1“Seriousinjury”isdenedhereaslossofsight,physicalinjury,
burns (high and low temperature), electric shock, broken
bones, poisoning or other injuries severe enough to involve
permanent damage and require hospitalization or extended
outpatient care.
*2“Minorormoderateinjury”isdenedhereasaphysicalinjury,
burns, or electric shock that does not require a hospital stay or
extended outpatient care.
*3“Damagetoproperty”isdenedhereasdamagethataectsa
building, furniture, livestock, or pets.
Description of Symbols
indicates a warning or
caution.Thespecicdetails
of the warning or caution are
indicated inside the symbol or
in an illustration or text near
the symbol.
indicates a prohibited
action.Thespecicdetails
of the prohibited action are
indicated inside the symbol or
in an illustration or text near
the symbol.
indicates an action that
must be taken or an instruction
that must be followed. The
specicdetailsoftheactionor
instruction are indicated inside
the symbol or in an illustration
or text near the symbol.
7
6
7
6
1
Important Safeguards
English
Keep the appliance plug out of the
reach of small children.
Do not allow them to place the appliance
plug in their mouths.
Doing so may cause electric shock,
shortcircuitsorre.
Keep the appliance plug away from
metal object and/or dust.
This is to avoid electric shock, short
circuitsorre.
Be sure to use the specied power
cord only. Do not use the power cord
for any other devices.
Doingsomaycausemalfunctionorre.
Do not use the rice cooker when
the power cord or the power plug is
damaged or the plug is loose in the
outlet.
Doing so may cause electric shock,
shortcircuitsorre.
Do not touch
the unit with
wet hands
Do not handle the power plug with
wet hands when in use.
Doing so may cause electric shock or
injury.
Never open the lid during cooking.
Doing so may cause burns.
Do not touch
Do not place your face or hands near
the steam vent.
Doing so may cause burns. Never allow
small children near the steam vent.
Do not allow children to use the rice
cooker by themselves and do not use
the rice cooker within the reach of
small children.
Doing so may cause burns, electric
shock or injury.
Never immerse
the unit in water
or other liquid
Do not immerse the rice cooker in
water or splash water over the rice
cooker.
Doing so may cause short circuits and
electric shock.
Do not expose the power plug to
steam.
When using the rice cooker on a sliding
table, be careful not to expose the power
plug to steam. Doing so may cause
electricshockorre.
Do not insert any metal objects, such
as pins, wires etc., into any gaps
between the parts.
Doing so may cause electric shock or
malfunction.
Disassembly
is prohibited
Do not attempt to modify the rice
cooker. Disassembly or repairs
should be performed only by an
authorized service representative.
Otherwise,re,electricshockorinjury
may occur.
Do not use the rice cooker in any
way not described in the instruction
manual (supplied COOKBOOK).
Steam or contents may spray out,
causing burns or other injuries.
Examples:
• Heating ingredients and seasonings
inside of plastic cooking bags, etc.
• Using parchment paper to cover food
in the rice cooker.
This rice cooker is for household use.
Exercise caution when it is used in the
following environments:
Store/ocekitchens,etc.
• Agricultural facilities
• Hotel guest rooms or similar
accommodation-type environments
• Guest houses or similar
accommodation-type environments
WARNING
In case of any malfunction or failure,
immediately stop use of rice cooker.
Using the rice cooker with a problem
maycausere,electricshockorinjury.
Examples of malfunction and failure:
• The power cord and/or power plug
become abnormally hot.
• Smoke comes out of the rice cooker or
a burning odor is detected.
• The rice cooker is cracked or there are
loose parts.
• The inner pot is deformed.
• There are other problems or
abnormalities.
Immediately unplug the power plug from
the outlet and contact an authorized
service representative for inspection/
repair service.
Do not use the rice cooker on an
unstable surface, a heat sensitive
table, or mat.
Doingsomaycausereordamageto
the table or mat.
Do not use the rice cooker on a
sliding tabletop that does not have
sucient load bearing capacity.
Otherwise, the rice cooker may fall,
resulting in injury, burns or malfunction.
Check that the load bearing capacity is
sucientbeforeuse.
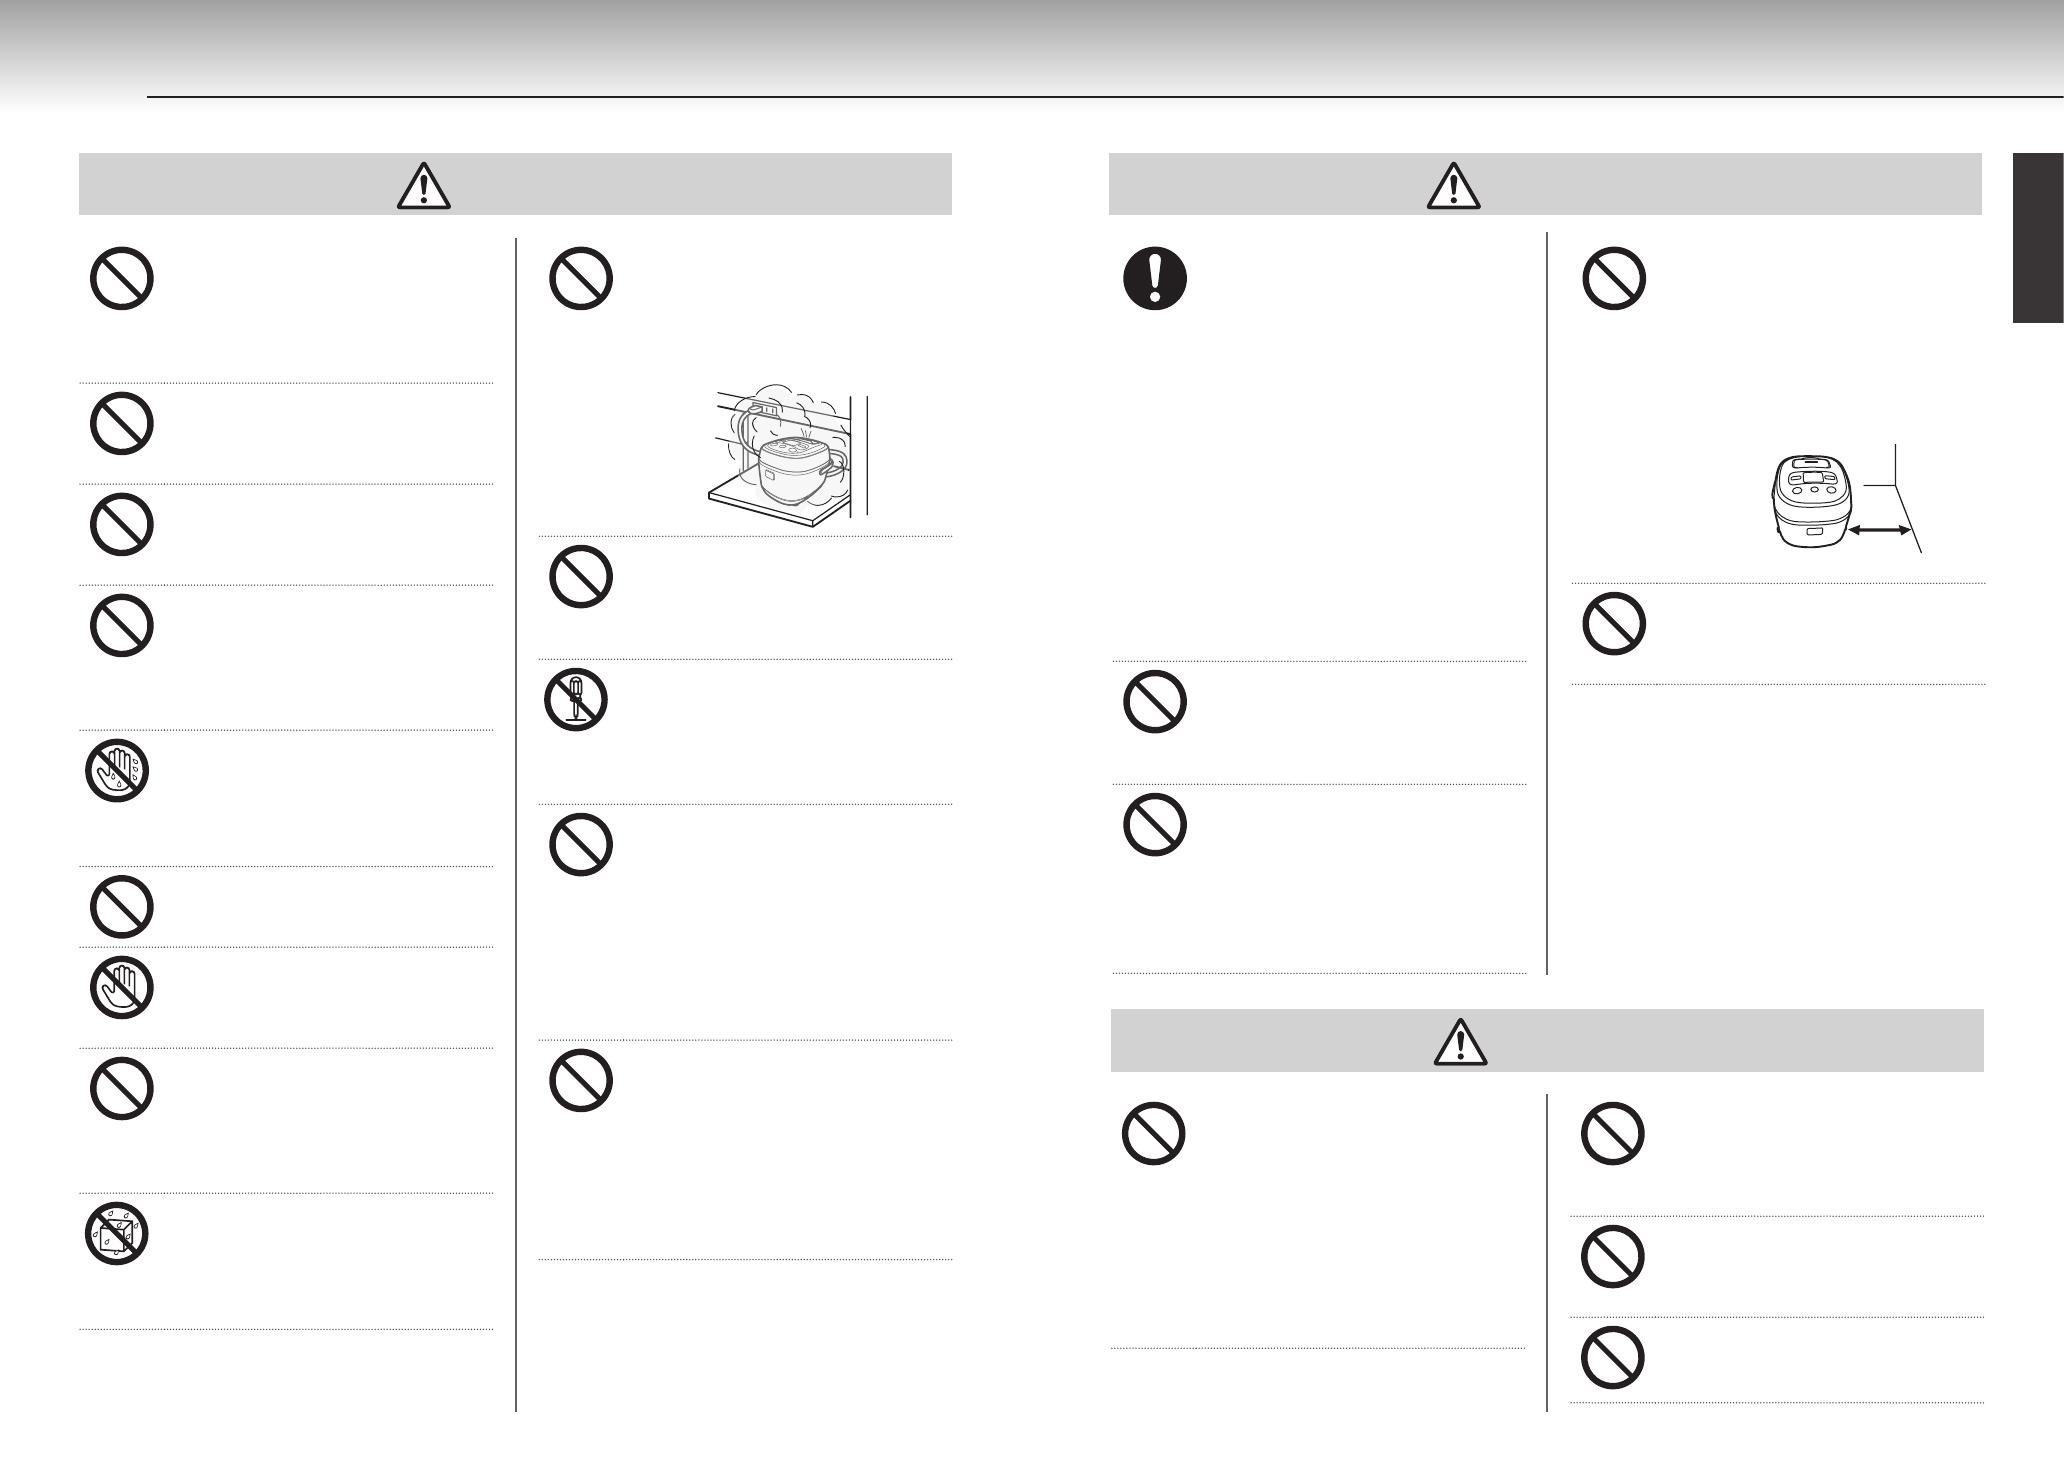
Do not use the rice cooker near walls
or furniture.
Steam and heat may cause damage,
discoloration and/or deformation. Use
the rice cooker at least 11.8 inches (30
cm) away from walls or furniture. When
using the rice cooker on a kitchen rack
or cabinet, make sure that steam is not
trapped.
At least 11.8 inches (30 cm)
Do not use the cooking plate without
the inner pot.
Doingsomaycausere,smoke,or
burns.
CAUTION
WARNING
Do not use the rice cooker in a small
space where the operation panel is
exposed to steam.
Steam and heat may cause deformation
of the operation panel and/or damage,
discoloration, deformation and/or
malfunction of the rice cooker. When
using the rice cooker on a sliding
tabletop, pull the tabletop out so that the
operation panel is not exposed to the
emitted steam.
Do not use the rice cooker near a
heat or water source.
Doing so may cause electric shock,
shortcircuits,reand/ordeformationor
malfunction of the rice cooker.
Use only the inner pot made
exclusively for this rice cooker.
Using any other pot may cause
overheating or malfunction.
Do not cook with the inner pot empty.
Doing so may cause overheating or
malfunction.
9
8
9
8
1
Important Safeguards
English
Follow the safety instructions
in order to use your rice cooker
safely.
Remove any cooked rice or remaining grains of
rice.
Failure to do so may cause steam to leak or
contents to boil over. This may cause malfunction
or improperly cooked rice.
Do not cover the rice cooker
with a cloth or any other
objects during cooking.
Doing so may cause the rice
cooker or the lid to become
deformed or discolored.
Do not store cooled rice in the rice cooker.
Doing so may cause unpleasant odors.
The holes in the rice cooker are designed to
maintain its functions and performance. In
extremely rare cases, dust or even insects may
enter these holes and cause malfunction. To
prevent this, a commercially available insect
prevention sheet, etc., is recommended. If a
malfunction does occur due to this problem, the
repair is not covered by warranty. Contact an
authorized service representative for repair.
Theuorocarbonresincoatingontheinner
pot may wear and peel with extended use. It is
harmless to humans and does not interfere with
actual cooking or the heat insulating capability of
the rice cooker.
If deformation or corrosion is found on the inner
pot, a new inner pot may be purchased. Contact
an authorized service representative for purchase.
Strictly observe the following instructions to
keeptheuorocarbonresincoatingoftheinner
pot from becoming scratched, deformed, or
peeling.
• Do not place the inner pot directly over a gas,
electric, or IH stove top or in a microwave
oven.
• Do not keep anything other than white rice or
rinse-free rice warm in the rice cooker.
• Do not use vinegar inside the inner pot.
• Use only the supplied spatula or a wooden
spatula.
• Do not use hard or sharp utensils such as
metal ladles, spoons, or whisks.
• Do not place a basket inside the inner pot.
• Do not place dishes, hard utensils, or other
hard objects inside the inner pot.
• Do not clean the inner pot using hard
materials such as metal spatulas or nylon
scrubbing sponges.
• Do not use a dishwasher/dryer to clean the
inner pot.
• Be careful not to scratch the inner pot when
rinsing rice in it.
If the inner pot becomes deformed, contact an
authorized service representative.
CAUTION
Do not use the rice cooker on an IH
cooking heater.
Doing so may cause malfunction.
Be careful about any escaping steam
when opening the lid.
Exposure to steam may cause burns.
Do not touch
Do not touch high-temperature
surfaces during or immediately after
cooking.
Doing so may cause burns.
Do not handle the inner pot with
bare hands when the rice cooker
is in operation or immediately after
cooking. Be sure to use oven mitts to
pick up the inner pot.
Touching the hot pot may cause
injuries.
Inner pot
Unplug the
power cord
Unplug the power plug when not in
use.
This is to avoid injury, burns, electric
shock,shortcircuitsorrecausedby
insulation deterioration.
Be sure to hold the power plug when
removing it from an outlet.
Otherwise, electric shock, short circuits,
orremayoccur.Donotpullthecord
itself.
Do not use multiple appliances on the
same outlet.
Doingsomaycausere.
Handle the rice cooker with care.
Dropping the rice cooker or exposing it
to a strong impact may cause injury or
malfunction of the rice cooker.
Wait until the rice cooker has cooled
down before cleaning it.
Touching the hot surfaces may cause
burns.
Do not wash the entire rice cooker.
Do not wash the main body or pour
water into the main body or the base.
Doing so may cause short circuits and
electric shock.
Do not move the rice cooker while it
is cooking.
Doing so may cause the contents to
spill, resulting in burns.
Do not touch
Do not touch the lid open button
while carrying the rice cooker.
Doing so may cause the lid to open,
resulting in injury or burns.
Do not use the cooking plate in any
other appliances.
Doingsomaycausereorburns.
11
10
English
2
Names and Functions of Component Parts
Lid
Heating plate
Lid gasket
Carrying handle
Used when carrying the
rice cooker
Center sensor
Inner pot
Upper casing
Lid open button
Push to open
the lid
Steam vent
Heater plate
Power plug
(Insert in an outlet)
Power cord
Appliance plug
(Insert in an appliance plug
inlet)
Appliance plug
inlet
Steam cap
Inner lid
Inner lid gasket
Inner lid button
Not removable.
Do not attempt to
remove.
(See P 32 to 33)
Not removable.
Do not attempt to
remove.
Tab
Lid sensor
Operation panel
[Hour] and [Min] keys
Used to set current time
and adjust Timer function.
[Menu] key
Used to select the desired cooking menu.
Keep Warm lamp
Lit when the Keep Warm
function is on.
[Keep Warm/Cancel] key
Used to keep rice warm
and to cancel the current
operation.
Display
Displays the
symbol (menu
cursor) and the current time, etc.
[Start] key
Used to start cooking rice and
food, etc.
The small projections (
) on the [Start] and [Keep Warm/Cancel] keys are to aid persons with a visual impairment.
Start lamp
Lit during cooking, etc.
Checking the accessories
Spatula
COOKBOOK
Cooking plate
Exclusive measuring cup
Approximately 5.29 oz
The spatula
can be
placed on
rice cooker
For rst time use
Wash inner pot and accessories before using
them. (See P 31)
Sounds emitted by the rice cooker
The following sounds coming from the rice cooker
during cooking, steaming, or when the Keep Warm
function is on are normal and do not indicate a problem:
• Clicking sound (This is the sound of the
microcomputer controller.)
• Scraping sound (This is the sound of metal
contracting and rubbing together due to heat.)
• Sound like boiling water (Only during cooking or
steaming.)
Lithium battery
The rice cooker has a built-in lithium battery. It
stores the current time and the preset timer settings
even with the power plug disconnected.
Ifthelithiumbatteryrunsout,“0:00”willblink
on the display when the power plug is plugged
back in. The rice cooker can still cook normally,
however, the current time, preset timer settings,
and elapsed Keep Warm time are deleted when
the power plug is disconnected.
Note
Do not attempt to replace the lithium battery
yourself.
To replace the lithium battery, contact an
authorized service representative.
Checking the current time
The time is displayed in a 12-hour format. Adjust the
time if the correct time is not displayed. (See P 42)
[Timer] key
Used to set the timer.
Timer lamp
Lit or blinks when the
Timer function is set.
Lid hook
13
12
12
English
Menu options and features
Menu
Timer
function
availability
Keep
Warm
function
availability
Feature
Plain
Cooks white rice (long-grain rice).
Synchro-Cooking
* Cooks rice and side dishes together using the cooking plate.
Quick
Quickly cooks white rice (long-grain rice).
Short
Cooks white rice (short-grain rice).
Mixed
Cooks seasoned rice.
Brown
Cooks brown rice or multigrain brown rice (brown rice mixed with
other grains).
Porridge
Cooks porridge.
See P 43 for cooking capacities
: Available
: Not available
:DonotusetheKeepWarmfunctiontoensurethemaximumavorofcookedrice.
* Remove the cooking plate from the rice cooker before using the Keep Warm function.
Note
Whenusingthe“Porridge”menu,porridgecanbecomepastyifkeptwarmfortoolong.Serveassoon
as possible.
Tips on making delicious rice
Select quality rice and a good storage
location.
• Choose freshly polished, glossy rice with a
uniform grain size.
• Store rice in a cool, dark and well ventilated
place.
Carefully measure the rice using the
supplied measuring cup.
1cup(levellling)is
approximately 0.18 L.
Use the supplied
measuring cup for
rinse-free rice as well.
Rinse the rice quickly.
Pour rice in the inner pot and add plenty of water.
Lightly stir the rice and discard the water quickly.
Use cold water and quickly rinse the rice by hand
so that the rice does not absorb the starchy water.
Cooking rinse-free rice
• Add rinse-free rice and water, and then stir well
from the bottom so that every individual grain
of rice becomes immersed in the water. Merely
adding water to the rice prevents it from soaking
in the water and may cause improperly cooked
rice.
• If the added water turns white, it is recommend
to rinse the rice thoroughly by replacing the
water once or twice. The water turning white
is due to starch in the rice and not its bran.
Cooking the rice with the starch left in the water
may lead to burned rice, the contents boiling
over or improperly cooked rice.
Adding other ingredients to rice
The total amount of ingredients should be no
more than 2.5 oz (approx. 70 g) per cup of
rice. Mix seasonings well and then add other
ingredients on top of the rice. If other ingredients
are to be added to the rice, be sure to use no
more than the acceptable maximum amount (see
the table below).
Menu 5.5-cup Cooker 10-cup Cooker
Mixed 3 cups 6 cups
Brown 3 cups 5 cups
• Do not open the lid during cooking to add other
ingredients.
• Add water prior to adding the ingredients.
Adding water after the ingredients may result in
thecookedricebeingtoorm.
• The following cases may result in improperly
cooked or burned rice.
• Adding too much of seasonings such as soy
sauce, sweet cooking rice wine, etc.
• Seasonings settle at the bottom
• Ketchup or tomato sauce is added
• Other ingredients are mixed with rice
• When adding ingredients to porridge, add
water to the rice so that the water level after the
ingredients are added is not over the top line for
porridge.
Add water according to the type of rice
and your personal preference.
Amount of water to add
If adding more or less water than the
recommended amount, do not deviate from that
amount by any more than 1/3 of one line. Doing
so may cause the contents to boil over.
Menu
Corresponding scale (Use the
corresponding scale on the inner pot
as a reference.)
Plain “Plain”scale
Synchro-Cooking “Plain”scale
Quick “Plain”scale
Short “Plain”scale
Mixed “Plain”scale
Brown “Brown”scale
Porridge
Hardporridge:“Porridge•hard”scale
Softporridge:“Porridge•soft”scale
Whencookingrinse-freerice,usethe“Plain”
scale as a reference but add a little extra water
(until it just covers the corresponding line).
• When cooking germinated brown rice, whole
rice, semi-polished rice, barley rice, or multigarin
rice,usethe“Plain”scaleasareference.
Iftheamountofwatertoaddisspeciedona
package of germinated brown rice or multigrain
brown rice, follow the directions on the package
and add water according to your personal
preference.
Read P 15 to16 for preparations to
cook rice and P 17 to 21 on how to
cook rice.
1515
14
English
Cooking semi-polished rice, whole rice,
barley rice, germinated brown rice, or
multigrain
Selectthe“Short”menu.
Whencookingporridge,selectthe“Porridge”
menu.
Cooking brown rice or multigrain brown
rice mixed in with white rice
• Multigrain brown rice is a mixture of brown rice
and multigrain.
• If the rice to be cooked includes more brown rice
or multigrain brown rice than white rice, select
the“Brown”menu.
Selectthe“Plain”menu(SeeP12)forthe
following:
• there is an equal amount of brown rice or
multigrain brown rice and white rice
• there is more white rice than brown rice or
multigrain brown rice
(Soak the brown rice separately for 1 to 2
hours before cooking)
Cooking multigrain together with white
rice
• The amount of multigrain should be less than
20% of the volume of the white rice.
• The maximum acceptable amount for the
combination of white rice and multigrain is 4
cups for the 5.5-cup cooker and 8 cups for the
10-cup cooker.
• Place the multigrain on top of the white rice.
Mixing them together may result in improperly
cooked food.
• If the multigrain is too hard, soak it separately
for approximately 1 hour prior to cooking and
then place it on top of the white rice.
• Small grained multigrain such as amaranth, can
expand and stick to the inner lid.
Cooking multigrain together with brown
rice
Besuretoselectthe“Brown”menu.
• The maximum acceptable amount for the
combination of brown rice and multigrain is 3.5
cups for the 5.5-cup cooker and 6 cups for the
10-cup cooker.
Cooking short-grain rice
Whencookingshort-grainrice,selectthe“Short”
menu. When cooking seasoned rice with various
ingredients using short-grain rice, select the
“Mixed”menu.Darkbrowncrispricemaybe
formed when cooking short-grain rice. Selecting
any other menu may result in improperly cooked
food.
1
Measure the rice.
Be sure to use the supplied measuring cup.
Filling the supplied measuring cup until it is
level is approximately 0.18 L, which is less
than 1 cup of a U.S. standardized measuring
cup.
Tips
Use the supplied measuring cup for rinse-free rice
as well.
Correct measurement Incorrect measurement
Note
Besuretousethespeciedvolumeofrice(see
thespecicationstableonP43)toensure
properly cooked rice.
If other ingredients are to be added to the rice,
see P 13.
2
Rinse the rice. (Rice can be
rinsed in the inner pot.)
For rinse-free rice, see P 13.
Note
Do not use hot water (over 95°F [35°C]) to rinse
or cook rice. It may prevent the rice from cooking
properly.
Do not apply too much force while rinsing rice.
Doing so may cause the inner pot to be deformed,
preventing rice from cooking properly.
3
Adjust the water level.
Place the inner pot on a level surface and
adjust the water level to the appropriate line
of the corresponding scale on the inside of
the pot.
Tips
Check the type of rice and the menu and adjust
the water level to your personal preference. (See
the guidelines on P 13)
When cooking 3 cups
of white rice, adjust the
water level to line
“3”onthe“Plain”scale.
4
Wipe any water and rice, etc. o
the inner pot.
Outside and brim of the inner pot
Inside the rice cooker
Inner lid gasket
Upper casing
Lid hook
Center
sensor
Heater plate
Inner lid
Inner lid button
3
Before Cooking Rice
17
16
17
16
17
16
3
Before Cooking Rice
English
Caution
Be sure to remove any cooked rice or grains
of rice on and around the heater plate, center
sensor, lid sensor, upper casing, and lid hook.
(See P 32)
Any rice that is not removed can prevent the
lid from closing, allow steam to leak out during
cooking, or enable the lid to open and the
contents to spray out, resulting in burns or injury.
5
Place the inner pot inside the
rice cooker and close the lid.
(1) Turn the inner pot slightly left and right so
it is positioned correctly without any tilt.
(2) Close the lid.
(1) Set the inner pot
in the rice cooker.
(2) Close the lid.
Inner
pot
Make sure
that the
inner lid is
attached
Note
Be sure the inner pot is set securely into the rice
cooker.
Be careful not to touch any operation key when
closing the lid.
6
Connect the power cord.
Appliance plug
(1) Insert the plug.
(2) Insert the plug.
Power plug
The power turns on and the symbol
blinks.
Blinks
Note
If the Keep Warm lamp is lit, press the [Keep
Warm/Cancel]keytoturnothelamp.
On O
4
1
Press the [Menu] key to move
to the desired menu.
Each time the [Menu] key is pressed, the
selected menu changes in the order shown
below.
The
symbol blinks while the menu is being
selected.
Blinks
It is not necessary to press the [Menu] key if
the desired menu is already selected.
Note
Whenthe“Quick”menuisselected,thecooking
time is shorter and cooked rice can be slightly
rmercomparedtothe“Plain”menu.
2
If you select the “Porridge” menu,
use the [Hour] and [Min] keys to
set the desired cooking time.
Each time the [Hour] key is pressed, the set
time increases by 5 minutes. Each time the
[Min] key is pressed, the time decreases by 5
minutes.
The cooking time can be set between 40 and
90 minutes in increments of 5 minutes.
Increases by
5 min.
Decreases by
5 min.
The default setting is 60 minutes. Adjust the
time as desired.
3
Press the [Start] key.
The Start lamp lights up.
Cooking starts.
The rice cooker makes one short and one
longbeepwhenthe“Plain”menuisselected
and one long beep when other menus are
selected.
On
On
How to Cook Rice
19
18
19
18
18
4
How to Cook Rice
English
Cooking time guidelines
Menu
Unit size
Plain Synchro-Cooking Quick Short
5.5-cup Cooker 32 to 43 min 37 to 48 min 24 to 36 min 43 to 58 min
10-cup Cooker 32 to 46 min 46 to 58 min 24 to 42 min 44 to 59 min
Menu
Unit size
Mixed Brown
5.5-cup Cooker 31 to 46 min 68 to 86 min
10-cup Cooker 32 to 55 min 68 to 86 min
• The above times indicate the amount of time until the end of steaming after cooking is completed when rice
is not soaked and the Timer function is not set. (Voltage: 120 V, Room temperature: 73.4°F [23°C], Water
temperature: 73.4°F [23°C], Water level: Normal)
• Cooking times vary somewhat depending on the amount of rice being cooked, the type of rice, the type and
quantity of ingredients, the room temperature, the water temperature, the amount of water, the electrical
voltage, and whether the Timer function is used or not, etc.
5
Once the nal steaming process
begins, the remaining time is
displayed.
The time until steaming is completed is shown
on the display in increments of 1 minute.
The steaming time varies depending on the
selected menu.
1
When the rice has been cooked
The Keep Warm function is automatically
activated.
The Keep Warm lamp will light up and current
time will be displayed.
The rice cooker beeps 8 times (long beeps).
O On
For porridge, press the [Keep Warm/Cancel]
key and serve it as soon as possible.
If ingredients have been added when using
the“Porridge”menuoralongercookingtime
is required, etc., simply press the [Hour] and
[Min] keys with the Keep Warm lamp lit to set
the additional cooking time and then press
the [Start] key. The cooking time can be
extended up to 15 minutes in increments of 1
minute, for a maximum of 3 times.
Stir the rice well before pressing the
[Start]
key
.
2
Stir and loosen the cooked rice.
Stir and loosen the rice as soon as cooking is
complete.
Use an oven mitt to hold the inner pot.
Condensation
collects here
(upper casing).
Inner pot
Note
Besuretowipeoanyhotwaterthatcollectson
the upper casing or that runs onto the outside of
the rice cooker when lid is open immediately after
cooking or while the Keep Warm function is on.
When nished using the rice
cooker...
1
Be sure to press the [Keep Warm/
Cancel] key.
On O
Note
If the power plug is disconnected without
canceling the Keep Warm function, the rice
cooker will not function the next time it is
turned on.
2
Disconnect the power plug and the
appliance plug.
(1) Disconnect the
power plug.
(2) Disconnect
the appliance plug.
3
Clean the rice cooker (see P 31 to
35).
Once Rice Is Finished Cooking
21
20
English
6
2
4
6
5
37
Timer function
Time to complete cooking can be preset.
Select“Timer”andsetthedesiredcompletion
time. The start of cooking is automatically adjusted
so that the cooking is completed at the preset
time.
• The preset timer settings are stored in the
memory.
Note
Example:If“Timer”issetto11:30,cookingis
completed at 11:30.
1
Connect the power cord.
2
Check the current time.
Blinks
See P 42 for the procedure to set the
current time.
3
Press the [Menu] key to select
the desired menu.
The symbol blinks while the menu is being
selected.
Blinks
It is not necessary to press the [Menu] key if
the desired menu is already selected.
4
If you select the “Porridge”
menu, use the [Hour] and [Min]
keys to set the desired cooking
time.
Each time the [Hour] key is pressed, the set
time increases by 5 minutes. Each time the
[Min] key is pressed, the time decreases by 5
minutes.
The cooking time can be set between 40 to
90 minutes in increments of 5 minutes.
Increases by
5 min.
Decreases by
5 min.
The default setting is 60 minutes. Adjust the
time as desired.
Using the Timer Function
5
Press the [Timer] key.
The Timer lamp blinks.
Blinks
Blinks
The previously preset time is displayed. It is
not necessary to set the timer again when
setting the Timer function at the same time.
Note
The Timer function is not available in the following
cases.
Whenthe“Synchro-Cooking”,“Quick”,“Mixed”,
or“SlowCook”menuisselected
When“0:00”isblinkingonthedisplay
If the Keep Warm lamp is lit, press the [Keep
Warm/Cancel]keytoturnothelamp.(TheTimer
function is not available while the Keep Warm
lamp is lit.)
Rice may become dark and crispy when the timer
setting is extended. If this is an issue, thoroughly
rinse the rice.
Timer setting guidelines for each menu
(The following table can be used for rinse-free
rice as well.)
Menu Timer setting guideline
Plain 50 minutes or more
Short 1 hour or more
Brown 1 hour and 30 minutes or more
Porridge Cooking time + 2 minutes or more
• When the preset time is less than the timer
setting guideline, cooking may not be completed
at the preset time.
Sounds emitted by the rice cooker
If the rice cooker is not operated within 30
seconds after pressing the [Timer] key, the rice
cooker will beep 2 times (short beeps).
If the [Timer] key is pressed while the rice cooker
is in a state where the Timer function is not
available, the rice cooker will beep 2 times (short
beeps).
6
Use the [Hour] and [Min] keys to
set the desired completion time.
Press the [Hour] key to set the time in
increments of 1 hour and the [Min] key to set
it in increments of 10 minutes.
Hold down the corresponding key to change
the time more rapidly.
Blinks
Note
Do not set the timer to more than 12 hours, as it
may result in spoiled rice.
7
Press the [Start] key.
The Timer lamp lights up and the Timer
function is set.
The rice cooker makes one short and one
longbeepwhenthe“Plain”menuisselected
and one long beep when other menus are
selected.
On
On
If you make a mistake or otherwise want
to reset the timer, press the [Keep Warm/
Cancel] key and repeat the procedure
from
step
3
on P 20.
23
22
23
22
English
7
The taste and gloss of white rice (rinse-free rice)
can be maintained.
The rice cooker will automatically switch to the
Keep Warm setting when the cooking is complete.
Turning o the Keep Warm
function
Press the [Keep Warm/Cancel]
key.
TheKeepWarmlampturnso.
On O
Restarting the Keep Warm
function
Press the [Keep Warm/Cancel]
key.
The Keep Warm lamp lights up and stays lit
while this setting is turned on.
On
Keeping a small amount of rice
warm
Collect the rice at the center of the inner pot and
serve it as soon as possible.
While the rice cooker is in the
Keep Warm setting
The Keep Warm lamp is lit while the rice cooker is
in the Keep Warm setting.
Checking elapsed Keep Warm time
Hold down the [Hour] key to display the elapsed
Keep Warm time while the Keep Warm function is
on. The elapsed time is displayed in increments of
1 hour. If more than 12 hours has elapsed, the time
on the display will blink up to 24 hours.
Note
Avoid the following, as they may cause unusual
odors, dryness, discoloration, and spoiling of the
rice, or corrosion of the inner pot.
• Using the Keep Warm function with cold rice
• Adding additional cold rice to rice that is being
kept warm
• Leaving a spatula in the inner pot while the
Keep Warm function is on
• Using the Keep Warm function with the power
plug disconnected.
• Using the Keep Warm function for longer than
12 hours
Keeping less than the minimum required amount
of rice warm
5.5-cup Cooker:
1 cup
10-cup Cooker:
2 cups
• Using the Keep Warm function for anything
other than white rice (including rinse-free rice)
• Keeping warm a circle of rice with a hole in the
middle
Be sure to remove any cooked rice or grains of
rice stuck to the brim of the inner pot as well as to
any gaskets. Failure to do so can cause dryness,
discoloration, odors, and stickiness of the rice
being cooked.
For porridge, press the [Keep Warm/Cancel] key
and serve it as soon as possible. Any porridge
left in the rice cooker can become pasty when
water on the inner lid drips. Serve it as soon as
possible.
Serve as soon as possible, especially when
the rice cooker is used in cold climates or high
ambient temperatures, etc.
Keeping Rice Warm
The cooking plate can be used to cook rice and side
dishes simultaneously.
See the supplied COOKBOOK for directions and
recipes.
Note
Do not cook with a greater volume of ingredients
than what is indicated in the supplied
COOKBOOK. Doing so may cause the contents
to boil over or result in improperly cooked rice.
Aromas may be transferred to the cooking plate
when cooking with ingredients with strong colors
and/or aromas.
Do not use sharp utensils such as kitchen knives,
table knives, or forks inside the cooking plate.
To enjoy various concurrent cookings
Precautions for ingredients to be placed in
the cooking plate
Usetheguidelineforllingtheplate,spread
out ingredients and making spaces between
ingredients so that steam is applied evenly.
Fill up the cooking plate to the position
shown below.
• Solid ingredients:
Up to this line
• Liquid ingredients:
Up to this line
Do not let ingredients cover the holes of the
cooking plate.
Do not let ingredients cover these holes.
Hole
Only use a small amount of liquid ingredients
such as water or sauce as it takes time to
heat a large amount of liquid.
If milk or fresh cream is separated during
use, stir well.
Only use a small amount of leavening ingredients
such as pancake mix (about 1/3 of the cooking
plate). Be careful with the number of eggs used
as they increase in volume. It is recommended to
not add more than 2 eggs for the 5.5-cup cooker,
or more than 3 eggs for the 10-cup cooker.
However, the number of eggs can be adjusted
according to the amount of other ingredients to be
added and the size of the eggs.
Cut root vegetables into thin slices as it
takes time to cook them.
Only steaming is possible using the cooking plate.
If heating is not sucient while cooking by
following the above suggestions, transfer the
ingredients to another container and reheat
them using a device such as a microwave (Do
not put the inner pot or cooking plate in the
microwave.)
8
Cooking Rice and Side Dishes Together
25
24
25
24
8
Cooking Rice and Side Dishes Together
English
1
Prepare ingredients and place
in the cooking plate.
Spread the ingredients entirely across the cooking
plate instead of stacking on top of each other.
Stacking ingredients may cause the contents to
boil over or result in improperly cooked rice.
2
Make the necessary
preparations for cooking rice
(see P 15).
Note
See the following table for the acceptable amounts
of rice that can be cooked simultaneously with
other food. Do not cook more than the acceptable
maximum or less than the minimum required
amounts. Doing so may cause the contents to boil
over or result in improperly cooked rice.
5.5-cup Cooker 10-cup Cooker
Maximum Minimum Maximum Minimum
2 cups 1 cup 4 cups 2 cups
3
Place the cooking plate inside
the inner pot and close the lid.
(1) Turn the inner pot slightly left and right so
it is positioned correctly without any tilt.
(2) Insert the cooking plate.
(3) Close the lid.
(2)
(3)
(1)
Inner pot
Cooking
plate
Note
Be sure to place the cooking plate inside the inner pot.
Make sure that the cooking plate is level (not set
at an angle).
4
Connect the power cord.
Appliance plug
(1) Insert the plug.
(2) Insert the plug.
Power plug
Note
If the Keep Warm lamp is lit, press the [Keep
Warm/Cancel]keytoturnothelamp.
5
Use the [Menu] key to select the
“Synchro-Cooking” menu.
The symbol blinks while the menu is being
selected.
Blinks
6
Press the [Start] key.
The Start lamp lights up and simultaneous
cooking starts.
On
On
Note
Do not open the lid during cooking. Doing so may
prevent the food from cooking properly.
7
Once cooking is complete, the
rice cooker will beep 8 times
(long beeps).
The Keep Warm lamp lights up.
On
O
8
Remove the cooking plate and
stir to loosen the rice.
Note
Do not leave the cooking plate in the rice cooker
while the Keep Warm function is on.
Be careful when removing the cooking plate after
cooking as it is hot.
Do not tilt the cooking plate while removing it. Do
not hold the center post.
The broth, etc., may spill out, resulting in burns.
Do not return the cooking plate to the inner pot
after removing it.
Doing so may result in the rice spoiling or not
being kept warm.
When cooking with ingredients that release a lot
of liquid, oils or fats, or expand during heating (e.g.
eggs),someofthebrothmayoverowdowninto
the rice.
Cooking without making rice
Cooking can be performed with water added to
the inner pot.
See“SteamingFood”(P28to29).
27
26
English
9
Prepare soup and simmered dishes with an ease.
See the supplied COOKBOOK for directions and
recipes.
Foodisrstbroughttonearboilingandtheheat
is then lowered for simmering. The temperature is
then lowered even further to continue simmering.
By gradually lowering the heating temperature this
way,avorsareenhancedandtheliquidsdonotboil
down even when heated for a long period of time.
Note
Caution should be exercised when making
dishes other than those described in the supplied
COOKBOOK, as they may boil over.
Stir well before cooking to prevent seasonings
from settling at the bottom of the inner pot.
Let it cool before cooking when simmering food in
broth.
Add starch at the end of cooking.
Adjusttheamountofpasteproductssuchassh
paste cakes as they expand with heat.
Add ingredients that can easily boil over (e.g.
milk) after heating is completed and heat them for
no more than 5 minutes. Adding these ingredients
at the beginning may cause them to boil over.
1
Prepare ingredients.
2
Add the ingredients to the inner
pot and close the lid.
Note
Usethe“Plain”scaleontheinsideoftheinnerpot
as a reference. Using more than the maximum
acceptable amount (see the table below) can
prevent proper boiling or cause the contents
to boil over. Be careful not to use less than the
minimum required amount, as that can also cause
the contents to boil over.
“Plain”scale
5.5-cup Cooker 10-cup Cooker
Maximum Minimum Maximum Minimum
5.5 or below 2 or above 8 or below 3 or above
3
Connect the power cord.
Note
If the Keep Warm lamp is lit, press the [Keep
Warm/Cancel]keytoturnothelamp.
4
Use the [Menu] key to select the
“Slow Cook” menu.
The symbol blinks while the menu is being
selected.
Blinks
5
Use the [Hour] and [Min] keys to
set the desired cooking time.
Each time the [Hour] key is pressed, the set
time increases by 5 minutes. Each time the
[Min] key is pressed, the time decreases by 5
minutes.
The cooking time can be set between 5 to
180 minutes in increments of 5 minutes.
Blinks
Slow Cooking
6
Press the [Start] key.
The Start lamp lights up and cooking starts.
“Readyin”isshownonthedisplay.
On
On
On
Note
Do not open the lid during cooking. Doing so may
prevent the food from cooking properly.
7
Once cooking is complete, the
rice cooker will beep 8 times
(long beeps).
TheKeepWarmlamplightsupand“0h”is
shown on the display.
On
O
If a longer cooking time is required, set the
desired additional cooking time. Press the
[Hour] and [Min] keys to set the additional
cooking time and press the [Start] key with
the Keep Warm lamp lit. The cooking time
can be extended up to 30 minutes, for a
maximum of 3 times.
Note
If a longer cooking time is required, do not press
the [Keep Warm/Cancel] key before extending
the cooking time. Doing so causes the Keep
Warmlamptoturnoandadditionalcooking
cannot be performed. If you mistakenly press the
[Keep Warm/Cancel] key, perform the following
procedure.
1. Remove the inner pot and set it on a wet towel
or cloth.
2. Leave the rice cooker lid open and cool
down the rice cooker and the inner pot for
approximately 10 minutes.
3. Place the inner pot back inside the rice
cooker.
4. Repeat the procedure
from
step
4
on P 26.
Once cooking is complete...
1
Be sure to press the [Keep Warm/
Cancel] key.
On O
2
Disconnect the power plug and the
appliance plug.
3
Clean the rice cooker (see P 31 to
35).
Note
When cooking is completed, the food is
automatically kept warm and the elapsed
Keep Warm time is displayed in hourly
incrementsfromthersthour(“1h”)upto6
hours(“6h”).After6hourshaselapsed,“6”
blinks on the display.
Do not use the Keep Warm function
continuously for more than 6 hours as some
foodsmayloseitsavor.
29
28
29
28
English
10
You can also perform steam cooking by adding
water to the inner pot without making rice.
1
Add ingredients to the cooking
plate.
2
Add water to the inner pot,
insert the cooking plate inside,
and close the lid.
See the following guideline for the amount of
water to add.
5.5-cup Cooker: 3.5 cups (21 oz)
10-cup Cooker: 4.5 cups (28 oz)
Place the cooking
plate.
Use the supplied
measuring cup
to add water.
Note
Be sure to add an appropriate amount of water in
the inner pot. Do not allow the inner pot to run out
of water or the cooking plate to become immersed
in water during steaming.
Water
Cooking plate
3
Connect the power cord.
Note
If the Keep Warm lamp is lit, press the [Keep
Warm/Cancel]keytoturnothelamp.
4
Use the [Menu] key to select the
“Slow Cook” menu.
The symbol blinks while the menu is being
selected.
Blinks
5
Press the [Hour] and [Min] keys
to set the desired steaming time.
Each time the [Hour] key is pressed, the set
time increases by 5 minutes. Each time the
[Min] key is pressed, the time decreases by 5
minutes.
The steaming time can be set between 5 to
60 minutes.
Blinks
6
Press the [Start] key.
The Start lamp lights up and steaming starts.
“Readyin”isshownonthedisplay.
On
On
On
Steaming Food in the Cooking Plate
Note
Do not open the lid during cooking. Doing so may
prevent the food from cooking properly.
7
Once the steaming is complete, the
rice cooker will beep 8 times (long
beeps). The Start lamp will turn o.
TheKeepWarmlampwilllightupand“0h”is
shown on the display.
On
O
To steam the food further, use the [Hour] and
[Min] keys to set the additional steaming time
and then press the [Start] key. The cooking
time can be extended up to 30 minutes, for a
maximum of 3 times.
Caution
• Be careful not to be burned by the rising steam
when opening the lid.
Note
Be sure to add water for additional steaming to
prevent the inner pot from running dry.
If a longer steaming time is required, do not press
the [Keep Warm/Cancel] key before extending
the steaming time. Doing so causes the Keep
Warm lamp to go out and additional steaming
cannot be performed. If you mistakenly press the
[Keep Warm/Cancel] key, perform the following
procedure.
1. Remove the inner pot and add water.
For the amount of water, see step
2
on P 28.
2. Leave the rice cooker lid open and cool
down the rice cooker and the inner pot for
approximately 10 minutes.
3. Place the inner pot back inside the rice
cooker.
4. Repeat the procedure from step
4
on P 28.
8
Remove the cooking plate.
Be careful when removing the cooking plate
after cooking as it is hot.
Serve the food as soon as steaming is
complete. If not removed from the rice cooker
right away, the food may become wet and
soggy.
Do not tilt the cooking plate while removing
it. The broth, etc., may spill out, resulting in
burns.
Once steaming is complete...
1
Be sure to press the [Keep Warm/
Cancel] key.
On O
2
Disconnect the power plug and the
appliance plug.
3
Clean the rice cooker (see P 31 to
35).
31
30
31
30
31
30
31
30
10
Steaming Food in the Cooking Plate
English
Guidelines for steaming times
Ingredients Amount Approx. time Tips for steaming
Chicken 1llet(1/2to3/4lbs[200to300g]) 25 to 30 min
Place a few small slits in the surface
of the chicken
Whitesh 2to3llets(5.0to7.0oz[150to200g]) 20 to 25 min
Fillet to a thickness of 3/4 inches (2
cm) or less
Be sure to wrap in aluminum foil
Shrimp 6 to 10 pieces (1/4 to 1/2 lbs [100 to 200 g]) 15 to 20 min Steam in shells
Carrots 1 to 2 pieces (7.0 to 11.0 oz [200 to 300 g]) 30 to 40 min Cut into bite-sized pieces
Potatoes
Medium size, 2 to 3 pieces (9.0 to 11.0
oz [250 to 300 g])
30 to 40 min Cut into bite-sized pieces
Sweet potatoes
Medium size, 1 piece (7.0 to 11.0 oz
[200 to 300 g])
30 to 40 min Cut into bite-sized pieces
Meat dumplings
(warming)
8 to 15 pieces 20 to 25 min Space evenly in the cooking plate
Donotllthecookingplateforthe5.5-cupcookeranyhigherthan11/5inches(3cm),or11/2inches
(4 cm) for the 10-cup cooker. Doing so may cause the food to touch the lid, resulting in wet and soggy food.
• Do not let the ingredients block the hole of the inner lid.
• The above steaming times are only a guideline. The required time varies depending on the temperature,
quality, and quantity of the ingredients.
• Additional time to steam may be required depending on how well the food is cooked.
• Add water to prevent the inner pot from running dry. Typically there will not be enough water for additional
steaming.
Whenmeat,sh,etc.aresteamedtoolong,theymaybecomehard.Iffooddoesnotsteamsucientlyat
shorter times, cut it into thinner slices.
Besuretowrapsh,etc.,inaluminumfoilforsteaming.Otherwise,thecontentsofthecookingplatemay
boil over.
11
Any other servicing not listed in this manual should be performed by an authorized service
representative.
It is recommended to clean the rice cooker on the same day it is used to maintain cleanliness and to remove
any odors that remain from cooking food. (See P 35)
Note
Disconnect the power plug and allow the rice cooker, inner pot, inner lid, and steam cap to cool down before
cleaning.
Always keep the inner pot and lid clean to prevent corrosion and odors.
Do not clean the rice cooker or its parts using thinner, cleanser, bleach, disposable cloths, metal sponges,
nylon scrubbing sponges or the like.
Clean each part separately.
Do not use a dishwasher/dryer to clean the rice cooker or its parts. Doing so may cause the rice cooker
and/or its parts to become deformed or discolored.
When cleaning the rice cooker using a detergent, use only a mild dishwashing detergent (for dishes and
kitchen utensils).
Rinse the parts thoroughly as detergent remaining on them may cause deterioration and/or discoloration.
Using any detergent other than mild detergents can cause discoloration, corrosion, etc.
Use a soft sponge or cloth.
Do not remove the gaskets.
Parts to wash after every use
Inner pot
Spatula
Cooking plate
Measuring cup
(1)
Clean with a soft sponge and with tap or
lukewarm water.
(2)
Wipe o water using a dry cloth and completely
dry all parts.
Note
Doingsomaydamagetheuorocarbonresincoating.
Do not clean the inner pot using the abrasive
side of a heavy duty scrubbing sponge.
Do not wash dishes inside the inner pot. Also, do not place
the inner pot upside down on top of dishes, etc., to dry. Doing
somaydamagetheuorocarbonresincoatingorcauseitto
peel.
Do not immerse the measuring cup and spatula in hot water.
Doing so may cause them to become deformed.
Cleaning and Maintenance
33
32
33
32
33
32
11
Cleaning and Maintenance
English
Steam cap
(Dismantle into 2 parts.
See P 34)
The steam cap can be rinsed.
(1)
Clean with a soft sponge and with tap or lukewarm
water.
(2)
Immediately wipe o water using a dry cloth and
completely dry it.
Note
Avoid the following, as the steam cap may become deformed:
• Rinsing with hot water
• Soaking in water
• Rinsing while the cap is hot immediately after cooking
Be sure to clean the steam cap after cooking with multigrain
rice (e.g. amaranth, barley, etc.). Otherwise, the steam cap
may become clogged, causing the lid not to open and rice to
not cook properly.
Wipeowaterusingadryclothimmediatelyaftercleaningthesteam
cap. Otherwise, water drops may leave marks on the steam cap.
Inner lid
(1)
Clean with a soft sponge and with tap or lukewarm
water.
(2)
Wipe o water using a dry cloth and completely
dry the inner lid.
Inner lid gasket
Clean the gasket on the inner lid.
Note
Be sure to remove any cooked rice or grains of rice on the inner
lid. Any rice on the inner lid can prevent the lid from closing,
allow steam to leak out during cooking or enable the lid to open
and the contents to spray out, resulting in burns or other injury.
Be sure to clean the inner lid after cooking rice with multigrain
rice (e.g. amaranth, barley, etc.). Otherwise, the inner lid may
clog, causing a problem to open the lid and the rice may not
cook properly.
Thoroughly wipe the inner lid using a dry cloth after cleaning
so there is no moisture remaining in any gaps. Otherwise,
water drops may leave marks on the inner lid.
If marks remain, soak the inner lid in lukewarm water.
Parts to wash when dirty
Lid hook
Upper
casing
Heating plate
Center
sensor
Heater
plate
Lid gasket
Lid sensor
Inside and outside the rice cooker
Wet a towel or cloth, squeeze out excess water and wipe.
Center sensor
Remove any cooked rice, grains of rice, etc.
Ifitisdiculttoremovethericefromthesensor,use
commercially available sandpaper (around #320), then
wet a towel or cloth, squeeze out excess water and wipe.
Around the upper casing and lid hook
Remove any cooked rice, grains of rice, etc.
Note
Do not allow water to go inside the rice cooker.
Power cord
Wipe using a dry cloth.
Note
Do not immerse the power cord in or splash it with
water. Doing so may cause short circuits, electric
shock, or malfunction.
Removing and attaching the inner lid
Removing the inner lid
Lift the inner lid button and
remove the inner lid o.
Attaching the inner lid
Securely insert the left and right
tabs of the inner lid into the groove.
Note
Do not pull on the lid gasket or inner lid gasket. It cannot
be reattached once it is removed.
Ifthelidgasketortheinnerlidgasketcomeso,
contact an authorized service representative.
Inner lid button
(1) Lift the inner lid.
(2) Remove it.
(1) Insert the tabs.
(2) Push in the lid until it clicks.
Tab
Groove
Inner lid gasket
Inner lid
Lid
Lid gasket
Do not remove the gasket.
Do not forcefully push or pull
the gasket. Doing so may
allow steam to leak, resulting
in malfunction.
35
34
35
34
35
34
11
Cleaning and Maintenance
English
Removing and attaching the steam cap
Removing the steam cap
(1)
Insert ngers into the indentation in the
lid and lift and remove the steam cap.
Steam cap
Note
Take caution when removing the steam cap
immediately after cooking, as hot condensation is
collected in it.
(2)
Rotate the cap unit counterclockwise
to align the marking on the cap with the
unlock symbol
.
The unlock symbol is marked on the cap lid.
Cap lid
Cap unit
Unlock symbol
Turn the cap unit
until it stops.
Marking
(3)
Lift and remove the cap unit from the cap lid.
Note
Do not remove the gasket or O-ring from the cap
unit. Securely reattach the gasket or O-ring if it
comeso.Makesurethatthedirectionofthe
gasket on the cap unit is correct.
Wet the O-ring if it is dicult to attach.
Be sure to set the gaskets, etc. before using the rice
cooker. Failure to do so may allow steam to leak out
and prevent the food from cooking properly.
O-ring
Cap unit
Cap lid
Gasket
Attaching the steam cap
(1)
Align and t the tabs of the cap unit with
the indentations of the cap lid as shown
in the gure.
There are three indentations and tabs each.
(2)
Rotate the cap unit clockwise and align the
marking on the cap unit with the lock symbol.
The lock symbol is marked on the cap lid.
Marking
Lock symbol
Turn the cap unit
until it stops.
(3)
Securely attach to the rice cooker.
Removing odors
The following procedures should be performed each time after cooking, or if odors become an issue.
Note
Take caution with the rice cooker, inner pot and cooking plate during cleaning as they may be hot and can
cause burns.
Rice cooker
Do not place the cooking plate inside the inner pot.
(1)
Fill the inner pot up to about 80% with
water, select the “Plain” menu, and
press the [Start] key.
(2)
Press the [Keep Warm/Cancel] key when
the Keep Warm lamp lights up.
Note
If odors become an issue, add citric acid
(approx.0.71oz)tothewaterformoreeective
deodorizing.
It there are issues with removing odors, contact
an authorized service representative.
(3)
Clean the inner pot, inner lid and steam
cap using a mild dishwashing detergent
and then rinse suciently with water.
(4)
Allow the rice cooker and all parts to dry
in a well ventilated location.
Cooking plate
Immerse the cooking plate in hot water and soak
for approximately 1 hour. Rinse well with water
afterwards.
Cleaning the heater plate
Water drops may fall from the lid during cooking and cause the surface of the heater plate to become dirty.
Thisdoesnotaecttheperformanceofthericecooker,howevercleantheheaterplateaccordinglywiththe
following procedure if necessary:
(1)
Add a small amount of
commercially available cream
cleanser to a nylon scrubbing
sponge and remove the stains
from the heater plate.
(2)
Wipe the heater plate clean
using a damp paper towel or
cloth.
Nylon scrubbing
sponge
Heater plate
37
36
37
36
37
36
English
12
Check the following if you experience problems with cooking rice:
Possible Causes
Problem
Was the amount of rice,
ingredients, and water or the
ratio of multigrain correct?
Was more than the maximum
acceptable amount cooked?
Was the rice cooked with
alkaline ionized water (pH 9
or higher)?
Was the rice cooked with hard
water such as mineral water?
Was the correct menu
selected?
Was the Timer function used?
Was the [Start] key pressed
after cooking without turning
otheKeepWarmfunction?
Are there grains of rice, cooked rice,
or water drops on the outside bottom
of the inner pot, heater plate, and
center sensor or on the lid sensor?
Is the inner pot deformed?
Was the rice stirred and
loosened well?
Was the appliance plug
removed or was there a power
outage during cooking?
Cooked rice
Too hard
Too soft
Not cooked
completely
Has a hard center
Burned
During cooking
Steam leaks
Boils over
The cooking time is
excessively long
Reference page(s)
13 to
14,
43
43 17 19
15, 31
to 32
19 43
Possible Causes
Problem
Are there any cooked rice or
grains of rice stuck to the gaskets
or the brim of the inner pot, etc.?
Was the rice (other than
rinse-free rice) rinsed well?
Was hot water (95°F [35°C] or
higher) used to rinse the rice or
adjust the water level?
Was the rice left soaking in
water too long after rinsing?
Was the rice left too long after
rinsing and draining?
Was the lid closed securely?
Was the rice mixed with other
ingredients, barley, or multigrain?
Were seasonings stirred well?
Were there a lot of cracked
grains of rice?
Was cooking continued
immediately after the initial
cooking?
Were the rice cooker and its
partscleanedsuciently?
Cooked rice
Too hard
Too soft
Not cooked
completely
Has a hard center
Burned
Smells like rice bran
During cooking
Steam leaks
Boils over
The cooking time is
excessively long
Reference page(s)
16,
31 to
32
13,
15
15
16,
32
13
31 to
35
Rice Does Not Cook Properly
Problem Cause
Thereisathinlmcovering
the rice.
Athin,tissue-likelmisformedbymeltedanddriedstarch.Thisisnotharmfultoyour
health.
Rice sticks to the inner pot. Soft rice and sticky rice can easily stick to the pot.
Possible Causes
Problem
Was the amount of rice and
water correct?
Are there grains of rice, cooked rice, or water
drops on the outside bottom of the inner pot,
heater plate, center sensor or on the lid sensor?
Was the rice stirred and
loosened well?
Are there any cooked rice or
grains of rice stuck to the gaskets
or the brim of the inner pot, etc.?
Was the rice rinsed well?
(other than rinse-free rice)
Was the Timer function set for
more than 12 hours in advance?
Was the Keep Warm function
used continuously for more than
12 hours?
Was the rice left in the rice
cooker with the Keep Warm
functionturnedo?
Was the appliance plug removed
or was there a power outage
during cooking?
Rice being kept warm
Has an odor
Discolored
Dry
Sticky
Reference page(s)
13 to
14,
43
15,
31 to
32
19
15,
31 to
35
13,
15
21 22 43
Possible Causes
Problem
Is there anything other than
white rice or rinse-free rice being
kept warm?
Is there less than the minimum
required amount of rice being
kept warm?
Is the rice concentrated along
the wall of the inner pot (less
rice in the middle of the pot)?
Was cold rice added to rice that
is being kept warm?
Was a spatula left in the inner
pot?
Were the rice cooker and its
partscleanedsuciently?
Were odors removed after
cooking?
Rice being kept warm
Has an odor
Discolored
Dry
Sticky
Reference page(s) 22 22 22 22 22
31 to
35
27, 29,
35
39
38
39
38
39
38
13
Check the following if there are problems with the food cooked simultaneously using the cooking plate.
Possible Causes
Problem
Were more ingredients and
seasonings used than indicated
in the COOKBOOK?
Were the ingredients arranged
unevenly in the cooking plate?
Was more than the acceptable
maximum amount or less than
the minimum amount of rice
cooked?
Was a menu other than
“Synchro-Cooking”used?
Was the food cooked according
to the precautions for ingredients
to be placed in the cooking
plate?
Was the appliance plug removed
or was there a power outage
during cooking?
Cooked rice
Too hard
Too soft
Not cooked
completely
Has a hard center
Burned
Has an odor
Sticky
Cooked food
Too hard
Too soft
Not fully heated
Overowsintothe
rice
During cooking
Steam leaks
Boils over
The cooking time is
excessively long
Reference page 23 23 24 24 23 43
Synchro-Cooking Does Not Work Properly
English
14
Check the following if you experience problems with cooking food.
Possible Causes
Problem
Were the appropriate ingredients and
amounts used?
Were more than the maximum
acceptable ingredients added?
Were less than the minimum required
ingredients added?
Was the cooking time too short?
Was the cooking time too long?
Was a recipe other than those described
in the COOKBOOK used?
Are there grains of rice, cooked rice, or water
drops on the outside bottom of the inner pot,
heater plate, center sensor or on the lid sensor?
Is the inner pot deformed?
Are there any cooked rice or grains of rice stuck
to the gaskets or the brim of the inner pot, etc.?
Was the lid closed securely?
Was the appliance plug removed or was
there a power outage during cooking?
Cooked food
Does not boil
Boils over
Boils down
Reference page(s)
26,
30
26
26 to 30
15,
31,
32
15, 31, 32
43
For possible issues not listed, contact an authorized service representative.
Cooking and Steaming Does Not Work Properly
  • Page 1 1
  • Page 2 2
  • Page 3 3
  • Page 4 4
  • Page 5 5
  • Page 6 6
  • Page 7 7
  • Page 8 8
  • Page 9 9
  • Page 10 10
  • Page 11 11
  • Page 12 12
  • Page 13 13
  • Page 14 14
  • Page 15 15
  • Page 16 16
  • Page 17 17
  • Page 18 18
  • Page 19 19
  • Page 20 20
  • Page 21 21
  • Page 22 22
  • Page 23 23
  • Page 24 24
  • Page 25 25
  • Page 26 26
  • Page 27 27
  • Page 28 28
  • Page 29 29
  • Page 30 30
  • Page 31 31
  • Page 32 32
  • Page 33 33
  • Page 34 34
  • Page 35 35
  • Page 36 36
  • Page 37 37
  • Page 38 38
  • Page 39 39
  • Page 40 40
  • Page 41 41
  • Page 42 42
  • Page 43 43
  • Page 44 44
  • Page 45 45
  • Page 46 46
  • Page 47 47
  • Page 48 48
  • Page 49 49
  • Page 50 50
  • Page 51 51
  • Page 52 52
  • Page 53 53
  • Page 54 54
  • Page 55 55
  • Page 56 56
  • Page 57 57
  • Page 58 58
  • Page 59 59
  • Page 60 60
  • Page 61 61
  • Page 62 62
  • Page 63 63
  • Page 64 64
  • Page 65 65
  • Page 66 66
  • Page 67 67
  • Page 68 68
  • Page 69 69
  • Page 70 70
  • Page 71 71
  • Page 72 72
  • Page 73 73
  • Page 74 74
  • Page 75 75
  • Page 76 76
  • Page 77 77
  • Page 78 78
  • Page 79 79
  • Page 80 80
  • Page 81 81
  • Page 82 82
  • Page 83 83
  • Page 84 84
  • Page 85 85
  • Page 86 86
  • Page 87 87
  • Page 88 88
  • Page 89 89
  • Page 90 90
  • Page 91 91
  • Page 92 92
  • Page 93 93
  • Page 94 94
  • Page 95 95
  • Page 96 96
  • Page 97 97
  • Page 98 98
  • Page 99 99
  • Page 100 100
  • Page 101 101
  • Page 102 102
  • Page 103 103
  • Page 104 104

Tiger JBX-B User manual

Category
Rice cookers
Type
User manual

Ask a question and I''ll find the answer in the document

Finding information in a document is now easier with AI