Indesit BAAN 40 FNF (TK) User guide

Category
Fridge-freezers
Type
User guide
BAN 40 FNF xx
BAAN 40 FNF xx
Contents
Operating Instructions, 1
Assistance,2
Description of the appliance,3
Description of the appliance, 4
Reversible doors,5
Installation,6
Accessories,6
Start-up and use, 7
Maintenance and care, 8
Precautions and tips, 9
Troubleshooting, 10
English
Operating Instructions
REFRIGERATOR/FREEZER COMBINATION
Türkçe Türkçe
Türkçe Türkçe
Türkçe
Kullaným talimatlarýKullaným talimatlarý
Kullaným talimatlarý
KOMBÝNE SOÐUTUCU/DONDURUCUKOMBÝNE SOÐUTUCU/DONDURUCU
KOMBÝNE SOÐUTUCU/DONDURUCU
ÝçindekilerÝçindekiler
Ýçindekiler
Kullaným talimatlarý, 1
Teknik Servis 2
Cihazýn tanýmý3
Cihazýn tanýmý, 4
Kapýlarýn açýlýþ yönünün deðiþtirilmesi, 5
Montaj, 11
Aksesuarlar, 11
Çalýþtýrma ve kullaným, 12
Bakým ve özen, 13
Önlemler ve öneriler, 14
Arýzalar ve onarýmlar, 15
2
Assistance
Before calling for Assistance:
Check if the malfunction can be solved on your own (
see
Troubleshooting
).
If after all the checks, the appliance still does not operate or the
problem persists, call the nearest Service Centre
Communicating:
type of malfunction
appliance model (Mod.)
serial number (S/N)
This information can be found on the data plate located on the
bottom left side of the refrigerator compartment.
Never call on unauthorized technicians and always refuse
spare parts which are not originals.
- model
- model - model
- model - model
- model
- serial number
- seri numarasý - seri numarasý
- seri numarasý
TT
TT
T
eknik Serviseknik Servis
eknik Servis
TT
TT
T
eknik Servis ile irtibata geçmeden önce:eknik Servis ile irtibata geçmeden önce:
eknik Servis ile irtibata geçmeden önce:
Servise baþvurmadan çözülebilecek bir arýza olup olmadýðýný
kontrol ediniz (
Arýza ve Onarým bölümüne bakýnýz
).
Sonucun olumsuz olmasý durumunda, en yakýn Teknik Servis ile
irtibata geçiniz.
þaðýdaki bilgileri bildiriniz:þaðýdaki bilgileri bildiriniz:
þaðýdaki bilgileri bildiriniz:
arýza tipi
cihazýn modeli (Mod.)
seri numarasý (S/N)
Bu bilgiler, soðutucu bölmesi içinde aþaðýda solda bulunan teknik
veriler etiketi üzerinde bulunmaktadýr.
Kesinlikle sadece yetkili teknik elemanlara baþvurunuzKesinlikle sadece yetkili teknik elemanlara baþvurunuz
Kesinlikle sadece yetkili teknik elemanlara baþvurunuz
ve her zaman orijinal yedek parçalarý kullanýnýz.ve her zaman orijinal yedek parçalarý kullanýnýz.
ve her zaman orijinal yedek parçalarý kullanýnýz.
BAN 40 FNF (TK)
BAN 40 FNF H (TK)
BAN 40 FNF NXH (TK)
BAAN 40 FNF (TK)
BAAN 40 FNF H (TK)
BAAN 40 FNF NXH (TK)
T
421kWh/y
A
295l t
T
347 kWh/y
A +
92
94
287 l t
Teknik Bilgiler
INDESIT
INDESIT COMPANY BEYAZ EÞYA PAZARLAMA
A.Þ.
Karahasan Sok. No:11 Balmumcu 34349
Beþiktaþ/Ýstanbul
TEL: (+90) 212 355 53 00
FAKS: (+90) 212 212 95 59
WEB: www.indesit.com.tr
INDESIT COMPANY BEYAZ EÞYA SANAYÝ VE
TÝCARET A.Þ.
Organize Sanayi Bölgesi 45030 / MANÝSA
TEL:
TEL:
TEL: (+90) 236
TEL:
TEL:
233 19 05 – 233 18 20
F
F
F
F
FAKS:
AKS:
AKS:
AKS:
AKS:
(+90) 236 233 16 52
3
Description of the appliance
Control panel
1 SUPER COOL
(quick cool) to lower the temperature of the
refrigerator compartment rapidly. When it is pressed, the
SUPER COOL indicator light illuminates (
see Start-up and use
).
2 REFRIGERATOR OPERATION Knob
to regulate the temperature of the refrigerator compartment:
warmer
colder.
ECO is the optimal temperature for energy saving levels.
HOLIDAY is the holiday function (
see Maintenance and care
).
3 SUPER COOL Yellow indicator light (rapid cooling)
illuminates when the SUPER COOL button is pressed.
4 POWER Indicator light illuminates when the appliance is
connected to the electricity network.
5 SUPER FREEZE Yellow indicator light (rapid freezing)
illuminates when the SUPER FREEZE button is pressed.
6 FREEZER OPERATION Knob
to regulate the temperature of the freezer compartment:
warmer.
colder.
ECO is the optimal temperature for energy saving levels.
switches the appliance off, including the refrigerator.
7 SUPER FREEZE button (rapid freezing) to freeze fresh food.
When it is pressed, the SUPER FREEZE indicator light
illuminates (
see Start-up and use
).
! The indicator lights are also used to indicate an unusual
temperature increase in the freezer compartment (
see
Troubleshooting
).
1 2 3 4 5 6 7
271eps
Cihazýn tanýmýCihazýn tanýmý
Cihazýn tanýmý
Kontrol paneliKontrol paneli
Kontrol paneli
1 SUPER COOL (hýzlý soðutma) tuþu, soðutucu bölmesi
içerisindeki sýcaklýk derecesini hýzlý bir þekilde düþürmek için
kullanýlýr. Bu tuþa basýldýðýnda SUPER COOL uyarý lambasý
yanar (
Çalýþtýrma ve kullaným
bölümüne bakýnýz).
2
SOÐUTUCU KONTROLSOÐUTUCU KONTROL
SOÐUTUCU KONTROL ayar düðmesi ile soðutucu
bölmesindeki sýcaklýk derecesi ayarlanýr:
daha az soðuk.
daha soðuk.
ECO düþük tüketim için optimal sýcaklýk derecesidir.
HOLIDAY tatil fonksiyonudur (
Bakým ve onarým
bölümüne
bakýnýz).
3 Sarý SUPER COOL (hýzlý soðutma) uyarý lambasý:
SUPER COOL tuþuna basýldýðýnda yanar.
4 Yeþil BESLEME uyarý lambasý: cihaz elektrik þebekesine baðlý
olduðu zaman açýlýr.
5 Sarý SUPER FREEZE (hýzlý dondurma) uyarý lambasý:
SUPER FREEZE tuþuna basýldýðýnda yanar.
6 DONDURUCU KONTROL ayar düðmesi ile dondurucu
bölmesindeki sýcaklýk derecesi ayarlanýr:
daha az soðuk.
daha soðuk.
ECOECO
ECOECO
ECO düþük tüketim için optimal sýcaklýk derecesidir.
soðutucu dahil olmak üzere cihazý kapatýr.
7 SUPER FREEZE (hýzlý dondurma) tuþu ile taze gýdalar
dondurulur. Bu tuþa basýldýðýnda SUPER FREEZE uyarý lambasý
yanar (
Çalýþtýrma ve kullaným
bölümüne bakýnýz).
! Uyarý lambalarý dondurucu bölmesinde ýsýnýn anormal bir þekilde
arttýðýný belirtmek için de kullanýlýr (
Arýza ve onarým
bölümüne
bakýnýz).
4
Description of the appliance
Overall view
The instructions contained in this manual are applicable to different
model refrigerators. The diagrams may not directly represent the
appliance purchased. For more complex features, consult the
following pages.
1 Levelling FEET
2 FREEZER and STORAGE compartment
3
IceIce
IceIce
Ice
33
33
3
ice tray
4 FRUIT and VEGETABLE bin
5 FLEX COOL BOX for MEAT and CHEESE*
6 WINE RACK*
7 SHELVES•
8 LAMP (see Maintenance).
9 Removable lidded shelf with EGG TRAY
10 Removable multipurpose SHELVES•
11 CAN RACK shelves
12 BOTTLE shelf
• Varies by number and/or position.
* Available only on certain models.
MAX
WATER LEVEL
MAX
WATER LEVEL
2
9
8
1
3
4
6
7
11
5
10
646eps
Cihazýn tanýmýCihazýn tanýmý
Cihazýn tanýmý
Genel görünümGenel görünüm
Genel görünüm
Kullaným talimatlarý birkaç model için geçerli olduðu için þekil satýn
aldýðýnýz cihazda olmayandeðiþik ayrýntýlarý gösterebilir. Sonraki
sayfalarda en karýþýk cisimler açýklanmýþtýr.
11
11
1 Ayarlanabilir
AA
AA
A
YY
YY
Y
AKLARAKLAR
AKLARAKLAR
AKLAR
22
22
2
DONDURMADONDURMA
DONDURMADONDURMA
DONDURMA ve
SAKLAMASAKLAMA
SAKLAMASAKLAMA
SAKLAMA bölmesi
3 Buzluk
EASY ICEEASY ICE
EASY ICEEASY ICE
EASY ICE
44
44
4
MEYVEMEYVE
MEYVEMEYVE
MEYVE ve
SEBZESEBZE
SEBZESEBZE
SEBZE çekmecesi
5 ET5 ET
5 ET5 ET
5 ET ve
BALIKBALIK
BALIKBALIK
BALIK* için
FLEX COOL BOX FLEX COOL BOX
FLEX COOL BOX haznesi
66
66
6
ÞARAP RAFIÞARAP RAFI
ÞARAP RAFI*
WINE RACK WINE RACK
WINE RACK WINE RACK
WINE RACK*
7 RAF7 RAF
7 RAF7 RAF
7 RAF•
8 LAMBA8 LAMBA
8 LAMBA8 LAMBA
8 LAMBA
(
Bakým bölümüne bakýnýz)
99
99
9 Çýkarýlabilen kapaklý raf ve
YUMURYUMUR
YUMURYUMUR
YUMUR
TT
TT
T
ALIKALIK
ALIKALIK
ALIK
1010
1010
10 Çýkarýlabilen
KAPI RAFIKAPI RAFI
KAPI RAFIKAPI RAFI
KAPI RAFI•
11
11
1
11
11
1
KUTU MEÞRUBA KUTU MEÞRUBA
KUTU MEÞRUBA
TT
TT
T tutucusu•
1212
1212
12
ÞÝÞE ÞÝÞE
ÞÝÞE ÞÝÞE
ÞÝÞE Rafý
• Sayýsý ve/veya pozisyonu deðiþebilir.
* Sadece bazý modellerde mevcuttur.
12
6
GB
Installation
! Before placing your new appliance into operation please read
these operating instructions carefully. They contain important
information for safe use, for installation and for care of the
appliance.
! Please keep these operating instructions for future reference.
Pass them on to possible new owners of the appliance.
Positioning and connection
Positioning
1. Place the appliance in a well-ventilated humidity-free room.
2. Do not obstruct the rear fan grills. The compressor and
condenser give off heat and require good ventilation to operate
correctly and save energy.
3. Leave a space of at least 10 cm between the top part of the
appliance and any furniture above it, and at least 5 cm between
the sides and any furniture/side walls.
4. Ensure the appliance is away from any sources of heat (direct
sunlight, electric stove, etc.).
5. In order to maintain the correct distance between the appliance
and the wall behind it, fit the spacers supplied in the installation
kit, following the instructions provided.
Levelling
1. Install the appliance on a level and rigid floor.
2. If the floor is not perfectly horizontal, adjust the refrigerator by
tightening or loosening the front feet.
Electrical connections
After the appliance has been transported, carefully place it
vertically and wait at least 3 hours before connecting it to the
electricity mains. Before inserting the plug into the electrical socket
ensure the following:
The appliance is earthed and the plug is compliant with the law.
The socket can withstand the maximum power of the appliance,
which is indicated on the data plate located on the bottom left
side of the fridge (e.g. 150 W).
The voltage must be in the range between the values indicated
on the data plate located on the bottom left side (e.g. 220-240V).
The socket is compatible with the plug of the appliance. If the
socket is incompatible with the plug, ask an authorised
technician to replace it (
see Assistance
). Do not use extension
cords or multiple sockets.
! Once the appliance has been installed, the power supply cable
and the electrical socket must be easily accessible.
! The cable must not be bent or compressed.
! The cable must be checked regularly and replaced by authorised
technicians only (see Assistance).
!
The manufacturer declines any liability should these The manufacturer declines any liability should these
The manufacturer declines any liability should these
safety measures not be observed.safety measures not be observed.
safety measures not be observed.
• Varies by number and/or position.
* Available only on certain models.
Accessories
SHELVES: with or without grill.
Due to the special guides the shelves are removable and the height
is adjustable (
see diagram
), allowing easy storage of large
containers and food. Height can be adjusted without complete
removal of the shelf.
FLEX COOL BOX*
This is the new box to keep meat, fish and cheese fresh.
When
positioned in the “lower” part of the fridge compartment, it is ideal
for meat and fish; when moved to the “top” part of the fridge, it is
perfect for cheese.
It can be taken out of the fridge when it is not
needed.
TEMPERATURE
* Indicator light: to identify the coldest area in the
refrigerator.
1. Check that OK appears clearly on the indicator light (
see
diagram
).
2. If the word “OK” does not appear it means that the temperature
is too high: adjust the REFRIGERATOR OPERATION knob to a
higher (colder) position and wait approximately 10 hours until
the temperature has stabilised.
3. Check the indicator light again: if necessary, readjust it following
the initial process. If large quantities of food have been added or
if the refrigerator door has been opened frequently, it is normal
for the indicator not to show OK. Wait at least 10 hours before
adjusting the REFRIGERATOR OPERATION knob to a higher
setting.
CAN RACK
shelf: stores cans horizontally (
see diagram
).
Yoghurt, butter or general containers may also be stored here.
GB
7
1. Pull out the tray by pushing it up.
Check that the tray is ompletely empty and fill it with water through
the opening provided.
2. Take care not to exceed the level indicated (MAX WATER
LEVEL). Excess water prevents the ice cubes from dispensing
(if this happens, wait for the ice to melt and empty the tray).
3. Turn the tray 90°: due to the connected compartments each
mould fills with water (
see diagram
).
4. Close the opening with the lid provided and put the tray back.
5. When the ice has formed (minimum time approximately 8 hours)
knock the tray against a hard surface and wet the outside so
that the ice cubes come loose and take them out through the
opening.
WATER LEVEL
MAX
WATER LEVEL
MAX
WATER LEVEL
MAX
Freezer compartment
ICE CARE tray
The fact that they are situated on the top part of the freezer
drawers ensures greater cleanliness: the ice no longer comes into
contact with the food placed inside the freezer compartment;
furthermore, the dripping of the water during filling is avoided (a lid
to cover up the hole after filling with water is also provided).
Start-up and use
Starting the appliance
! Before starting the appliance, follow the installation
instructions (
see Installation
).
! Before connecting the appliance, clean the compartments and
accessories well with lukewarm water and bicarbonate.
! The appliance comes with a motor protection control system
which makes the compressor start approximately 8 minutes after
being switched on. The compressor also starts each time the
power supply is cut off whether voluntarily or involuntarily
(blackout).
1. Set the FREEZER OPERATION knob on
.
2. Insert the plug into the socket and ensure that the green
POWER indicator light illuminates.
3. Turn the FREEZER OPERATION knob to an average value and
press the SUPER FREEZE button (rapid freezing): the SUPER
FREEZE indicator light will illuminate. Once the refrigerator has
reached the optimal temperature, the indicator light goes out
and you can begin food storage.
4. Turn the REFRIGERATOR OPERATION knob to an average
value. After a few hours you will be able to put food in the
refrigerator.
Chiller system
No Frost
The No Frost system circulates cold air continuously to collect
humidity and prevent ice and frost formation. The system maintains
an optimal humidity level in the compartment, preserving the
original quality of the food, preventing the food from sticking
together and making defrosting a thing of the past. Do not block
the aeration cells by placing food or containers in direct contact
with the refrigerating back panel. Close bottles and wrap food
tightly.
Using the refrigerator to its full potential
Use the REFRIGERATOR OPERATION knob to adjust the
temperature (
see Description
).
Press the SUPER COOL button (rapid cooling) to lower the
temperature quickly. For example, when you place a large
number of new food items inside a fridge the internal
temperature will rise slightly. The function quickly cools the
groceries by temporarily reducing the temperature until it
reaches the ideal level.
Place only cold or lukewarm foods in the compartment, not hot
foods (
see Precautions and tips
).
Remember that cooked foods do not last longer than raw foods.
Do not store liquids in open containers. They will increase
humidity in the refrigerator and cause condensation to form.
ODOUR FILTER
*: Some models are fitted with a new odour filter
with active carbons, which ensures better air quality inside the
refrigerator.
The filter is located on the bottom right-hand side, inside the
ventilation opening.
8
GB
The removable accessories may be soaked in warm water and
soap or dishwashing liquid. Rinse and dry them carefully.
The back of the appliance may collect dust which can be
removed by delicately using the hose of a vacuum cleaner set
on medium power. The appliance must be switched off and the
plug must be pulled out before cleaning the appliance.
Avoiding mould and unpleasant odours
The appliance is manufactured with hygienic materials which are
odour free. In order to maintain an odour free refrigerator and to
prevent the formation of stains, food must always be covered or
sealed properly.
If you want to switch the appliance off for an extended period of
time, clean the inside and leave the doors open.
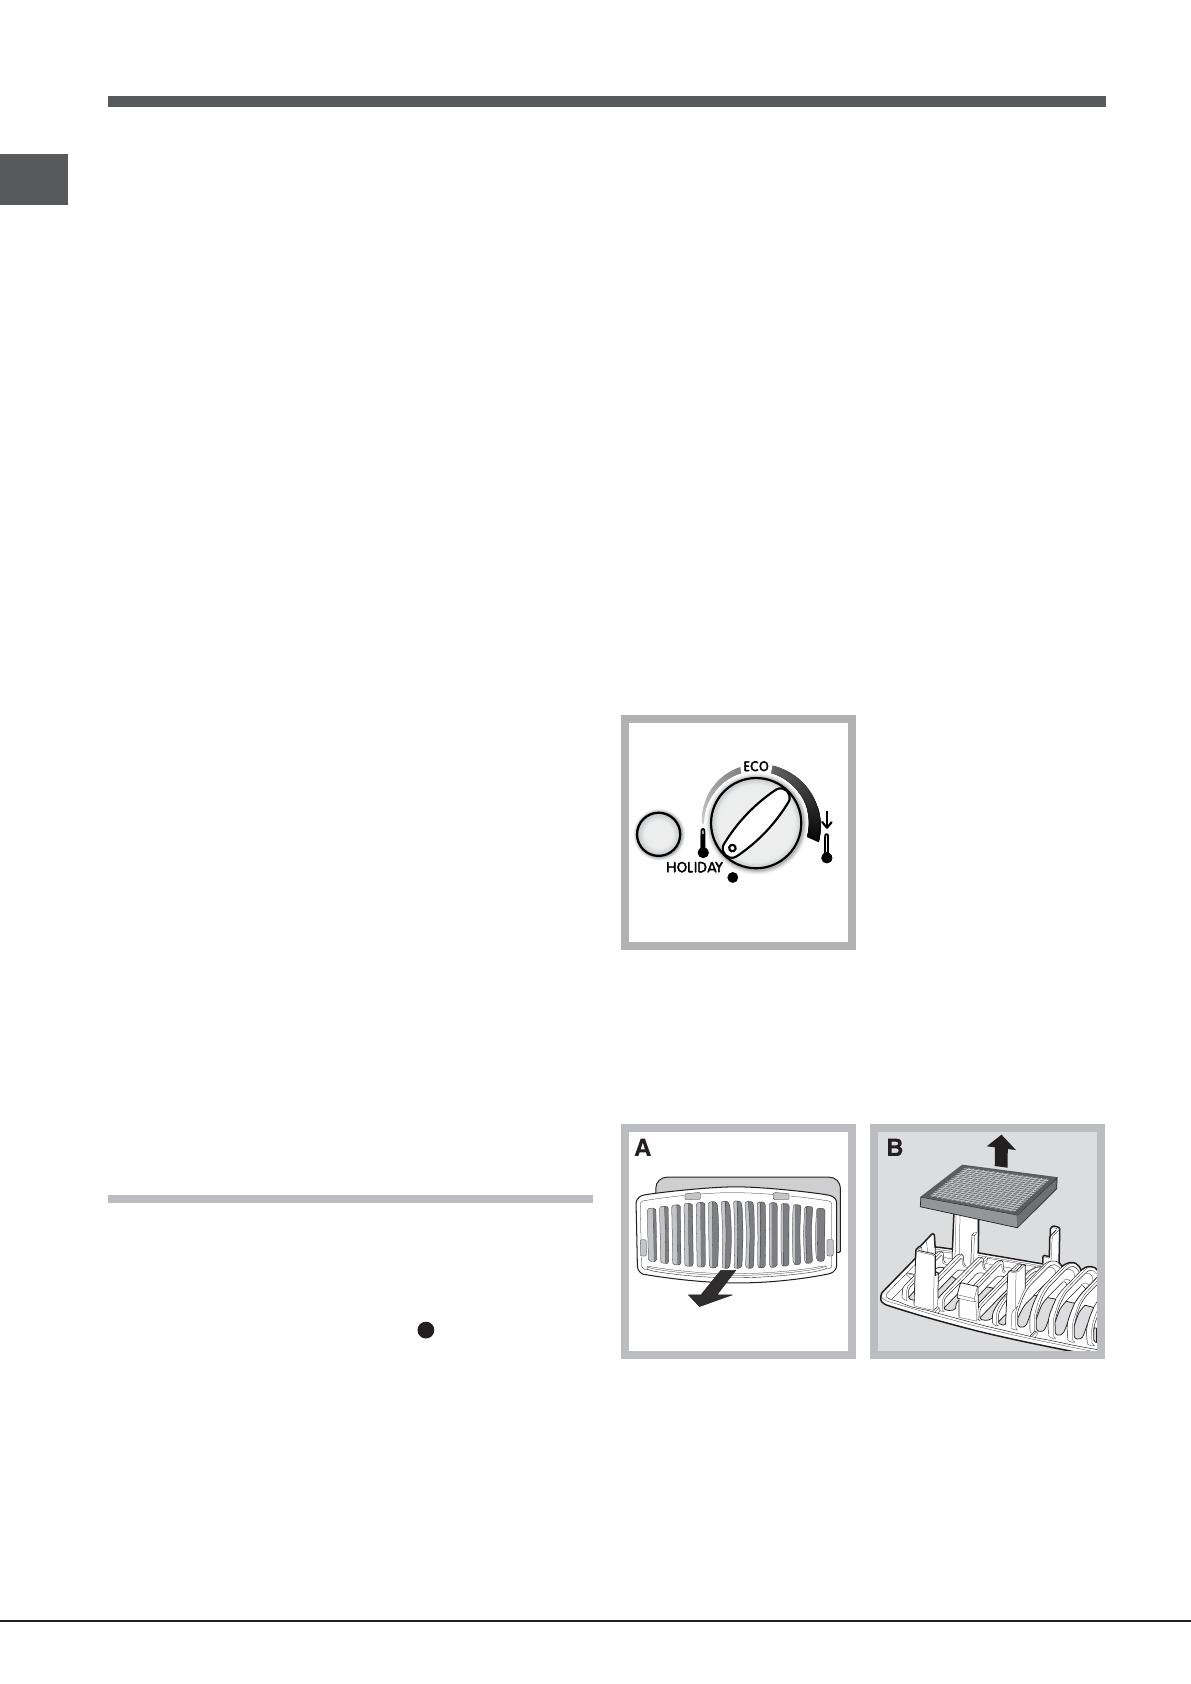
Holiday function
If you are going on holiday, you do not have to switch the appliance
off; it features a low-energy function which optimises the
temperature of the refrigerator compartment to suit the products
stored inside it (you may, for example, wish to protect cosmetics
and beauty products from the heat). The freezer temperature must
be set to the minimum value in order to preserve the food.
To enable the function: set the REFRIGERATOR OPERATION knob
on HOLIDAY (
see diagram
).
A double acoustic signal informs you when it has been enabled. A
single acoustic signal informs you when it has been disabled.
Replacing the l Odour filter
The filter should be replaced after approximately 6-8 months from
when it is activated. This period may vary depending on the type of
food that is stored. For information on where a replacement filter may
be purchased, contact Assistance (
see Assistance
).
To replace the filter, follow the instructions (
see diagrams A and B
).
Replacing the light bulb
To replace the light bulb in the refrigerator compartment, pull out
the plug from the electrical socket. Follow the instructions below.
Access the light bulb by removing the cover as indicated in the
diagram. Replace it with a similar light bulb within the power range
indicated on the cover (10W).
Food hygiene
1. Once you have bought your food, remove all external
packaging made of paper/cardboard or other wrappers, which
could introduce bacteria or dirt inside your refrigerator.
2. Protect the food, (especially easily perishable items and those
that have a strong smell), in order to avoid contact between
them, thereby removing both the possibility of germ/bacteria
contamination as well as the diffusion of strong odours inside the
fridge.
3. Store all food in such a way as to ensure air can circulate freely
between different items.
4. Keep the inside of your fridge clean, taking care not to use
oxidiser or abrasive products.
5. Remove all food past its expiry date from the refrigerator.
6. For the correct preservation of food, all easily perishable items
(soft cheeses, raw fish, meat, etc.) should be stored in the
coldest zone of the fridge compartment, i.e. just above the salad
crisper where the temperature indicator is situated.
Using the freezer to its full potential
Use the FREEZER OPERATION knob to adjust the temperature
(
see Description
).
Do not re-freeze food that is defrosting or that has already been
defrosted. These foods must be cooked and eaten (within 24
hours).
Fresh food that needs to be frozen must not come into contact
with food that has already been defrosted.
Do not place glass bottles which contain liquids, and which are
corked or hermetically sealed in the freezer because they could
break.
The maximum quantity of food that may be frozen daily is
indicated on the plate containing the technical properties located
on the bottom left side of the refrigerator compartment (for
example: Kg/24h: 4).
To freeze (if the freezer is already operating): press the rapid
freezing SUPER FREEZE button (corresponding yellow indicator
light illuminates), insert the food and close the door. The function
is disabled automatically after 24 hours or when optimal
temperatures have been reached (indicator light goes out);
! To avoid blocking the air circulation inside the freezer
compartment, it is advisable not to obstruct the ventilation holes
with food or containers.
! Do not open the door during freezing.
! If there is a power cut or malfunction, do not open the freezer
door. This will help maintain the temperature inside the freezer,
ensuring that foods are conserved for at least 9 -14 hours.
Maintenance and care
Switching the appliance off
During cleaning and maintenance it is necessary to disconnect the
appliance from the electricity supply:
1. set the FREEZER OPERATION knob on
2. pull the plug out of the socket
Cleaning the appliance
The external and internal parts, as well as the rubber seals may
be cleaned using a sponge that has been soaked in lukewarm
water and bicarbonate of soda or neutral soap. Do not use
solvents, abrasive products, bleach or ammonia.
GB
9
1
2
Precautions and tips
! The appliance was designed and manufactured in compliance
with international safety standards. The following warnings are
provided for safety reasons and must be read carefully.
This appliance complies with the following Community Directives:
- 73/23/EEC of 19/02/73 (Low Voltage) and subsequent
amendments;
-89/336/EEC of 03.05.89 (Electromagnetic Compatibility) and
subsequent amendments;
- 2002/96/CE.
General safety
The appliance was designed for domestic use inside the home
and is not intended for commercial or industrial use.
The appliance must be used to store and freeze food products
by adults only and according to the instructions in this manual.
The appliance must not be installed outdoors, even in covered
areas. It is extremely dangerous to leave the appliance exposed
to rain and storms.
Do not touch the appliance with bare feet or with wet or moist
hands and feet.
Do not touch the internal cooling elements: this could cause skin
abrasions or frost/freezer burns.
When unplugging the appliance always pull the plug from the
mains socket, do not pull on the cable.
Before cleaning and maintenance, always switch off the
appliance and disconnect it from the electrical supply. It is not
sufficient to set the temperature adjustment knobs on
(appliance off) to eliminate all electrical contact.
In the case of a malfunction, under no circumstances should you
attempt to repair the appliance yourself. Repairs carried out by
inexperienced persons may cause injury or further
malfunctioning of the appliance.
Do not use any sharp or pointed utensils or electrical equipment
- other than the type recommended by the manufacturer - inside
the frozen food storage compartments.
Do not put ice cubes taken directly from the freezer into your
mouth.
This appliance is not intended for use by persons (including
children) with reduced physical, sensory or lack of experience
and knowledge unless they have been given supervision or
instruction concerning use of the appliance by a person
responsible for their safety. Children should be supervised to
ensure that they do not play with the appliance.
Keep packaging material out of the reach of children! It can
become a choking or suffocation hazard.
Disposal
Observe local environmental standards when disposing
packaging material for recycling purposes.
The European Directive 2002/96/EC on Waste Electrical and
Electronic Equipment (WEEE), requires that old household
electrical appliances must not be disposed of in the normal
unsorted municipal waste stream. Old appliances must be
collected separately in order to optimise the recovery and
recycling of the materials they contain and reduce the impact on
human health and the environment. The crossed out “wheeled
bin” symbol on the product reminds you of your obligation, that
when you dispose of the appliance it must be separately
collected. Consumers should contact their local authority or
retailer for information concerning the correct disposal of their
old appliance.
Respecting and conserving the environment
Install the appliance in a fresh and well-ventilated room. Ensure
that it is protected from direct sunlight and do not place it near
heat sources.
Try to avoid keeping the door open for long periods or opening
the door too frequently in order to conserve energy.
Do not fill the appliance with too much food: cold air must
circulate freely for food to be preserved properly. If circulation is
impeded, the compressor will work continuously.
Do not place hot food directly into the refrigerator. The internal
temperature will increase and force the compressor to work
harder and will consume more energy.
Defrost the appliance if ice forms (
see Maintenance
). A thick
layer of ice makes cold transference to food products more
difficult and results in increased energy consumption.
Regularly check the door seals and wipe clean to ensure they
are free of debris and to prevent cold air from escaping (
see
Maintenance
).
Troubleshooting
If the appliance does not work, before calling for Assistance (see
Assistance), check for a solution from the following list.
The green POWER indicator light does not illuminate.
The plug has not been inserted into the electrical socket, or not
far enough to make contact, or there is no power in the house.
The motor does not start.
The appliance comes with a motor protection control (
see Start-
up and use
).
The indicator lights are on but the light is dim.
Pull out and reverse the plug before putting it back in the socket.
a) The alarm sounds.
a) The refrigerator door has remained open for more than two
minutes (the buzzer will stop sounding when you shut the door)
or the correct switching-off procedure was not followed (
see
Maintenance
).
b) The alarm sounds and the two yellow indicator lights
flash.
b) The temperature in the freezer is too high. Check the quality of
the food products and dispose if necessary.
+ buzzer = Heating is excessive
10
GB
c) The alarm sounds and the two yellow indicator lights as
well as the green one flash.
c) The temperature in the freezer has reached a dangerous level.
The food must be disposed immediately.
+ buzzer = Heating danger
b/c) In the first case the freezer will maintain a temperature of about
0°C so that the food does not re-freeze. In the second case,
however, the temperature will remain at approximately -18°C. To turn
off the acoustic signal open and close the refrigerator door. To
restore normal operation bring the FREEZER OPERATION knob
setting to
(off) and turn the appliance on again.
The green POWER indicator light flashes.
The appliance is not operating correctly. Contact the Technical
Assistance Centre.
The refrigerator and the freezer do not cool well.
The doors do not close properly or the seals are damaged.
The doors are opened too frequently.
The OPERATION knobs are not on the correct setting (
see
Description
).
The refrigerator or the freezer have been over-filled.
The food inside the refrigerator is beginning to freeze.
The REFRIGERATOR OPERATION knob is not on the correct
setting (
see Description
).
The food is in contact with the back inside wall of the refrigerator.
The motor runs continuously.
The SUPER FREEZE button has been pressed (rapid freezing):
the yellow SUPER FREEZE light is on or flashing (
see
Description
).
The door is not closed properly or is continuously opened.
The outside ambient temperature is very high.
The thickness of the frost exceeds 2-3 mm (
see Maintenance
).
The appliance makes a lot of noise.
The appliance has not been installed on a level surface (
see
Installation
)
.
The appliance has been installed between cabinets that vibrate
and make noise.
The internal refrigerant makes a slight noise even when the
compressor is off. This is not a defect, it is normal.
Some of the external parts of the refrigerator become hot
Temperaturile ridicate sunt necesare pentru a evita formarea
apei de condens în anumite zone ale produsului.
  • Page 1 1
  • Page 2 2
  • Page 3 3
  • Page 4 4
  • Page 5 5
  • Page 6 6
  • Page 7 7
  • Page 8 8
  • Page 9 9
  • Page 10 10
  • Page 11 11
  • Page 12 12
  • Page 13 13
  • Page 14 14
  • Page 15 15
  • Page 16 16

Indesit BAAN 40 FNF (TK) User guide

Category
Fridge-freezers
Type
User guide

Ask a question and I''ll find the answer in the document

Finding information in a document is now easier with AI

in other languages