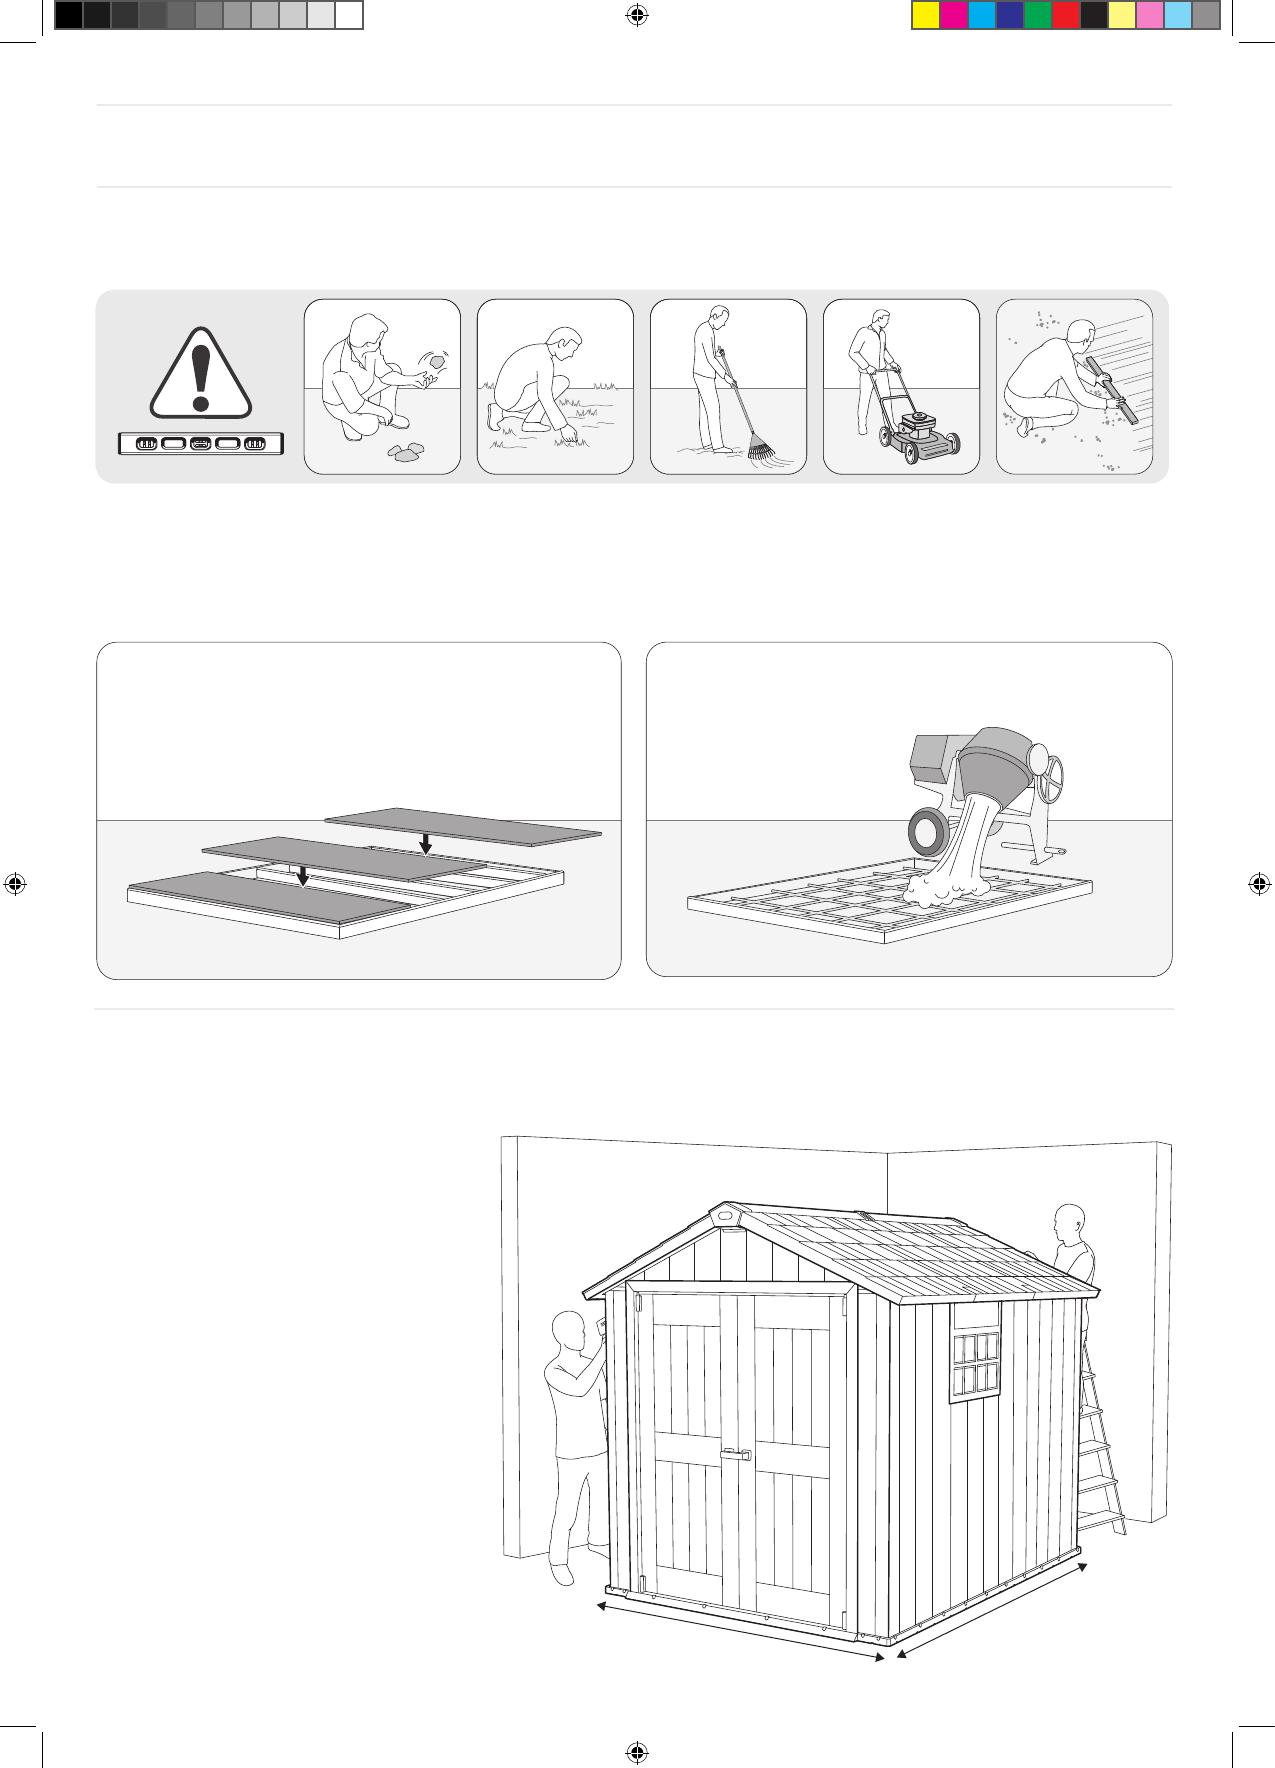
For external access during assembly,
make sure to leave enough room around
the outside of the shed assembly site.
Pour un accès externe au cours du
montage, veillez à laisser suffisamment de
place autour du site de montage.
Para tener un acceso exterior durante el
montaje, asegúrese de dejar suficiente
espacio alrededor del lugar de montaje del
cobertizo.
Lassen Sie am Aufstellungsort außerhalb
des Schuppens ausreichend Platz, so dass
Sie während des Aufbaus von außen
Zugang zum Schuppen haben.
Om tijdens de montage aan de buitenkant
van het schuurtje te kunnen werken, moet
u ervoor zorgen dat u genoeg ruimte laat
aan de buitenkant van de montageplaats.
Per l'accesso esterno durante il montaggio,
assicurati di lasciare abbastanza spazio
intorno alla parte esterna del luogo di
montaggio del deposito attrezzi.
Para ter acesso externo durante a
montagem certifique-se de que deixa
espaço suficiente em redor do exterior do
local de montagem do abrigo.
SITE PREPARATION | PRÉPARATION DU SITE | PREPARACIÓN DEL LUGAR | VORBEREITUNG DES AUFSTELLUNGSORTES
| VOORBEREIDING VAN HET TERREIN | PREPARAZIONE DEL LUOGO DI MONTAGGIO | PREPARAÇÃO DO LOCAL
Level the ground surface | Égalisez la surface du sol | Nivele la superficie del suelo | Ebnen Sie die Bodenoberfläche |
Maak de bodem vlak | Livella la superficie del terreno | Nivele a superfície do solo
Recommendation: Construct a wooden or concrete base as a foundation | Recommandation: fabriquez une base en bois ou
en béton en guise de fondation | Recomendación: construya una base de madera o de cemento a modo de cimiento |
Empfehlung: Bauen Sie als Fundament eine Grundfläche aus Holz oder Beton | Aanbeveling: maak een houten of betonnen
ondergrond als fundering | Raccomandazione: costruisci una base di legno o di cemento come fondamenta |
Recomendação: Construa uma base de madeira ou de cimento como fundação
External floor measurements are: | Les measures externes de la étage sont: |
Las medidas del suelo externo son: | Die Außen-Bodenmaße betragen: | De
afmetingen van de externe vloer zijn: | Le misure del pavimento esterno sono: |
As medidas externas do chão são:
Option | Opción | optie | opzione | opção
A
Option | Opción | optie | opzione | opção
B
82.7”
210 cm
109.8”
279 cm
REQUIRED TOOLS | OUTILS EXIGÉS | HERRAMIENTAS NECESARIAS | BENÖTIGTE WERKZEUGE | BENODIGD
GEREEDSCHAP | ATTREZZATURA OCCORRENTE | FERRAMENTAS NECESSÁRIAS
ASSEMBLY REQUIRES TWO PEOPLE | LE MONTAGE DOIT ÊTRE EFFECTUÉ PAR DEUX PERSONNES | SE NECESITAN
DOS PERSONAS PARA ARMARLO | ZWEI PERSONEN ZUR MONTAGE NOTWENDIG | MONTAGE VEREIST TWEE
PERSONEN | MONTAGGIO RICHIEDE DUE PERSONE | A MONTAGEM EXIGE DUAS PESSOAS
BEFORE STARTING ASSEMBLY | AVANT DE COMMENCER LE MONTAGE | ANTES DE EMPEZAR EL ARMADO |
VOR MONTAGEBEGINN | VOORDAT U BEGINT TE MONTEREN | PRIMA DI INIZIARE IL MONTAGGIO | ANTES DE
INICIAR A MONTAGEM
Read the care and safety guidelines at the end of this manual | Check to ensure that there are no missing or damaged
parts BEFORE starting or arranging assembly | Review all assembly instructions | Assemble all the parts according to the
directions in this manual. Do not skip any steps.
Lisez les instructions de précaution et de sécurité à la fin de ce manuel | Assurez-vous qu’il n’y a pas de pièces manquantes
ou endommagées AVANT de commencer ou d'organiser l'assemblage | Lisez toutes les instructions de montage |
Assemblez toutes les pièces selon les instructions de ce manuel. Ne sautez aucune étape.
Lea las intrucciones de precauciones y seguridad que están al final de este manual | Asegúrese de que no faltan piezas ni
están dañadas ANTES de comenzar o disponer el montaje | Revise todas las instrucciones de montaje | Monte todas las
piezas según las instrucciones de este manual. No se saltee ningún paso.
Lesen Sie die Sicherheitsrichtlinien am Ende des Benutzerhandbuchs durch | Prüfen Sie bitte VOR dem Zusammenbau,
dass keine Teile beschädigt sind oder fehlen | Gehen Sie noch einmal die komplette Aufbauanleitung durch | Bauen Sie alle
Teile entsprechend der Anleitung in diesem Handbuch zusammen. Lassen Sie dabei keinen Arbeitsschritt aus.
Lees de richtlijnen voor zorg en veiligheid achterin deze handleiding | Controleer dat er geen onderdelen mankeren, of
beschadigd zijn, VOORDAT u met de montage begint | Bekijk alle montagehandleidingen | Monteer alle onderdelen
volgens de aanwijzingen van deze handleiding. Sla geen stappen over.
Leggi le linee guida di assistenza e sicurezza alla fine di questo manuale | Verificare per assicurarsi che non ci siano parti
mancanti o danneggiate PRIMA di iniziare o di disporre il montaggio | Consulta tutte le istruzioni di montaggio | Monta tutti
i componenti secondo le istruzioni contenute in questo manuale. Non saltare nessuna fase.
Leia as diretrizes de cuidados e segurança que constam da parte final deste manual | Verifique para se assegurar de que
não há peças em falta ou danificadas ANTES de começar a preparar a montagem | Reveja todas as instruções de
montagem | Monte todas as peças de acordo com as instruções do manual. Não salte quaisquer passos.
2
A-1380-4 579235 OAKLAND 759.indd 2 12.3.2017 8:52