Page is loading ...

User
|
Manual
www.fl x . b i k e
flx.bike/support
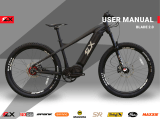
ROADSTER TRAIL ATTACK


Table of Contents:
02
03
05
10
11
14
18
19
20
21
22
23
24
25
01
Dear Customer,
Quick Start Guide
Components
Proper Use & Safety Info
Technical Specs
LCD Screen
LCD Screen: Error Codes
Battery Care
Cleaning & Care
Useful Tips
Legal Requirements
Legal Disclaimer
Legal Details
Terms & Conditions

02
Dear Customer
First off, welcome to the FLX family! We’re so happy you’re here. We want to thank you from
the bottom of our hearts for buying a FLX bike. You’ve picked a top-of-the-line model and in
this manual we’re going to break down the basics to make sure that your bike remains in top
shape and performs to the highest standard. You’re about to experience the ride of your life.
In order to get you out and having fun as quickly and as safely as possible please read the
chapters: Quick-Start Guide, Useful Tips, and Safety Information. Also we highly recommend
familiarizing yourself with local laws for e-bikes and the components of the model that you
have before your first ride.
Having trouble sleeping? Check out the chapter Legal Requirements, Disclaimer & Details,
we promise it will put you right out.
FLX assumes that all persons involved in: using, repairing, maintaining, cleaning, or disposing
of this or any FLX product must have fully read and understood the content and meaning of
these operating instructions. Additionally FLX claims no responsibility for any injury or
damage resulting in improper use of any FLX product.
Ready to get started? Let’s ride!
--Team FLX

x.bike
03

04
Quick-Start Guide
1. Completely charge the battery before the first use
2. Assemble the Handle Bars
3. Attach the Pedals
4. Mount the Front Wheel
flx.bike/manual
( Red light is on when battery is charging, green when
fully charged. 13Ah batteries take approx 4.5 hours to charge,
17Ah take approx 5.5 hours. )
Note: The left hand pedal has a reverse thread.
To tighten, please turn anti-clockwise.
5. Make sure the seat post is inserted at least 4" deep in the seat tube.
If you need to raise the seat higher than this, please get a longer seat post
that can be inserted to proper depth. Failure to insert to this minimum insertion depth
may damage the bike and could lead to a serious accident.

05
Components Pt.1

06
ts Pt.1 Components Pt.2

07
Components Pt.3

08
Proper Use
&
Always ensure before riding that all components are attached
properly, as neglecting to ensure this may cause issues in the future.
Always abide by the local laws of the areas that you ride in.
Here at FLX we’re always concerned with your safety, comfort,
and happiness. We can’t stress enough the use of proper safety
equipment in addition to the correct use of any FLX product. While the
use of pads and a helmet may not be required by law they will provide
an extra layer of protection, and we highly recommend their use.
Always wear appropriately bright clothing during the day and use
head- and tail- lights at night to increase visibility. Learn and use proper
cycling hand signals and always use caution when riding on the road
whether or not there is a bike lane.
FLX products were built for high intensity and heavy use, they
can stand up to quite a bit of punishment. Please take care of them as
rust, dents and other damage can affect the performance. For cleaning
information see Cleaning and Care.
Most adjustments to any FLX product can be performed with a
basic set of hex wrenches and other basic tool. Larger issues should be
handled by a qualified mechanic.
Safety Info
flx.bike/faq

Technical Specs: Roadster
09
Frame
19” 6 series
aluminum alloy,
integrated battery
housing, internal
cable routing,
accessory mounts
Fork
Custom aluminum
alloy, fender eyelets
Tires
Kenda Nevegal
27.5 x 1.5 wire bead
Wheels
Samson 27.5” alloy
-
Motor
650w (peak) Bofeili
brushless mid motor
Battery
36V 13A (468WH)
lithium ion,
Panasonic cells
LED charge
indicator
Lockable
USB Port
Display
Backlit LCD with
thumb controls
Assist
5 level pedal assist
Thumb throttle
Brakes
Tektro hydraulic
Disc with power
cutoff
180mm rotors
Rear Derailleur
Shimano Alvio 9
speed
Cassette
Shimano 9 speed
11-34t
Chain
KMC 9 speed
Chainring
48t

10
Technical Specs:
Trail
Frame
19” 6 series
aluminum alloy,
integrated battery
housing, internal
cable routing,
accessory mounts
Fork
SR Suntour XCR coil
suspension
Tires
Kenda Nevegal
27.5 x 2.25 wire bead
Wheels
Samson 27.5” alloy
-
Motor
650w (peak) Bofeili
brushless mid motor
Battery
36V 13A (468WH)
lithium ion,
Panasonic cells
LED charge
indicator
Lockable
USB Port
Display
Backlit LCD with
thumb controls
Assist
5 level pedal assist
Thumb throttle
Brakes
Tektro hydraulic
Disc with power
cutoff
180mm rotors
Rear Derailleur
Shimano Alvio 9
speed
Cassette
Shimano 9 speed
11-34t
Chain
KMC 9 speed
Chainring
48t

Technical Specs:
11
Attack
Frame
19” 6 series
aluminum alloy,
integrated battery
housing, internal
cable routing,
accessory mounts
Fork
SR Suntour Epixon
air suspension with
remote lock out
Tires
Kenda Nevegal
27.5 x 2.25 wire bead
Wheels
Samson 27.5” alloy
Rear Suspension
SR Suntour air shock
with lock out
Motor
650w (peak) Bofeili
brushless mid motor
Battery
36V 17A (612WH)
lithium ion,
Panasonic cells
LED charge
indicator
Lockable
USB Port
Display
Backlit LCD with
thumb controls
Assist
5 level pedal assist
Thumb throttle
Brakes
Tektro hydraulic
Disc with power
cutoff
180mm rotors
Rear Derailleur
Shimano Alvio 9
speed
Cassette
Shimano 9 speed
11-34t
Chain
KMC 9 speed
Chainring
48t

12
LCD Screen
Our LCD has many functions, and we are just going
to cover the basics. For more information visit King Meter
SW-LCD Manual. The computer in each screen has already
been adjusted for the wheel size of the model that it is
mounted on, and that way you can get out and
ride as soon as you want!
flx.bike/manual

LCD Screen:
Screen & Controls
13
MODE
88:88
AVG SPEED
MAX SPEED
TRIP
ODO
F E
PAS
Error
WATT
Maintain
DST. TO GO
ECO STD POWER SPEED HANDLE WALK
Mile
Km
888.8
MPH
Km/h
SPEED
MODE
8
888
Battery indicator
Distance
Distance Unit
Speed Unit
Push Cruise Control
Error Code
Power Level

14
LCD Screen:
Instructions
To start the computer press and hold the “MODE” button for 1.5
seconds. Once this is done the “Power Level” section of the screen will
display the current level of pedal assist active. Default is 0, and
maximum is 5. The level of pedal assist can be adjusted by pressing the
“UP” or “DOWN” buttons as appropriate. When active the throttle will
also be active, and this can be triggered regardless of the level of pedal
assist by depressing the throttle lever found on the right-hand grip of
the handlebars.
Additionally a walk-assist mode can be activated by pressing
“DOWN” for 2.5 seconds. This is a single-speed designed to be an
average walking pace, NOT FOR RIDING.
When full, the “Battery Indicator” will show 5 segments, when the
battery is low there will be one segment, and to indicate that it needs
to be charged the segment will flash at 1Hz.
The headlight, taillight and backlight on the LCD screen can be
activated by pressing the “UP” and “MODE” buttons for 3 seconds,
similarly it can be turned off by holding the “UP” and “MODE” buttons
for 3 seconds. For USB charging, insert the USB cable into the display
before turning the display on to activate USB charging mode.

LCD Screen: Programming
15
Please check the default settings on your bike to ensure they are
correct and in compliance with local laws. It is possible to change these
defaults by entering the “Programming Mode” by holding both the “UP”
and “DOWN” buttons for 2.5 seconds. The options can be cycled through
and adjusted as you see fit. To save and exit press the “MODE” button for
3 seconds. You are able to change the settings for:
Wheel Diameter
Maximum Speed
Backlight Brightness
Display Unit (Metric system / British system)

16
LCD Screen:
Error Codes
There is a possibility of error codes appearing on the screen, and
this will prevent the motor and computer from functioning until the
error is addressed.
Code Number Definition
21
22
23
24
25
30
Abnormal Current
Throttle Fault
Motor Phase Problem
Motor Hall Defect
Brake Failed
Abnormal Communication

Battery Care
17
Removing the battery from the bike when storing it for a long
period of time is recommended. In this case store it in a cool, dry area
away from water. The charge left in the battery should be 50%-75% for
long storage times.
Cleaning the battery and battery housing should only be done
while disconnected and powered off. Use a dry rag, and if need be a
lightly damp rag. DO NOT spray with high-pressured water to prevent
damage or possible short-circuiting.
Only charge the battery with the supplied charger as others may
not function properly, and this increases the possibility of fire or
explosion. Charging the battery during the day in a dry space with a
smoke/fire alarm is recommended, while placing the battery on a
non-flammable surface. Do not store the charger or battery in a wet
place or in direct sunlight. Lithium-ion batteries are meant to be
recharged with 10%-15% of the charge remaining to prevent damage to
the cells. Keep both the battery and charger out of the reach of children
and p
Note that based on IATA regulations you are not allowed to ship
Lithium batteries of such size by air. Please consult a land or sea fright
for transportation of the battery.
ets while charging or during ‘storage.
If there appears to be an issue with the charger or battery, stop use
immediatley and contact either the manufacturer or us at hello@
flx.bike.
Battery Indicator
Power Button
Charging Port
USB Port

18
Cleaning & Care
Whenever you service, be sure to first remove the battery.
Keeping the chain, shifter, and gear cassette properly
lubricated will help prolong the life of your bike. The greatest enemy of
any bike is rust, so make sure to dry it off after a wet ride and store it in
a dry place. In general, wiping down your bike after a rough ride with
some soap and water should be plenty to keep it looking great, just
make sure to take special care around the electronics.
/