Page is loading ...

WWW.RADIENTRC.COM
Simple
•
Capable
•
Safe
Safe
Peak
Safe
Start
• Entire contents ©2014 Radient RC.
• Before using your product, review all documentation and
inspect the products carefully. If for some reason you decide it
is not what you wanted, then do not continue with unpacking,
setup or operation of your product. Your local hobby dealer
cannot accept a product for return or exchange after partaking
in actions that produce wear and tear.
• Product specifications are subject to change without notice.
Due to ongoing development, the actual product may vary from
images shown.
• This product contains chemicals known to the State of
California to cause cancer and birth defects or other reproduc-
tive harm.
• This product is not a toy! (14+) Recommended for ages 14
and up. Adult supervision required for ages under 18 years old.
Contains small parts, keep out of reach of children 3 years of
age and younger.
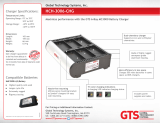
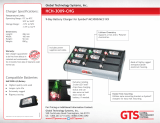
Input power
AC 100-240V @50-60Hz
DC 12-15V
Internal DC switching power supply 50W with cooling fan
Charge current rate
LiFe/Ion/Po
2s
(6.6/7.2/7.4V)
0.1-6A
3s
(9.9/10.8/11.1V)
NiCd/MH 1-8 cell
Current drain for balance port 300mAh
Output connector HCT-Plug to JST-Mini adapter
Integrated balance plug JST-XH (2s-3s)
Weight 350g
Dimensions 161x105x60mm

PACKAGE CONTENTS
COMPATIBLE BATTERY TYPES FOR USE WITH YOUR CHARGER
UNBOXING
INTRODUCING THE ASCEND CHARGER
THE CONTROL PANEL
2
MULTI-CHEMISTRY AC/DC PEAK DETECTION BALANCE CHARGER
1. Lithium Iron Phosphate (LiFe/LiFePO
4
/A123)
a. 2 (6.6V) - 3 (9.9V) cells
2. Lithium Ion (Li-Ion)
a. 2( 7.2V) - 3 (10.8V) cells
3. Lithium Polymer (LiPo)
a. 2 (7.4V) - 3 (11.1V) cells
1. Remove the charger from the box
2. Ensure the plug is compatible with your battery.
a. NOTE: There are many different types of battery plugs on the market. If yours does not fit the standard supplied plugs, please visit
your local hobby dealer to purchase the correct adapter.
3. Read charging instructions and understand all warnings and cautions before proceeding.
a. This product is not a toy and should not be charged, operated, or maintained without supervision of an adult.
b. Note: It is necessary to follow all manufacturer’s charging instructions per each battery type.
1. [1] Ascend Charger
2. [1] HCT-Plug to JST-Mini/Micro plug adapter
4. Nickle Cadmium (NiCd)
a. 1 (1.2V) - 8 (9.6V) cells
5. Nickle Metal-Hydride (NiMH)
a. 1 (1.2V) - 8 (9.6V) cells
3. [1] Documentation
BACKLIT LCD DISPLAY
LiPo/Fe JST-XH 2s
Balance Port
LiPo/Fe JST-XH 3s
Balance Port
COOLING FAN
(KEEP CLEAR)
AIR VENT (KEEP
CLEAR)
MAIN CHARGE LEADS
1
3
2
9
8
10
10
Back / Cancel
Scroll Down
Scroll Up
Enter / OK
6
5
4
7

PHYSICAL FEATURES
3
Simple • Capable • Safe
1. Backlit LCD 16x2 display
a. Displays Safe Start menu system, charge status and charge summary.
2. Main charging lead
a. Connect to the main charge leads of your battery using the appropriate connector type. Visit your local hobby dealer for assistance if
the plug on your battery and charger do not match.
i. WARNING: Never try to force connectors together.
3. 2s-3s JST-XH Balance ports
a. Connected your LiPo balance plug to the appropriate port to enable LiPo balance charging.
i. If your battery has a different connector, do not try to modify your connector or the charger. Visit your local hobby dealer and
purchase a Radient Primal/Ascend Universal Balance Adapter (RDNA0003) for use with your balance plug.
4. Back/Cancel Button
a. Use to ‘go back’ while navigating the Safe Start menu system.
b. Used to cancel or stop a charge cycle.
5. Scroll Down
a. Press to scroll down both adjustable values or screens in the Safe Start menu system.
b. Press while charge summary screen is displayed to scroll through the available results.
6. Scroll Up
a. Press to scroll up both adjustable values and screens in the Safe Start menu system.
b. Press while charge summary screen is displayed to scroll through the available results.
7. Enter/OK
a. Use to enter into a menu screen or confirm an action.
b. Hold for 3 seconds to confirm the charging parameters and start the charge cycle.
c. Press during charge to display advanced charge data.
8. AC input plug.
a. For use with 2 prong grounded receptacles (plugs) supplying 100-240V @50-60Hz AC power.
9. DC input wires
a. Comes with banana style connectors installed for connection to popular 12V-15V power supplies.
b. Alligator clips for connection to 12V deep cycle batteries are available and sold separately (RDNA0007).
10. Cooling fan and vents
a. Always keep clear and never stick anything into the charger through these or any other holes in the case.
b. Note: The cooling fan turns on automatically when needed.

GENERAL CHARGING PRECAUTIONS
TIPS FOR SAFELY OPERATING YOUR CHARGER
4
MULTI-CHEMISTRY AC/DC PEAK DETECTION BALANCE CHARGER
Although great for first time users, Radient RC products are indeed advanced and sensitive electronics that could result in injury if used improperly.
Always use caution and common sense as failure to operate your Radient RC product in a safe and responsible manner can result in damage to the
product or other properties. Therefore this product is not intended for use or maintenance by children without direct adult supervision. Radient RC
and your local hobby dealer shall not be liable for any loss or damages, whether direct, indirect, special, incidental, or consequential, arising from
the use, misuse, or abuse of this product or any product required to operate or maintain it. Following are some general tips that will help increase
the safe operation and enjoyment of using your charger.
• Do not operate your charger in direct sun light, rain, electrical, or thunder storms
• The charger should never be connected to a battery without being connected to an input power source
• Never operate your charger where input power is highly unstable
• Never attempt to charge a non-rechargable battery or battery type that is not compatible wit this charger
• Operate in a dry, open environment away from property, and cars (never run into the street for any reason)
• Always disconnect the battery from the charger after charge is complete
• Never connect the battery to the charger when the charger is powered off. The charger should always be powered on before connecting the
battery
• Never stick anything into the charger case due to risk of electrical shock or interference with the cooling fan
• Always allow batteries to completely cool before charging
› NOTE: Only use genuine replacement or aftermarket parts available from your local hobby dealer to ensure proper operation of your
Radient RC product
• Avoid charging on or around flammable items
• Never attempt to charge a swollen or damaged battery
• Never leave the battery unattended while charging
• Never operate the charger without adult supervision
• Never charge a warm battery, always allow the battery to cool to room temperature before charging
• Never drop the charger or battery
• Inspect the battery and charger before use. Never charge a battery or operate a charger if the wire or connector has been damaged or if the
battery has experienced a short circuit
• Incorrect use of the battery, connections, or charging equipment can cause personal injury or property damage
• Never allow batteries or charger to come in contact with moisture at any time; avoid environments with high humidity
• Disconnect input power and battery immediately if the battery, connector, or charger becomes hot or changes form (swells, bulges, indents,
etc.) during use

SAFE START MENU SYSTEM AND SOFTWARE FEATURES
5
Simple • Capable • Safe
Although different from the original implementation of Safe Start technology first seen in the Primal charger, the Ascend features the same logic.
The Safe Start menu system is different from any charger you may have used before and thus designed to help you, the user consciously select the
correct charging mode for your batteries to protect both yourself and your equipment, while remaining easy to operate and understand what you are
doing with the charger.
Safe Start Logic:
When the charger is powered on you will be greeted and automatically routed to the area of the software where you can select your desired func-
tion. The default start screen is always the LiFe charge mode. This default provides the simplest menu system that also incorporates the highest
level of safety seen in today’s chargers. Here’s why:
• Due to the charging algorithm used, charging in LiFe charge mode is the safest option of those offered by the Ascend charger as it charges
to the lowest termination voltage. Many batteries will fall out of the voltage limits of that mode if you accidentally try to charge a battery not
designed for it.
• The LiFe mode is a balance only charging mode that requires you to insert a balance plug into one of the ports (or aftermarket universal
adapter board). Since NiXX type batteries do not have a balance plug and thus cannot be connected, as part of the Safe Start system the
charger will not charge these batteries in LiFe mode. If a LiPo battery is by chance at a low enough voltage to be accepted by the charge
mode, it will only receive a partial charge, still a safe result from the opposite alternative
Charge Mode (Charge Rate Calculation Mode):
The Ascend is equipped with two charging modes relative to each battery primary chemistry which allows setting of the charge rate based on either
the capacity of the battery being charged or a user input value (the last value used is remembered for each charge mode for your convenience). We
recommend charging by capacity charge mode as it offers the safest operating conditions. Here’s a description of both options that are available
under the “Options” menu of your charger. This option can be set independently of chemistry (LiXX/NiXX).
• Capacity Mode:
› After selecting a charge mode (LiFe, Li-Ion, LiPo, NiMH/NiCd) from the main menu, you are presented with the screen to set the
battery capacity.
› Enter the “mAh” value printed on your battery pack.
» Minimum value: 100mAh
» Maximum value: 9900mAh
› After entering the battery capacity the charger will calculate the maximum allowable charge current as 1C but. The following confir-
mation screen will display the calculated maximum allowable charge rate. Using common sense calculation (like having an idea of
how much change you should get back from a teller after a cash transaction) make sure this value is not higher than expected. If it
is, go back and double check the entered value for mAh.
› When the charger measures the capacity increase in the battery at the entered value, the charge cycle will automatically stop to
prevent over charging.
• Current Mode:
› After selecting a charge mode (LiFe, Li-Ion, LiPo, NiMH/NiCd) from the main menu, you are presented with the screen to set the
charge current.
› NOTE: See the index in this Owner’s guide for a guide to calculate the charge current based on a battery’s charge C rating
» Minimum value: 0.1A
» Maximum value: 6.0A
» Note: The charger will always try to achieve the desired paremeters that you have entered for charging while taking into
account the attached battery and input power source. However to keep the charger in safe operating limits the maximum
charge current may be reduced as needed.
» A standard 120min safety time is used in current mode. Some high capacity batteries or batteries charged at less than 1C
may take longer than this to complete the charge. Use your discretion to determine if the battery needs to be charged again
before use.
» WARNING: Always allow batteries to cool completely before re/charging.
CAUTION: It should always be noted that safety timers of any type do not alone prevent over charging, they
are meant to be useful in the most typical charging conditions however they can all be circumvented. For this
reason its is always recommended to never leave your batteries unattended while charging and to monitor their
condition periodically. Disconnect input power and battery immediately if the battery, connector, or charger
becomes hot or changes form (swells, bulges, indents, etc.) during use.

SAFE START MENU SYSTEM AND SOFTWARE FEATURES CONTINUED
6
MULTI-CHEMISTRY AC/DC PEAK DETECTION BALANCE CHARGER
Confirm the Settings:
After deciding and setting either the charge current or battery capacity and pressing enter, you are asked to confirm the settings that you have just
entered. It is most important to confirm the following items:
• Battery Type/Chemistry is accurate
• Charge rate does not exceed 1C (unless done intentionally, see Index at the back of this manual for charge rate calculations)
Starting a Charge:
Once you have visually confirmed the settings for charging your battery, press and hold the Enter button for 3 seconds. The charger will display
a message as it checks for any errors in the connections, battery voltage etc., you may then release the button and the charge will start if all the
checks are succesful and determined OK.
Charge Data:
Your charger will now display the charge status and current charge data including the Time, Voltage, Charge Current, and mAh (in). You will also no-
tice a very unique feature displayed in the upper left hand corner of the screen. Here are the letters you will see and their corresponding definitions.
• CC: Constant Current mode used for the initial charge phase when charging LiPo/Fe batteries and the entire charge cycle for NiXX batteries
• CV: Constant Voltage mode used for the final charge phase when charging LiPo/Fe batteries. You will see this displayed for approximately
the last 20% of the charge cycle indicating the battery is approximately 80% charged
• DV: Delta-Peak mode is used to detect the voltage drop during the charge cycle for NiXX type batteries. This setting is used to monitor the
voltage drop of the battery pack and it is what determines when the battery is fully charged. The D-Peak setting is adjustable for both NiMH
and NiCD separately from 5-20mV in the Options menu. We recommend only changing these values if your an advanced user; otherwise
leaving the default settings for each battery type as they come from the factory will give you good and consistent power form your batteries
Advanced Charge Data:
During any charge cycle, you can press the Enter button to view more information about the current charge. For Li/XX batteries, you will be shown a
table of the individual cell voltages. For NiXX batteries, you will be shown the current Peak Voltage and DV value as it is monitored in real time.
Charge Summary:
Upon charge completion the charger will sound an audible alert indicating the charge cycle is done. Pressing the Enter button will silence the alert.
At this time you can disconnect the battery from the charger, but do not press the Back/Cancel button yet! There’s more information waiting for you.
By pressing the Up/Down buttons you can scroll through the charge summary screens displaying more vital information about your battery’s charge
cycle. Here you will find:
• Done T: Shows the amount of time since the battery charge has been completed
• Final V: Shows the final voltage that the battery peaked at. It is common for the battery voltage to fluctuate after a charge is complete, this
just shows what the charger read as the charge completed
• Peak V: Shows the highest voltage of the battery that was read during the charge cycle
• mAh (in): Shows the approximate capacity that was charged back into the battery
• Charge T: Shows the length of time the battery was charging
Pressing the Back/Cancel button at anytime will return you to the beginning of the Menu system at LiFe Charge mode for safety reasons described
earlier in this manual. Note this will STOP the charge cycle if one is in process.
Believe it or not, your Ascend charger does more than just charge batteries. If you continue past the charge functions in the beginning of the menu
you will see a Tools and Options menu that provide some advanced features never before seen in a product like this.
Tools:
There are times when knowing the voltage of your battery is handy, either when checking the charge state or just to see if there is a bad connection
somewhere. For this reason we have included two different Volt meters for you to use. They are described below.
• Volt Meter: Displays both the charger input voltage (DC only) and the output voltage. This feature is helpful if you are using your real car 12V
battery as a power source so that you can monitor the input voltage and not accidentally drain your real car battery. While the most useful
case for monitoring the input voltage, it is not the only since you can also use it to adjust the output of your power supply and know where to
stop so that you don’t exceed the input voltage limit of 15V. This is also useful for checking the voltage of a standard NiXX battery pack.
• Balance Meter: Displays the overall voltage and the individual cell voltages for a LiXX battery so that you can see the state of the balance
of your battery. Given that the Ascend is a balance charger, if the cells are a little off you shouldn’t need to worry as they will be balanced
within close tolerance on their next charge.
› NOTE: the voltages displayed here are more accurate than those displayed on the Volt Meter menu so you will notice a slight discrep-
ancy if you are comparing numbers

SAFE START MENU SYSTEM AND SOFTWARE FEATURES CONTINUED...
THIS PART IS REALLY IMPORTANT, PLEASE READ AND UNDERSTAND IT...
7
Simple • Capable • Safe
Options:
The Options menu contain various settings for your charger and one very useful feature for maintaining the health of your LiPo batteries, a LiPo Stor-
age charge mode. Here’s a list of what you’ll find under the Options menu
• LiPo Storage: This mode is very similar to the standard LiPo storage charge mode however you can only charge using the capacity mode to
determine the charge rate, regardless of the default setting for the normal LiPo charge mode. This is done for more accurate calculations
and to help get your battery in the optimal state for long term storage (max 6 months)
› LiPo storage mode will charge your batteries to approximately 3.85V per cell (approx 80% of full charge)
› You must start this storage charge cycle with a battery that is under 7.6V for the battery to charge properly since the Ascend is not
equipped with a high current discharger capable of reducing the voltage of a fully charged battery pack
• LiXX Charge Mode: Gives you the option of calculating the charge rate based on either capacity or current for LiXX based batteries. See the
Index of this manual for more details on charge rate calculation
• NiMH/Cd Charge Mode: Gives you the option of calculating the charge rate based on either capacity or current for NiXX based batteries. See
the Index of this manual for more details on charge rate calculation
• Default Values: Here you are able to select the delta peak voltage value for NiMH and NiCd batteries. This value is set to 8mV by defaul but it
is adjustable between 1-20mV to suit your needs.
• Audio Tones: This setting allows you to be able to turn the audio alarms for button presses or charge complete alerts on or off
Input Power:
Your charger is equipped to accept input power from either a 100-240V AC wall plug or from a 12-15V DC power supply. A common 12V power
supply used is a typical full size lead acid battery from an automobile. Do not connect both power inputs at the same time.
Reminder:
We want to remind you that just because the Ascend charger has advanced features it doesn’t mean you have to use them. We set out with the
intent of making this charger easy to use and understand so that you are not kept in the dark or forced to decode cryptic words on a tiny screen.
We also wanted to improve on the safety of using a charger with any of today’s most common battery types, this seems to be something that
many people have forgotten about. When technology changes, it is critical to update the users with the information and tools required to gain the
maximum enjoyment out of using the product. We feel we have raised the bar in this area and we hope you do to. If you still feel that you want to
stick to the basics, we happily encourage you to do so and learn at your own pace when the time is right. Never hesitate to ask questions and seek
advice where you find there is need.
Lets get charging:
Now that you are familiar with the charger, its features, and general precautions of what not to do and some of what to do, we should get started
charging your first battery. Just a reminder...set some time aside so you DON’T have to walk away and STOP THE CHARGER, MID
CHARGE since you should NEVER LEAVE THE CHARGER UNATTENDED WHILE CHARGING. Finally, confirm the battery
chemistry type, capacity, voltage and cell count of the battery you will charge and ensure all connector plugs are compatible.
1. Plug the charger into a properly grounded AC wall plug or DC power source.
2. Plug the battery into the charger and place the battery on/in a non-flammable surface/container and away from any flammable objects.
3. Read and follow the following charge instructions for your battery chemistry type (from battery manufacturer too).
4. Unplug the battery from the charger when the charge is complete.
5. Remove charger from wall plug when not in use
a. NOTE: Only use batteries with labels that are legible and clearly state the capacity, cell count (or voltage), and chemistry type as
either NiCd, NiMH, LiPo, Li-Ion, or LiFe (A123).
WARNING: The Radient Ascend charger has the capability of charging both LiFe/Li-Ion/LiPo (LiXX) and NiCd/NiMH (NiXX) batteries which require
significantly different charging modes. It is extremely important to choose the correct charging mode when charging your batteries. Choosing the
wrong charging mode can cause fire or explosion. Be sure to properly identify the battery chemistry, voltage and capacity of every pack before
attempting to charge it to ensure the correct settings. Some LiPo battery packs are designed to look like NiXX battery packs. One indication of a LiPo
battery is the presence of a balance plug either exiting the battery with small wires and small plug on the end or a small female plug embedded into
the end of the battery pack. If you are unsure of the battery type you are attempting to charge; please consult your local hobby dealer for assistance.
To help ensure the correct charging mode is used when charging your batteries, the charger is equipped with Safe Start technology. Safe Start is
a start sequence technology used to deter the use of the incorrect charging mode for batteries of different chemistry. When battery packs are con-
nected properly per chemistry the system is very robust; however if some batteries are improperly connected it is possible to charge LiPo batteries
in NiXX mode, exactly what you should NEVER do, so caution is always required when operating the charger. Safe Start is used by requiring the
simultaneous pressing of both the Safe Start button and the appropriate charge mode button for 3 seconds to begin the charge cycle.

CHARGING A LiPo/Li-Ion/LiFe BATTERY
8
MULTI-CHEMISTRY AC/DC PEAK DETECTION BALANCE CHARGER
The Radient Ascend charger supports charging of LiFe, Li-Ion and LiPo batteries, however since the process of charging these batteries is very
similar, we will walk through the steps of charging a common LiPo battery which can then be applied to the charging of a LiFe or Li-Ion with the
substitution of functions (and voltages displayed below) being used on the charger. Both of these batteries charge using Constant-Current Constant-
Voltage (CC-CV) charge mode for 2s-3s cell configurations with available charge current range from 0.1-6 Amps.
› NOTE: Your charger is equipped with both a capacity based and time based safety shut-off timer set to 120min. Charging of batteries
with capacity higher than 5000mAh, or charging batteries at less than 1C may require a greater charge time and thus require more
than one charge cycle to achieve full charge. It is always recommended to allow your battery to cool to room temperature before
charging either the first or second time.
To charge a LiPo battery in CC-CV charge mode, perform the following steps:
1. Connect your LiPo battery’s balance plug connector to either the JST-XH (2s or 3s) balance port built into the charger or into a connected
external balance adapter board (RDNA0003 for example).
a. NOTE: Charging of LiPo batteries in LiPo mode without connecting the balance connector is not supported As an added feature to our
Safe Start technology, if a balance plug is detected by the charger, use of the NiMH or NiCd charge modes are disabled and cannot
be circumvented.
2. Connect the main charging leads to your battery.
a. NOTE: it is critical that the battery always be connected with the correct polarity, Negative (-) = Black, and Positive (+) = Red. Only
connect Like color and symbol together.
3. Use the Up/Down scroll buttons to select the “LiPo Charge” function form the LCD menu and press “Enter”.
a. WARNING: Selecting the appropriate charge mode is critical to the safe charging of your batteries.
Using a charge mode other for a battery type other than specified may lead to fire or explosion. Always
read your labels carefully to ensure you have the correct information about your battery for setting your
charger.
i. Note: Although you may select charge currents up to 6A, the maximum final charge current may be reduced as needed to
keep the charger operating within safe limits. Typically this occurs when charging a 3s LiPo at 6A.
01). Example: A 3s LiPo may start to charge at 6A but as the voltage of the battery increases the charge current will
reduce to approximately 4A.
ii. Utilizing this method of charge current control enables the charger to always try to charge your battery as close as possible
to the setting you specify, while keeping the system within safe operating limits.
4. By default your charger comes in Capacity mode for setting the charge rate.
a. Locate the capacity rating on your battery pack and use the Up/Down scroll buttons to select the capacity value closest to (but not
greater than) the number listed on your battery pack and press “Enter”.
i. To achieve the safest operating conditions and longest life from your batteries it is recommended
to charge your batteries at no more than 1C. See the Index at the back of this manual for charge
rate calculations.
5. The charger will now calculate the maximum appropriate charge rate for the information you have entered and ask you to confirm the
calculation of charge rate and battery type is as you expect.
a. NOTE: The charger will calculate the maximum based on the battery voltage, input power source and number of cells detected.
b. If you notice an error on the confirmation screen, you can press the Back/Cancel button to go back and correct the problem.
6. When the settings have been verified as correct, press and hold the “Enter” button for 3 seconds to begin the charge cycle.
a. The charger will perform an error checking process and once all is confirmed OK, the charge will begin. You can now monitor the
charge status on the LCD screen and notice CC in the upper left hand corner of the screen indicating the charger is in Constant
Current mode. Press “Enter” for more charge information.
7. Near the end of charge completion the LCD screen will display CV indicating it has switched to Constant Voltage mode, the battery is typi-
cally 80% charged at this point.
8. When the charge is complete, the audio alarm will sound (Press “Enter” to silence the alarm) and the LCD screen will display “Charge
Complete” and present you with the charge summary data. Use the Up/Down scroll buttons to view the charge summary.
9. Press the Back/Cancel button to return to the beginning of the menu or STOP the charge at any time.

CHARGING A NiCD OR NiMH (NiXX) BATTERY
9
Simple • Capable • Safe
The Radient Ascend charger supports charging of NiMH and NiCd batteries, however since the process of charging these batteries is very similar,
we will walk through the steps of charging a common NiMH battery which can then be applied to the charging of a NiCd with the substitution of
functions being used on the charger. Both of these batteries are charged using a Constant Current Delta Peak (CC-DV) charge mode for 1-8 cell
series configurations and adjustable Delta Peak values for each type with available charge current range from 0.1-6 Amps.
› NOTE: Your charger is equipped with both a capacity based and time based safety shut-off timer set to 120min. Charging of batteries
with capacity higher than 5000mAh, or charging batteries at less than 1C may require a greater charge time and thus require more
than one charge cycle to achieve full charge. It is always recommended to allow your battery to cool to room temperature before
charging either the first or second time.
To charge a NiXX battery in Delta-Peak charge mode, perform the following steps:
› WARNING: Ensure your battery is truly a NiCD or NiMH battery. Some LiPo battery packs are designed
to look like NiXX battery packs. If you are unsure of the battery type you are attempting to charge;
please consult your local hobby dealer for assistance.
› NOTE: As an added feature to our Safe Start technology, if a balance plug is not detected by the charger, use of the LiPo or LiFe
charge modes are disabled. By the same logic, if a balance plug is detected the use of NiMH and NiCd charge modes are disabled.
This cannot be circumvented.
1. Connect the main charging leads to your battery.
a. NOTE: it is critical that the battery always be connected with the correct polarity, Negative (-) = Black, and Positive (+) = Red. Only
connect Like color and symbol together, any other form of connection may cause fire or explosion.
2. Use the Up/Down scroll buttons to select the “NiMH Charge” function form the LCD menu and press “Enter”.
a. WARNING: Selecting the appropriate charge mode is critical to the safe charging of your batteries.
Using a charge mode other for a battery type other than specified may lead to fire or explosion. Always
read your labels carefully to ensure you have the correct information about your battery for setting your
charger.
i. Note: Although you may select charge currents up to 6A, the maximum final charge current may be reduced as needed to
keep the charger operating within safe limits. Typically this occurs when charging a 8 cell NiXX at 6A.
01). Exp: A 8 cell NiMH may start to charge at 6A but as the voltage of the battery increases the charge current will
reduce to approximately 4A.
ii. Utilizing this method of charge current control enables the charger to always try to charge your battery as close as possible
to the setting you specify, while keeping the system within safe operating limits.
3. By default your charger comes in Capacity mode for setting the charge rate.
a. Locate the capacity rating on your battery pack and use the Up/Down scroll buttons to select the capacity value closest to (but not
greater than) the number listed on your battery pack and press “Enter”.
i. To achieve the safest operating conditions and longest life from your batteries it is recommended
to charge your batteries at no more than 1C. See the Index at the back of this manual for charge
rate calculations.
4. The charger will now calculate the maximum appropriate charge rate for the information you have entered and ask you to confirm the
calculation of charge rate and battery type is as you expect.
a. NOTE: The charger will calculate the maximum based on the battery voltage, input power source and number of cells detected.
b. If you notice an error on the confirmation screen, you can press the Back/Cancel button to go back and correct the problem.
5. When the settings have been verified as correct, press and hold the “Enter” button for 3 seconds to begin the charge cycle.
a. The charger will perform an error checking process and once all is confirmed OK, the charge will begin. You can now monitor the
charge status on the LCD screen and notice CC in the upper left hand corner of the screen indicating the charger is in Constant
Current mode. Press “Enter” for more charge information.
6. Near the end of charge completion the LCD screen will display DV indicating it has switched to Delta Peak mode, the battery is typically 90%
charged at this point and is looking for a voltage drop (D-Peak) as set in the Options.
7. When the charge is complete, the audio alarm will sound (Press “Enter” to silence the alarm) and the LCD screen will display “Charge
Complete” and present you with the charge summary data. Use the Up/Down scroll buttons to view the charge summary.
8. Press the Back/Cancel button to return to the beginning of the menu or STOP the charge at any time.

GENERAL CARE AND MAINTENANCE
STORAGE AND DISPOSAL
RELATED SPARE PARTS LIST
10
MULTI-CHEMISTRY AC/DC PEAK DETECTION BALANCE CHARGER
WARNING: This charger contains a built in AC to DC converter which can store electrical power for a short time
after disconnection from the AC input power source. Always unplug the charger from both input power and output
charging leads before performing any cleaning or maintenance to prevent electric shock. It is advisable to wait at
least 1 minute before starting your cleaning or maintenance
Care:
• Always use clean, dry cloth or soft bristle brush to clean your equipment
• Never use chemical cleansers to avoid damage to the sensitive electronics and plastics
• Before every use, inspect the input and output power cords and plugs and discontinue use if there are any signs of damage
› Contact your local hobby dealer or Radient RC Customer Support for assistance with repair needs.
› NOTE: Continued use of a damaged battery or charger will void the warranty and could cause personal injury and property damage
Maintenance:
• Regularly check the input power source cords and connectors for signs of damage and discontinue use if you notice exposed wiring
• Periodically use compressed air to blow out dust that has been trapped inside the charger to help prevent excessive heat due to dust build
up
› WARNING: Always wear eye protection when using compressed air to clean your charger
› NOTE: Ensure the charger is disconnected form input power and any battery before performing any care or cleaning procedures
Storage:
• There is a cord wrap feature located on the bottom of your charger. Use it to coil the unused length of input power cord.
› NOTE: Never “kink” (or bend sharply) any electrical wires. Doing so may damage the internal electrical wire even if the outside
appears undamaged
• Never store the charger (or your batteries) in direct sunlight for extended periods of time
• Since every battery and manufacturer is different, refer to the storage instructions from your battery manufacturer for proper information.
Disposal:
• Your product and the various batteries it is intended to be used with are considered electronic waste and should never be discarded in
standard garbage containers. Please visit your local hobby dealer and use the FREE battery disposal center for proper disposal/recycling of
batteries. Consult your local city waste disposal center for information on disposal of electronics other than batteries
• Please do your part to protect our environment
RDNA0003 ..................PRIMAL/ASCEND UNIVERSAL LIPO BALANCE ADAPTER BOARD (2-3S) ....................................................................................
RDNA0007 ..................ALLIGATOR CLIPS (LARGE) WITH BULLET CONNECTION ..........................................................................................................
See your local hobby dealer for the latest in genuine replacement parts and accessories for your Radient RC
product

TROUBLESHOOTING GUIDE
11
Simple • Capable • Safe
Problem / Symptom Possible Cause Possible Solution
Error
Connection
Main charge leads disconnected Check for stable input power with proper voltage
Reverse polarity
Check battery connection and ensure red wires are connected to
red wires and black wires are connected to black wires
Balance plug not connected properly
when attempting to balance charge
LiPo/Fe battery
Check balance plug is properly connected
Ensure the correct charge mode is being used for your battery type
Balance plug connected when trying
to charge NiXX battery
Check balance plug is not connected
Ensure the correct charge mode is being used for your battery type
Error
Batt V Too High
The connected battery has a voltage
that is outside the safe limits to
charge in the selected mode or at
the selected current
Use the battery as normal to reduce the battery voltage to safe
limits for charging
A LiPo battery has too much charge
when attempting to perform a Stor-
age Charge
Use the battery to reduce the voltage and try again
The charger is detecting a LiPo
battery when trying to charge in
LiFe mode
Confirm the battery type you are attempting to charge is indeed a
LiFe (A123)
Error
Batt V Too Low
The battery is damaged or worn out
Check battery connections and confirm battery type and charge
mode
There is a connection problem Check input and output connections
Error
Input V Too Low
The power supply voltage is too
low or the AC input power is below
operable limits
Check input power source. Find another known good source to test
and compare
Error
Input V Too Low
The power supply voltage is too
high or the AC input power is above
operable limits
Check input power source. Find another known good source to test
and compare
Error
Over Temperature
Please Wait...
The charger has over-heated and
reduced the charge current to a
minimum. Your battery will continue
to charge but at a very slow rate
until the internal temperature of
the charger is back down into
operational limits. It will then resume
charging at the previous settings
Stop charging, unplug your charger from all connections and blow
compressed air through the side vents to remove dust. See the
“General Care and Maintenance” section of this manual
Remove the charger from direct sun light or area of high ambient
temperature and allow to cool
Direct a cooling fan into the charger through the left side vent
(where existing fan is located)
The charger resets LiFe mode after
every charge
This is a built in safety feature
and is executed after pressing the
Back/Cancel button during or after
a charge
Use the Up/Down scroll buttons to select the desired charge mode
The charger is unresponsive to
any input
The input power is unstable
Check input power connections and appropriate voltages are
present

INDEX
12
MULTI-CHEMISTRY AC/DC PEAK DETECTION BALANCE CHARGER
Understanding C Ratings:
Many battery manufacturers do not list the definition of or explain the purpose of C ratings and how to use that information. For LiPo batteries there
is typically listed both a C rating for charging and discharging of the batteries. You must use caution that you calculate your charge rate based on
the charge C rating and not the discharge C rating.
• Charge Rate Calculation
› The charge C rating of a battery refers to a ratio between the battery’s capacity and the maximum safe charge current as determined
by each manufacturer for each battery. This value is typically listed in the lower ranges between 1C-5C. It signifies the maximum
current the battery should be charged at in a multiple of the capacity of the battery cells (on a per cell basis, not per pack basis)
» For example: if a battery cell is 2000mAh and the charge C rating is listed at 2C, the maximum charge current that should be
used with this battery is equal to 2000 x 2 = 4000mA = 4.0A
» NOTE: 1000mAh = 1Ah. For simplified annotation, although charge rates are actually units of Ah, we refer to them as A only.
Thus 1Ah = 1A
» The Ascend charger increments in values of 100mAh from 200mAh up to 9900mAh, if the calculated maximum charge rate
is a decimal value (4.4) it is highly recommended to round this value down to the nearest whole number and use that as the
maximum charge rate, but not necessarily the best charge rate option
» If the calculated charge rate is over the maximum capability for this charger, you can simply use the maximum allowed
› Radient RC recommends charging at 1C for the maximum cycle life of your batteries
› Always check the instructions provided with your batteries for proper charge and care. Those instructions should over-ride these
since they pertain to the particular battery that you have and this is a general statement
• Discharge Rate Calculation
› The discharge C rating of a battery refers to a ratio between the battery’s capacity and the maximum safe discharge current as
determined by each manufacturer for each battery This value is typically listed in the higher range from 15C upwards. It signifies the
maximum current the battery should be discharged at in a multiple of the capacity of the battery cells (on a per cell basis, not per
pack basis)
» For example: if a battery cell is 2000mAh and the discharge C rating is listed at 30C, the maximum discharge charge current
that should be used with this battery is equal to 2000 x 30 = 60000mA = 60A. This means you can continuously discharge
this battery at a rate of 60A per hour without damage
» Since the Ascend charger does not discharge, this information is only for reference in helping you understand the terminology
of the battery industry
Termination Voltages (Peak Detection):
• LiFe/Ion/Po Batteries: The peak detection of a LiPo, Li-Ion, or LiFe battery works by increasing the voltage of the battery pack to a specified
range. The goal of the charger is to increase the voltage of the battery into this range while injecting the most mAh into the battery as pos-
sible. The charge cycle terminates when this value is reached.
› The nominal voltage of a LiPo battery cell is listed at 3.7V
› The Ascend charger will terminate the charge of a LiPo battery pack when it measures a voltage of 4.18-4.2V per cell.
› For a 2s 7.4 nominal voltage battery pack, the termination voltage would be 2 x 4.2 = 8.4V
› The nominal voltage of a LiFe battery cell is listed at 3.3V
› The Ascend charger will terminate the charge of a LiFe battery pack when it measures a voltage of 3.58-3.60V per cell
› For a 2s 6.6 nominal voltage battery pack, the termination voltage would be 2 x 3.6 = 7.2V
› The nominal voltage of a Li-Ion battery cell is listed at 3.6V
› The Ascend charger will terminate the charge of a Li-Ion battery pack when it measures a voltage of 4.08-4.1V per cell
› For a 2s 7.2 nominal voltage battery pack, the termination voltage would be 2 x 4.1 = 8.2V
• NiXX Batteries
› The nominal voltage of a NiXX battery cell is listed at 1.2V
› The Delta Peak (DV) value can be adjusted in the Options menu in the range of 1-20mV (default and recommended 8mV).
» Setting a lower D-Peak value will terminate the charge sooner, keep the battery temperature down, and typically extend the
life of the batteries. We recommend starting with the default settings and make small changes as necessary.
» Setting a higher D-Peak value will terminate the charge later, create more heat, produce slightly more power, but typically
reduce the life of the batteries. We recommend starting with the default settings and make small changes as necessary.
Some older batteries may require a higher D-Peak value to charge successfully.
› The Ascend charger will terminate the charge of a NiXX battery pack when it measures a maximum voltage of the battery pack in a
specified range and then also measures a drop in that voltage of the set D-Peak value found in the Options.
› The maximum voltage a battery pack reaches changes during the life of the battery (increasing with age). The characteristic
behavior of the voltage drop remains the same however thus allowing the charger to continue to detect a “peak” voltage (maximum
voltage - [D-Peak]mV) regardless of age.

INDEX CONTINUED
NOTES
13
Simple • Capable • Safe
Power rating (Watt-hour):
› Some products state a recommended Watt hour rating for a battery to be used with that product. The Watt hours can be approxi-
mately calculated knowing the battery capacity and the voltage
» For Example: if a battery is 2000mAh and the voltage is 8.4V the Watt Hours (Wh) is equal to 2000 x 8.4 = 16,800mWh =
16.8Wh
Recommended Discharge Voltage Cut-offs:
• For maximum cycle life and safety, LiPo batteries should never be discharged below 3.3V per cell when discharged at a rate of 1-4C. For
this reason, many electronic speed controllers have a special “LiPo Mode” which activates a cut-off of power when the ESC measures the
battery voltage in a dangerous range
• For maximum cycle life and safety, NiXX batteries should never be discharged below 0.9V per cell when discharged at a rate of 1-4C. The
use of an ESC low voltage “cut-off” mode is not necessary with NiXX batteries
Storage Voltages:
• Although the Ascend charger does not offer discharge capabilities it is important to understand this information about your batteries since it
is critical to both the safety of the battery and the cycle life.
› Always consult the battery manufacturer’s documentation for storage information specific to that battery
» WARNING: You should NEVER store LiPo batteries at full charge for more than a few hours at
most (and they should be stored at temps of 40-75 degrees Fahrenheit whenever possible to help
prevent swelling and/or loss of performance/capacity)
› LiPo batteries should be charged (or discharged depending on their state prior to storage) to approximately 50% of their rated
capacity (approximately 3.85V per cell). The storage time at this voltage should not exceed 6 months and a use cycle and return to
storage mode is recommended every 3 months
› The storage voltage of NiXX batteries is not as critical as LiPo but they should be stored in cool conditions and at a low cell voltage to
prevent memory buildup and loss of capacity and performance

THE SAFE START MENU FLOW CHART
14
MULTI-CHEMISTRY AC/DC PEAK DETECTION BALANCE CHARGER
SELECT FUNCTION
LIFE CHARGE
SELECT FUNCTION
LIIO CHARGE
SELECT FUNCTION
LIPO CHARGE
SELECT FUNCTION
NIMH/CD CHARGE
SELECT FUNCTION
TOOLS
SELECT FUNCTION
OPTIONS
LIFE CAPACITY
6000MAH
LIIO CAPACITY
6000MAH
LIPO CAPACITY
6000MAH
NIXX CHARGE RATE
6.0A
TOOLS
BALANCE METER
TOOLS
VOLT METER
OPTIONS
LIPO STORAGE
OPTIONS
LIXX CHG MODE
OPTIONS
NIMH/CD CHG MODE
OPTIONS
DEFAULT VALUES
OPTIONS
AUDIO TONES
V:00.00 C1:0.00V
C2:0.00 C3:0.00V
INPUT: 00.000V
OUTPUT: 00.000V
LIPO CAPACITY
6000MAH
LIPXX CHG MODE
CAPACITY
NIXX CHG MODE
CURRENT
NIXX D-PEAK
8MV
AUDIO TONES
ON
AUDIO TONES
OFF
CHECKING BATT
FOR LIFE CHARGE
CHECKING BATT
FOR LIIO CHARGE
CHECKING BATT
FOR LIPO CHARGE
CHECKING BATT
FOR NIXX CHARGE
CONFIRM (6.0A)
LIFE CHARGE
3
CONFIRM (6.0A)
LIIO CHARGE
3
CONFIRM (6.0A)
LIPO CHARGE
3
CONFIRM (6.0A)
NIXX CHARGE
3
CONFIRM (6.0A)
LIPO STORAGE
3
1
2

15
Simple • Capable • Safe
CHARGE COMPLETE
DONE T=0:01:23
CHARGE COMPLETE
FINAL V: 6.600
CHARGE COMPLETE
PEAK V: 6.615
CHARGE COMPLETE
MAH(IN): 6000
CHARGE COMPLETE
CHARGE T=1:23:45
CHECKING BATT
FOR LIPO CHARGE
V: 6.70 C1:3.45V
C2:3.45 C3:0.00V
CV TIME: 1:23:45
V:6.600 A:0.6
CC TIME: 1:23:45
MAH(IN): 5432
DV: 3MV
Peak V:8.76
DV TIME: 1:23:45
V:8.765 A:6.0
CC TIME: 1:23:45
MAH(IN): 5432
V: 7.60 C1:3.80V
C2:3.80 C3:0.00V
CV TIME: 1:23:45
V:7.600 A:0.6
CC TIME: 1:23:45
V:7.600 A:6.0
3
1
BACK/CANCEL
CHANGES WITH UP/DOWN SCROLLU
SCROLL DOWN
SCROLL UP
ENTER/CONFIRM
BACK/CANCEL UNAVAILABLE
SCROLL DOWN UNAVAILABLE
SCROLL UP UNAVAILABLE
ENTER/CONFIRM UNAVAILABLE
PRESS AND HOLD FOR 3 SECONDS
NODE/JUNCTION
This menu flow chart is useful to help you find a particular feature or func-
tion of your charger. Use the Key on the right of this paragraph to understand
the symbols seen in the diagram above. The purpose is not to show an
actual charge cycle, only illustrate how the displays might look when you
see them.
*Note: Due to ongoing research and development some items may change
without notice
1
2

000062-002 (REV A)
WWW.RADIENTRC.COM
/