Drayton 2290B Installation guide

Category
Thermostats
Type
Installation guide

Drayton 2290B is a versatile programmable room thermostat that offers precise temperature control for your home, adapting to your daily routine and saving you energy. With its simple user interface, you can easily set up to 8 time and temperature events per day, ensuring a comfortable environment when you need it. The Partial Sight Assistant provides audible tones for easy adjustment, while the Frost Protection feature prevents freezing temperatures, even when the heating is off.

Drayton 2290B is a versatile programmable room thermostat that offers precise temperature control for your home, adapting to your daily routine and saving you energy. With its simple user interface, you can easily set up to 8 time and temperature events per day, ensuring a comfortable environment when you need it. The Partial Sight Assistant provides audible tones for easy adjustment, while the Frost Protection feature prevents freezing temperatures, even when the heating is off.

Programmable Room
Thermostat
Installation Guide
Model: 2290B
1. Remove the front cover by releasing the 2 screws at the
bottom. Mounting holes and electrical connections are
found underneath the hinged black cover (Fig 1).
Before Installation
If you do not have the knowledge to install the
thermostat safely then you must arrange for a
competent electrician or heating engineer to install it
for you. Wiring must conform to the current IEE
regulations.
Prior to commencing the installation you must ensure
the mains supply is switched off.
Digistat
3rd Generation
(Fig 1)
(Fig 3)
(Fig 4)
(Fig 6)
(Fig 7)
(Fig 2)
2. Fix back plate directly onto the wall using suitable wall plugs
and screws or mount over existing wall box (Fig 2).
3. Complete the wiring according to the connection suggestions
4. Close the black hinged terminal cover and replace the front
shown in (Fig 3). For Basic boiler, Combi boiler and Basic
boiler with zone valve applications Digistat with battery or
mains supply are suitable.
For Electric Heat application use
Digistat
with mains
supply only.
cover by locating the two latches at the top then fasten the
2 screws at the bottom (Fig 4).
(Fig 5)
7. Replace the battery cover (Fig 7).
5. Remove the battery cover by sliding the battery cover at the
bottom downwards (Fig 5).
6. Install the 2 AA batteries provided (Fig 6).
control the room temperature.
8. The Digistat is now installed and will automatically start to
Technical Helpline Tel: 0333 6000 622
Website: www.draytoncontrols.co.uk
User and Installation Guide 06490308001 Iss D
INSTALLER OPTIONS
To make changes to the default Installer Options shown below,
enter the Installer Options menu by pressing the settings button
for 3 seconds. This allows access to the User Menu 01, the
Advanced User Settings Menu 02, the Installer Settings 03, and
Service Interval Settings 04. Use the + and - buttons to scroll to
Installer Options and press O to select. You can exit the menu by
pressing until you have returned to the home screen. In the
Installer Options menu (Fig 8), scroll through the options using
the + and - buttons and press O to select. Scroll through the
dierent settings using the + and - buttons and press O to select
and save. (Fig 9 shows Option 02 OFF).
(Option 01) Partial Sight Assistant (beep)
When enabled, audible tones indicate when the setpoint is
more than, less than or equal to the current room temperature
when a user manually adjusts the setpoint using the + button:
Setpoint > room temperature - single high tone per 0.5°C
increase
Setpoint = room temperature - double tone
Setpoint < room temperature - single low tone per 0.5°C
decrease
(Option 02) Frost Protection
The Digistat will switch on the heating if the temperature falls
to 5°C and maintains a temperature of 7°C even when
in OFF mode.
(Option 03) Minimum Setpoint Limit
Change minimum setpoint temperature. After any changes to
setpoint limits, all setpoints in AUTO, MANUAL, BOOST and
HOOLIDAY modes will be modified to conform accordingly.
(Fig 8) (Fig 9)
(Option 04) Maximum Setpoint Limit
Change maximum setpoint temperature. After any changes to
setpoint limits, all setpoints in AUTO, MANUAL, BOOST and
HOOLIDAY modes will be modified to conform accordingly.
(Option 05) Optimum Start
When enabled, this uses current ambient temperature, the
next scheduled setpoint and heat gain data captured by the
device to adjust the thermostat setpoint early, so the ambient
temperature is at the required level when the next event starts.
Delayed Start
When enabled, this uses current ambient temperature, current
event setpoint and heating characteristics of the environment
to delay implementation of the setpoint if the ambient
temperature is already close to it, therefore saving energy.
(Option 06) Valve Protection Time
In some hydronic heating systems it may be required to protect
the valve by operating it for a given time. When enabled, this
maintenance feature ensures that each relay output is operated
for at least one (1) minute each week.
(Option 07) Sensor Fault Function
In the event of a sensor fault, central heating output is reduced
to 30% by turning heating ON for 3 minutes, then OFF for 7
minutes.
(Option 08) Application Type
Select the central heating system energy type.
(Option 09) System Capability
Select the flow capability of the heating system.
(Option 13) Installer Settings Lock
When enabled, installers can lock the installer settings menu
until a 3 digit code is entered. If the code is forgotten while
device is locked, please call the Technical Helpline.
(Option 20) Reset (Service Interval settings are NOT reset)
Reset the Digistat to its original factory settings.
Service Interval Options continued on reverse.
What is it Select between Default
Installer Options
01 OFF ON ON
02 ON OFF ON
03 5High Limit 5
04 Low Limit 30 30
05 OFF Delayed Start Optimum Start OFF
06 OFF 5 4 3 2 1 OFF
07 OFF ON OFF
08 Gas Electric Oil Heat Pump Gas
09 Fast Flow Normal/Slow Flow Fast Flow
13 OFF ON OFF
20
Partial Sight Assistant
Frost Protection
Low Set Point C
High Set Point C
Optimum Start
Valve Protection Time (Mins)
Sensor Fault Function
Application Type
System Capability
Installer Settings
Lock Reset NO YES NO
Service Internal Options
01 Si Status OFF ON OFF
02 Si Type Reduced Comfort Heating OFF No Effect Reduced Comfort
03 Si Due Date YY/MM/DD
04Si Warning 09930
05 Si Due Alarm OFF ON OFF
06 Si Boost OFF ON
07 Si Password Reset Select 4-digit PIN
OFF
0000
Screen
Abbreviations
bEEP
FrSt
LoSP
HiSP
OPSt
vPrt
SEnS
APPL
SySt
LOC
rSEt
StAt
tYPE
dUE
WArn
ALAr
bSt
COdE
EXit
User Guide
INSTALLER OPTIONS - continued
Pre-set Program 1 (5-2day weekend):
1Event 2 3 4 (5)* (6) (7) (8)
Time 06:30 08:30 16:30 22:30
20°CTemperature 16°C 21°C OFF
Power supply 2x AA 1.5V alkaline batteries
Switch type & rating3(1)A at 230V/50Hz
current
Min. recommended
Ambient temperature
SPDT (voltage free contacts)
10mA@24VAC (inductive)
(Si Option 01) Si Status
Enable or disable Service Interval Mode.
(Si Option 02) Si Type
Select eect imposed on the heating when service is due.
(Si Option 03) Service Due Date
Set date when next service is due.
(Si Option 04) Warning
Select no. of days before service due date.
(Si Option 05) Service Due Alarm
Enable or disable the audible service due alarm.
(Si Option 06) Si Boost
Enable or disable the Service Boost feature (5 boosts).
(Si Option 07) Password Reset
Change the 4 digit PIN. If you forget your Si password,
please call the Technical Helpline.
Technical Data
Ambient humidity
Operating: 0°C to +40°C
Storage: -20°C to 65°C
(non condensing) 20% to 80%, 90% non-condensing
Temperature range C to 30°C
4KVRated impulse voltage
75°C
Ball pressure test
1BDisconnection means
Automatic action 100,000 cycles
Operating Frequency 2402-2480 MHz
Max RF Power
transmitted +10dBm
Degree 2
Pollution situation
IP30Protection level
Wiring
IV = 2%
Energy Class
comply with IEE wiring regulations
Relevant EC Directives: 2014/53/EU (RED)
2011/65/EU (RoHS)
2012/19/EU (WEEE)
Standards: EN 60730-1
EN 60730-2-7
EN 60730-2-9
ESTI EN 300 328
EN IEC 63000
ESTI EN 301 489
The Drayton Digistat thermostat is a universal thermostat with
24 hour, 5-2day or 7day program types and up to 8 time/
temperature events per day and can also be used as a simple
room thermostat.
Clock Setting
Press and hold the cog button until User 01 appears,
Press the plus button to Advanced 02, then press O to
enter,
Press O to enter Time settings,
Using the + and - you can adjust the time, then press O
to save,
Press the cog button twice to bring you back to the
home screen.
General Operation
Programmable thermostats do not have “On” and “Off” times
like traditional timers. They offer temperature control both
day and night and you simply select which temperatures you
require at each point in the day.
With the unit in “Auto Mode” (the calendar icon is visible at
the bottom of the screen) the temperature can be changed for
a short time by using the + and – buttons. Changing the
temperature in this way will keep the Digistat set to your new
temperature until the next pre-programmed event (at which
time it will revert to programmed temperature). The
temperature you are setting will flash on the screen. Once
temperature is set, the unit will revert to showing the room
temperature again. The indicator will show on the screen if
the unit is calling for heat.
Programming the Digistat
Your Digistat comes with the following settings
pre-programmed for your convenience and is suitable for
those working out of the house during a typical 9-5 pattern.
When the 5-2day program type is selected the pre-set
temperatures will be different Mon-Fri and Sat-Sun, as per
the tables below:
Pre-set Program 1 (24h, 5-2day weekdays, or 7day):
1Event 2 3 4 (5)* (6) (7) (8)
Time 07:00 09:00 16:00 23:00
20°CTemperature 18°C 21°C OFF
Hereby, Schneider Electric Controls UK Ltd, declares that Digistat 2290B
is in compliance with Directive 2014/53/EU.
The declaration of conformity may be consulted at
www.draytoncontrols.co.uk
*To add these additional time periods manually (max. 8 per day) please
refer to the steps to the right.
The Bluetooth® word mark and logos are registered trademarks owned
by Bluetooth SIG, Inc. and any use of such marks by Schneider Electric is
under license. Other trademarks and trade names are those of their
respective o wners.
Plymouth
401 Southway Drive
PL6 6QT
United Kingdom
Schneider Electric Industries SAS
35 rue Joseph Monier
F-92500 Rueil-Malmaison
France
Setting up Times/Temperatures on the Digistat
What is a programmable
room thermostat?
…an explanation for householders
A programmable room thermostat is both a programmer and
a room thermostat. A programmer allows you to set ‘Onand
‘O time periods to suit your own lifestyle. A room thermostat
works by sensing the air temperature, switching on the heating
when the air temperature falls below the thermostat setting, and
switching it o once this set temperature has been reached.
So, a programmable room thermostat lets you choose what
times you want the heating to be on, and what temperature it
should reach while it is on. It will allow you to select dierent
temperatures in your home at dierent times of the day (and
days of the week) to meet your particular needs.
Turning a programmable room thermostat to a higher setting
will not make the room heat up any faster. How quickly the
room heats up depends on the design of the heating system,
for example, the size of boiler and radiators.
Neither does the setting aect how quickly the room cools
down. Turning a programmable room thermostat to a lower
setting will result in the room being controlled at a lower
temperature, and saves energy.
The way to set and use your programmable room thermostat is
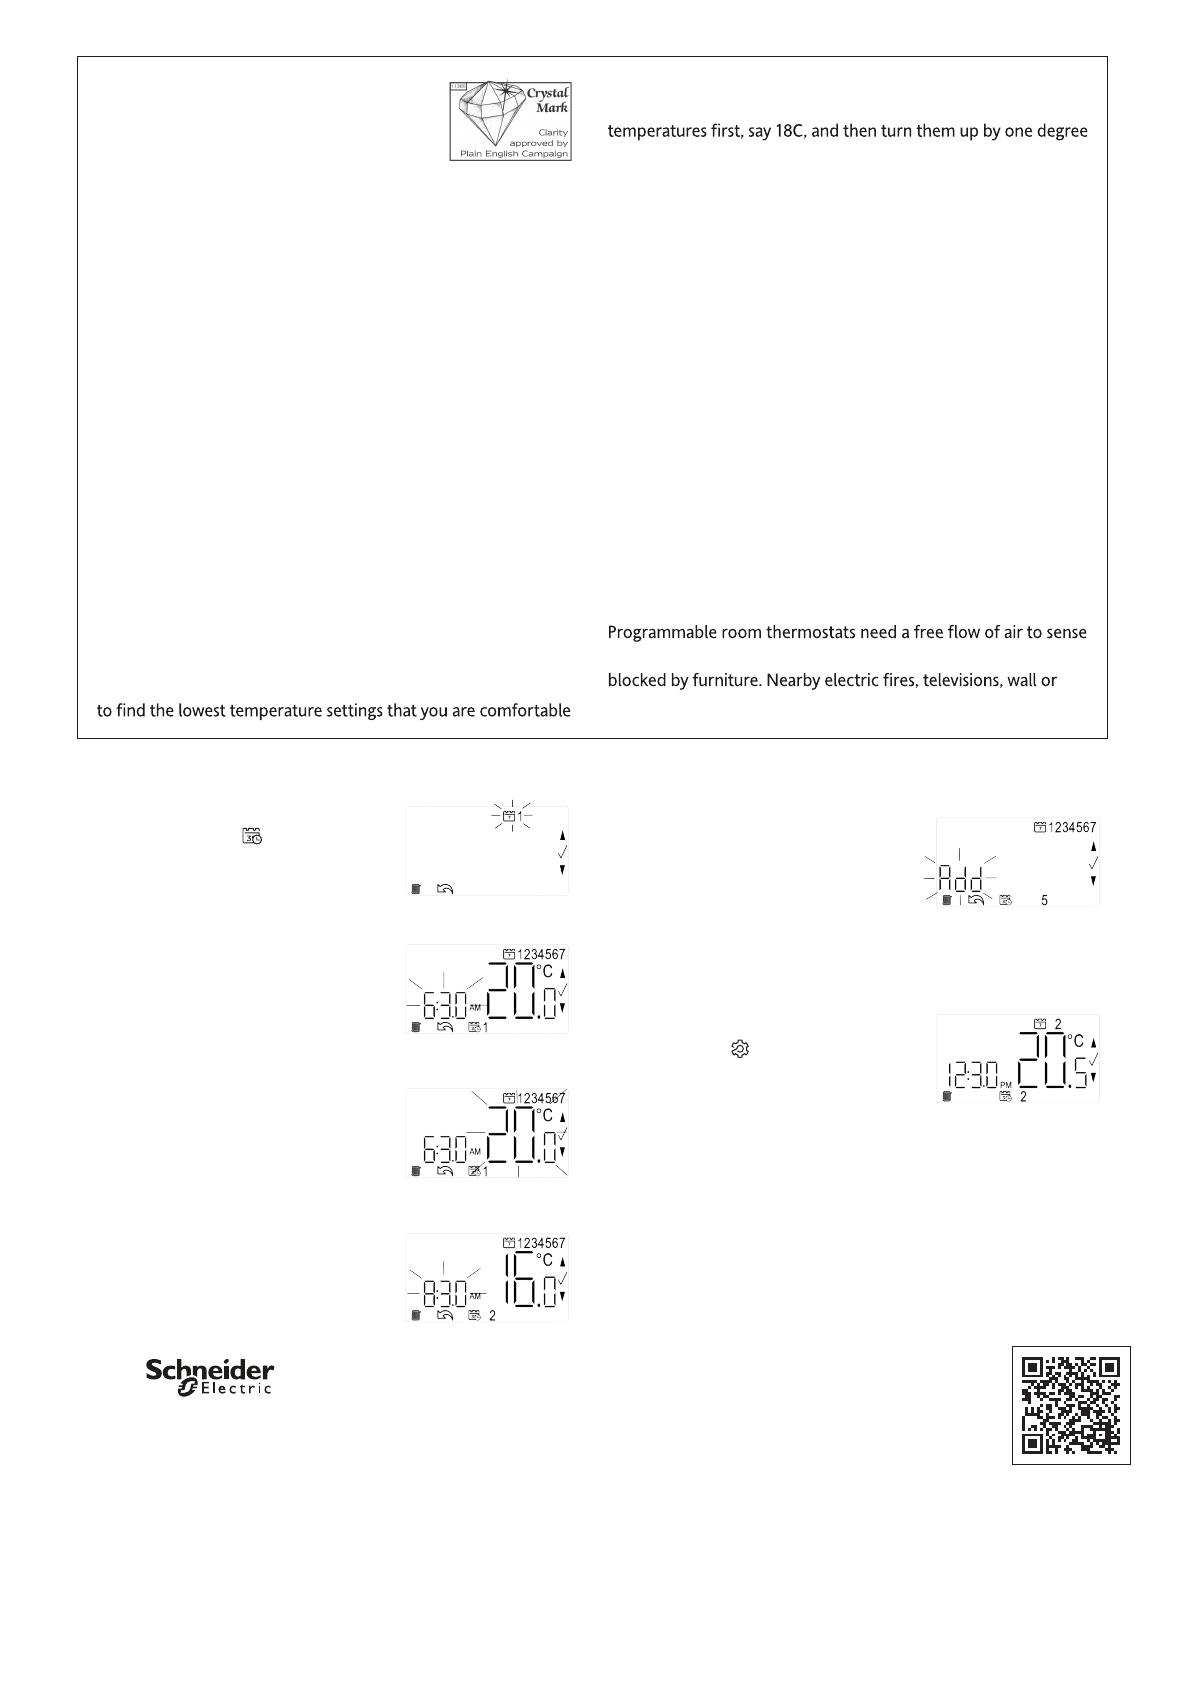
5. In Pre-set Program 1 you will have 4
time periods available, to add more
(max. 8 per day) press + when you
see the SAVE option on-screen and
time period 5 at the bottom of the
screen, to scroll to the Add option.
Press O to add time period then
adjust time and temperature as
required.
6. To exit press to go back until you
return to the home screen.
with at the dierent times you have chosen, and then leave
it alone to do its job. The best way to do this is to set low
each day until you are comfortable with the temperatures. You
wont have to adjust the thermostat further. Any adjustments
above these settings will waste energy and cost you more money.
If your heating system is a boiler with radiators, there will
usually be only one programmable room thermostat to control
the whole house. But you can have dierent temperatures in
individual rooms by installing thermostatic radiator valves (TRVs)
on individual radiators. If you don’t have TRVs, you should
choose a temperature that is reasonable for the whole house.
If you do have TRVs, you can choose a slightly higher setting
to make sure that even the coldest room is comfortable, then
prevent any overheating in other rooms by adjusting the TRVs.
The time on the programmer must be correct. Some types
have to be adjusted in spring and autumn at the changes
between Greenwich Mean Time and British Summer Time.
You may be able to temporarily adjust the heating programme,
for example, ‘Override’, Advance’ or ‘Boost’. These are
explained in the manufacturer’s instructions.
the temperature, so they must not be covered by curtains or
table lamps may prevent the thermostat from working properly.
1. With the product operating as normal
in Auto Mode, press once. Use +
and – to select the day or set of days
you want to adjust the times and
temperatures for. Press O to confirm.
2. The time on the display will now be
flashing as shown, use + and – to
adjust the first period start time. Press
O to confirm.
3. Once the time has been set the
temperature on the display will now
be flashing, use + and – to adjust the
temperature for the first time period.
Press O to confirm.
4. Move to the next time and temperature
periods and adjust as needed,
confirming the changes by pressing O.
The new schedule will be saved
pressing O when the word SAvE is
flashing.
Automatic to Manual
1. Press and hold Cog button until you see USEr 01,
2. Press the O button to select and you will see Mode,
3. Press O to enter and you will see either Auto, Man or off.
4. Use the + and - button to choose between these options.
5. Press the O button to select your option then press the Cog
button twice to take you to the home page.
Where to find User Guide
Please use the QR code to the right or go to our
website www.draytoncontrols.co.uk to download
our full online user guide which also features
Bluetooth pairing, and how to use the smartphone
app.
User guide
  • Page 1 1
  • Page 2 2
  • Page 3 3
  • Page 4 4

Drayton 2290B Installation guide

Category
Thermostats
Type
Installation guide

Drayton 2290B is a versatile programmable room thermostat that offers precise temperature control for your home, adapting to your daily routine and saving you energy. With its simple user interface, you can easily set up to 8 time and temperature events per day, ensuring a comfortable environment when you need it. The Partial Sight Assistant provides audible tones for easy adjustment, while the Frost Protection feature prevents freezing temperatures, even when the heating is off.

Ask a question and I''ll find the answer in the document

Finding information in a document is now easier with AI