
USER
MANUAL
AXENT.ONE PLUS


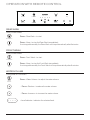
THANK YOU
Thank you for selecting an AXENT Switzerland product. To ensure proper installation,
please review these instructions carefully before use. Carefully unpack and examine the
intelligent toilet before installation. For any questions, contact us at 1-800-769-4857.
Thank you again for choosing AXENT.
BEFORE YOU BEGIN
CAUTION!
Risk of personal injury or product damage
Handle with care. Vitreous china can break
or chip if handled carelessly.
All installation procedures should comply with
applicable local plumbing and building codes.
INSTALLATION BY A PROFESSIONAL,
LICENSED PLUMBER OR CONTRACTOR
IS HIGHLY RECOMMENDED.

2
Smartphone App
Safety
Introduction
Operation With Main
Operation With Remote Control
Maintenance
Troubleshooting
Dimension
Technical data
Guarantee
USER MANUAL
AXENT.ONE PLUS

3
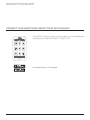
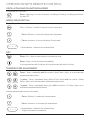
SMARTPHONE APP
CONNECT YOUR AXENT INTELLIGENT TOILET WITH OUR APP
Rear wash Lady wash Stop
Night light ECO Drainage
System purge Standby Setting
100 %9:41 AM
The AXENT Remote App can be used as an individualized
remote control with the AXENT. ONE PLUS.
www.axentbath.us » Downloads

4
SAFETY
SAFETY SYMBOLS
The following symbols in the manual will highlight hazardous situations and their severities.
DANGER!
High Risk, Lethal Hazards, Severe Injuries
WARNING!
Medium Risk, Severe Injuries
CAUTION!
Low Risk, Minor Injuries
NOTE!
Damage to Property
NORMAL USAGE
The intelligent toilet’s spray arm attachment should only be used for the rear wash and front wash
cleaning functions. The product may also be used as a normal toilet seat. This product is meant for
indoors usage only.
Any other usage will not be deemed as normal usage. AXENT undertakes no liability for abnormal
usage.
AXENT is not liable or responsible for damage to other electronics connected to the same power line
while the intelligent toilet is in use.
IMPORTANT SAFEGUARDS
READ ALL INSTRUCTIONS BEFORE USING
SAVE THESE INSTRUCTIONS
A copy of the instructions can also be downloaded from https://axentbath.us.
When using electrical products, especially when children are present, basic safety precautions should
always be taken, including the following:
DANGER!
To reduce the risk of electrocution
Do not reach for any electrical components of the intelligent seat that have fallen into water.
Unplug toilet immediately.
Unplug product if not in use for extended periods of time.
Do not use while wet after bathing.
Do not place or store product where it can fall or be pulled into a tub or sink.
Do not place or submerge the intelligent toilet or it’s components into water or other liquids.

5
SAFETY
WARNING!
To reduce the risk of burns, electrocution, fire, or injury to persons.
Children or disabled persons may require supervision during use.
Use this product only for its intended use as described in this manual.
Do not use attachments not authorized by the manufacturer.
Never operate this product if it has a damaged cord or plug, if it is not working properly, if it has been
dropped or damaged, or dropped into water. Return the product to a service center for examination
and repair.
Keep the cord away from heated surfaces.
Do not block the air vents on this product.
Do not place the toilet on or by objects such as long window curtains that could potentially obstruct
the air vents during normal usage. Keep air vents free of lint, hair, and other debris.
Never use while sleepy or drowsy.
Never drop or insert any object into any openings or hoses.
Do not use outdoors or operate where aerosol (spray) products are being used or where oxygen is
being administered.
Connect this product to a properly grounded outlet only. See Section « Grounding instructions » on
page 7.
Unplug this product before filling water. Fill (reservoir) with water only unless otherwise specified by
manufacturer. Do not overfill.
SAFETY INSTRUCTIONS
Carefully read and observe the following safety instructions!
Information for the user
Children or persons with limited physical/mental capabilities may require supervision or proper
instructions/guidance prior to or during use.
Ensure that children cannot play with intelligent toilet.
Avoiding malfunctions and damage to the product as a result of improper use
If intelligent toilet is moved from a cold location to a warm location, condensation may form. Leave
the unit switched o for a few hours.
Do not install the intelligent toilet in rooms where the temperature will be less than 4 °C ( 39 °F ).
Do not place open flames, candles, cigarettes, or similar objects on or by the toilet.
Do not reuse old hoses or water lines. Please use new water lines when installing.
Do not install the intelligent toilet next to items that would potentially expose the toilet to a large
amount of water.

6
SAFETY
Do not climb on or stand on the product.
Do not place any heavy objects on the lid.
Do not open or close the lid or seat with force.
Do not deliberately soil, spray or block the spray arm.
Repairs should only be carried out by a person with the necessary expertise
Do not carry out modifications, tamper with, install additional equipment, or attempt to repair the
intelligent toilet.
Improperly performed repairs can lead to accidents, injuries, or damage to the product.
Only use the device when it is fully functional
Make sure the power cable is not damaged before use. Do not allow the power cable to be severe-
ly pinched, bent, or kinked.
Keep the power cable away from hot surfaces and sharp edges.
Do not handle the power cord or plug with wet hands.
Do not use the product if it is not working properly. In case of malfunction, disconnect the power
immediately. Close the water cut-o valve to interrupt the water supply. Contact your installer.
Information on the use of batteries
Keep batteries out of the reach of small children. Batteries can be life-threatening if swallowed. If a
battery has been swallowed, seek medical assistance immediately.
Do not attempt to recharge non-chargeable batteries for use with unit.
Always remove empty batteries from the remote control immediately. They may leak and cause
damage.
Do not insert new and old batteries together in the remote control.
Clean the battery and contacts before inserting the battery. Make sure the batteries are oriented
properly.
Remove the batteries if the remote control will not be used for an extended period of time.
Do not expose the batteries to hot surfaces or direct sunlight to reduce the risk of battery leakage.
If battery acid has leaked, avoid contact with skin, eyes and mucous membranes. In case of con-
tact with the acid, flush the affected areas with large amounts of clean water and seek medical
assistance immediately.

7
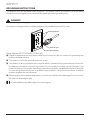
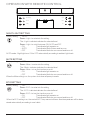
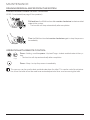
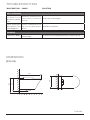
GROUNDING INSTRUCTIONS
This product must be grounded when plugged in. The power cord on this product has a grounding
plug and must be plugged into an outlet with a properly grounded grounding plug.
DANGER!
Improper use of grounding plug can result in a risk of electric shock.
For safety, the intelligent toilet should be plugged into a standard 3 prong GFCI outlet.
Grounding pin
Grounded outlet
Grounded
outlet box
Wiring Diagram (NOT FOR INSPECTOR’S USE)
If repair or replacement of the power cord or plug is necessary, do not connect the grounding wire
to either flat blade terminal.
This product is not to be used with extension cords.
This product is factory equipped with a specific electric cord and plug to permit proper connection.
No adapters should be used with this product. Do not modify the power cord on the toilet. If the
power cord will not fit the outlet, have the proper outlet installed by a qualified electrician. If the prod-
uct must be reconnected for use on a dierent type of electric circuit, the reconnection should be
made by qualified service personnel.
Please unplug unit immediate and contact for service if cord becomes damaged. Do not use a bi-
det seat with a damaged cord.
Actual installation may dier slightly from the diagram.
SAFETY

8
FCC INSTRUCTIONS
Please note that changes or modifications not expressly approved by the party responsible for com-
pliance could void the user’s authority to operate the equipment.
Note: This equipment has been tested and found to comply with the limits for a Class B digital device,
pursuant to part 15 of the FCC Rules. These limits are designed to provide reasonable protection
against harmful interference in a residential installation. This equipment generates, uses and can ra-
diate radio frequency energy and, if not installed and used in accordance with the instructions, may
cause harmful interference to radio communications. However, there is no guarantee that interference
will not occur in a particular installation. If this equipment does cause harmful interference to radio or
television reception, which can be determined by turning the equipment o and on, the user is encour-
aged to try to correct the interference by one or more of the following measures:
- Reorient or relocate the receiving antenna.
- Increase the separation between the equipment and receiver.
- Connect the equipment into an outlet on a circuit dierent from that to which the receiver is connect-
ed.
- Consult the dealer or an experienced radio/TV technician for help.
SAFETY

9
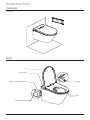
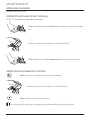
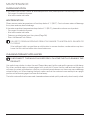
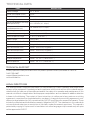
INTRODUCTION
OVERVIEW
[320-E2]
MAIN
Multifunction Dial
Lid
Rear cover
Multifunction Dial Indicator
Seat
Nozzle

10
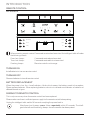
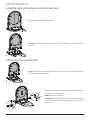
INTRODUCTION
REMOTE CONTROL
INTERFACE
User
Rear Wash
Massage Water Flow
Position
Front Wash Dry Stop
System Purge
Descale
Setting
Light
Mute
Eco
When receiving remote control Command received and executed, the intelligent toilet will make
the following sounds:
One short «beep» Command received and executed
Two short «beep» Command received but not executed
One long «beep» Remote control is not in range
TURNING ON
Install batteries to turn on remote control.
TURNING OFF
Remove batteries to turn o remote control.
BATTERY REPLACEMENT
When the power is low, the « Level Indicator » blinks which means the battery needs to be replace.
Please replace batteries. When replacing batteries, do not mix old and new batteries or batteries of
dierent brands or types.
PAIRING TO REMOTE CONTROL
This is only necessary when the remote control has been replaced.
Please make sure there is sucient power supply for the remote control before pairing.
Unplug the intelligent toilet, wait for 30 seconds, and plug the power back in.
Stop
After three short «beeps», press «Stop» repeatedly within 20 seconds. The intelli-
gent toilet will emit three long «beeps» once the remote has been paired.

11
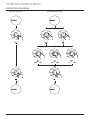
OPERATION WITH MAIN
OPERATION DIAGRAM
QUICK START
.ONE
.ONE
REGULAR USE
.ONE
.ONE

12
OPERATION WITH MAIN
REAR WASH
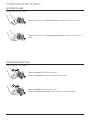
After you are seated:
QUICK START
Press the Multifunction dial to start.
REGULAR
Turn the Multifunction dial counter clockwise to start.
Press
the Multifunction dial
to stop the Rear Wash immediately.
If not stopped manually, the Rear Wash will stop automatically after 3
minutes.
The system will always clean itself after use. This cannot be disabled.
FRONT WASH
After you are seated:
Turn the Multifunction dial clockwise to start.
Press the
Multifunction dial
to stop the Front Wash immediately.
If not stopped manually, the Front Wash will stop automatically after 3
minutes.
The system will always clean itself after use. This cannot be disabled.

13
OPERATION WITH MAIN
WATER VOLUME
During Rear or Front Wash:
Turn the Multifunction dial clockwise to increase the water volume.
Turn the Multifunction dial counter clockwise to reduce the water vol-
ume.
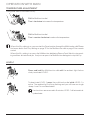
SPRAY ARM POSITION
During Rear or Front Wash:
2
Press and hold the Multifunction dial.
Turn it clockwise to move the Spray Arm forward.
2
Press and hold the Multifunction dial.
Turn it counter clockwise to move the Spray Arm backward.

14
OPERATION WITH MAIN
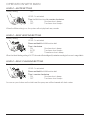
TEMPERATURE ADJUSTMENT
During Rear Wash, Front Wash, or Dry:
2
Pull the Multifunction dial.
Turn it clockwise to increase the temperature.
2
Pull the Multifunction dial.
Turn it counter clockwise to reduce the temperature.
When Auto Dry setting is on, you can start the Dryer function through the Multifunction dial. Please
find more about Auto Dry Setting on page 17 for the Multifunction dial or page 21 for remote
control.
When Auto Dry setting is on, press the Multifunction dial during Rear or Front Wash to stop wash-
ing and then activate the dryer. And you can press the Multifunction dial again to stop the Dry.
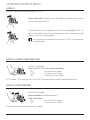
LEVEL
Press and hold the Multifunction dial until the ambient light flashes
slowly to activate LEVEL 1.
To deactivate LEVEL 1, press the multifunction dial while LEVEL 1 is
active. The ambient light will stop flashing and you will hear one single
«beep». Level 1 is now deactivated.
If no functions are accessed in 3 minutes, LEVEL 1 will automatical-
ly deactivate.

15
OPERATION WITH MAIN
LEVEL > MUTE SETTING
Factory setting: OFF
LEVEL 1 is activated,
Turn the Multifunction dial counter clockwise.
- ON One time short «beep»
- OFF Two times short «beep»
When the Mute setting is on, the system will not play back any sounds.
LEVEL > SEAT HEATING SETTING
Factory setting: ON
2
LEVEL 1 is activated,
Press and hold the Multifunction dial.
Turn it clockwise.
- ON One time short «beep»
- AUTO Two times short «beep»
- OFF Three times short «beep»
When the Seat Heating setting is AUTO, the seat will be intelligently heated according to the user’s usage habits.
LEVEL > SELFCLEANING SETTING
Factory setting: ON
2
LEVEL 1 is activated,
Press and hold the Multifunction dial.
Turn it counter clockwise.
- ON One time short «beep»
- OFF Two times short «beep»
As soon as you sit down on the toilet seat, the spray arm will be cleaned with fresh water.

16
OPERATION WITH MAIN
LEVEL
When the Multifunction dial is already in LEVEL 1:
Press and hold the Multifunction dial until the ambient light flashes
quickly to activate LEVEL 2.
To deactivate LEVEL 2, press the multifunction dial while LEVEL 2 is
active. The ambient light will stop flashing and you will hear one single
«beep». Level 1 is now deactivated.
If no functions are accessed in 3 minutes, LEVEL 2 will automati-
cally deactivate.
LEVEL > NIGHT LIGHT SETTING
Factory setting: AUTO
LEVEL 2 is activated,
Turn the Multifunction dial counter clockwise.
- ON One time short «beep»
- AUTO Two times short «beep»
- OFF Three times times «beep»
AUTO mode – The night light turns ON or OFF automatically according to ambient light levels.
LEVEL > DEODORIZER
Factory setting: ON
2
LEVEL 2 is activated,
Press and hold the Multifunction dial.
Turn it clockwise.
- ON One time short «beep»
- OFF Two times short «beep»
The deodorizer will active when a user is seated.

17
OPERATION WITH MAIN
LEVEL > AUTO DRY SETTING
Factory setting: OFF
2
LEVEL 2 is activated,
Press and hold the Multifunction dial.
Turn it counter clockwise.
- ON One time short «beep»
- OFF Two times short «beep»
When the Auto Dry setting is ON, the Dry function will be started after pressing the Multifunction dial to
stop Rear or Front wash.
LEVEL > SYSTEM RESET
2
LEVEL 2 is activated,
Pull the Multifunction dial.
Turn it counter clockwise to start System Reset.
- All settings are reset to factory defaults. This will be followed by a short
«beep».
STANDBY MODE
Press and hold the Multifunction dial until ambient light off to activate
the Stand-by mode.
- Slap the toilet rear cover to deactivate Stand-by mode.
In Stand-by mode, the intelligent toilet will remain powered, but electronic functions will be disabled.
PAIRING TO DIAL
Cut o the power of the intelligent toilet and wait for 30 seconds and then
apply power to it.
After three times short «beep», the pairing is started by pressing Multi-
function dial repeatedly within 20 seconds until hearing three times long
«beep» from the intelligent toilet, which means pairing successful.
Pairing has originally been done in the factory. It is necessary only after you replaced your dial.

18
OPERATION WITH REMOTE CONTROLOPERATION WITH REMOTE CONTROL
Rear Wash
Massage Water Flow
Position
Front Wash Dry Stop
REAR WASH
After you are seated:
Rear Wash
Press « Rear Wash » to start.
Stop
Press « Stop » to stop the Rear Wash immediately.
If not stopped manually, the Rear Wash will stop automatically after 3 minutes.
FRONT WASH
After you are seated:
Front Wash
Press « Front Wash » to start.
Stop
Press « Stop » to stop the Front Wash immediately.
If not stopped manually, the Front Wash will stop automatically after 3 minutes.
WATER VOLUME
During Rear or Front wash:
Water
Volume
Press « Water Volume » to adjust the water volume.
Reduce
- Press « Reduce » to reduce the water volume.
Increase
- Press « Increase » to increase the water volume.
Level Indicator
« Level Indicator » indicates the selected level.
Page is loading ...
Page is loading ...
Page is loading ...
Page is loading ...
Page is loading ...
Page is loading ...
Page is loading ...
Page is loading ...
Page is loading ...
Page is loading ...
Page is loading ...
Page is loading ...
Page is loading ...
Page is loading ...
Page is loading ...
Page is loading ...
-
 1
1
-
 2
2
-
 3
3
-
 4
4
-
 5
5
-
 6
6
-
 7
7
-
 8
8
-
 9
9
-
 10
10
-
 11
11
-
 12
12
-
 13
13
-
 14
14
-
 15
15
-
 16
16
-
 17
17
-
 18
18
-
 19
19
-
 20
20
-
 21
21
-
 22
22
-
 23
23
-
 24
24
-
 25
25
-
 26
26
-
 27
27
-
 28
28
-
 29
29
-
 30
30
-
 31
31
-
 32
32
-
 33
33
-
 34
34
-
 35
35
-
 36
36


Ask a question and I''ll find the answer in the document
Finding information in a document is now easier with AI
Other documents
-
Mayfair 295CT 000 User manual
-
 SmartBidet SB-2000WE User manual
-
Alpha JX Bidet Toilet Seat User manual
-
 OVE Decors GODFREY Installation guide
-
 OVE IT-415 User manual
-
Dyconn 325ZA Installation guide
-
Kogan KAPWDBIDETA User guide
-
Toto Washlet TCF896CG User manual
-
-


