Page is loading ...

PARTS:
30 Millivolt Output Thermocouple with 2 Adaptor Fittings
TOOL NEEDED:
Adjustable Wrench
INSTALLATION INSTRUCTIONS
REMOVING THE DEFECTIVE THERMOCOUPLE:
1. Turn knob on top of gas control valve to “OFF” position.
2. Turn off main gas valve closest to heater for added safety.
3. Allow burner assembly to cool to room temperature.
4. Remove outer and inner heater doors.
5. Locate thermocouple and remove from burner assembly. To remove the thermocouple, you will have to
apply slow pressure while working the spring clip out.
6. Use an open-end wrench and remove the opposite end of thermocouple from the gas control valve.
INSTALLING THE NEW THERMOCOUPLE:
1. Compare the removed thermocouple to the new replacement to determine if they are the same. Choose
the correct combination of adaptors required to hold new part in place in burner assembly.
2. Tighten the threaded fitting end into the gas control valve. Be sure you do not overtighten. Be sure
thermocouple is fastened securely to pilot burner.
Make sure the combination of fittings used allows only ½ in. of the thermocouple tip to be surrounded
by the pilot flame.
Do not overtighten thermocouple nut to control. Tighten only ¼ turn beyond finger tight. Do not use
pipe joint compound on this connection.
3. Open the main gas valve. If you drained the water from heater, be certain to refill before lighting water
heater.
4. Follow lighting instructions found on your water heater.
5. Reinstall inner and outer heater doors.
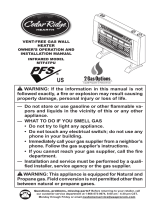
IDENTIFICATION OF KIT PARTS
Thermocouple 24 in./61 cm
For all natural and LP gas models except models
beginning with “FG”
THERMOCOUPLE ADAPTORS
PRINTED IN USA
Part
#
321887-000
Grooves On Thermocouple To
Accommodate Top Of Adaptor
This End Snaps Into
Thermocouple Grooves
PUSH-IN TYPE
SCREW-IN TYPE AND CLAMP-ON TYPE
INSTALL
ADAPTOR 2
FIRST
1
INSTALL
ADAPTOR 1
SECOND
ITEM
#
0362434
MODEL #9008073046
PIEZAS:
Termopar con salida de 30 milivoltios con 2 conexiones para adaptador
HERRAMIENTA NECESARIA:
Llave ajustable
INSTRUCCIONES DE INSTALACIÓN
EXTRACCIÓN DEL TERMOPAR DEFECTUOSO:
1. Gire la perilla sobre la válvula de control de gas hasta la posición “OFF” (apagado).
2. Cierre la válvula de gas más cercana al calentador para tener mayor seguridad.
3. Deje que el ensamble del quemador se enfríe hasta la temperatura ambiente.
4. Retire las puertas exterior e interior del calentador.
5. Ubique el termopar y retírelo del ensamble del quemador. Para retirar el termopar, deberá aplicar
presión lentamente mientras trabaja en sacar el sujetador de resorte.
6. Use una llave española y retire el extremo opuesto del termopar de la válvula de control de gas.
INSTALACIÓN DEL TERMOPAR NUEVO:
1. Compare el termopar retirado con el repuesto nuevo para determinar si son el mismo. Escoja la
combinación correcta de adaptadores necesaria para sostener la pieza nueva en su lugar en el
ensamble del quemador.
2. Apriete el extremo del conector roscado en la válvula de control de gas. Asegúrese de no apretar
demasiado. Asegúrese de que el termopar esté ajustado firmemente al quemador del piloto.
Asegúrese de que la combinación de conectores usada permita que sólo 1,27 cm de la punta del
termopar se rodeen con la llama del piloto.
No apriete demasiado la tuerca del termopar para poder controlarla. Apriete sólo ¼ de giro más que el
ajuste manual. No use compuestos para uniones de tuberías en esta conexión.
3. Abra la válvula de gas principal. Si drenó el agua del calentador, asegúrese de volverlo a llenar antes
de encenderlo.
4. Siga las instrucciones de encendido que aparecen en el calentador de agua.
5. Vuelva a instalar las puertas interior y exterior del calentador.
IDENTIFICACIÓN DE LAS PIEZAS DEL KIT
Termopar de 24 pulg./60,96 cm
Para todos los modelos de gas natural y PL excepto los que
comiencen con “FG”
TERMOPAR ADAPTADORES
DEL TERMOPAR
ADJETIVO EN EN EE.UU.
Pieza
#
321887-000
Ranuras en el termopar para alojar
la parte superior del adaptador
Este extremo se encaja en las
ranuras del termopar
DE TIPO A PRESIÓN
DE TIPO A PRESIÓN Y DE TIPO CON ABRAZADERAS
INSTALE EL
ADAPTADOR 2
PRIMERO
1
NSTALE EL
ADAPTADOR 1
DESPUÉS
ARTÍCULO
#
0362434
MODELO #9008073046
/