Page is loading ...

LX728-V1 Smoke Alarm Instruction
The photoelectric smoke detector is designed to sense smoke that comes into the detector chamber. It does
not sense gas, heat, or flame. This smoke detector is designed to give early warning of developing fires by
giving off the alarm sounds from its built-in alarm horn. It can provide precious time for you and your family to
escape before a fire spreads.
Specifications
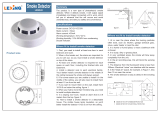
Where to install smoke alarm
1.Install a smoke detector in the hallway outside every separate bedroom area, as shown in Figure 1.
2.Install a smoke detector on every floor of a multi-floor home or apartment, as shown in Figure2.
3.Install a smoke detector inside every bedroom.
4.Install smoke detectors at both ends of a bedroom hallway if the hallway is more than 40 feet (12 meters) long.
5.Install a smoke detector inside every room where one sleeps with the door partly or completely closed, since
smoke could be blocked by the closed door and a hallway alarm may not wake up the sleeper if the door is closed.
6.Install basement detectors at the bottom of the basement stairwell.
7.Install second-floor detectors at the top of the first-to-second floor stairwell.
8.Install additional detectors in your living room, dining room, family room, attic, utility and storage rooms.
9.Install smoke detectors as close to the center of the ceiling as possible. If this is not practical, put the detector on
the ceiling, no closer than 20 inches (50 cm) from any wall or corner, as shown in Figure 3.
10.If some of your rooms have sloped, peaked, or gabled ceilings, try to mount detectors 3 feet (0.9 meter)
measured horizontally from the highest point of the ceiling as shown in Figure 4.
Power source: DC9V
Static current: <10uA
Alarm current: <10mA
Low voltage alarm:7 V±0.5V
Alarm sonority:> 85 db (3m)
AC power: Power: 100-130V/AC
220-240V/AC
Power frequency:50/60Hz
Working temperature:-10°C~50°C
Figure 2
Fiure 1
smoke detector for minimum security
floor
garage
basement
kitchen
ground
bedroom
bedroom
bedroom
living room
family room
bedroom
kitchen
bedroom
bedroom
bedroom
smoke detector for minimum security
smoke detector for more security
Figure 4Figure 3
0.9M(3ft)
horizontal distance from peak
detector
WALL
best location
acceptable location
50CM(20'')
MINIMUM
never here
CEILING
certer of ceiling
92.50mm
1
7
.
0
0
1
5
.
4
0
101.50mm
Ø79.00mm
27.00mm
Ø101.50mm
4.77mm
mm
mm

Where not to install smoke alarm
Nuisance alarms take place when smoke detectors are installed where they will not work properly. To avoid nuisance
alarms, do not install smoke detectors in the following situations:
1.Combustion particles are the by-products of something that is burning. Thus, in or near areas where combustion particles
are present you do not install the smoke detectors to avoid nuisance alarms, such as kitchens with few windows or poor
ventilation, garages where there may be vehicle exhaust, near furnaces, hot water heaters, and space heaters.
2.Do not install smoke detectors less than 20 feet (6 meters) away from places where combustion particles are normally
present, like kitchens. If a 20-foot distance is not possible, e.g. in a mobile home, try to install the detector as far away from
the combustion particles as possible. To prevent nuisance alarm alarms, provide good ventilation in such places.
3.In damp or very humid areas, or near bathrooms with showers. Moisture in humid air can enter the sensing chamber,
then turns into droplets upon cooling, which can cause nuisance alarms. Install smoke detectors at least 10 feet (3 meters)
away from bathrooms.
4.In very cold or very hot areas, including unheated buildings or outdoor rooms. If the temperature goes above or below
the operating range of smoke detector, it will not work properly. The temperature range for your smoke detector is 40 oF to
100 oF (4 oC to 38 oC).
5.In very dusty or dirty areas, dirt and dust can build up on the detector’s sensing chamber, to make it overly sensitive.
Additionally, dust or dirt can block openings to the sensing chamber and keep the detector from sensing smoke.
6.Near fresh air vents or very drafty areas like air conditioners, heaters or fans, fresh air vents and drafts can drive smoke
away from smoke detectors.
7.Dead air spaces are often at the top of a peaked roof, or in the corners between ceilings and walls. Dead air may prevent
smoke from reaching a detector.
8.In insect-infested areas. If insects enter a detector’s sensing chamber, they may cause a nuisance alarm. Where bugs
are a problem, get rid of them before putting up a detector.
9.Near fluorescent lights, electrical “noise” from fluorescent lights may cause nuisance alarms. Install smoke detectors at
least 5 feet (1.5 meters) from such lights.
WARNING: Never remove batteries to stop a nuisance alarm. Open a window or fan the air around the detector to
get rid of the smoke. The alarm will turn itself off when the smoke is gone. If nuisance alarms persist, attempt to
clean the detector as described in this User’s Manual.
WARNING: Do not stand close to the detector when the alarm is sounding. The alarm is loud in order to wake you
in an emergency. Too much exposure to the horn at close range may be harmful to your hearing.
Installing your smoke detector
1. At the place where you are going to install the detector, draw a
horizontal line six inches long.
2. Remove the mounting bracket from your unit by rotating it
counterclockwise.
3. Place the bracket so that the two longest hole slots are aligned on
the line. In each of keyhole slots, draw a mark to locate a mounting plug
and screw.
4. Remove the bracket.
5. Using a 3/16-inch (5mm) drill bit, drills two holes at the marks and
insert plastic wall plugs. Put the detector away from getting plaster dust
on it when you drill holes for mounting.
6. Using the two screws and plastic wall plugs (all supplied), attach the
bracket to the ceiling.
7. Open the battery cover and to install the battery.
8. Line up the slot of the bracket and the detector. Push the detector
onto the mounting bracket and turn it clockwise to fix it into place. Pull
outward on the detector to make sure it is securely attached to the
mounting bracket.
The smoke detectors are to be mounted on the ceiling. Please follow these steps to install your smoke detector:
NOTE: When the detector battery first makes contact with the detector, the alarm horn may sound for one second. This
means normal and indicates that the battery is positioned properly. Close cover, then press the test button, holding it down
for about 5 seconds until the horn sounds. The horn should sound a loud, pulsating alarm. This means the unit is working
properly.

Red Indicator
The red LED, as the ALARM indicator, is featured with the detector. It can be seen through the test button on the cover of
the detector. When red LED flashes once 35 seconds, it indicates the detector under normal operation. When smoke
detector senses smoke and simultaneously sounds an audible alarm, the red LED will flash very frequently, once 0.5
seconds.
Testing Your smoke detector
Test the detector weekly by pushing firmly on the test button with your finger until the horn sounds. Testing method may
take up to 20 seconds to sound the alarm horn. These are only ways to be sure that detector is working correctly. If the
detector fails to test properly, have it repaired or replaced immediately.
WARNING: Never use an open flame to test your detector. You may set fire to damage the detector, as well as your
home. The built-in test switch accurately tests all detector functions, as required by Underwriters’ Laboratories.
They are the only correct ways to test the unit.
WARNING: When you are not testing the unit and the alarm horn sounds a loud continuous sound, this means the
detector has sensed smoke or combustion particles in the air.
Be sure that the alarm horn is a warning of a possible serious situation, which requires your immediate attention.
˙ The alarm could be caused by a nuisance situation. Cooking smoke or a dusty furnace, sometimes called “friendly fires”
can cause the alarm to sound. If this happens, open a window or fan the air to remove the smoke or dust. The alarm will
turn off as soon as the air is completely clear.
˙ If the alarm horn begins to beep once a minute, this signal means that the detector’s battery is weak. Replace new battery
immediately. Keep fresh batteries on hand for this purpose.
Taking care of your smoke detector
To keep your detector in good working order, you must test the detector weekly, as referring to section “TESTING YOUR
SMOKE DETECTOR”.
˙ Replace the detector battery once a year or immediately when the low battery “beep” signal sounds once a minute. The
low battery “beep” should last at least 30 days.
NOTE: For replacement battery , use Eveready #522, #1222, #216; Duracell #MN1604; or Gold Peak #1604P,
#1604S; or Ultralife U9VL-J.
˙ Open the cover and vacuum the dust off the detector’s sensing chamber at least once a year. This can be done when you
open the detector to change the battery. Remove battery before cleaning. To clean detector, use soft brush attachment to
your vacuum. Carefully remove any dust on detector components, especially on the openings of the sensing chamber.
Replace battery after cleaning. Test detector to make sure battery is incorrectly. Check to make sure there are no
obstruction inside the test button. If there is any dust in the test button, insert a toothpick from the back to the front.
˙ Clean detector cover when it gets dirty. First open the cover and remove battery. Hand-wash cover with cloth dampened
with clean water. Dry it with lint-free cloth. Do not get any water on the detector components. Replace the battery, and close
cover. Test detector to make sure that battery works correctly.
/