
C
lock Radio
Register your product and get support at
w
ww.philips.com/welcome
User Manual
AJ3226
IFU_AJ3226_79 2008.5.23 5:28 PM Page 1

FM
MW
MHz
KHz
x10
ALARM 2
ALARM 1
SLEEP
UP DOWN
ALARM RESET
REP
•SLEEP OFF•
EAT ALARM
CLOC
K
S
E
T
A
L 1
SET AL
2
SET TIME
AL 1
OFF
BU
Z
RAD
IO
TU
N
IN
G
MW
FM
BAND
V
O
L
AUX
RADIO
OFF
CLOCK RADIO AJ 3226
AL 2
OFF
B
U
Z
RADIO
3
1
2
8
7
6
5
0
9
4
@
!
$
%
^
#
1
IFU_AJ3226_79 2008.5.23 5:28 PM Page 2

Congratulations on your purchase and welcome to Philips!
To fully benefit from the support that Philips offers, register your
product at www.philips.com/welcome.
English
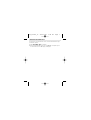
CONTROLS (see fig. 1 )
1 SLEEP -
activates the radio for sleep function
-
adjusts the sleep period
2 Clock control
- SET TIME :
sets the clock time
- SET AL 1:
sets the alarm time for alarm 1
- SET AL 2:
sets the alarm time for alarm 2
- CLOCK:
to run on clock time
3 UP / DOWN:
adjusts the hours/ minutes for the clock and alarm times
4 REPEAT ALARM / SLEEP OFF
-
switches off the active alarm for a 6-7 minute period
- switches off the sleep function
5 Frequency indicator - shows the radio frequency of your selected waveband
6 TUNING - tunes to radio stations
7 BAND - select FM/MW waveband
8 VOLUME - adjusts the sound level
9 ALARM RESET -
stops the active alarm for 24 hours
0 DISPLAY - show the clock/ alarm times and status of the set
! OFF • RADIO • AUX -
switches off the set or selects the radio/AUX mode.
@ AL 1, AL 2
–
OFF switches off the alarm 1 or alarm 2
–
RADIO activates the radio for alarm 1 or alarm 2
–
BUZ activates the buzzer for alarm 1 or alarm 2
# Battery door -
opens to store a 9 volt 6F22 type battery (not included) for
clock memory backup
$ Mains lead -
for AC mains supply
%
Pigtail aerial
-
improves FM reception
^
AUX
-
connects external audio source.
IFU_AJ3226_79 2008.5.23 5:28 PM Page 3

INSTALLATION
POWER SUPPLY
1
Check if the mains supply, as shown on the type plate located on the
bottom of the set, corresponds to your local mains supply. If it does not,
consult your dealer or service centre.
2
Connect the mains lead to the wall socket.
3
To disconnect the set from the mains supply completely, remove the plug from
the wall socket.
CLOCK MEMORY BACKUP
The clock memory backup allows your alarm and clock time settings to be stored
for up to a day when there is a power interruption e.g. mains failure. The com-
plete clock radio and display illumination will be switched off. As soon as the
mains supply returns, the display will indicate the correct time.
1
Remove the battery door to insert a 9 volt 6F22 type battery (not included) for
backup.
2
Replace the battery door.
NOTE:
If no backup battery is installed or the power interruption is prolonged, you
will need to set the clock and alarm times again.
Batteries contain chemical substances so should be disposed of
properly.
IFU_AJ3226_79 2008.5.23 5:28 PM Page 4

RADIO
You can use this set solely as a radio!
1
Adjust
OFF • RADIO • AUX
to
RADIO
to switch on the radio.
2
Select your waveband by adjusting the BAND switch
.
3
Adjust TUNING to tune to your desired station
.
4
Turn the VOLUME control to adjust the volume level
.
5
Adjust
OFF • RADIO • AUX
to OFF to switch off the radio.
To improve reception:
FM: extend and
position the pigtail for optimum reception
.
MW:
uses a built-in aerial inside the set. Direct the aerial by adjusting
the position of your set
.
SETTING THE CLOCK AND ALARM TIME
The time is displayed using the 24-hour clock
IMPORTANT!
To adjust the clock and alarm times accurately, always make sure
you press
UP / DOWN
separately and not simultaneously.
1
Turn the clock control to SET TIME or SET AL 1 or SET AL 2 to set the
clock or alarm time respectively.
2
Press
UP / DOWN
repeatedly or hold down on the respective button to adjust
the hours and minutes.
3
Release
UP / DOWN
when you reach the correct setting.
4
After you have set both the hour and minutes, turn the clock control to
CLOCK to run on clock time.
SELECTING THE ALARM MODE
GENERAL
If you wish to use the alarm, you must first set the alarm time first. You can
choose from two different alarm modes to wake you up: by radio or buzzer.
•
Select your choice of alarm mode by adjusting AL 1 or AL 2 to RADIO or
BUZ.
™
The buzzers are at a set volume and cannot be adjusted. BUZ on AL 1 is a
low tone buzzer while BUZ on AL 2 is a high tone.
IFU_AJ3226_79 2008.5.23 5:28 PM Page 5

SWITCHING OFF THE ALARM
There are three ways of switching off the alarm. Unless you cancel the alarm
completely, the 24 hour alarm reset option will be automatically selected after
59 minutes, from the time your alarm time first goes off.
24 HOUR ALARM RESET
If you want the alarm mode to be stopped immediately but also wish to retain the
same alarm setting for the following day:
•
Press ALARM RESET during the alarm call.
CANCELING THE ALARM COMPLETELY
To cancel the set alarm time before it goes off, or during the alarm call:
•
Adjust AL 1 or AL 2 to OFF position.
REPEAT ALARM
This repeats your alarm call at 6-7-minute intervals.
1
During the alarm call, press REPEAT ALARM/SLEEP OFF.
SLEEP
About Sleep
This set has a built-in timer which enables the set to be automatically switched
off during radio playback after a set period of time. This allows you to lie back,
listen and fall asleep. The maximum sleep time is 59 minutes.
Setting SLEEP
1
Check that the clock control is in CLOCK position.
2
Set
OFF • RADIO • AUX
to
OFF
position.
3 To s
et the sleep function, do one of the following:
•
Press and hold
SLEEP
.
™
The display will begin to count down from 0:59 to 0:00 minutes.
•
Hold down
SLEEP
, and press
UP/DOWN
repeatedly to adjust sleep time from
59 minutes downward.
™
To cancel sleep, press REPEAT ALARM/SLEEP OFF.
IFU_AJ3226_79 2008.5.23 5:28 PM Page 6

CONNECTING AN EXTERNAL DEVICE
You can listen to your favourite music of the connected external device through
your AJ3226’s speakers.
1
Adjust
OFF • RADIO • AUX
to select AUX.
2
Connect the AUX-IN cable of the set to an AUDIO OUT or headphone jack on
an external device (such as MP3 player, or CD player).
IFU_AJ3226_79 2008.5.23 5:28 PM Page 7

SAFETY INFORMATION
•
Install the unit near the AC outlet and where the AC plug can be easily
reached.
•
Where the MAINS plug is used as the disconnect device, the disconnet device
shall remain readily operable.
•
Place the set on a hard and flat surface so that the system does not tilt.
•
If you do not intend to use the set for a long time, withdraw the power plug
from the wall outlet. In addition to this, it is advisable to remove the battery
from the clock radio. This will prevent any danger of leakage and the clock
radio will not be damaged.
•
Do not expose the set, batteries to humidity, rain, sand or excessive heat
caused by heating equipment or direct sunlight.
•
The apparatus shall not be exposed to dripping or splashing.
•
Adequate ventilation with a minimum gap of 15cm between the ventilation
holes and surrounding surfaces is necessary to prevent heat build-up.
•
The ventilation should not be impeded by covering the ventilation openings
with items, such as newspapers, table-cloths, curtains, etc..
•
No objects filled with liquids, such as vases, shall be placed on the appartus.
•
No naked flame sources, such as lighted candles, should be placed on the
apparatus.
•
To clean the set, use a soft, slightly dampened chamois leather. Do not use
any cleaning agents containing alcohol, ammonia, benzene or abrasives as
these may harm the housing.
•
Battery shall not be exposed to excessive heat such as sunshine, fire or the like.
CAUTION
Use of controls or adjustments or performance of procedures other than
herein may result in unsafe operation.
This set complies with the radio interference requirements of the
European Union.
IFU_AJ3226_79 2008.5.23 5:28 PM Page 8

TROUBLESHOOTING
If a fault occurs, first check the points listed below before taking the set for repair.
If you are unable to remedy a problem by following these hints, consult your dealer or
service center.
WARNING: Under no circumstances should you try to repair the set yourself, as this
will invalidate the warranty. Do not open the set as there is a risk of
electric shock.
Problem
– Possible Cause
• Remedy
No sound/power
– Volume not adjusted
• Adjust the volume
Occasional crackling sound during FM broadcast
– Weak signal
•
Adjust the position of the Pigtail
Continuous crackling/hiss disturbance during MW broadcast
– Electrical interference from TV, computer, fluorescent lamp, etc.
• Move set away from other electrical equipment
The alarm does not function
–
Alarm time not set and or alarm mode not selected
• Set
the alarm time and / select alarm mode
– Volume too low for RADIO
• Adjust the volume
–
Radio alarm not adjusted to radio station
•Tune to a radio station
IFU_AJ3226_79 2008.5.23 5:28 PM Page 9

ENVIRONMENTAL INFORMATION
We have reduced packaging to the minimum for easy separation into two
materials: paper and cardboard.
Your set consists of materials which can be recycled if disassembled by a special-
ized company. Please observe local regulations on the disposal of packing materi-
als and old equipment.
Specifications
AC Power.............................................230 – 240 V / 50 Hz
Power Consumption
Active...........................................................................5 W
Standby.....................................................................2.5 W
Dimensions (w x d x h)....................174 x 62 x 159 (mm)
Weight......................................................................0.52 kg
IFU_AJ3226_79 2008.5.23 5:28 PM Page 10

IFU_AJ3226_79 2008.5.23 5:28 PM Page 11

IFU_AJ3226_79 2008.5.23 5:28 PM Page 12
-
 1
1
-
 2
2
-
 3
3
-
 4
4
-
 5
5
-
 6
6
-
 7
7
-
 8
8
-
 9
9
-
 10
10
-
 11
11
-
 12
12


Ask a question and I''ll find the answer in the document
Finding information in a document is now easier with AI
Related papers
-
Philips AJ3231/79 User manual
-
-
Philips AJ3226/12 Datasheet
-
-
-
Philips AJ3226 User manual
-
-
-
-
Philips MCB395/05 User manual