Page is loading ...

INSTALLATION INSTRUCTIONS
THESE INSTRUCTIONS MUST BE
LEFT WITH HOMEOWNER
MODELS 4901, 8901
Measurements
Installs through 1-1/4" hole drillings on 4" centers.
Escutcheons diameters - 1-3/4".
Supplies are 3/8" O.D. copper tubing with 1/2" male
NPT nipple connedtions. Makes up to supply stops or
connec tions with flexible supplies.
The spout is not a swing spout. Fasten spout escutch-
eon securely before tightening the spout nut.
Equipped with flow control aerator.
BAR SINK FAUCET WITH
GOOSENECK SPOUT
➤
➤
➤
➤
➤
➤
➤
➤
➤
➤
➤
➤
➤
➤
➤
10-3/4"
8-1/2"
3-1/2"
SPOUT
NUT
ESCUTCHEON
SPOUT
ASSEMBLY
HANDLE
HOUSING
HANDLE
LEVER
ESCUTCHEON
WASHER
SPACER
RETAINER
CLIP
MODEL 8901
NOTE: Maximum Deck
Thickness is 1/16".
CAUTION:
CLIP
EAR
CLIP
EAR
Always turn water off before disassembling the valve. Open valve
handle to relieve water pressure and insure that complete water shut-
off has been accomplished.
Before turning water on during either rough-in or trim-out, make sure that cartridge retainer clip is in place. The
cartridge and retainer clip were properly installed and tested before leaving the factory. Although it is unlikely,
it is nevertheless possible that through the handling of the valve by any number of persons the retainer clip
may not be properly installed. This should be carefully checked at time of rough-in and trim-out. If the retainer
clip is not properly installed, water pressure could force the cartridge out of the casting. Personal injury or water
damage to the premises could result.
®
Complies with ASME A112.18.1M and CSA B125
MT161A

WASHER
AERATOR
SPOUT
NUT
RETAINING
RING
SPOUT
O-RING
ESCUTCHEON
Maintenance
Your new Moen faucet will give good service for an extended period of time. Should foreign materials in the system affect its
operation, routine repairs can be easily made.
If your faucet drips from the spout end or leaks up through the handle, follow "Disassembly" instructions and replace the
cartridge. If your faucet leaks from either the top or bottom of the spout hub, replace o-rings. Be sure to use only genuine Moen
replacement parts. Re-assemble, following "Reassembly" instructions. For proper water flow, aerator must be free of foreign
particles. If flow is weak or irregular, unscrew aerator, clean and replace.
Installation
TO INSTALL FAUCET: Be sure sink or mounting surface is clean and dry. Place a bead of plumber's putty under the rim of
the escutcheon. Place faucet body up through right hand mounting hole. Use spacers, retainer clips and escutcheon to fasten
it securely.
TO INSTALL SPOUT: Place a bead of plumber's putty under the rim of the escutcheon. Place spout down through mounting
hole and tighten spout nut securely by hand.
MT161A
FAUCET
CONNECTION
NIPPLE
TIGHTEN
NUT
HOLD WITH
WRENCH
WARNING: Severe bends of the supply
tubes may cause crimping. Restricted wa-
ter flow could result. When connecting
supplies, hold the faucet connection nipples
with a wrench when tightening to prevent
twisting and collapse of the tubing.
Flushing
IMPORTANT:
Pipe chips, sand, stones, and other solids found in new and renovated plumbing can damage the sealing surface of the
cartridge and cause a leak. To avoid damage, DO NOT OPERATE THE VALVE until you have followed these instructions:
1. After installing and connecting the faucet turn the valve on in the full cold position (handle pointing to the right) and turn
on the cold supply for 15 seconds.
2. Without closing the valve turn to the full hot position (handle pointing to the left and turn on the hot supply for 15 seconds.
3. Close the valve, unscrew aerator from the end of the spout and clean the cone screen.
4. Replace aerator.
5. Check the system for leaks.

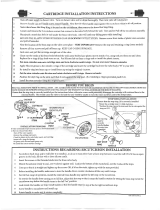
Disassembly
1. Turn "OFF" both hot and cold water supplies. Turn
faucet on to relieve pressure and insure complete
shut-off. Pull handle cap up and off (it snaps into
place). Remove the handle screw (illustration 1).
2. Push cartridge stem down and then lift and tilt
handle lever and handle body off. Leave handle
inside the handle body.
3. Lift off the retaining ring.
4. Pry out the retainer clip with a screwdriver (illustra-
tion 2).
Lift off the grooved sleeve.
5. Use cartridge twisting tool furnished with the
replacement cartridge and rotate cartridge be-
tween
11 and 1 o'clock.
6. Grasp cartridge stem with pliers. Pull cartridge out
(illustration 3).
HANDLE
CAP
HANDLE
SCREW
HANDLE
BODY
HANDLE
RETAINING
RING
GROOVED
SLEEVE
ESCUTCHEON
NOTCHED
FLAT
ON STEM
RETAINER
CLIP
CARTRIDGE
SPACER
RETAINER
CLIP
SPACER
MOUNTING
NUT
MODEL 8901MODEL 4901
HANDLE
HANDLE
SCREW
HANDLE
COVER
ILLUSTRATION 1
FAUCET
BODY
RETAINER
CLIP
ILLUSTRATION 2
➤
➤
CARTRIDGE
STEM
ILLUSTRATION 3
CARTRIDGE
EARS
ILLUSTRATION 5
Reassembly
1. With cartridge stem UP, insert cartridge with ears
aligned front to back (illustration 4).
2. Push the cartridge down by the ears until the top of
the ears are flush with the top of the body (illustra-
tion 5).
3. Turn notched flat of cartridge stem toward front of
sink. (Note: for cross piping installations, see in-
structions on back).
4. Insert the retainer clip so that the legs straddle the
cartridge ears and slide into the opposite slot in the
body. Remove clip. Replace grooved sleeve and
slide clip through the slots into position, this pre-
vents the cartridge from rotating and locks it in the
body (illustration 6).
5. Replace retaining ring.
6. Press cartridge stem down. Holding handle UP,
hook handle ring inside the handle body (illustra-
tion 7) into groove on sleeve.
8. Swing handle back and forth until it drops down
into place.
9. Replace handle screw. Tighten securely. Push
handle cap down until it snaps into place.
ILLUSTRATION 4
ILLUSTRATION 6
ILLUSTRATION 7
HOLD
UP
EAR
CLIP
HOLD
UP
HOLD
UP
To Eliminate Cross-Piping on Back-To-Back
Installations, or to Correct Reversed Rough-In
Where Hot and Cold Positions are Reversed:
Remove handle cap, handle screw and handle body (see "Disassembly"
instructions). Turn cartridge stem around so that the notched flat is turned
one half turn or 180°. Re-install handle parts (see "Reassembly").
If handle won't operate properly...you have not hooked handle ring into
sleeve groove. Hold handle up, hook ring in handle housing into groove
on sleeve.
HANDLE
CAP
HANDLE
SCREW
HANDLE
BODY
HANDLE
TURN STEM
1/2 TURN
HANDLE
HANDLE
SCREW
HANDLE
COVER

MT161A SEP 95
Copyright 1995
Moen Incorporated
Printed in U.S.A.
Consumer Information
Faucets made of leaded brass alloys may contribute small amounts of lead to water that is allowed to stand in contact with
the brass. The amount of lead contributed by any faucet is highest when the faucet is new. The following steps may
reduce potential exposure to lead from faucets and other parts of the plumbing system:
• Always run the water for a few seconds prior to use for drinking or cooking.
• Use only cold water for drinking or cooking.
• If you wish to flush the entire plumbing system of water that has been standing in the pipes or other fittings, run the
cold water until the temperature of the water drops, indicating water coming from the outside main.
• If you are concerned about lead in your water, have your water tested by a certified laboratory in your area.
HELPLINE:
For answers to any product, installation,
replacment parts or warranty questions,
call our consumer helplines.
In the U.S., toll free:
1-800-321-6636
In Canada call:
Toronto, 905-829-3400
Rest of Canada, 1-800-465-6130
Moen Incorporated 25300 Al Moen Drive, North Olmsted, OH 44070-8022, U.S.A.
In Canada:
Moen Inc. 2816 Bristol Circle, Oakville, Ontario L6H5S7
®
/