
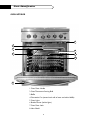
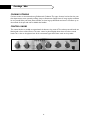
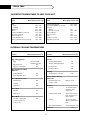
Dynamic Cooking Systems, Inc.
30” FIVE BURNER SELF CLEANING
GAS RANGE
Care and Use Guide
Models:
■
RGSC-305SS
■
RGSC-305BK
■
RGSC-305WT
■
RGSC-305GN
■
RGSC-305BL
■
RGSC-305PL

A Message To Our Customers
1
Thank you for selecting this DCS Professional 30” Five Burner Self Cleaning Gas Range. Because of this
appliance’s unique features we have developed this Care and Use Guide. It contains valuable information
on how to properly operate and maintain your new appliance for years of safe and enjoyable cooking.
To help serve you better, please fill out and return the Ownership Registration Card and keep this Guide
handy, as it will help answer questions that may arise as you use your new appliance.
For your convenience, product questions can be answered by a DCS Technical Support
Representative by phone: 1-888-281-5698, or Fax: 714-372-7003
or by mail:
DCS
Attention Customer Service,
5800 Skylab Road, Huntington Beach, CA 92647
WARNING
If the information in this manual is not followed exactly, a fire or explosion may result causing property
damage, personal injury or death.
PRECAUTION
Do not store or use gasoline or other flammable vapors and liquids in the vicinity of this or any other
appliance.
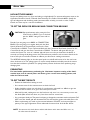
FOR YOUR SAFETY
If you smell gas:
• Do not try to light any appliance.
• Do not touch any electrical switch; do not use any phone in your building.
• Immediately call your gas supplier from a neighbor’s phone. Follow the gas supplier’s instructions.
• If you cannot reach your gas supplier, call the fire department.
Installation and service must be performed by a qualified installer, service agency or the gas supplier.
PLEASE RETAIN THIS MANUAL
FOR FUTURE REFERENCE.

Tab le O f Contents
2
SAFETY PRACTICES TO AVOID PERSONAL INJURY
Read Before Using your new appliance..................................................................................4-6
PARTS IDENTIFICATION
.............................................................................................................7-8
BEFORE USING YOUR APPLIANCE
.........................................................................................9
COOKTOP USE
Burners ............................................................................................................................................10
Simmering .......................................................................................................................................10
Electronic Igniters .........................................................................................................................11
Burner Efficiency and Flame Characteristics ..........................................................................11
Flame Height ..................................................................................................................................12
Burners ............................................................................................................................................12
Burner Grates................................................................................................................................12
Cooking Utensils...........................................................................................................................13
Control Knobs...............................................................................................................................13
OVEN USE
Burners ............................................................................................................................................14
Electric Glow Igniter Coil...........................................................................................................14
Oven...........................................................................................................................................14-16
To Set The Oven For Baking ......................................................................................................16
Preheating .......................................................................................................................................17
Condensation.................................................................................................................................17
To Get The Best Results..............................................................................................................17
Oven Racks.....................................................................................................................................18
High Altitude Baking .....................................................................................................................19
To Set The Oven For Broiling And Convection Broil...........................................................19
Reheating.........................................................................................................................................19
To Get The Best Results..............................................................................................................19
Oven Racks Position ....................................................................................................................20
Using A Meat Thermometer To Broil And Convection Broil..............................................20
To Use The Oven For Slow Cooking Or Low Temperatures ............................................20
Suggested Temperatures To Keep Food Hot...........................................................................21
Internal Cooking Temperature...................................................................................................21

Tab le of Contents
3
OVEN SELF-CLEANING
Oven Self-cleaning.........................................................................................................................22
Oven Door Lock During Self-clean..........................................................................................22
Before Self-cleaning The Oven ...................................................................................................22
Setting The Oven For Self-clean ................................................................................................23
At the End Of The Clean Cycle ................................................................................................23
CARE AND MAINTENANCE
Cooktop ..........................................................................................................................................24
Burner Grates................................................................................................................................24
Burners ............................................................................................................................................25
Igniters .............................................................................................................................................25
Control Knobs-Cooktop And Oven ........................................................................................25
Backguard........................................................................................................................................26
Oven And Door Interior.............................................................................................................26
Oven Racks And Rollers..............................................................................................................27
Frame, Sides, Door Exterior, Heat Defector ..........................................................................27
Door Gasket ..................................................................................................................................27
Oven Light Bulb Replacement....................................................................................................27
Power Failure .................................................................................................................................27
Before You Call For Service........................................................................................................28
If The Cooktop Burners Do Not Light....................................................................................28
Service Information ......................................................................................................................28
WARRANTY
............................................................................................................................................29
SERVICE
.....................................................................................................................................................30

S afety P ractices To Avoid P ers onal I njury
4
When properly cared for, your new DCS Appliance has been designed to be a safe, reliable cooking
appliance.When using this restaurant caliber appliance, use it with extreme care, as this type appliance
provides intense heat and can increase the accident potential. Basic safety precautions must be
followed when using kitchen appliances, including the following:
Read this Care and Use Manual thoroughly before using your new appliance.This will help to
reduce the risk of fire, electric shock, or injury to persons.
Begin by insuring proper installation and servicing. Follow the installation instructions which
came with this appliance. Be sure to have a qualified technician to install and ground this
appliance before using.
Have the installer show you where the gas supply shutoff valve is located so you will know how
and where to turn off the gas to the appliance.
If you smell gas, the installer has not done a proper job of checking for leaks.You can have a
small leak and therefore a faint gas smell if the connections are not completely tight. Finding a
gas leak is not a “do-it-yourself” procedure. Some leaks can only be found with the burner
control in the ON position and for your protection it must be done by a qualified service
technician.
If by some chance a burner goes out and gas escapes, open a window or a door to let the room
air out. Do not attempt to use the appliance until the gas has had time to dissipate. Follow the
instructions on page 1,“What to do if You Smell Gas”.
This appliance has been factory assembled for natural gas. It should be correctly adjusted by a
qualified service technician or installer for the type of gas that is used.
Do not repair or replace any part of this appliance unless it is specifically recommended in this
manual.All other servicing should be referred to a qualified technician.
Children should not be left alone or unattended in an area where appliances are in use.
They should never be allowed to turn knobs, push buttons, sit or stand on any part of an
appliance.
Children in walkers, or children crawling can be attracted to the round oven door handle and
may grab and open the oven door.This can result in injury from the door being pulled open on a
child, or severe burns if the oven is in use and hot.
CAUTION: Do not store items of interest to children above or at the back of any appliance.
Children could be seriously injured if they should climb onto the appliance to reach
these items.
Never store anything in the oven or on the cooktop. Flammable materials can catch fire,
plastic items may melt or ignite and other types of items could be ruined.
Do not hang articles from any part of the appliance or place anything against the oven. Some
fabrics are quite flammable and may catch on fire.
If the appliance is near a window be certain the curtains do not blow over or near the
cooktop burners; they could catch on fire.
Do not use water on grease fires.Turn all burners OFF, then smother fire with baking soda or
use a dry chemical or foam-type fire extinguisher.

Never let clothing, pot holders, or other flammable materials come in contact with, or too close
to, any burner or burner grate until it has cooled. Fabric may ignite and result in personal injury.
Be certain to use only dry pot holders: moist or damp pot holders on hot surfaces may cause
burns from steam. Do not use a towel or other bulky cloth in place of pot holders. Do not let
pot holders touch hot burners, or burner grates.
For personal safety, wear proper apparel. Loose fitting garments or hanging sleeves should
never be worn while using this appliance. Some synthetic fabrics are highly flammable and should
not be worn while cooking.
Do not use aluminum foil to line any part of the oven or cooktop. Using a foil liner could
result in a fire hazard, or the obstruction of the flow of combustion and ventilation air. Foil is an
excellent heat insulator and heat will be trapped underneath it.This trapped heat can upset the
cooking performance and can damage the finish of the oven or the cooktop parts.
WARNING: This appliance is for cooking. Based on safety considerations, never use the oven or
cooktop to warm or heat a room. Also, such use can damage the cooktop or oven
parts.
When using the cooktop: Do not touch the burner grates or the immediate
surrounding area.
Areas adjacent to the burners may become hot enough to cause burns.
When using the oven: Do not touch the interior surfaces of the oven, the exterior area
immediately surrounding the door or the back trim.
The surfaces directly above the
oven door may be hot if the oven has been operated with the door open, or if something has
prevented the door from sealing.
Never leave the cooktop unattended when using high flame settings. Boil overs cause
smoking and greasy spill overs may ignite. More importantly, if the burner flames are smothered
by a severe boil over which effects the igniter, unburned gas will escape into the room. See
page 1.
Only certain types of glass, heat-proof glass-ceramic, ceramic, earthen ware, or
other glazed utensils are suitable for cooktop use.
This type of utensil may break with
sudden temperature changes. Use only on low or medium flames settings according to the
manufacturer’s directions.
Do not heat unopened food containers; a build up of pressure may cause the container to
burst.
During cooking, set the burner control so that the flame heats only the bottom of the
pan
and does not extend beyond the bottom of the pan.This could heat and/or melt the
handles.
Always use utensils that have flat bottoms large enough to cover the burner. The use
of undersized utensils will expose a portion of the flame to direct contact and may result in
ignition of clothing.
To minimize burns, ignition of flammable materials and unintentional spill overs, position handles
of
utensils inward so they do not extend over adjacent work areas, cooking areas, or the edge
of the cooktop.
S afety P ractices To Avoid P ersonal Injury
5

S afety P ractices To Avoid P ers onal I njury
6
Hold the handle of the pan to prevent movement of the utensil when stirring or turning
food.
GREASE IS FLAMMABLE. Let hot grease cool before attempting to handle it.Avoid letting
grease deposits collect around the cooktop burners. Clean after each use or boil over.
For proper lighting and performance of the cooktop burners, keep the burner ports clean. It
may be necessary to clean these when there is a boil over or when the burner does not light,
even though the electronic igniters click.
Clean the cooktop with caution.Avoid steam burns; do not use a wet sponge or cloth to clean
the cooktop while it is hot. Some cleaners produce noxious fumes if applied to a hot surface.
Follow directions provided by the cleaner manufacturer.
Be sure all the range and/or cooktop controls are turned off and the appliance is cool before
using any type of aerosol cleaner on or around the appliance.The chemical that produces the
spraying action could, in the presence of heat, ignite or cause metal parts to corrode.
Place oven racks in desired position while the oven is cool. If a rack must be moved
while the oven is hot, do not let the pot holders contact the hot interior of the oven.
Use care when opening the oven door. Let hot air or steam escape before removing or
replacing foods.
Do not rub, damage, move or remove the door gasket. It is essential for a good seal during
baking.
Clean the ventilator hood and filters above the range or cooktop frequently so grease
from cooking vapors does not accumulate on them.
Turn the ventilator OFF in case of fire or when intentionally “flaming” liquor or other spirits on
the cooktop.The blower, if in operation, could unsafely spread the flames.
Do not obstruct the flow of combustion or ventilation air to the appliance. Be sure a fresh air
supply is available.
For safety reasons and to avoid damage to the appliance never sit, stand, or lean on the oven
door or cooking surface.
Service should only be done by authorized technicians.Technicians must disconnect the power
supply before servicing this appliance.
California Proposition 65 - Warning:The burning of gas cooking fuel generates some by-products
which are known by the State of California to cause cancer or reproductive harm. California law
requires businesses to warn customers of potential exposure to such substances.To minimize
exposure to these substances, always operate this unit according to the instructions contained in
this booklet and provide good ventilation to the room when cooking with gas.

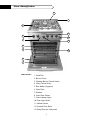
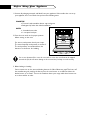
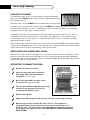
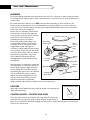
Parts I dentification
7
1. Island Trim
2. Burner Grates
3. Cooktop Burner Control Knobs
4. Oven Control Knob
5. Rack Rollers (Supports)
6. Oven Door
7.Window
8. Oven Door Gasket
9. Oven Indicator Lights
10. Oven Light Switch
11. Selector Switch
12. Standard Oven Racks
13. Rating Plate (on back panel)
PARTS LIST:
1
2
3
9
8
5
10
12
6
7
13
11
4

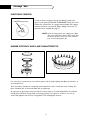
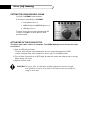
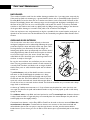
Parts I dentif ication
8
OVEN INTERIOR
7
2
6
4
5
8
1
1. Oven Door Handle
2. Oven Thermostat Sensing Bulb
3. Baffle
4. Convection Fan (center back wall of oven can behind baffle)
5. Oven Lights
6. Broiler Burner (behind glass)
7. Oven Door Lock
8. Heat Shield
3

Before Us ing Y our Appliance
9
1. Remove all packaging materials and labels from your appliance. If the installer has not set up
your appliance, do it now. Check that you have the following items:
COOKTOP
5 burner head assemblies, burner caps and grates
Backguard (if other than island installation)
OVEN
4 standard oven racks
1 two-piece broil pan
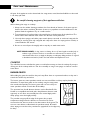
2. Place the oven racks in the proper position
before turning on the oven.
For correct rack position check your recipe.
The most frequently used position is number 2.
The rack positions are numbered from the
bottom as in the floors of a building.
Do not use aluminum foil to cover the oven racks or to line the oven. Heat can be trapped
beneath the foil, this can cause damage to the oven and the food may not cook correctly.
3. Before baking or broiling:
One at a time turn on the oven and broiler burners for 20 to 30 minutes each.This burns off
the manufacturing oils used by the factory.Turn the oven burner on to 450ºF and then the
broiler burner on to “Broil”.Turn on the ventilator above your range while these burners are
on, as there will be an odor.
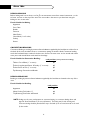
1
2
3
4
OFF
BAKE
BAKE
BROIL
OVEN ON
CLEAN
HEATING
DOOR LOCKED

Cooktop Use
10
BURNERS
Your new professional gas range is
equipped with burners typical of those
used in restaurants.These burners are
designed for maximum cleanability and
controllability.The large cap spreads the
simmer burner heat out to avoid too
much heat being concentrated on the
center of the pan.The simmer burner is
always on when the burner is in use.The
burner should never be operated if the
cap is not in place.
All the cooktop burners have electronic spark ignition to eliminate continuously burning pilots, when
the main burner is on and the flame is blown out, it will relight.
SIMMERING
Your new professional cooktop has exceptionally low simmering capabilities.The large cap serves as a
heat diffuser to spread out the heat to avoid having a center hotspot. Keep in mind that because of the
high heat capacity of the outer burner, and the mass of the cast iron burner grates (they retain heat
longer than lighter, conventional grates) some foods may continue to cook by retained heat after the
burner has been turned off.
When lighting the simmer burner, turn the main burner knob down to the simmer burner position.
Should a strong draft or boil over extinguish the simmer flame it will relight automatically as the main
burner would.
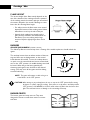
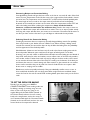
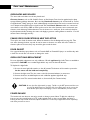
Simmer
Flame
Cap
Brass
Port Ring
Burner Max. Low/Simmer
Location Btu/hr Btu/hr
Nat LP Nat LP
1 16,000 14,000 500-1,200 500-1,200
2 16,000 14,000 500-1,200 500-1,200
3 17,500 14,000 500-1,200 500-1,200
4 16,000 14,000 500-1,200 500-1,200
5 16,000 14,000 500-1,200 500-1,200
Simmer
Flame
1
3
4
5
2

Cooktop Use
11
ELECTRONIC IGNITERS
If a burner does not ignite, listen for the clicking sound. If the
igniter is not clicking,TURN OFF THE BURNER. Check the circuit
breaker for a blown fuse or a tripped circuit breaker. If the igniter
still fails to operate, see page 28,“Before Calling For Service”.To
light the burner manually, see page 27.
BURNER EFFICIENCY AND FLAME CHARACTERISTICS
It is necessary to keep the burner ports and the igniters clean for proper lighting and efficient performance of
the cooktop burners.
The burner flame should burn completely around the burner with no excessive noise or lifting.The
flame should be blue in color and stable with no yellow tips.
An improper air-gas mixture may cause either a burner flutter or a yellow tipped flame.A technician
should adjust the flame. During initial use, foreign particles in the gas line, or dust in or in the air
around the appliance may cause an orange flame.This will disappear with use.
NOTE: If you are using propane gas, a slight pop or flash
may occur at the burner ports a few seconds after
the burner has been turned “off ”.This “extinction
pop” is normal for propane gas.
IGNITER (keep clean)

Cooktop Use
12
FLAME HEIGHT
The correct height of the flame mainly depends on the
size of the bottom of the cooking utensil, the material
of the cooking utensil, the amount and type of food and
the amount of liquid in the utensil. Following are some
basic rules for selecting flame height.
• For safety reasons the flame must never extend
beyond the bottom of the cooking utensil. Never
allow flames to curl up the side of the pan.
• Utensils which conduct heat slowly (such as
glass-ceramic) should be used with medium to
low flames. If you are cooking with a large
amount of liquid, a slightly larger flame can be
used.
BURNERS
SEALED TOP BURNERS (w/ Grates removed)
The Sealed Top Burners must be kept clean. Cleaning of the sealed top burners should include the
igniter.
The cooktop burners have an infinite number of heat set-
tings and there are no fixed positions on the control
knobs between HI and LO. To turn the cooktop burner
on, push in on the control knob and turn it counterclock-
wise to the “LITE” position. An audible clicking sound will
be heard. When the gas has been ignited by the
electronic spark igniter, turn the knob to the desired
setting. (This step turns off the igniter and the clicking
sound should stop.)
NOTE: The igniter will continue to click as long as a
control knob is in the “LITE” position.
CAUTION: When turning on any cooktop burner, be sure to stop at the “LITE” position before turning
the burner to a flame setting for cooking. If the burner is not lit and it is turned beyond the
“LITE” position, to HI, MEDIUM, or LO, there will be a burst of flame when the burner does
light. This could cause burns or damage to the surrounding countertop.
BURNER GRATES
The burner grates are heavy cast iron.They were
designed in sections to make them easier to remove
and clean.
HI
LO
SIM
LITE
OFF

Cooktop Use
13
COOKING UTENSILS
For best results we recommend using Professional Cookware.This type of utensil can be found at your
finer department stores, specialty cooking shops, or Restaurant Supply Stores. If using regular cookware
be very careful if the pans have plastic handles, as these large professional size burners can flame up on
the outside of the pan and melt or bubble the handles.
CONTROL KNOBS
The control knobs are readily associated with the burners they control.The cooktop control knobs are
labeled and in front of the burners.The oven control is placed slightly lower than the other control
knobs.This is due to the physical size of the commercial type thermostats used on the product.

Oven Use
14
CONVECTION BAKING
Convection Baking is baking with a fan at the back of the oven circulating the hot air in a
continuous pattern around the food.This circulating hot air heats and browns the surface of the
food more effectively than in a standard oven.This allows most foods to be cooked at lower
oven temperatures or in less time, if baked at the regular temperature.The air is recirculated
and reheated. Uncovered, longer cooking foods such as large pieces of meat or other foods that
can be cooked in low sided baking utensils or air leavened foods, are where you will see the
most savings in cooking time. Using multiple racks at the same time will achieve a good time
saving, as you can cook more food at the same time.The number of recipes requiring
preheating of the oven is reduced considerably because the heat reaches the food faster as the
hot air circulates around the food.
Foods Suitable to Cook by Convection:
Air Leavened Foods (Angel Food Cake, soufflés, cream puffs, meringue shells)
Appetizers
Breads
Main Dishes
Oven Meals (1 to 3 racks)
Cookies
Pies
Poultry
Roasts
BURNERS
Your new professional gas range is equipped with bake and broil burners typical of those used in
restaurants.The oven broiler burner is 15,000 Btu/hr and the oven baking burner is 28,000 Btu/hr.
ELECTRIC GLOW IGNITER COIL
The oven bake and broil burners are equipped with an electric glow igniter and safety system which
lights the gas.There will be a delay after the control knob has been turned on to when you actually
hear gas arrive at the burner.The burner will ignite after the gas reaches the burner.
OVEN
Your large new oven can be used in four cooking modes; convection bake, regular bake, convection
broil, or regular broil.To help you decide which way to cook your food read this information first.
Remember this is a new oven and the thermostat has been checked for accuracy.Your old oven may
have had a thermostat that over the years got a little hot or a little cold. Check your recipes for the
correct time and temperature and don’t use the old time or temperature you were using to
compensate for your old oven being off temperature.

Oven Use
15
REGULAR BAKING
Bake is baking with hot air; there is no fan.The air movement comes from natural convection - as the
air heats, it moves to the top of the oven.This oven mode is the same as you have been using for
baking on one or two racks.
Foods Suitable for Baking
Appetizers
Pies, Cakes
Breads
Desserts
Main Dishes
Oven Meals (1 to 2 racks)
Poultry
Roasts
CONVECTION BROILING
Convection Broiling is cooking by intense infrared radiation supplied by the broil burner while a fan at
the back of the oven circulates hot air in a continuous pattern around the food. Convection broiling
cooks the food with better results for thicker cuts of meat.The meat sears on the outside and retains
more juices and natural flavor inside with less shrinkage.
Foods Suitable for Convection Broiling:
rack position (same positions for broiling)
Thicker Cuts of Meat (1” or more) #3
Thicker, Irregular-sized Pieces of Poultry (1” or more) #3
Thicker Pieces of Fish (1” or more) #3
Top Browning: Casseroles and Breads #3
REGULAR BROILING
Broiling is cooking by intense infrared radiation supplied by the broil burner located at the top of the
oven.
Foods Suitable for Broiling:
rack position
Appetizers #4
Meats, Poultry, Fish (under 1”)#4
Top Browning: Casseroles and Breads #3
NOTE: Broiling uses the same rack positions as convection broiling (see convection broiling above and
page 20 “Oven Rack Position” for more information). The broiler pan for both broiling and
convection broiling should be placed all the way to the back of the oven and centered on the rack
for best results.

Oven Use
16
Converting Recipes to Convection Baking
Low sided baking utensils will give the best results as the hot air can reach all sides of the food
easier.The oven temperature can be left the same as the recipe and the food cooked a shorter
period of time.The temperature can be lowered 25ºF to 50ºF and the food will probably take
the same length of time to cook as the recipe states. If you find that food is adequately
browned on the outside, but not done in the center, lower the temperature another 25ºF and
add to the baking time.When reducing the temperature
always check the food for
doneness, a minute or two before the minimum time
stated in the recipe, as time can
always be added. Some recipes will cook faster then others.There is no way to predict exactly
how long each recipe will take when you convert it to convection. Convection will be easier to
use after you have used it a few times as you will begin to understand the way it bakes.
Selecting Utensils for Convection Baking
Cooking by convection does not require any specially designed baking utensils.You probably
have many utensils in your kitchen that are suitable to use.When choosing a baking utensil,
consider the material, the size and the shape as they all affect the baking time, the palatability
and the appearance of the finished product.
Metal bakeware (aluminum, steel and cast iron) all result in the fastest cooking time and the
best end product. Aluminum pans work best for all types of baked goods. For the best
browning, use a pan with a dark or dull finish that absorbs heat, when baking pies and breads.A
shiny finish works best for cakes and cookies, since it reflects some of the heat and provides a
more tender surface. Cookie sheets with only one lip will give the best results, as the heated
air can circulate all around the sides of the food. For roasting use the bottom of the broil pan
and elevate the meat on a metal roasting rack. Glass-ceramic or glass utensils do not conduct
heat as well as metal, but they can be used. Use them for foods that do not require a dark
brown crust or crisping, such as soufflés.
Baked items cook more quickly and evenly if they are individually smaller in size, i.e. two or
three small foods do better than one large piece.When single food items are baked, always
center the food on the rack. If several foods are being baked, space them evenly on the rack or
racks.
TO SET THE OVEN FOR BAKING
Decide if you are going to use BAKE or
CONVECTION BAKE.These cooking modes are
for baking, roasting or warming using one, two,
three or four racks. If you are going to use
regular Bake push the Bake Switch (located on
the Control Panel) and turn the oven control
knob to the temperature used in the recipe.To
use Convection Bake push the Convection Switch
(located on the control Panel) and turn the oven
control knob to the temperature desired.

Oven Use
17
PREHEATING
Preheating takes about 10 to 15 minutes depending on the temperature set. Preheating is usually
necessary for foods baked at high temperature for a short period of time, i.e. drop cookies.The oven
heating light will turn off when the oven has reached temperature.
CONDENSATION
During any cooking process there is a certain amount of moisture that evaporates from the food.The
amount of moisture that condenses on the oven depends on the moisture content of the food.The
moisture will condense on any surface that is cooler than the inside of the oven, such as the control
panel or the top of the door.
TO GET THE BEST RESULTS
Baking:
• Follow the recipe amounts and ingredients, including the size and shape of the baking utensil
recommended in the recipe.
• Do not open the oven door “just to peek”, use the interior oven light and look through the
window.
• Do not use the oven for storage, especially when baking in the oven. Extra utensils, not being
used for baking, can affect the food product, baking time, browning, and end result.
• If you are using glass utensils, lower the temperature 25ºF.
• Use a minute timer and set it for the minimum time suggested in the recipe.
Convection Baking:
• Follow the first three recommendations above.
• Metal utensils give better results, in convection, than do glass baking utensils. If you use glass, it
usually is not necessary to lower the temperature an additional 25ºF.
• Use a minute timer and set it for less than the minimum time suggested in the recipe. The first
time you use a recipe in the convection mode, be sure to note the new baking time on your
recipe for future reference.
• Be sure to read the basic information on convection before using the oven for the first time,
page 14-16.
• Keep in mind that convection baking results vary, depending on type of product. In many cases
standard bake yields superior results over convection.

Oven Use
18
OVEN RACKS
CAUTION: Aluminum foil should never be used to cover the oven racks or to line the oven
bottom.The trapped heat can damage the porcelain and the heated air cannot
adequately reach the food being baked.
Baking
One or two racks can be used simultaneously during bake. Place the rack(s) in the desired position
before turning the oven on. Store any unused racks out of the oven.
Rack position 2 (second from bottom) will probably be used the most for single rack baking.
If you are using two racks simultaneously, be sure to check the food on the bottom rack sooner than
the minimum time.The food on the lower rack position may cook slightly faster than the food on the
upper rack, particularly if you are using large baking utensils.
If you are using two racks simultaneously, be sure to stagger the baking utensils so that one is not
directly above the other and the heated air can circulate freely around each pan.Allow at least 1” of
space between the oven walls and the pans.
If using large or commercial size baking utensils, the food may take a few extra minutes as the air
cannot circulate as freely as it does with a smaller pan.When using commercial size baking utensils, use
only one rack as the heat does not have the room to circulate.
Convection Baking
One to four racks can be used simultaneously during convection baking. Place the rack(s) in the desired
position before turning the oven on. Store the unused racks out of the oven.
Rack position 2 (second from bottom) will probably be used the most for single rack convection
baking.
When baking on more than one rack you do not need to stagger the pans. However, allow at least
1” of space between the oven walls and the pans so the heated air can circulate.

Oven Use
19
HIGH ALTITUDE BAKING
Recipes and baking times vary if you are baking at a high altitude. For accurate information write to the
Agriculture Extension Service, Colorado State University, Fort Collins, Colorado 80521. Specify the
type of information and the baking mode (convection bake or bake) you need i.e. cakes, cookies,
breads, etc.There may be a cost for the bulletins.
TO SET THE OVEN FOR BROILING AND CONVECTION BROILING
CAUTION: Pay special attention when setting the Oven
Control knob on “BROIL”. If you set the knob
past the “BROIL” setting, the burner will not
ignite.
Decide if you are going to use BROIL or CONVECTION
BROIL. If you are going to use regular broil push the Broil
Switch (located on the Control Panel) and turn the Oven
Control knob to “BROIL”.To use Convection Broil push the Convection Broil Switch (located on the
Control Panel) and turn the Oven Control knob to “BROIL”.The burner will ignite after the gas
reaches the burner.The “oven on” indicator light will come on to let you know that the broiler is
currently on. During the broiling process, the infra-red burner produces such an intense heat that the
burner will cycle on and off to maintain an efficient yet safe interior cooking environment.
The HEATING indicator light on the valve panel cycles on and off with burner to let the user know
when the burner is lit.This cycling process is used to evenly distribute and safely control the intense
heat that the broil burner produces.The cycling feature prevents the burner from producing range
damaging heat.
PREHEATING
For best broiler performance, preheating for 10 minutes improves searing of the food’s
outside layer, seals in natural juices and flavors, gives a more even cooking pattern, and
takes less time to cook.
TO GET THE BEST RESULTS
• Defrost the food before starting to cook.
• Set a minute timer for the minimum time to check the food.
• Steaks should be at least one inch thick, if a rare doneness is desired. It is difficult to get rare
with meat that is thinner, or to get a nice brown piece of meat.
• After half the total cooking time turn the food over only once. It is not necessary to turn over
thin foods (fillet of fish, ham slices, etc.). Liver slices must be turned over.
• Use a two-piece broil pan.Two-piece broil pans are designed to minimize smoke and spatter. DO
NOT cover the slotted grid with aluminum foil.This will catch the grease and could cause a fire.
• When top browning use metal or glass-ceramic bakeware. DO NOT use heat-proof glass or
pottery as this type of glassware cannot withstand the intense heat of the broiler burner.
NOTE: You cannot use the broiler burner and the bake burner at the same time.When one is on,
the other cannot be turned on.
Page is loading ...
Page is loading ...
Page is loading ...
Page is loading ...
Page is loading ...
Page is loading ...
Page is loading ...
Page is loading ...
Page is loading ...
Page is loading ...
Page is loading ...
Page is loading ...
Page is loading ...
Page is loading ...
-
 1
1
-
 2
2
-
 3
3
-
 4
4
-
 5
5
-
 6
6
-
 7
7
-
 8
8
-
 9
9
-
 10
10
-
 11
11
-
 12
12
-
 13
13
-
 14
14
-
 15
15
-
 16
16
-
 17
17
-
 18
18
-
 19
19
-
 20
20
-
 21
21
-
 22
22
-
 23
23
-
 24
24
-
 25
25
-
 26
26
-
 27
27
-
 28
28
-
 29
29
-
 30
30
-
 31
31
-
 32
32
-
 33
33
-
 34
34


Ask a question and I''ll find the answer in the document
Finding information in a document is now easier with AI
Related papers
Other documents
-
BCP SKY5276 Enamel Cast-Iron Dutch Oven Kitchen Cookware Operating instructions
-
Whirlpool TGR51WOW User manual
-
-
Capital MCT365GSL User guide
-
Electrolux E36DF76EPS Owner's manual
-
Dacor ER30GSCHNGH Owner's manual
-
-
-
Thermador PRG366 User manual
-