Page is loading ...

INSTALLATION AND
OPERATING INSTRUCTIONS FOR
WALL MOUNT UNIT
WM-1641
INSTALLER: LEAVE THIS MANUAL WITH THE APPLIANCE.CONSUMER:
RETAIN THIS MANUAL FOR FUTURE REFERENCE.


QUICK REFERENCE GUIDE
I. Prior to installation, please ensure:
1. The rated voltage of your firebox fits the output voltage of your outlet;
2. The light bulbs in your firebox are in good condition. For checking this, please follow the
instructions for replacing the light bulbs on section MAINTENANCE.
II. The heater on your fireplace may emit a slight, harmless odor when first used. This odor is a normal
condition caused by the initial heating of internal heater parts and will not occur again.
III. If your heater does not emit heat, please ensure the Heater Switch is on. For further information,
please consult section Operation of the Practical User's Guide.
Marks
NOTE
Procedures and techniques, that are considered important enough to emphasize.
CAUTION
Procedures, which if not carefully followed, will result in damage to the equipment.
WARNING
Procedures, which if not carefully followed, will expose the user to the risk of serious injury, illness or
death.

IMPORTANT INSTRUCTIONS
WARNING
You should read and always follow the important instructions below to reduce the risk of fire, electric
shock, and injury to persons.
1. Read all instructions before using this fireplace.
2. This fireplace is hot when in use. To avoid burns, do not let bare skin touch hot surfaces, such as
surfaces near the heater outlet or light bulbs. The grill directly in front of the heater outlet becomes
hot during heater operation. Keep combustible materials, such as clothes, pillows, furniture, bedding,
papers and curtains at least 3 feet from the front of the unit. Do not cover or block heater outlet or
any ventilation or exhaust opening at any time. Do not use on soft surfaces where openings may
become blocked.
3. Extreme caution is necessary when any heater is used by or near children or invalids and whenever
the heater is left operating and unattended.
4. Do not install the fireplace directly on carpet or a similar surface, which may restrict air circulation
beneath the unit.
5. Always unplug fireplace when not in use.
6. To disconnect fireplace, turn controls to off, then remove plug from outlet.
7. Do not use outdoors.
8. This fireplace is not intended for use in wet locations, such as bathrooms, laundry areas and similar
indoor locations. Never locate fireplace where it may fall into water container.
9. Do not operate the fireplace with a damaged cord or plug, or if the fireplace has malfunctioned, or if
the fireplace has been dropped or damaged in any manner. Return fireplace to authorized service for
examination, adjustment or repair.
10. Do not run cord under carpeting. Do not cover cord with throw rugs, runners, or the like. Arrange
cord away from traffic area and where it will not be tripped over.
11. Do not insert or allow foreign objects to enter any ventilation or exhaust opening as this may cause
an electric shock or fire, or damage the firebox.
12. To prevent a possible fire, do not block air intakes or exhaust in any manner. Do not use on soft
surfaces, like a bed, where openings may become blocked.
13. All electrical heaters have hot and arcing or sparking parts inside. Do not use it in areas where
gasoline, paint, or flammable liquids are used or stored or where the unit will be exposed to
flammable vapours.
14. Do not modify this fireplace. Use it only as described in this manual. Any other use not
recommended by the manufacturer may cause fire, electric shock or injury to persons.
15. Avoid the use of an extension cord because the extension cord may overheat and cause a risk of fire.
However, if you have to use an extension cord, the cord shall be 16AWG minimum size and rated not
less than 125V/15A or 2000 watts.
16. Do not burn wood or other materials in this fireplace.
17. If the supply cord is damaged, it must be replaced by a special cord or assembly available from the
manufacturer or its service agent.
18. Do not strike fireplace glass.
19. Always use a certified electrician should new circuits or outlets be required.
20. Always use properly grounded, fused and polarized outlets.
21. Always use ground fault protection where required by electrical code.
22. The heater must not be located immediately below a socket-out.
23. Always disconnect power before performing any cleaning, maintenance or relocation of the fireplace.
24. When transporting or storing the fireplace and cord, keep in a dry place, free from excessive
vibration and store so as to avoid damage.
25. WARNING: In order to avoid overheating, do not cover the heater.
26. This appliance is not intended for use by persons (including children) with reduced physical, sensory
or mental capabilities, or lack of experience and knowledge, unless they have been given
supervision or instruction concerning use of the appliance by a person responsible for their safety.
27. Children should be supervised to ensure that they do not play with the appliance.
28. Indoor and household use
29.
CAUTION: In order to avoid a hazard due to inadvertent resetting of the thermal cutout, this appliance
must not be supplied through an external switching device, such as a timer, or connected to a circuit that
is regularly switched on and off by the utility
.

INSTALLATION
This section provides step-by-step instructions for installation of your fireplace.
WARNING
The outlet must be 15A/125V.
CAUTION
1. This fireplace is designed to be able to hang on solid walls or insert into a wall hole after proper
construction. Select a suitable location, which is not susceptible to moisture, safe, dust free, away from
high traffic and away from things may catch fire or block openings such as drapes, furniture, etc.
2. The fireplace must be installed at a suitable position where at least 50cm above the floor and no higher
than 180cm.
NOTE
It is a good idea to place your fireplace near an existing outlet, for ease of electrical hook up.
CAUTION
Store your fireplace insert in a dry, safe and dustless place when placing the mantel or
building the wall construction.
WARNING
Do not attempt to wire you own new outlets or circuits. To reduce the risk of fire, electric shock
or injury to persons, always use a licensed electrician.
1. If there's no 15A/125V outlet near the desired location, install a new one near or behind mantel.
2. Make sure the fireplace insert is switched off (refer to operation instruction section).
3. Plug the fireplace into a 15A/125V outlet. Wiring the cord along the corner of wall.
4. There is 4 keyholes on the back side of the fireplace casing, place the mantel in the desired location and
drill 4 holes according to the position of the 4 keyholes. Then insert 4 expansion bolts. Use strong
screws to fix it on the wall, each of the screw needs to come out of the wall for 8mm, ensure that the
screw are well fixed then lift the fireplace and make the keyholes a little higher than the screw’s position,
then make the screws slide slowly into the keyholes until it take the whole weight of the fireplace.

OPERATION
This section will explain the function of each convenient control.
NOTE
The heater may emit a slight, harmless odor when first used. This odor is a normal condition caused
by initial heating of internal heater parts and will not occur again.
• Control Panel Operation
A. Buttons and indicators
There are four buttons on the remote controller, and four on the control panel of the fireplace, each pair of
buttons with the same label perform the same function, the back of it is manual switch near the power cord:
<I/O> button is main power switch;
<ON/OFF> button is power switcher of the electric fireplace;
<DIMMER> button is used to adjust the brightness of simulated flame and logs;
<FLAME> button for the stepper motor speed control / on and stop status. ;
<HEAT> button turns the heater is working in low-power status and the heater is working in high-
power status. If the heater already is, turn it off;
There are four indicators on the control panel:
is the power indicator, it light up when the
fireplace is working, and turned out when the
fireplace is turned off;
indicates the status of the simulated flame
and logs. It's brighten up when the flame
simulate component is working, and will be
flashing when you adjusting the brightness of
the flame;
indicate click to start a beginning stepper
motor speed control loop, and then stops at
the current location;
indicate the heater is working in low-power status
and the heater is working in high- power status.
The red window on the control panel of fireplace is the eye of receiver, do not cover.
B. Operation
On the first usage of remote controller, install the batteries first: open the battery box by sliding its cover
along the arrow, install two AAA batteries according to the marks in the box, and slide the cover to its
original position. If no batteries installed or the batteries are failure, the remote controller will be unusable.
To use the remote controller effectively, point it to the electric fireplace and keep a distance of 1-5 meters.
There're four buttons marked the same as buttons on the remote controller, each pair of them perform the
same function, choose as you favour.
1. Power control. Press the <ON/OFF> button, the electric fireplace will be powered on, and the
lamp will brighten up. The heater will not be turned on automatically when you power on the
fireplace, please refer to paragraph 3. Note, all operations are valid only when the power is on,
except to "turn the power on" operation. Press the <ON/OFF> button again, the fireplace will be
powered off.
2. Adjust the brightness of simulated flame and logs. When the fireplace is powered on, flame is
turned on automatically, and it is as bright as when the fireplace is powered off.
Press <DIMMER> button to adjust the brightness, the
lamp will be flashing,
and the brightness of the flame and logs will start and keep changing. When the
brightness goes to the point you want, press <DIMMER> button again, and the
brightness will keep still and the
lamp will keep brighten up.
3. Flame speed adjusted control. Is defined as the stepper motor speed control / on
and stop. When the fireplace is powered on,
is brighten up, click <FLAME> to
start a stepper motor speed control loop, from between 20-7s and then click
I O

<FLAME> stop at the current location, adjusted speed the process of blinking display (as
dimmer lights flicker frequency ), do not adjust flame speed then the
is brighten up.
4. Press <HEAT> button, process of operations in accordance with LOW-HIGH-OFF-LOW ... ...
status, between the cycle of low-power to high-power and then off. Press one <HEAT> button,
when
micro-light is on low-power status. Another press <HEAT> button, when full-time
bright is on high-power status. Then press <HEAT> button, when
dark the heater is power off.
Note, before the heater emits heat or after it stop producing heat, the hot air outlet may output air for
10 seconds. This is designed for protect circuit, and it's not spoiled.
5. Power off the electric fireplace when you leave it for a long time.
6. The two alkaline battery must be removed from the appliance before it is scrapped.
7. The alkaline battery is to be disposed of safely.

MAINTENANCE
WARNING
Disconnect power before attempting any maintenance or cleaning to reduce the risk of fire, electric
shock to persons or damage.
Light Bulb Replacement
Light bulbs need to be replaced when you notice a dark section of the flame or when the clarity
and detail of the log exterior disappears. There are two bulbs under the log set.
WARNING
Allow at least 5 minutes for light bulbs to cool off before touching bulbs to avoid burning of skin.
I. Bulb Requirements
Quantity of 1 clear chandelier or candelabra bulbs with an E-14(small) socket base, rating voltage
230 volts, rating power 40 watts.
CAUTION
Do not exceed 40 watts per bulb
II. Operation
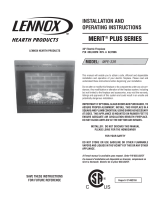
1. Open the light bulb area:
The light bulb area is at the front of electric fireplace, see ”E” .there are 6 screws on it.loosen the
screw by some tool, then you can open it. (Under figure)
2. Examine the bulbs to determine which bulbs require replacement.
3. Remove old bulb and replace a new one. Hold the socket while unscrewing or screwing bulbs.
(Right figure)
4. Replace the cover of light bulbs.
5. Done.


Correct Disposal of this product
This marking indicates that this product should not be disposed with
other household wastes throughout the EU. To prevent possible harm to
the environment or human health from uncontrolled waste disposal,
recycle it responsibly to promo
te the sustainable reuse of material
resources. To return your used device, please use the return and
collection systems or contact the retailer where the product was
purchased. They can take this product for environmental safe recycling.

www.amantii.com
Date of Purchase:
Dealer Information:
/