Smeg DI6013-1 User manual

Category
Dishwashers
Type
User manual

This manual is also suitable for

INSTRUCTION MANUAL
GUIDE FOR USING THE DISHWASHER AND THE WASHING PROGRAMS
Contents
1
1.
Description of the controls ________________________________ 2
2.
Operating instructions ___________________________________ 16
3.
Cleaning and maintenance _______________________________ 31
4.
Troubleshooting _______________________________________ 35
Thank you for choosing one of our products.
You are advised to read this manual carefully; it contains all the
information you need about the right conditions for the proper, safe use
of your dishwasher.
The individual sections are laid out to provide you with a step-by-step
guide to all your appliance's functions; the texts are easy to understand
and are complete with detailed illustrations.
Recommendations are given for the correct use of the baskets, spray
arms, containers, filters, washing programs, and for operating the
controls.
Following the cleaning instructions provided here will keep your
dishwasher's performance at peak levels in the long term.
This user-friendly manual will provide answers to all your questions
about use of the dishwasher.
USER INSTRUCTIONS: these consist of recommendations for using the
appliance, a description of its controls and of the correct cleaning and
maintenance procedures.
User instructions
2
1. Description of the controls
1.1 Upper panel
All the dishwasher controls are grouped on the upper panel. Switch-on,
programming, switch-off, etc. procedures are only possible when the door is open.
The panel shown is only a guideline example: the form of the lights and
buttons may vary depending on the model.
1
ON/OFF BUTTON
Press this button to switch the dishwasher on/off.
2
SELECTED PROGRAM INDICATOR LIGHTS
Illumination of this light denotes the program selected and the
occurrence of a fault
(troubleshooting).
3
PROGRAM SELECTION BUTTON
+ ADJUSTING THE WATER SOFTENING SYSTEM
Used to select the washing program required and adjust the water
softening system.
4
WATER HARDNESS ADJUSTMENT ON INDICATOR LIGHT
The light flashes to indicate that the appliance is in “water hardness
adjustment” mode.
SALT WARNING LIGHT
If the symbol is present, illumination of this light denotes a
regenerating salt warning level.
5
RINSE AID WARNING LIGHT
Illumination of this light denotes a rinse aid warning level in the tank.
User instructions
3
6
PROGRAM DELAY BUTTON
Press this button to delay the start of the program.
7
INFORMATION DISPLAY (1 or 3 digits depending on model)
8
OPTIONS (on some models only)
9
CHILD SAFETY DEVICE (on some models only)
Information displayed
no Scheduled program
duration
yes
no Remaining program
time
yes
1 - 9 hours Delayed start 1 - 24 hours
E
Error message
Err
<<OPTIONS(8)>>
Depending on the model, this zone may contain one or more of the
following options, identified by the relative symbols and described in
more detail in the relevant sections of the manual.
It is not possible to select any options when the soak program is being
used. All options except "Flexi Tabs" are disabled at the end of the
wash cycle. To disable the “Flexi Tabs” option, press the relative
button (the light goes out).
User instructions
4
Flexi Tabs
Option recommended for the use of multi-function tablet
detergent.
HYCLEAN
Adds a final antibacterial rinse to the selected program.
Spread HALF LOAD WASH
Allows washing of just a few dishes placed in both baskets.
PROGRAM DELAY
Allows the program to be set to start with a delay of 9, 12 or
24 hours depending on the model.
QUICK TIME OPTION
Select this option together with any washing program (except
the soak program) to SHORTEN the cycle.
ENERSAVE
Indicated option for save energy.
User instructions
5
PROGRAMS TABLE
The manual contains the programs table for several models. To find the
table for your dishwasher, compare the program symbols at the top of the
table with those on your control panel.
SETTING THE WASHING PROGRAM AND SWITCHING ON
After identifying the most suitable program with the aid of the programs
table:
Press the ON/OFF button (1) and wait for the PROGRAM
INDICATOR LIGHT (2) to illuminate;
Keep pressing the PROGRAM SELECTION button (3) until the
indicator light corresponding to the desired program illuminates;
select the option required (if any and if the model provides options);
close the door; after about 2" the program will start LIGHT will
flashing (indicating that the program is being executed).
PROGRAM IN PROGRESS INDICATOR LIGHT
(on some models only)
When a program is running, a flashing light is projected onto the floor
under the right-hand corner of the door. At the end of the program, the
light goes out to reduce sleep mode electricity consumption.
User instructions
6
PROGRAMS TABLE
PROGRAMME
NUMBER
& SYMBOL
LOAD CROCKERY AND
CUTLERY
PROGRAM
PROGRESS
DURATION
CONSUMPTION
MINUTES
(1)
WATER
LITRES
POWER
kWh (1)
1
RAPID 27’
Dishes with light dirt,
washed immediately after
use
Wash at 38°C
Rinse at 50°C
27
(3)
6,5 0,70
2 GLASS
Glass, china and mixed
dishes with light dirt.
Wash at 45°C
Cold rinse
Rinse at 70°C
Dry
65
(3)
9,5 1,10
3 ECO (*)
EN 50242
Dishes with normal dirt,
even with dried-on
residues
Wash at 45°C
Cold rinse
Rinse at 55°C
Dry
**
** **
4
AUTO 45-65
IEC/DIN***
Pans and dishes with
normal dirt, even with
dried-on residues.
When the "
AUTO
" program is selected, the dishwasher
recognises the type of dirt and automatically adjusts the
washing parameters as appropriate.
5 SUPER
****
Very dirty pans and
dishes, even with dried-on
residues.
Hot prewash
Wash at 70°C
Cold rinse (2)
Rinse at 70°C
Dry
150
(3)
15,5 1,70
IMPORTANT: see “NOTES AND REFERENCES” table on the following pages.
If the dishwasher door is open or not properly closed, the washing cycle
will not start.
User instructions
7
QUICK TIME PROGRAMS
(see relevant section for explanation of functioning modes)
PROGRAMME
NUMBER E
SYMBOL
LOAD CROCKERY AND
CUTLERY
PROGRAM
PROGRESS
DURATION
CONSUMPTION
MINUTI
(1)
WATER
LITRES
POWER
kWh (1)
6
SOAK
+
Pans and dishes awaiting
completion of the load
Cold prewash
15
(3)
3,5 0,02
7
DELICATE
QUICK
+
Delicate dishes with normal
dirt.
Cold prewash
Wash at 50°C
Cold rinse
Rinse at 70°C
65
(3)
12,5 1,15
8
ECO
QUICK
+
Dishes with normal dirt,
washed immediately after
use.
Cold prewash
Wash at 60°C
Cold rinse
Rinse at 70°C
80
(3)
12,5 1,25
9
NORMAL
QUICK
+
Dishes with normal dirt,
washed immediately after
use.
Cold prewash
Wash at 70°C
Cold rinse
Rinse at 70°C
85
(3)
13 1,40
10
STRONG
and FAST
+
Mixed dishes with normal
dirt without dried-on
residues.
Wash at 65°C
Cold rinse
Rinse at 70°C
50
(3)
10 1,20
IMPORTANT: see “NOTES AND REFERENCES” table on the following pages.
If the dishwasher door is open or not properly closed, the washing cycle
will not start.
User instructions
8
PROGRAMS TABLE
PROGRAMME
NUMBER
& SYMBOL
LOAD CROCKERY AND
CUTLERY
PROGRAM
PROGRESS
DURATION
CONSUMPTION
MINUTES
(1)
WATER
LITRES
POWER
kWh (1)
1
RAPID 27’
Dishes with light dirt,
washed immediately after
use
Wash at 38°C
Rinse at 50°C
27
(3)
6,5 0,70
2
AUTO 45-65
IEC/DIN***
Pans and dishes with
normal dirt, even with
dried-on residues.
When the "
AUTO
" program is selected, the dishwasher
recognises the type of dirt and automatically adjusts the
washing parameters as appropriate.
3 ECO (*)
EN 50242
Dishes with normal dirt,
even with dried-on
residues
Wash at 45°C
Cold rinse
Rinse at 55°C
Dry
**
** **
4 HALF LOAD
Half load of dishes with
normal dirt, washed
immediately after use.
Wash at 65°C
Cold rinse
Rinse at 70°C
Dry
90
(3)
11 1,20
5 SUPER
****
Very dirty pans and
dishes, even with dried-on
residues.
Hot prewash
Wash at 70°C
Cold rinse (2)
Rinse at 70°C
Dry
150
(3)
15,5 1,70
IMPORTANT: see “NOTES AND REFERENCES” table on the following pages.
If the dishwasher door is open or not properly closed, the washing cycle
will not start.
User instructions
9
QUICK TIME PROGRAMS
(see relevant section for explanation of functioning modes)
PROGRAMME
NUMBER E
SYMBOL
LOAD CROCKERY AND
CUTLERY
PROGRAM
PROGRESS
DURATION
CONSUMPTION
MINUTI
(1)
WATER
LITRES
POWER
kWh (1)
6
SOAK
+
Pans and dishes awaiting
completion of the load
Cold prewash
15
(3)
3,5 0,02
7
DELICATE
QUICK
+
Delicate dishes with normal
dirt.
Cold prewash
Wash at 50°C
Cold rinse
Rinse at 70°C
65
(3)
12,5 1,15
8
ECO
QUICK
+
Dishes with normal dirt,
washed immediately after
use.
Cold prewash
Wash at 60°C
Cold rinse
Rinse at 70°C
80
(3)
12,5 1,25
9
NORMAL
QUICK
+
Dishes with normal dirt,
washed immediately after
use.
Cold prewash
Wash at 70°C
Cold rinse
Rinse at 70°C
85
(3)
13 1,40
10
STRONG
and FAST
+
Mixed dishes with normal
dirt without dried-on
residues.
Wash at 65°C
Cold rinse
Rinse at 70°C
50
(3)
10 1,20
IMPORTANT: see “NOTES AND REFERENCES” table on the following pages.
If the dishwasher door is open or not properly closed, the washing cycle
will not start.
User instructions
10
NOTES AND REFERENCES
Only
run the soak program with half loads.
Options cannot be used with the soak program.
The ENERSAVE option cannot be used with soak, ultra clean, or any programs
which do not include the final drying stage.
*
Standard programme under
EN 50242
. The
ENERSAVE
option must
be
enabled.
** See information sheet provided
***
IEC/DIN
reference programme. The
ENERSAVE
option must
be enabled
.
****
Reference program for laboratories: Detergent:
20g
in the
dispenser
+
10g
in
the door or tablet. Configuration: see photo in “Using the baskets”.
(1) Program consumption and duration figures have been measured in
accordance with the EN 50242 standard. Values may vary depending on
intake water and room temperatures and the type and quantity of dishes
loaded.
(2) 1 or 2 cold rinses depending on the model.
REFERENCES for the ENERGY LABEL supplied with the dishwasher:
- Annual energy consumption is based on 280 standard wash cycles with cold
water and consumption of low-energy operating modes. Actual consumption
depends on the way in which the appliance is used.
- Water consumption is based on 280 standard wash cycles. Actual
consumption depends on the way in which the appliance is used.
- Information refers to the EN 50242 STANDARD programme (identified in the
programmes table), which is the most effective in terms of combined energy
and water consumption. The programme is recommended for dishes with a
normal level of dirt.
- Drying efficiency class on a scale from “G” (minimum efficiency) to “A”
(maximum efficiency).
User instructions
11
1.2 Washing programs
Before starting a washing program make sure that:
The water supply tap is open.
The softener container contains regenerating salt.
The correct amount of detergent has been added to the
dispenser.
The baskets have been correctly loaded.
The spray arms are able to rotate freely and without
obstruction.
The dishwasher door is securely closed.
CHILD SAFETY DEVICE
(on some models only)
Press the button to activate this device (the light comes on). When it is
active, the beeper sounds three times to confirm that the door is about to
open. So in this case, to open the door keep pressing until the 3rd beep,
then release at once. If the pressure is continued after the third beep, the
door does not open and the operation has to be repeated.
OPTION SELECTION
Options are selected by pressing the relative button by the symbol of the
option required; the light comes on to confirm that the option has been
activated.
It is not possible to select any options when the soak
program is being used.
All options except "Flexi Tabs" are disabled at the end of the
wash cycle. To disable the “Flexi Tabs” option, press the
relative button (the light goes out).
All options, including "Flexi Tabs" are disabled when a
program is CANCELLED after it has begun.
User instructions
12
ADDITIONAL OPTIONS
Some models feature additional options, activated by pressing two
buttons simultaneously. In this case, two lines in the control panel
graphics link the symbol of the additional option to the two buttons to be
pressed simultaneously to enable it. (e.g. “Flexi Tabs” in this
illustration)
QUICK TIME
OPTION
Select this option together with any washing program (except the soak
program) to SHORTEN the cycle
. To activate this option, press button
(light comes on) after selecting the program required.
The option is automatically deactivated at the end of the program.
ENERSAVE
This option can be selected with the wash programme of choice to
further reduce energy consumption. Drying is aided by a special
device that automatically releases the door, which opens slowly and
smoothly by a few centimetres. This ensures perfect drying and greater
control of rinsing temperatures, which can be kept at lower levels for
significant energy saving. Once the door has opened, the end of the
wash cycle is indicated by a short beep.
Enersave is activated
automatically every time
a wash cycle is
selected (except for programs that do not include the final drying phase;
see programs table) and can be disabled before the program is started.
Flexi Tabs, once selected, remains enabled until intentionally disabled.
When the function is activated, opening of the door must not be
impeded in any way; do not leave anything in the space in front of the
door necessary to allow it to open.
Do not re-close the door during automatic opening as this would
damage the mechanism. Wait for the pushers to retract before re-closing
the door.
User instructions
13
ULTRA CLEAN
The "ULTRA CLEAN" program prolongs the final hot rinse to ensure a
further reduction in the bacteria level. If the temperature in the tank falls
during this stage of the program (e.g. because the door is opened or due
to a power blackout), the light of the option and the program lights (2) flash
to warn that the additional washing phase has not been completed
successfully. This does not mean that the wash program has been less
effective than usual.
SPREAD HALF LOAD
Suitable when there are not many dishes to be washed, it saves energy
and reduces the program duration. Place dishes in both baskets then
load the detergent dispenser than less than the normal amount for a full
load.
Flexi Tabs
Specifically for washing with combination detergents in tablets, which
also contain salt and rinse aid (3in1) or other agents such as glass
protector, steel rinse aids, etc. (4in1, 5in1…). When this option is
selected, salt and rinse aid will not be dispensed even if the relative
compartments contain them. If the containers are empty, the lights will
remain on.
If the option is not provided, we recommend the use of conventional
products (separate detergent, salt and rinse aid), because with
conventional washing cycles, combined products might create problems
such as a white deposit, poor drying results and residues left on dishes.
For further information, refer to the detergent pack.
IMPORTANT:
when no longer required, the option must be deactivated by pressing
the relative button (the light goes out).
These products
are not suitable
for use with
excessively “hard”
water.
If the hardness level set is higher than H3, when the option is activated
the relative light flashes to indicate that the product is being used
incorrectly; the dishwasher will still work, but washing results may be
poor.
User instructions
14
ULTRA CLEAN
The "ULTRA CLEAN" program prolongs the final hot rinse to ensure a
further reduction in the bacteria level. If the temperature in the tank falls
during this stage of the program (e.g. because the door is opened or due
to a power blackout), the light of the option and the program lights (2) flash
to warn that the additional washing phase has not been completed
successfully. This does not mean that the wash program has been less
effective than usual.
SPREAD HALF LOAD
Suitable when there are not many dishes to be washed, it saves energy
and reduces the program duration. Place dishes in both baskets then
load the detergent dispenser than less than the normal amount for a full
load.
DELAYED START
The start of the washing program can be delayed to program the
dishwasher to operate at the preferred time of day (e.g. overnight). Press
the PROGRAM DELAY button to activate the option and display a 1 hour
delay. Keep pressing to select the delay required, which may be up to 9,
12 or 24 hours depending on the model.
When the door is closed, the appliance will prewash the dishes, after
which the "program delay" set will come into effect.
CANCELLING THE CURRENT PROGRAM
To cancel the currently selected program open the door and hold
down the PROGRAM SELECTION (3) button for a few seconds
until the indicator lights for programs 4 and 5 illuminate
simultaneously (marked "end").
Close the door.
After approximately 1 minute the dishwasher will advance to the end
of cycle.
CHANGING THE PROGRAM
To change the program in progress, simply open the door and select a
new program. When the door is closed the dishwasher will automatically
select the new program.
User instructions
15
TO SAVE ON ENERGY! AND PROTECT THE ENVIRONMENT
Always use the dishwasher with a full load.
Do not wash the dishes in running water.
Use the washing program that is most appropriate for each type of
load.
Do not carry out any preliminary rinsing.
If available, connect the dishwasher to a hot water supply up to 60°C.
TO CUT DOWN ON DETERGENT CONSUMPTION! AND PROTECT
THE ENVIRONMENT
The phosphates contained in dishwasher detergents are harmful to the
environment. To avoid using excessive amounts of detergent and to save
on electricity, observe the following:
separate the more delicate items from dishes that are more resistant
to aggressive detergents and high temperatures;
do not pour the detergent directly on the dishes.
If the door has to be opened while washing is in progress, the program
will be interrupted. The relative light will keep flashing and a beeper will
signal that the cycle has not been completed. You must wait about 1
minute before closing the door to restart the program. When the door is
closed the program will continue from where it was interrupted. This
operation should only be carried out if strictly necessary, because it
might cause problems in execution of the program.
SWITCHING OFF
At the end of the program the beeper
sounds briefly and the lights of programs no.
4 and 5 (marked "end") flash.
To switch off the dishwasher, open the door and press the
ON/OFF
button (1).
ENERGY MANAGEMENT
After 5 minutes of waiting (washing cycle completed, stopped or set but
not started) the dishwasher switches to a standby state to reduce
energy consumption.
In this state, the dishwasher indicator panel (lights or display depending
on model) functions more slowly (switch-on once every 5 seconds).
REMOVING THE DISHES
At the end of the washing program, wait at least 20 minutes before
removing the dishes, to allow them to cool. To ensure that any drops of
water left in the top basket cannot drip onto the dishes still in the bottom
basket, you are advised always to empty the bottom basket first.
User instructions
16
2. Operating instructions
Once the dishwasher has been correctly installed, prepare for use as
follows:
Adjust the water softening system;
Add the regenerating salt;
Add the rinse aid and detergent.
2.1 Using the water softening system
The amount of scale contained in the
water (water hardness index) can cause
whitish staining on the dry dishes, which
tend to become dull over time. The
dishwasher is equipped with an automatic
softening system which uses a special
regenerating salt to reduce the hardness
of the water.
The dishwasher is factory set for water
hardness level 3
(average hardness
41-60°dF 24-31°dH ).
When using water of medium hardness, the regenerating salt container
should be refilled after approximately 20 washing cycles. The salt
container can hold approximately 1.7 Kg of salt in grains. Some models
are equipped with an optical no-salt indicator. In these models, the cap
of the salt container contains a green float which descends as the salt
concentration in the water drps. When the green float can no longer be
seen through the transparent cap, the container must be topped up with
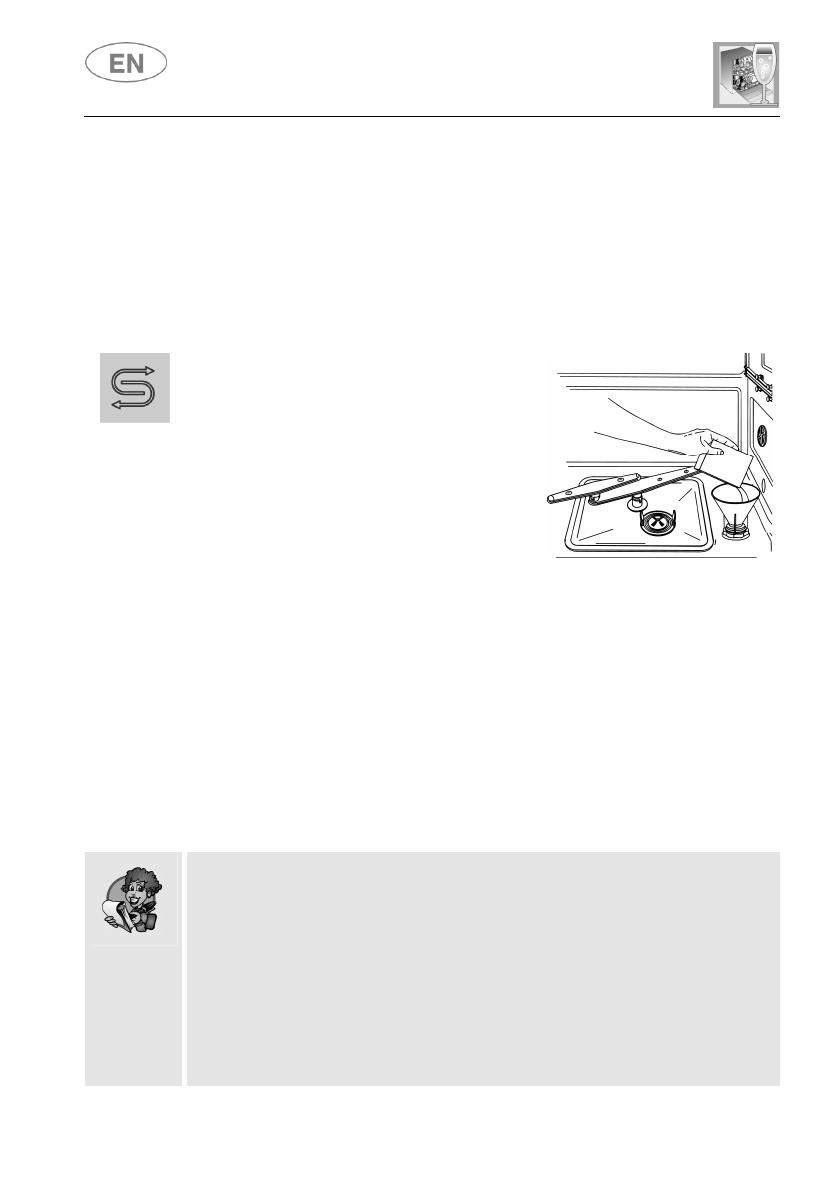
regenerating salt. The container is situated at the bottom of the
dishwasher. After removing the lower basket, unscrew the salt container
cap by turning it anticlockwise and pour in the salt using the funnel
supplied with the dishwasher. Before replacing the cap, remove any salt
residues from around the opening.
When using the dishwasher for the first time, in addition to the salt it
is also necessary to add one litre of water to the container.
Each time the salt container is refilled, make sure that the cap is
securely closed. The mixture of water and detergent must never
penetrate the salt container, as this would compromise the operation
of the regeneration system. In the event of this occurring, the
warranty will be invalidated.
Only use regenerating salt specially formulated for domestic
dishwashers. If using salt tablets, do not fill the container
completely.
SALT
User instructions
17
Do not use table salt as it contains insoluble substances which,
over time, may damage the water softening system.
When necessary, refill the regenerating salt container before
starting the washing program. In this way, the excess saline
solution will be immediately removed by the water; the prolonged
presence of salt water inside the tank may lead to corrosion.
Be careful not to confuse the salt and detergent packages; adding
detergent to the salt container will damage the water softening system.
ADJUSTING THE
WATER SOFTENING SYSTEM
The dishwasher is equipped with a device which allows the softener
setting to be varied to suit the hardness of the mains water. The
hardness is set using the PROGRAM SELECTION BUTTON (3).
To access the setting function, hold the button down for more than 15
seconds. The WATER HARDNESS ADJUSTMENT INDICATOR LIGHT
(4) flashes, while the SELECTED PROGRAM INDICATOR LIGHTS (2)
show the current setting. Each pressure on the button changes the
setting following the sequence in the table below:
>
User instructions
18
WATER HARDNESS TABLE
WATER HARDNESS
SETTING
German
degrees (°dH)
French
Degrees (°dF)
0 - 6 0 - 11
All lights off
(no salt)
7 - 10 12 - 18
One light on
11 - 15 19 - 27
Two lights on
16 - 21 28 - 37
Three lights on
22 - 28 38 - 50
Four lights on
29 - 35 51 - 62
Five lights on
36 - 50 63 - 90
Two lights on
Contact your local water board for information on the hardness of your
water supply.
After adjustment or display of the current setting, simply do not touch the
button for a few seconds; the dishwasher will automatically return to
standard mode, quitting the adjustment mode.
2.2 Using the rinse aid and detergent dispensers
The detergent and rinse aid
dispensers are situated on the inner
part of the door: the detergent
dispenser is on the left, and the
rinse aid dispenser is on the right.
With the exception of the SOAK program, before every washing cycle it
is necessary to add the required amount of detergent to the detergent
dispenser. The rinse aid, on the other hand, should only be added as
required.
  • Page 1 1
  • Page 2 2
  • Page 3 3
  • Page 4 4
  • Page 5 5
  • Page 6 6
  • Page 7 7
  • Page 8 8
  • Page 9 9
  • Page 10 10
  • Page 11 11
  • Page 12 12
  • Page 13 13
  • Page 14 14
  • Page 15 15
  • Page 16 16
  • Page 17 17
  • Page 18 18
  • Page 19 19
  • Page 20 20
  • Page 21 21
  • Page 22 22
  • Page 23 23
  • Page 24 24
  • Page 25 25
  • Page 26 26
  • Page 27 27
  • Page 28 28
  • Page 29 29
  • Page 30 30
  • Page 31 31
  • Page 32 32
  • Page 33 33
  • Page 34 34
  • Page 35 35
  • Page 36 36
  • Page 37 37
  • Page 38 38
  • Page 39 39

Smeg DI6013-1 User manual

Category
Dishwashers
Type
User manual
This manual is also suitable for

Ask a question and I''ll find the answer in the document

Finding information in a document is now easier with AI