Remington HC5950 Owner's manual
- Category
- Hair trimmers & clippers
- Type
- Owner's manual
Page is loading ...
Page is loading ...

3
ENGLISH
Thank you for buying your new Remington® product.
Before use, please read these instructions carefully and keep them safe. Remove all packaging
before use.
I Claim your extra 1 year warranty by registering your product online.
Simply go to: www.remingtoneurope.com/register .
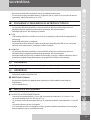
A CAUTION
• Usethisapplianceonlyforitsintendeduseasdescribedinthismanual.Donotuse
attachments not recommended by Remington®
• Donotusethisproductifitisnotworkingcorrectly,ifithasbeendroppedordamaged,
or dropped in water.
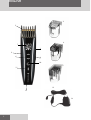
C KEY FEATURES
1 On / O Switch
2 Motorised comb
3 stubble comb
4 Short Length comb
5 Long length comb
6 Touch screen area
7Digitaldisplayfor
•Batterylevel
•Lengthsetting
•Lengthunitofmeasuremmor#
•Lock/unlock
•Speedlevel
8 Locked / unlocked switch
9 Comb Selection switch
10 Tri Boost System
11 Battery icon
12 MicroUSBport
13 MicroUSBcable
14 Adaptor
•3yearguarantee
C GETTING STARTED
Before the unit can be used for the rst time, pull out the plastic marked with a red arrow from
the bottom of the unit. Then push the power button to turn on the unit. The plastic tab is only for
shipping and can be discarded.
C CHARGING YOUR HAIRCLIPPER
•Beforeusingyourhairclipperforthersttime,chargefor14-16hours.
•Ensuretheproductisswitchedo.
•Connectthechargingadaptortotheproductandthentothemains.Thedisplaywill
indicate the unit is charging .

4
ENGLISH
• Iftheproductisnotgoingtobeusedforanextendedperiodtime(2–3months),unplug
it from the mains and store.
• Fullyrechargeyourtrimmerwhenyouwouldliketouseitagain.
•Topreservethelifeofyourbatteries,letthemrunoutevery6monthsthenrechargefor
14-16hours.
, Charging Via Standard Electrical Socket
•Ensuretheproductisswitchedo.
•Connectthechargingadaptortotheproductandthentothemains.
•Whenchargingthedigitaldisplaywillindicatetheunitischarging
•Allow90minutesforacompletecharge.
, USB
•ConnectyourUSBcabletotheUSBportonyourpowersource.
•ConnecttheUSBcabletoyourappliance.
•DonotruntheclipperwhileconnectedtoaUSBport.Itwillonlyrunoitsbatteriesinthis
condition and stop charging.
, Corded Use
•Connectthechargingadaptortotheproductthentothemains.
•Whenthecordisconnectedtothemains,adigitaldisplaywillbedisplayedonthe
appliance.
•Theunitwillonlyrunincordedmodewhenconnectedtothemainsusingthesupplie
•Remingtonpoweradaptor,otherUSBchargerswillonlychargetheunit
A CAUTION
Extendedmainsonlyusewillresultinthereductionofthebatterylife.
, Warning
TheappliancecannotbeoperatedincordedmodewhileconnectedtoaPCviatheUSBport.
, Cordless Use
Whentheunitisswitchedonandfullycharged,theproductcanbeusedincordlessmodeforup
to 40 minutes.
F HOW TO USE
,USINGTHETOUCHSCREEN
,ADJUSTINGTHETRIMLENGTH
•Firstselectwhichhaircomb,stubblecomb,shortlengthcomborlonglengthcombfor
the length range desired.
•Stubblecomb(1.5mm,#0)shortlengthcomb(3–23mm,#1–8),longlengthcomb(22–
42mm,#7–14).
•Ifthestubblecombisselected,thedisplaywillalwaysshow1.5mmor#0,asthereisno
mechanical adjustment.
•Fortheshortlengthcombandthelonglengthcombthetouchbuttonscanbeusedto

5
ENGLISH
adjust to the desired cutting length following the steps below.
•Withthelonglengthcombinstalledontotheproductandthecorrespondingcomb
switchselected(A)theadjustmentcanbegin.Thelengthcannowbeincreasedor
decreased in 0.5mm increments. Also ensure that the locked button is in the unlocked
position.
•Fortheshortlengthcombthereare2combswitchsettings,Bwillincreaseanddecrease
the cutting length in 0.5mm increments and setting C will adjust the length in 0.1mm
increments.
Note: Ifaredwarninglightisvisiblethroughthecombwheninstalled,thisisindication
that the comb selection switch is on the wrong setting.
• Pressandholdthearrowuptoincreasethecuttinglengthanddowntodecreaseit.The
comb will move to reach each setting, the lengths will change as you hold the up/down
arrow, and the setting number will appear on the digital display.
• Selectthedesiredboostlevelbypressingtheboostbuttonwiththelockinthe
unlocked position. The display will indicate the level.
• Oncethedesiredlengthandboostlevelarereached,lockthesystemusingthelock
switch. The display should show a closed lock, and the current length setting and boost
level. Proceed to use the clipper
• Note: Adjustments to length and boost can be done anytime the lock switch is set to
unlock. Setting can be done with the main motor o, if the power button is pressed a
second time. To turn the main motor back on the power button needs to be pressed
again.
• Pressandholdthebatteryicontodisplaytheremainingbatterytimeinminutesonthe
digital display. This can be used whilst the appliance is locked.
, SWITCHING BETWEEN UNITS OF LENGTH (mm, #)
Holdthepowerbuttonfor3seconds,thedisplaywillshowthechangebetweenmmand#,at
this time release the power button. The setting has been changed.
Note:Iftheusercontinuestoholdthepowerbuttonfor8seconds,thesystemwillenterreset
mode
A CAUTION
Once the digital display changes from mm to grade number, release the power button to avoid
an inadvertent restart.
NOTE: The comb must be attached to the appliance in order to use the hair length selector. To
achieve 0.4mm the comb must be removed.
, Touch Lock
•Onceyourdesiredlengthandmotorspeedisset,lockthedevicebyslidingtheswitch
into the lock position.
•Theappliancewillnotcutifthelockswitchisintheunlockposition.
, Before Starting The Cut
• Inspecttheclippermakingsurethatitisfreefromhairanddirt.
• Seatthepersonsothattheirheadisapproximatelyatyoureyelevel.
• Beforecutting,alwayscombthehairsoitistanglefreeanddry.

6
ENGLISH
, To Attach A Comb
• Holdthecombwithitsteethupward
• Guidethecombrailsintotheslotsonthesideoftheclipperhead.Thenpushthecomb
down until it seats on the adjustment arm.
, To Remove The Comb
• Holdingtheclipperwiththebladesfacingawayfromyou,rmlypushthecomb
upward and away from the blades.
A CAUTION
Iftheincorrectcombisattachedtotheproductforthedesiredcuttinglength,aredwarning
light will illuminate to indicate this.
Please inspect that the desired comb is attached or that the correct setting is selected on the
comb switch.
F INSTRUCTIONS FOR HAIR CUTTING
Note:Forevencutting,allowthecombattachment/bladetocutitswaythroughthehair.Do
notforceitthroughquickly.Ifyouarecuttingforthersttime,startwiththemaximumcomb
attachment
STEP 1–Napeoftheneck
• Setthecombto3mmor6mm.
• Holdtheclipperwiththebladeteethpointingupwards.Beginstartingatthecentreof
the head at the base of the neck.
• Slowlylifttheclipper,workingupwardsandoutwardsthroughthehair,trimmingjusta
little at a time
STEP 2–Backofthehead
Withthecombsetat12mmor18mm,cutthehairatthebackofthehead.
STEP 3–Sideofthehead
• Setthecombto3mmor6mm,trimsideburns.Thenchangethesettingto9mmand
continue to cut the top of the head.
STEP 4–Topofthehead
• Usethelongerlengthcombattachmentandsetitto24mmor27mmthencuthairon
top of the head against the direction in which the hair normally grows.
• Forlongerhairontop,usethelongerlengthcombattachment(22–42mm)toachieve
the desired style.
• Alwaysworkfromthebackofthehead.
STEP 5 –Thenishingtouches
• Usetheclipperwithoutanattachmentcombforclosetrimmingaroundthebaseand
sides of the neck.

7
ENGLISH
• Toproduceacleanstraightlineatthesideburns,reversethehairclipper.Placethe
reversed clipper at right angles to the head, tips of the blades lightly touching the skin
and then work downwards.
, Short Tapered Styles – “Flat Tops” & Short Cuts
• Startingwiththelongestguidecombattached(22-42mm),cutfromthebackofthe
necktothecrown.Holdtheguidecombatagainsttheheadandslowlymovethe
clipper through the hair.
• Usethesameprocedurefromthelowersidetotheuppersideofthehead.Thencutthe
hair against the direction in which it grows and level with the sides.
• Togivea“attop”look,thehairontopoftheheadmustbecutoverthetopofaat
comb.
• Useacloserguidecombtotaperthehairdowntothenecklineasdesired.
C CARE FOR YOUR HAIRCLIPPER
Your clipper is tted with high quality titanium blades that are permanently lubricated.
To ensure long lasting performance of your clipper, clean the blades and unit regularly.
Always keep the attachment guide comb on the trimmer blade.
E AFTER EACH USE
• Ensuretheclipperisswitchedoanddisconnectedfromthemains.
• Removeattachmentguidecombandcutterassembly.
• Gentlybrushtheremaininghairsawayfromthecombandtrimmerblade.
• Donotrinsethecutterassemblyunderwater.
F RESET INSTRUCTIONS
•Youwillneverhavetoforceasystemresetundernormalconditions.Ifthetrimmer
experiences abnormal behaviour, such as low or high touch sensitivity or subjected to
electrostatic discharge disturbance, or subjected to electrical fast transient/bursts from
the LV network, the system can be reset.
• Holdthepowerbuttonfor8consecutiveseconds
• Systemwillshow88.8mm,fullbattery,fulllockandfullboostlevel.
• Ensurenoobjects,handsorngersarenearthetouchbuttons.
• Pushthepowerbuttononce.
• Combwilltraveldowntoitslowestsetting,anddisplaywillshowcurrentbatterylevel,
lock status and 1st boost level.
• Lettheproductsituntilthescreendims.
• Productisnowready,turnitonandconrmproperfunction.
A CLEANING CAUTIONS
•Onlytheattachmentguidecombsandtrimmerblademayberemovedfromthe
product for cleaning.
•Cleaningshouldbedonewithasoftbrush,suchasthebrushsuppliedwiththeproduct.
•Theapplianceisnotwashable.

8
•Donotrinseunderwater.
•Donotuseharshorcorrosivecleanersontheunitsortheirblades
F IMPORTANT SAFETY INSTRUCTIONS
WARNING – TO REDUCE THE RISK OF BURNS, ELECTROCUTION, FIRE, OR INJURY TO
PERSONS:
• Anapplianceshouldneverbeleftunattendedwhenpluggedintoapoweroutlet,
except when charging.
• Keepthepowerplugandcordawayfromheatedsurfaces.
• Makesurethepowerplugandcorddonotgetwet.
• Donotplugorunplugtheappliancewithwethands.
• Donotusetheproductwithadamagedcord.Areplacementcanbeobtainedviaour
InternationalServiceCentres.
• Donottwistorkinkthecable,anddon’twrapitaroundtheappliance.
Store the product at a temperature between 15°C and 35°C.
• Onlyusethepartssuppliedwiththeappliance.
• Theappliance,includingitscord,mustnotbeused,playedwith,cleanedormaintained
by persons under eight years old and should at all times be kept out of their reach.
Use,cleaningormaintenanceoftheappliancebychildrenovereightorbyanyonewith
a lack of knowledge, experience or with reduced physical, sensory or mental
capabilities should only be undertaken after receiving appropriate instruction and
under the adequate supervision of a responsible adult to ensure that they do so safely
and that the hazards involved are understood and avoided.
• Don’tputtheapplianceinliquid,don’tuseitnearwaterinabath-tub,
basinoranyothervessel,anddon’tuseitoutdoors.
H ENVIRONMENTAL PROTECTION
To avoid environmental and health problems due to hazardous substances
in electrical and electronic goods, appliances marked with this symbol must
not be disposed of with unsorted municipal waste, but recovered,
reused or recycled.
ENGLISH

9
ENGLISH
^ BATTERY REMOVAL
•Thebatterymustberemovedfromtheappliancebeforeitisscrapped.
•Theappliancemustbedisconnectedfromthesupplymainswhenremovingthebattery.
•Unpluggroomerfromtheoutlettoavoidriskofelectricalshock.
•Prytheupperhousingfromtheproductwithaatheadscrewdriver.Thiswillexposethe
batteries.
•Withwirecutters,clipthewiresleadingtothebatteries.
•Removethebatteriesfromtheproduct.Contactyourlocalauthoritiesforproper
disposal.
•Thebatteryistobedisposedofsafely.
E SERVICE AND GUARANTEE
This product has been checked and is free of defects.
Weguaranteethisproductagainstanydefectsthatareduetofaultymaterialor
workmanship for the guarantee period from the original date of consumer purchase.
Iftheproductshouldbecomedefectivewithintheguaranteeperiod,wewillrepairanysuch
defect or elect to replace the product or any part of it without charge, provided there is proof
of purchase.
This does not mean an extension of the guarantee period.
InthecaseofaguaranteesimplycalltheServiceCentreinyourregion.
This guarantee is oered over and above your normal statutory rights.
The guarantee shall apply in all countries in which our product was sold via an authorised
dealer.
This guarantee does not include damage to the product by accident or misuse, abuse,
alteration to the product or use inconsistent with the technical and/or safety instructions
required.
This guarantee shall not apply if the product has been dismantled or repaired by a person not
authorised by us.
IfyoucalltheServiceCentre,pleasehavetheModelNo.tohand,aswewon’tbeabletohelp
you without it.
It’sontheratingplatewhichcanbefoundontheappliance.
Page is loading ...
Page is loading ...
Page is loading ...
Page is loading ...
Page is loading ...
Page is loading ...
Page is loading ...
Page is loading ...
Page is loading ...
Page is loading ...
Page is loading ...
Page is loading ...
Page is loading ...
Page is loading ...
Page is loading ...
Page is loading ...
Page is loading ...
Page is loading ...
Page is loading ...
Page is loading ...
Page is loading ...
Page is loading ...
Page is loading ...
Page is loading ...
Page is loading ...
Page is loading ...
Page is loading ...
Page is loading ...
Page is loading ...
Page is loading ...
Page is loading ...
Page is loading ...
Page is loading ...
Page is loading ...
Page is loading ...
Page is loading ...
Page is loading ...
Page is loading ...
Page is loading ...
Page is loading ...
Page is loading ...
Page is loading ...
Page is loading ...
Page is loading ...
Page is loading ...
Page is loading ...
Page is loading ...
Page is loading ...
Page is loading ...
Page is loading ...
Page is loading ...
Page is loading ...
Page is loading ...
Page is loading ...
Page is loading ...
Page is loading ...
Page is loading ...
Page is loading ...
Page is loading ...
Page is loading ...
Page is loading ...
Page is loading ...
Page is loading ...
Page is loading ...
Page is loading ...
Page is loading ...
Page is loading ...
Page is loading ...
Page is loading ...
Page is loading ...
Page is loading ...
Page is loading ...
Page is loading ...
Page is loading ...
Page is loading ...
Page is loading ...
Page is loading ...
Page is loading ...
Page is loading ...
Page is loading ...
Page is loading ...
Page is loading ...
Page is loading ...
Page is loading ...
Page is loading ...
Page is loading ...
Page is loading ...
Page is loading ...
Page is loading ...
Page is loading ...
Page is loading ...
Page is loading ...
Page is loading ...
Page is loading ...
Page is loading ...
Page is loading ...
Page is loading ...
Page is loading ...
Page is loading ...
Page is loading ...
Page is loading ...
Page is loading ...
Page is loading ...
Page is loading ...
Page is loading ...
Page is loading ...
Page is loading ...
Page is loading ...
Page is loading ...
Page is loading ...
Page is loading ...
Page is loading ...
Page is loading ...
Page is loading ...
Page is loading ...
Page is loading ...
Page is loading ...
Page is loading ...
Page is loading ...
Page is loading ...
Page is loading ...
Page is loading ...
Page is loading ...
Page is loading ...
Page is loading ...
Page is loading ...
Page is loading ...
Page is loading ...
Page is loading ...
Page is loading ...
Page is loading ...
Page is loading ...
Page is loading ...
Page is loading ...

144
HRVATSKI JEZIK/SRPSKI JEZIK
Page is loading ...
Page is loading ...
Page is loading ...
Page is loading ...
Page is loading ...
Page is loading ...
Page is loading ...
Page is loading ...
Page is loading ...
Page is loading ...
Page is loading ...
Page is loading ...

157
GERMANY
BENELUX
FRANCE
ITALY
SCANDINAVIA
AUSTRIA
SWITZERLAND
Central Europe
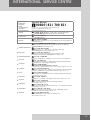
00800 / 821 700 821
Mo.-Fr. 9 a.m. – 5 p.m. Central European Time (free call)
E-Mail: service@remington-europe.com
www.remington-europe.com
SPAIN
+34 902 10 45 17; 08.00 - 13.00; lunes - viernes (Posventa)
+34 932 070 166 (Información al consumidor final)
PORTUGAL
+351 299 942 915;
MALTA
Tel. +356 21 664488
Miller Distributors Ltd, Miller House - Airport Way, Tarxien Road, Luqa LQA 1814,
www.millermalta.com
UNITED KINGDOM
Tel. +44 0800 212 438 (free call)
Spectrum Brands (UK) Limited, Fir Street, Failsworth, Manchester, M35 0HS,
UNITED KINGDOM, www.remington.co.uk
ČESKÁ REPUBLIKA
Tel. +420 487 754 605
VARTA Baterie spol. s r. o., Jindřicha z Lipé 108, 470 01 Česká Lípa,
ČESKÁ REPUBLIKA, www.cz.remington-europe.com
IRELAND
Tel. +353 (0) 1 460 4711
Remington Consumer Products, Unit 7C, Riverview Business Park,
New Nangor Road, Dublin 22, IRELAND, www.remington.co.uk
MAGYARORSZÁG
Tel. +36 1 3300 404
Remington Szervizközpont, 1138 Budapest, Váci út 136/a, www.remington.hu
POLSKA
РОССИЯ
Ɍɟɥ. 8 800 100 8011
ООО «КОМПАНИЯ «ПРОФСЕРВИС», РОССИЯ.
115201, Москва, 1-й Варшавский проезд, д.1а, стр.3, www.remington-europe.com
TÜRKIYE
Tel. +90 212 659 01 24
Varta Pilleri Ticaret Ltd. Şti., İstoç 25.Ada Sonu Kuzey Plaza Kat 1 D4, 34217, Mahmut-
bey/İstanbul, TÜRKİYE, Fax +90 212 659 48 40, www.tr.remington-europe.com
U.A.E.
Tel. +9714 355 5474
V.R.R Trading (L.L.C), Khalid Bin Waleed Street, Al Jawhara Bldg 504, Dubai, U.A.E.,
www.remington-europe.com
CROATIA
Tel. +385 12481111
Alca Zagreb d.o.o., Zitnjak bb, 10000 Zagreb, Croatia, www.remington-europe.com
CYPRUS
Tel. +357 24-532220
Thetaco Traders Ltd, Eletherias Ave 75, 7100 Aradippou, Cyprus,
www.remington-europe.com
ROMANIA
Tel. +40 21 411 92 23
Best Expert Service Jak SRL , 4th, Drumul Taberei St., sector 6, Bucharest, Romania,
www.remington-europe.com
SLOVENIA
Tel. +386 (0) 1 561 66 30
Ježek Tr govina Servis d.o.o., Cesta 24.Junija 21, 1231 LJUBLJANA - Črnuče
Republika Slovenija, www.remington-europe.com
GREECE
Tel. +30 210 94 10 699
D. & J. DAMKALIDIS S.A., Import Agencies, 44 Zefyrou str.,
www.remington-europe.com
Tel.+22 598 07 00
Spectrum Brands Poland Sp.z o o. ul.Bitwy Warszawskiej 7a 02-366 Warszawa
Fax+22 598 07 01 ww.plremington-europe.com
INTERNATIONALSERVICECENTRE
Page is loading ...
-
 1
1
-
 2
2
-
 3
3
-
 4
4
-
 5
5
-
 6
6
-
 7
7
-
 8
8
-
 9
9
-
 10
10
-
 11
11
-
 12
12
-
 13
13
-
 14
14
-
 15
15
-
 16
16
-
 17
17
-
 18
18
-
 19
19
-
 20
20
-
 21
21
-
 22
22
-
 23
23
-
 24
24
-
 25
25
-
 26
26
-
 27
27
-
 28
28
-
 29
29
-
 30
30
-
 31
31
-
 32
32
-
 33
33
-
 34
34
-
 35
35
-
 36
36
-
 37
37
-
 38
38
-
 39
39
-
 40
40
-
 41
41
-
 42
42
-
 43
43
-
 44
44
-
 45
45
-
 46
46
-
 47
47
-
 48
48
-
 49
49
-
 50
50
-
 51
51
-
 52
52
-
 53
53
-
 54
54
-
 55
55
-
 56
56
-
 57
57
-
 58
58
-
 59
59
-
 60
60
-
 61
61
-
 62
62
-
 63
63
-
 64
64
-
 65
65
-
 66
66
-
 67
67
-
 68
68
-
 69
69
-
 70
70
-
 71
71
-
 72
72
-
 73
73
-
 74
74
-
 75
75
-
 76
76
-
 77
77
-
 78
78
-
 79
79
-
 80
80
-
 81
81
-
 82
82
-
 83
83
-
 84
84
-
 85
85
-
 86
86
-
 87
87
-
 88
88
-
 89
89
-
 90
90
-
 91
91
-
 92
92
-
 93
93
-
 94
94
-
 95
95
-
 96
96
-
 97
97
-
 98
98
-
 99
99
-
 100
100
-
 101
101
-
 102
102
-
 103
103
-
 104
104
-
 105
105
-
 106
106
-
 107
107
-
 108
108
-
 109
109
-
 110
110
-
 111
111
-
 112
112
-
 113
113
-
 114
114
-
 115
115
-
 116
116
-
 117
117
-
 118
118
-
 119
119
-
 120
120
-
 121
121
-
 122
122
-
 123
123
-
 124
124
-
 125
125
-
 126
126
-
 127
127
-
 128
128
-
 129
129
-
 130
130
-
 131
131
-
 132
132
-
 133
133
-
 134
134
-
 135
135
-
 136
136
-
 137
137
-
 138
138
-
 139
139
-
 140
140
-
 141
141
-
 142
142
-
 143
143
-
 144
144
-
 145
145
-
 146
146
-
 147
147
-
 148
148
-
 149
149
-
 150
150
-
 151
151
-
 152
152
-
 153
153
-
 154
154
-
 155
155
-
 156
156
-
 157
157
-
 158
158


Remington HC5950 Owner's manual
- Category
- Hair trimmers & clippers
- Type
- Owner's manual
Ask a question and I''ll find the answer in the document
Finding information in a document is now easier with AI
in other languages
- italiano: Remington HC5950 Manuale del proprietario
- français: Remington HC5950 Le manuel du propriétaire
- español: Remington HC5950 El manual del propietario
- Deutsch: Remington HC5950 Bedienungsanleitung
- русский: Remington HC5950 Инструкция по применению
- Nederlands: Remington HC5950 de handleiding
- português: Remington HC5950 Manual do proprietário
- slovenčina: Remington HC5950 Návod na obsluhu
- dansk: Remington HC5950 Brugervejledning
- polski: Remington HC5950 Instrukcja obsługi
- čeština: Remington HC5950 Návod k obsluze
- Türkçe: Remington HC5950 El kitabı
- svenska: Remington HC5950 Bruksanvisning
- suomi: Remington HC5950 Omistajan opas
- română: Remington HC5950 Manualul proprietarului
Related papers
-
Remington D5015 Owner's manual
-
Remington HC5200 Owner's manual
-
Remington HC5780 Owner's manual
-
Remington AS300 User manual
-
-
-
-
Remington BHT6250 Owner's manual
-
Remington AS701 Operating instructions
-
Remington HC5150 Owner's manual
Other documents
-
Carrera 622 User manual
-
Tristar Rechargeable trimmer User manual
-
MIA HC 027 User manual
-
Philips QC5045/00 User manual
-
Philips QC5055/00 Quick start guide
-
-
Philips CC5060/60 User manual
-
Philips QC5770/44 User manual
-
Philips QC5170 User manual
-