Princess 142388 Owner's manual
- Category
- Toasters
- Type
- Owner's manual
This manual is also suitable for

New Classics 4-slice Toaster
Article 2388
• Gebruiksaanwijzing • User's instructions • Mode d'emploi
• Bedienungsanleitung • Instrucciones de uso • Istruzioni per l'uso
• Bruksanvisning • Brugsanvisning • Bruksanvisning
• Käyttöohje • Instruções de uso •
ϡΪΨΘδϤϟ ϞϴϟΩ
Garantiekaart / Guarantee card /
Certificat de garantie / Garantiekarte /
Certificado de garantía / Certificato di
garanzia / Garantikort / Garantibevis/
Takuutodistus / Garantibevis / Postal de
garantia /
Δ
ϗΎτΑϥΎϤπϟ
Datum van aankoop / Date of purchase / Date d'achat / Kaufdatum / Fecha de compra/Data di acquisto /
Inköpsdatum / Købsdato / Ostopäivämäärä / Kjøpsdato / Data de compra / :
˯ήθϟ ΦϳέΎΗ
Dealer / Dealer / Concessionnaire / Händler / Distribuidor / Rivenditore / Återförsäljare / Forhandler / Myyjä
/ Forhandler/Revendedor / :
ήΟΎΘϟ
Type / Model / Type / Typ / Tipo / Modello / Modell / Type / Tyyppi / Type / Tipo / :
ϞϳΩϮϤϟ
Koper / Purchaser / Acheteur / Käufer / Comprador / Dati relativi all'acquirente / Köpare / Køber /
Ostaja / Kjøper / Cliente / :
ϱήΘθϤ
ϟ
princess_New_Classics_Toaster_4X_omslag_aanpassing.fm Page 1 Monday, May 2, 2005 3:48 PM

1
2
5
3
4
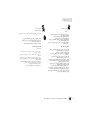
Nederlands: Garantievoorwaarden
1 jaar op fabrikage- en materiaalfouten. De
garantie geldt alleen met volledig ingevuld garan-
tiebewijs. Geen garantie op defekten t.g.v.
verkeerd gebruik, onbevoegde demontage en
vallen. De garantie is niet geldig voor gevolg-
schade.
English: Terms and conditions of
guarantee
1 year on manufacturing and material faults.
The guarantee is valid solely when the guarantee
card has been completed in full. The guarantee
does not cover defects caused by incorrect use,
unauthorized disassembly, or damage caused
by a fall. The guarantee does not cover
consequential damage.
Français : Conditions de garantie
1 année sur les défauts de pièce et main
d'œuvre. La garantie est valable uniquement si le
certificat de garantie est entièrement rempli. La
garantie n'est pas valable si l'appareil a été incor-
rectement utilisé, démonté par une personne non
qualifiée, ou est tombé. La garantie n'est pas
valable pour les dommages consécutifs.
Deutsch: Garantiebedingungen
1 Jahr auf Herstellungs- und Materialfehler.
Die Garantie gilt nur mit komplett ausgefülltem
Garantienachweis. Die Garantie gilt nicht für
Schäden, die aufgrund falschen Gebrauchs,
unbefugter Demontage und weil das Gerät
heruntergefallen ist, entstanden sind. Die Garan-
tie gilt nicht für Folgeschäden.
Español: Condiciones de garantía
1 año por defectos de fabricación o de los
materiales. La garantía es válida únicamente con
la presentación del certificado de garantía debi-
damente gestionado. No se otorga garantía por
fallos ocasionados por el uso inadecuado,
desmontaje de las partes por personas no
autorizadas o caída del aparato. La garantía no
aplica para daños consecuenciales.
Italiano: Condizioni di garanzia
L'apparecchio è garantito per un periodo di 12
mesi dalla data di acquisto a copertura di difetti di
materiale e/o di fabbricazione. La garanzia è
valida unicamente se accompagnata da un
certificato di garanzia debitamente compilato in
ogni sua parte. La garanzia non si applica ai
danni derivanti da utilizzo errato o non conforme
del prodotto, da riparazioni eseguite da
personale non autorizzato e da eventuali cadute
dell'apparecchio. La garanzia non copre gli
eventuali danni indiretti a persone e/o cose
causati dal malfunzionamento del prodotto.
Svenska: Garantivillkor
1 år på tillverknings- och materialfel. Garantin
gäller endast tillsammans med ett fullständigt
ifyllt garantibevis. Ingen garanti för fel på grund
av felaktig användning, obehörig demontering
och fall. Garantin täcker inte följdskador.
Dansk: Garantibetingelser
1 år på fabrikations- og materialefejl. Garantien
gælder kun med et fuldstændigt udfyldt garan-
tibevis. Ingen garanti på defekter opstået som
følge af forkert brug, uautoriseret afmontering og
fald. Garantien dækker ikke følgeskade.
Norsk: Garantibetingelser
Ett år på fabrikasjons- og materialfeil. Garantien
gjelder bare når garantibeviset er fullstendig
utfylt. Det gis ingen garanti for defekter på grunn
av feil bruk, uautorisert demontering og fall.
Garantien gjelder ikke følgeskader.
Suomi: Takuuehdot
Yhden vuoden takuu valmistus- ja materiaalivir-
heiden osalta. Takuu on voimassa vain, jos
takuutodistus on täytetty täydellisesti. Takuu ei
kata vikoja, jotka johtuvat virheellisestä käytöstä,
valtuuttomattomasta purkamisesta tai
putoamisesta. Takuu ei kata seurannaisva-
hinkoja.
Português: Condições de garantia
1 ano para defeitos de fabrico e de material A
garantia apenas é válida com a prova de
garantia completamente preenchida. Não se
garantem defeitos devido a utilização errada,
desmontagem não autorizada e queda.
A garantia não abrange danos resultantes.
ΓΪΤΘϤϟ ΔϜϠϤϤϟ :ϥΎϤπϟ ρϭήη
ΔϣΪΨΘδϤϟ ΩϮϤϟϭ ϊϴϨμΘϟ ϲϓ ΐϴϋ ϱϷ ΓΪΣϭ ΔϨγ .
˱ΔϠϣΎϛ ϥΎϤπϟ ΔϗΎτΑ ˯Ϟϣ ϝΎΣ ϲϓ ϻ· ˱ΎΤϟΎλ ϥΎϤπϟ ϥϮϜϳ ϻϭ .
ˬίΎϬΠϟ ϡΪΨΘγ ˯Ϯγ Ϧϋ ΔΠΗΎϨϟ ΏϮϴόϟ ϥΎϤπϟ ϲτϐϳ ϻϭϞϜθΑ ϪϜϓ ϭ
ίΎϬΠϟ ρϮϘγ Ϧϋ ΞΗΎϨϟ Ϟτόϟ ϭ ˬϪΑ κΧήϤϟ ήϴϏ .
ΔϴϋΎΒΘΘγϻ έήοϷ ϥΎϤπϟ ϲτϐϳ ϻϭ.
princess_New_Classics_Toaster_4X_omslag_aanpassing.fm Page 2 Monday, May 2, 2005 3:48 PM
Page is loading ...
Page is loading ...
Page is loading ...
Page is loading ...

5
New Classics 4-slice Toaster Article 2388
General
This attractive Princess New Classics 4-
slice Toaster is one of the products in our
New Classics range, all of which are
finished in sturdy chrome-plated steel. The
toaster is supplied complete with tosti
holders and a rack accessory to toast rolls
and French bread.
This sophisticated 1350 -1500 W toaster
rapidly toasts slices of bread or tostis for 4
people at the same time, and is very
simple to use – making it a boon for the
entire family! The rack accessory also
enables you to toast rolls or French bread.
In addition, the appliance is equipped with
a dustproof cover, stop, reheating and
thawing buttons, a browning control, a
bread lift, and a centring mechanism. The
centring mechanism ensures that slices of
bread are always correctly positioned in
the slots. Connect the appliance to a 220 -
240 V mains power supply.
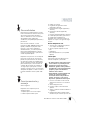
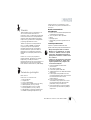
Operation and
controls
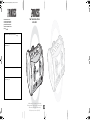
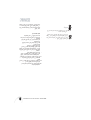
See Figure 1.
The appliance is equipped with the
following features:
1 Dustproof cover
2 Bread lift
3 Power cord and plug
4 Browning control (left and right)
5 Thawing button (left and right)
6 Reheating button (left and right)
7 Stop button (left and right)
8 Rack accessory for rolls and French
bread
9 Tosti holders (2)
A removable crumb tray at the rear of the
appliance collects any loose breadcrumbs
for easy cleaning.
Before use for the first time
1 Remove all packaging materials before
using the appliance for the first time.
2 You can now toast any of the following:
• slices of bread;
•tostis;
• rolls/French bread (using the rack
accessory).
Toasting bread
Toast slices of bread by dropping them into
the slots and switching on the appliance.
• Do not force the slices into the slots;
they could become stuck. Slices of
bread that are too high for the
appliance should be cut to size before
toasting. However, slices that are too
small will be difficult to remove from
the slots.
• You can break off the toasting cycle
by pressing the stop button. The
appliance will stop toasting, and the
bread lift will rise.
1 Put the plug into an earthed wall socket.
2 Open the dustproof cover.
3 Drop the slices in the toaster’s slots.
4 Adjust the browning control to the
required degree of browning.
5 Press the lever downwards to lower the
bread lift and start the toasting. The
appliance ensures that the slices are
correctly centred in the slots.
6 The appliance will automatically stop
toasting, and the bread lift will
automatically rise. Remove the toast
from the appliance.
7 When you have finished using the
toaster remove the plug from the wall
socket and allow the appliance to cool.
Close the cover.

6
New Classics 4-slice Toaster Article 2388
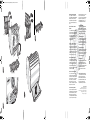
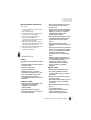
Adjusting the degree of browning
See Figure 2.
The degree of browning can be varied with
the browning control. Turning the control
clockwise will yield browner toast:
• with the control in the left position the
toast will be just crisp
• with the control in the mid position the
toast will be yellowish-gold
• with the control in the right position the
toast will be dark-brown.
8 Try different settings to obtain the
required result. Always begin with the
control in the lowest setting. Bear in
mind that the result will depend on the
nature of the bread: dry or older bread
will toast more rapidly, fresh or deep-
frozen bread will require a little more
time.
Reheating toast/thawing bread
See Figure 3.
You can use the appliance to reheat cold
toast. You can also use it to thaw slices of
bread. Follow the instructions under
‘Toasting bread’ and after step 5 press the
reheating or thawing button.
Toasting tostis
Tostis are usually prepared from bread and
cheese. If you so wish, you can also add
ingredients such as ham, bacon, onion,
salami, pineapple, tomato, smoked
salmon, etc.
See Figure 4.
1 Put the plug into an earthed wall socket.
2 Open the dustproof cover.
3 Put the tosti in the tosti holder and
clamp the grips together.
4 Fit the tosti holder containing the tosti in
one of the toaster’s slots.
5 Toast the tosti in the normal manner, in
accordance with the 'Toasting bread'
instructions from step 4 onwards.
Toasting rolls/French bread
with the rack accessory
Rolls and French bread that are too wide
for the toaster’s slots can be toasted using
the rack accessory. Fit the rack accessory
to the top of the toaster.
See Figure 5.
1 Put the plug into an earthed wall socket.
2 Open the dustproof cover.
3 Fit the rack accessory to the top of the
toaster.
4 Lay the rolls/French bread on the rack.
5 Toast the bread in the normal manner
(in accordance with the 'Toasting bread'
instructions, from step 4 onwards); if so
required, turning the rolls/French bread
over whilst the toaster is operating will
result in more uniform browning.
Maintenance
and cleaning
Always clean the appliance and the
accessories after each use. This will
prevent food residues from baking onto the
appliance.
• Make sure no moisture gets into the
appliance.
• Do not immerse the appliance in
water, or in other liquids. If this
happens do not use the appliance any
more; for safety reasons, dispose of
the appliance.
• Never use corrosive or scouring
cleaning agents.

7
New Classics 4-slice Toaster Article 2388
Removing the crumb tray
See Figure 5.
1 Always remove the plug from the wall
socket before removing the crumb tray.
2 Allow the appliance to cool.
3 Pull the crumb tray out of the rear of the
appliance, and remove any
breadcrumbs.
4 Wash the loose parts (crumb tray, tosti
holders and rack accessory) with water
containing washing-up liquid. Dry with a
dry cloth.
5 Clean the exterior of the toaster with the
special microfibre cloth supplied with
the appliance. Do not moisten the cloth.
6 Return the crumb tray to the appliance.
7 Close the cover, and store the
appliance in a safe place.
Safety
General
• Please read these instructions
carefully and retain them for
reference.
• Use this appliance only in accordance
with the instructions.
• This appliance is intended solely for
domestic use.
• Keep the appliance out of the reach of
children, and of persons who may not
be able to operate it safely.
• Have the appliance repaired only by a
qualified electrician. Never try to
repair the appliance yourself.
Electricity and heat
• Verify that the mains voltage is the
same as that indicated on the type
plate on the appliance before use.
• Plug the appliance into an earthed
wall socket.
• Always remove the plug from the
socket when the appliance is not in
use.
• Always remove the plug from the wall
socket by pulling on the plug, not the
power cord.
• Check the appliance’s power cord
regularly to make sure it is not
damaged. Do not use the appliance if
the power cord is damaged. Have a
damaged power cord replaced by a
qualified electrician.
• Make sure that the appliance and the
power cord do not come in contact
with sources of heat, such as a hot
hob or naked flame.
• Make sure that the appliance, the
power cord and plug do not come in
contact with water.
• Take care when touching the toaster
and the accessories. Allow the
appliance to cool down first. The
toaster and the accessories will
become hot whilst the appliance is in
use. The toaster’s housing will also
become hot, since the housing is an
excellent conductor of heat.
• The appliance needs space to allow
heat to escape, thereby preventing the
risk of fire. Make sure that the
appliance has sufficient space around
it, and does not come in contact with
flammable material. The appliance
must not be covered.
During use
• Never use the appliance outdoors.
• Place the appliance on a flat, stable
surface where it cannot fall.
• Never allow the power cord to hang
over the edge of the draining board,
worktop or table.
• Make sure that your hands are dry
before touching the appliance, power
cord or plug.

8
New Classics 4-slice Toaster Article 2388
• Never use the appliance in a humid
room.
• Switch off the appliance and remove
the plug from the wall socket in the
event of a malfunction during use, and
before cleaning the appliance, fitting
or removing an accessory, or storing
the appliance after use.
• Never use the appliance with the
cover closed.
• Make sure that the appliance is
outside the reach of children. The
toaster and the accessories can
become hot whilst the appliance is in
use.
• Never remove jammed toast with a
knife or other sharp object. Always
remove the plug from the wall socket
before removing jammed toast.
• Do not pick up the appliance if it falls
into water. Remove the plug from the
wall socket immediately. Do not use
the appliance any more.
• Clean the appliance thoroughly after
use (see the ‘Cleaning and
maintenance’ Section).
U.K. WIRING INSTRUCTIONS
The wires in the mains lead are
coloured in accordance with the
following code:
• BLUE NEUTRAL
•BROWN LIVE
• GREEN/YELLOW EARTH
As the colours of the wire in the mains
lead of this appliance may not
correspond with the colour markings
identifying the terminals on your plug,
proceed as follows:
• The wire which is coloured BLUE
must be connected to the terminal
which is marked with the letter N or
coloured black.
• The wire which is coloured BROWN
must be connected to the terminal
which is marked with the letter L or
coloured red.
• The wire which is coloured GREEN/
YELLOW must be connected to the
terminal which is marked with the
letter E or (earth symbol) and is
coloured GREEN or GREEN/YELLOW
WARNING: THIS APPLIANCE MUST BE
EARTHED
The Environment
Dispose of packaging material, such as
plastic and boxes, in the appropriate waste
containers.
When it reaches the end of its useful life
the appliance must be disposed of in a
responsible manner. Contact your
municipal council or refuse-disposal
agency for disposal instructions. You can
also hand in the appliance to the retailer.
Page is loading ...
Page is loading ...
Page is loading ...
Page is loading ...
Page is loading ...
Page is loading ...
Page is loading ...
Page is loading ...
Page is loading ...

18
New Classics 4-slice Toaster Article 2388
Page is loading ...
Page is loading ...
Page is loading ...
Page is loading ...
Page is loading ...
Page is loading ...
Page is loading ...
Page is loading ...
Page is loading ...

28
New Classics 4-slice Toaster Article 2388
Page is loading ...
Page is loading ...
Page is loading ...
Page is loading ...
Page is loading ...
Page is loading ...
Page is loading ...
Page is loading ...
Page is loading ...
Page is loading ...
Page is loading ...
Page is loading ...
Page is loading ...
Page is loading ...
Page is loading ...
Page is loading ...
Page is loading ...
Page is loading ...
Page is loading ...
Page is loading ...
Page is loading ...
Page is loading ...
Page is loading ...
Page is loading ...
-
 1
1
-
 2
2
-
 3
3
-
 4
4
-
 5
5
-
 6
6
-
 7
7
-
 8
8
-
 9
9
-
 10
10
-
 11
11
-
 12
12
-
 13
13
-
 14
14
-
 15
15
-
 16
16
-
 17
17
-
 18
18
-
 19
19
-
 20
20
-
 21
21
-
 22
22
-
 23
23
-
 24
24
-
 25
25
-
 26
26
-
 27
27
-
 28
28
-
 29
29
-
 30
30
-
 31
31
-
 32
32
-
 33
33
-
 34
34
-
 35
35
-
 36
36
-
 37
37
-
 38
38
-
 39
39
-
 40
40
-
 41
41
-
 42
42
-
 43
43
-
 44
44
-
 45
45
-
 46
46
-
 47
47
-
 48
48
-
 49
49
-
 50
50
-
 51
51
-
 52
52
-
 53
53
-
 54
54


Princess 142388 Owner's manual
- Category
- Toasters
- Type
- Owner's manual
- This manual is also suitable for
Ask a question and I''ll find the answer in the document
Finding information in a document is now easier with AI
in other languages
- italiano: Princess 142388 Manuale del proprietario
- français: Princess 142388 Le manuel du propriétaire
- español: Princess 142388 El manual del propietario
- Deutsch: Princess 142388 Bedienungsanleitung
- Nederlands: Princess 142388 de handleiding
- português: Princess 142388 Manual do proprietário
- dansk: Princess 142388 Brugervejledning
- čeština: Princess 142388 Návod k obsluze
- svenska: Princess 142388 Bruksanvisning
- suomi: Princess 142388 Omistajan opas
Related papers
-
Princess 2387 Owner's manual
-
-
-
Princess 142465 Owner's manual
-
-
Princess 143002 Specification
-
-
-
Princess 142700 Owner's manual
-
Other documents
-
Tristar BR-1013 User manual
-
Whirlpool TT 22M MDB0 User guide
-
Philips HD2566 User manual
-
Centurion BT240 User manual
-
Melissa 643-200 User manual
-
-
Hotpoint TT 22M DSL0 Owner's manual
-
Hotpoint TT 22E AB0 Owner's manual
-
OBH Nordica Gravity User manual
-