Kohler K-101-2BZ Installation guide

Category
Sanitary ware
Type
Installation guide

This manual is also suitable for

Installation Guide
Deck/Wall-Mount Bath Faucet
M product numbers are for Mexico (i.e. K-12345M)
Los números de productos seguidos de
M corresponden a México (Ej.
K-12345M)
Français, page “Français-1”
Español, página “Español-1”
K-110 K-331
K-6905 K-16210
1008209-2-G
Tools and Materials
Before You Begin
WARNING: Risk of personal injury. This product is not
designed or intended for use as a grab or support bar. Do not
install in a location where this product may be inadvertently
used as a grab or support bar.
Please read all instructions before you begin.
Observe all local plumbing and building codes.
Shut off the main water supply.
Inspect the waste and supply tubing and replace as needed.
Install or relocate the supplies as necessary to conform to the
roughing-in dimensions.
This faucet can be installed in freestanding, deck-mount or wall
mount configurations. Follow only the instructions that apply to
your installation.
An optional wall-mount bracket is available to adapt the
handshower to a stationary location.
Kohler Co. reserves the right to make revisions in the design of
faucets without notice, as specified in the Price Book.
Propane
Torch
Plus:
• Adjustable Arc Pliers
• 1/2" Piping
Threaded 1/2" Adapters
• 1/2" Union Elbows
• Bath Shower Ells
• K-6525 Wall-Mount Bracket
Assorted
Screwdrivers
Solder
Thread
Sealant
Strap
Wrench
Adjustable
Wrench
Assorted Hex
Wrenches
Drill and
Bits
Level
1008209-2-G 2 Kohler Co.
Roughing-In
X
X
Roughing-In Dimensions-
Wall-Mount Kit
Roughing-In Dimensions-
Free-Standing and Deck-Mount
Bath drain to faucet
Bath Models
K-100
K-700, K-702
K-710, K-711, K-712, K-726, K-727
1/2"
NPT
1/2"
NPT
Top of Rim
4"
(10.2 cm)
4"
(10.2 cm)
4"
(10.2 cm) Min
2-1/4"
(5.7 cm) D.
2-7/16"
(6.2 cm)
2-1/4"
(5.7 cm) D.
8-15/16"
(22.7 cm) D.
1-1/8"
(2.9 cm) D.
K-126, K-127
27-7/8"
(70.8 cm)
K-128
31-1/2"
(80 cm)
9-5/8"
(24.4 cm)
9-5/8"
(24.4 cm)
5-5/8"
(14.3 cm)
1-13/16"
(4.6 cm)
1-13/16"
(4.6 cm)
2-3/8"
(6 cm)
11-3/8"
(28.9 cm)
2-3/8"
(6 cm)
5-5/8"
(14.3 cm)
8-15/16"
(22.7 cm)
3" (7.6 cm) Min
4-1/4" (10.8 cm) Max
K-101
5-7/8" (14.9 cm)
6-3/8" (16.2 cm)
4-3/8" (11.1 cm)
Kohler Co. 3 1008209-2-G
1. Prepare the Site
If not already installed, install or relocate the water supplies as
needed to conform to the roughing-in dimensions for your
particular installation.
Use thread sealant on all the threaded connections.
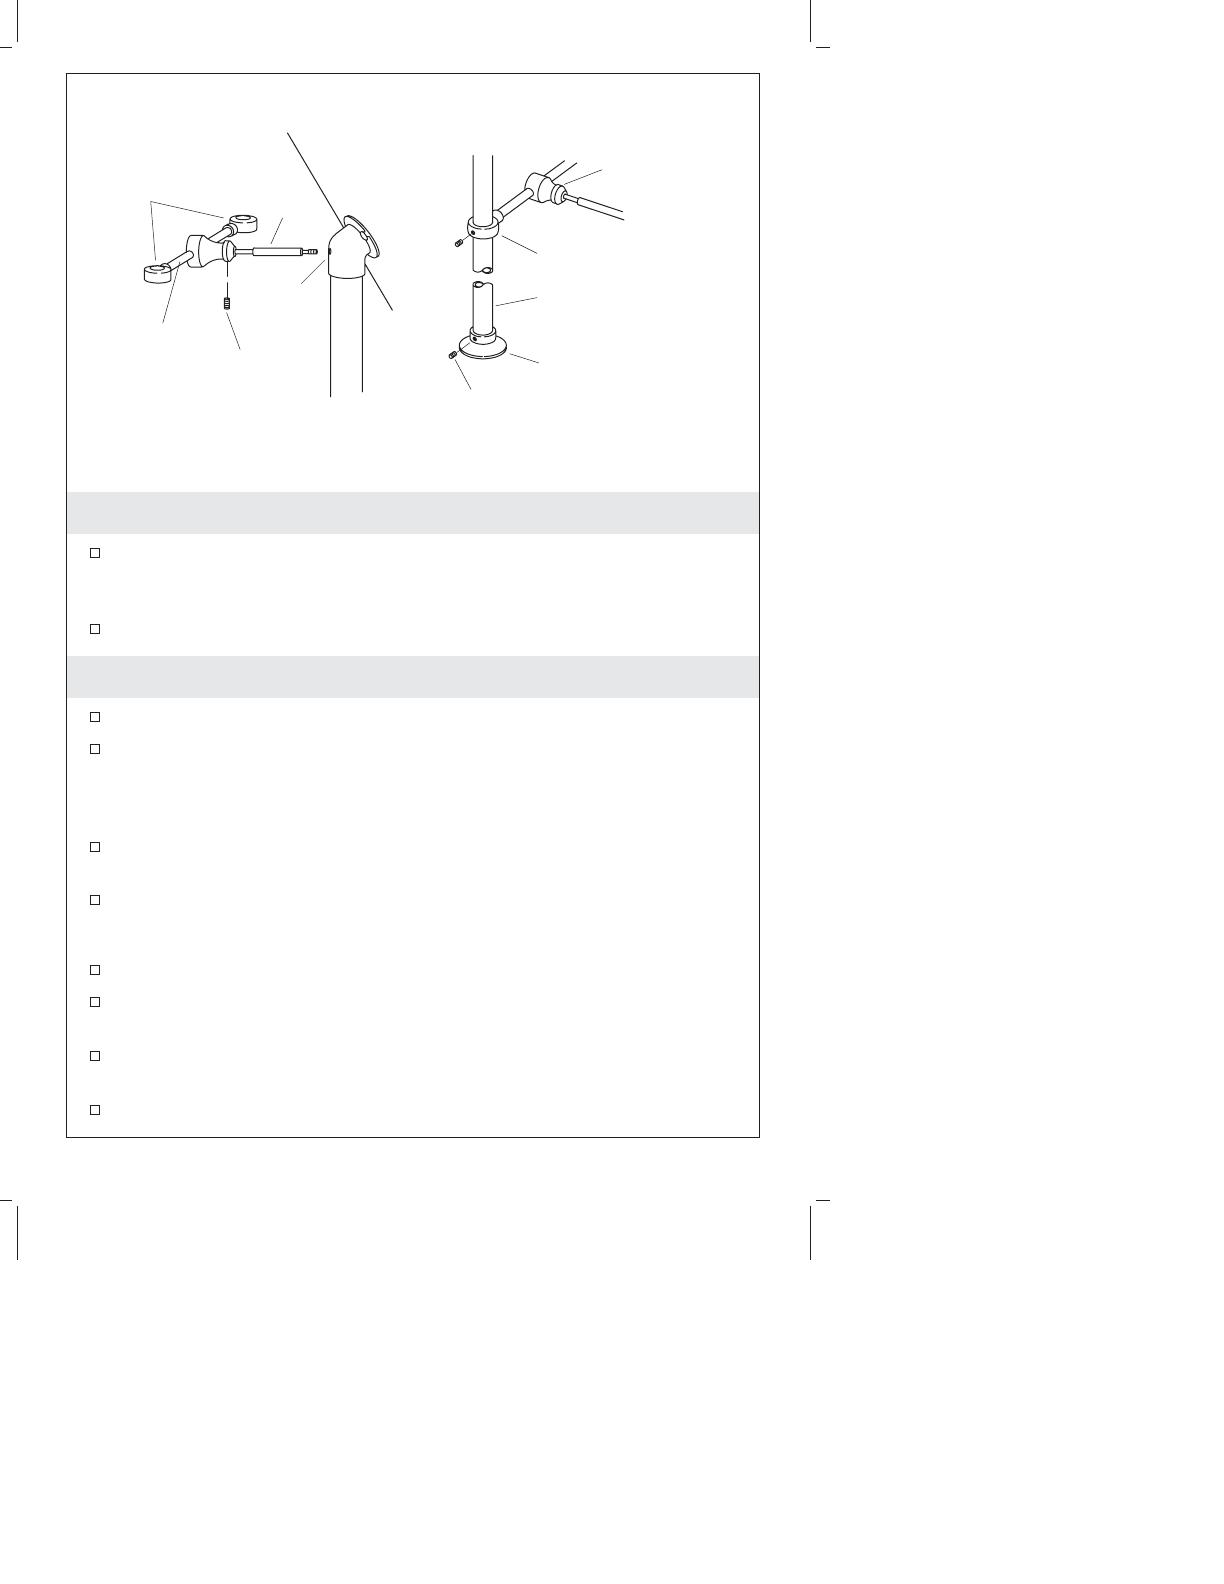
2. Freestanding Supply Installation
Remove the temporary plugs from the water supply couplings.
Replace the long rod with the short rod for Kohler models
K-710, K-711, K-712, K-726 and K-727. To determine the bath to
drain faucet measurement for your model bath refer to the
Roughing-In section of this manual.
Thread the tee bracket into the hole in the back of the overflow
elbow.
Insert the rod into the tee bracket and secure with the setscrew.
Install the Supply Tubes
Loosen the setscrews in the pipe holder and flange.
Carefully slide the plated supply pipe through the pipe holder
and flange.
Thread the supply pipe into the supply rough-in and tighten it
with a strap wrench.
Tighten the setscrews in the pipe holder and flange.
Rod
Setscrew
Pipe
Holder
Tee
Bracket
Overflow
Elbow
Plated Supply Pipe
Setscrew
Pipe
Holder
Tee Bracket
Flange
1008209-2-G 4 Kohler Co.
Freestanding Supply Installation (cont.)
Repeat for the second supply tube.
Kohler Co. 5 1008209-2-G
3. Deck-Mount Supply Installation
Remove the temporary plugs from the water supply couplings.
Construct a frame for the deck with two 1 (2.5 cm) holes
measuring 8 (20.3 cm) apart from the center of each hole.
Carefully slide the plated supply pipe through the holes.
Thread the supply pipe into the supply rough-in and tighten with
a strap wrench.
Securely strap the supply pipes to the framing below the bath
deck.
Loosen the setscrew in the flange.
Carefully slide the flange down the supply pipe so it rests on the
bath deck.
Tighten the flange setscrew.
8" (20.3 cm) Center-to-Center
1" (2.5 cm) Diameter Holes
Plated
Supply
Pipe
Setscrew
Flange
1008209-2-G 6 Kohler Co.
4. Freestanding and Deck-Mount Faucet Installation
Carefully slip the O-ring into the groove in the plug button.
Press the plug button into the hole in the back of the cradle.
Apply thread sealant to the threads of the plated supply pipes.
Slide a nut onto one of the plated supply pipes. Be careful to
avoid scratching the plated finish.
Thread the flanged union onto the supply pipe. Verify that the
flanged union is level.
Set the washer on top of the flanged union.
Repeat for the other supply pipe.
Set the spout assembly on both washers.
Thread the nuts up onto the spout assembly to secure it to the
supply tubes.
Plug
Button
O-Ring
Spout
Assembly
Flanged
Union
Plated
Supply Pipe
Nut
Washer
Cradle
Kohler Co. 7 1008209-2-G
5. Wall-Mount Supply Installation
Determine the faucet installation location.
Install support framing at the installation location as shown.
Secure the piping to the framing.
Install temporary plugs in the supply ells.
Turn on the water supplies and check for leaks.
Turn off the water supplies.
Complete the finished wall.
In the finished wall, drill two 1 (2.5 cm) holes measuring 8
(20.3 cm) apart from the center of each hole.
Drill a 1/2 (1.3 cm) hole at the exact location illustrated. This
hole must be through the plywood support.
Remove the temporary plugs from the water supply ells.
Support
Framing
1/2"
Copper
Tubing
Minimum 1/2"
Plywood
Supply Ells
11-3/8"
(28.9 cm)
11-3/8"
(28.9 cm)
This hole must be centered,
and must be through
plywood support.
1" (2.5 cm) Diameter Holes
8" (20.3 cm)
Center-to-Center
1/2" (1.3 cm)
Diameter Holes
1008209-2-G 8 Kohler Co.
6. Wall-Mount Elbow Installation
Loosen the flange setscrews.
Carefully slide a flange onto one of the plated elbows. Be careful
to avoid scratching the plated finish.
Apply thread sealant to the threads of the plated elbows.
Insert one of the plated elbows through the wall and into a
supply ell.
Thread the plated elbow into the supply ell and tighten with a
clean strap wrench. Position the plated elbows with the opening
facing up.
Carefully slide the flange over the plated elbow and up against
the finished wall.
Tighten the flange setscrew.
Repeat for the other plated elbow.
Apply thread
sealant here.
Setscrew
Flange
Plated Elbow
Kohler Co. 9 1008209-2-G
7. Wall-Mount Support Installation
Pivot the metal anchor channel so the plastic straps touch.
Insert the channel into the 1/2 (1.3 cm) hole in the finished wall.
Pull on the strap ring until the metal anchor channel is flush on
the inside of the finished wall.
Slide the plastic cap along the straps until it is flush with the
wall.
Break the straps off flush with the finished wall.
Insert the screw through the support flange.
Thread the screw and support flange into the anchor. Securely
hand tighten.
Loosely thread the support bolt completely into the support
flange.
Install the Anchors
Anchor Hole
Anchor Channel
Loop
Clip
Strap
Loop
Screw
Anchor
Support
Flange
Support
Bolt
1008209-2-G 10 Kohler Co.
8. Wall-Mount Faucet Installation
Verify that thread sealant has been applied to the threads of the
plated elbows. If not, apply thread sealant at this time.
Slide a nut onto one of the plated elbows. Be careful to avoid
scratching the plated finish.
Thread the flanged union onto the plated elbow. Verify that the
flanged union is level.
Set the washer on top of the flanged union.
Repeat for the other plated elbow.
Set the spout assembly on both washers.
Thread the nuts up onto the spout assembly to secure it to the
plated elbows.
NOTE: Make sure the faucet is installed parallel with the finished
wall. Do not force the faucet when installing the support bolt into
the cradle.
Unthread the support bolt until it enters the hole in the back of
the cradle.
Secure the support bolt in place with the cradle setscrew.
Turn support
bolt
couterclockwise
to unthread.
Flanged
Union
Plated
Elbow
Spout
Assembly
Nut
Washer
Cradle
Setscrew
Kohler Co. 11 1008209-2-G
9. Install the Handshower – All Installations
NOTE: Only deck-mount installation is shown in the illustration.
The handshower installs the same for all faucet installation types.
Thread the end of the shower hose with the nut onto the nipple.
Thread the handshower onto the other end of the shower hose.
Nipple
Showerhead
Assembly
Shower Hose
B
A
Deck-Mount
Installation is Shown
1008209-2-G 12 Kohler Co.
10. Oval Handle Installation
Verify that the valves are in the closed position.
NOTICE: Risk of product damage. Do not overtighten.
Overtightening will damage the handle.
Insert the stem screw into the stem extension and tighten with a
screwdriver.
Place the ceramic insert into the oval handle.
Secure the insert with the handle screw. Do not overtighten.
Loosen the setscrew.
Position the handle assembly on the stem extension.
Verify that the handle is in an even horizontal position. If needed,
remove the handle and adjust its position on the splines of the
stem extension until horizontal. For fine adjustment, pull out the
stem extension until it disengages from the valve, rotate, and
return it to its original position. Do not pull the stem extension
completely out.
Tighten the setscrew.
Repeat for the other handle.
Setscrew
Open
Close
Open
Hot Cold
Close
Oval
Handle
Ceramic
Insert
Handle
Screw
Stem
Extension
Stem
Screw
Bonnet
Shown in Closed Position
Kohler Co. 13 1008209-2-G
11. One-Piece Lever Handle Installation
Verify that the valves are in the closed position.
Insert the handle onto the stem extension so the handle is
positioned horizontally.
Verify that the handle is in an even horizontal position. If needed,
remove the handle and adjust its position on the splines of the
stem extension until horizontal. For fine adjustment, pull out the
stem extension until it disengages from the valve, rotate, and
return it to its original position. Do not pull the stem extension
completely out.
NOTICE: Risk of product damage. Do not overtighten.
Overtightening will damage the handle.
Insert the stem screw into the stem extension and tighten with a
screwdriver.
Repeat for the other handle.
Open
Close
Open
Hot Cold
Close
Lever
Handle
Stem
Extension
Stem
Screw
Bonnet
Shown in Closed Position
1008209-2-G 14 Kohler Co.
12. Six Prong Handle Installation
Verify that the valves are in the closed position.
NOTICE: Risk of product damage. Do not overtighten.
Overtightening will damage the handle.
Insert the stem screw into the stem extension and tighten with a
screwdriver.
Loosen the setscrew.
Position the handle assembly on the stem extension.
Verify that the handle label is in an even horizontal position. If
needed, remove the handle and adjust its position on the splines
of the stem extension until horizontal. For fine adjustment, pull
out the stem extension until it disengages from the valve, rotate,
and return it to its original position. Do not pull the stem
extension completely out.
Tighten the setscrew.
Repeat for the other handle.
Open
Close
Open
Close
Six Prong
Handle
Stem
Extension
Stem
Screw
Setscrew
Bonnet
Shown in Closed Position
Kohler Co. 15 1008209-2-G
13. Multi-Piece Lever Handle Installation
Verify that the valves are in the closed position.
NOTICE: Risk of product damage. Do not overtighten.
Overtightening will damage the handle.
Install the stem extension to the valve stem.
Thread the bonnet onto the valve body.
Align the bath adapter over the stem extension so that the holes
line up horizontally. Secure with the screw.
Install the skirt cap to the end of the bath adapter.
Position the long sleeve over the handle arm.
Slide the O-ring onto the handle arm down to the long sleeve.
Insert the handle arm through the bath adapter.
Slide the short sleeve onto the handle arm up to rest on the bath
adapter.
Slide the washer onto the handle arm down to the short sleeve.
Thread the end cap onto the end of the handle arm to secure the
assembly.
Repeat for the other handle.
Open
Close
Open
Close
Long Sleeve
Handle Arm
Stem
Extension
O-Ring
Skirt Cap
Endcap
Washer
Bonnet
Shown in Closed Position
Short Sleeve
Stem Screw
Bath Adapter
1008209-2-G 16 Kohler Co.
14. Complete the Installation
Open the supplies.
Turn on the hot and cold water.
Run the water through both the handshower and the faucet.
Check for leaks.
Turn off the water.
Kohler Co. 17 1008209-2-G
1 / 1

Kohler K-101-2BZ Installation guide

Category
Sanitary ware
Type
Installation guide
This manual is also suitable for

Ask a question and I''ll find the answer in the document

Finding information in a document is now easier with AI

Ask the document