Glacier 873W-3004 Installation guide
- Category
- Sanitary ware
- Type
- Installation guide
This manual is also suitable for

THANK YOU
USE AND CARE GUIDE
SINGLE-HANDLE TUB AND SHOWER FAUCET
Questions, problems, missing parts? Before returning to the store,
call Glacier Bay Customer Service
8 a.m. - 6 p.m., EST, Monday - Friday
1-855-HD-GLACIER
HOMEDEPOT.COM
Model #873W-3001
873W-3004
shower faucet. We strive to continually create quality products designed to enhance your home. Visit us online
to see our full line of products available for your home improvement needs. Thank you for choosing Glacier Bay!
REV.01YOW

2
Table of Contents
Safety Information ....................................2
Warranty ...................................................2
Pre-Installation .........................................3
Planning Installation ..............................3
Tools Required .......................................3
Hardware Included .................................3
Package Contents ..................................4
Installation ................................................5
Adjusting the temperature .......................10
Care and Cleaning ....................................13
Service Parts .............................................13
Safety Information
Please read and understand this entire manual before
attempting to assemble, operate, or install the product.
CAUTION: Always turn off the water supply before
removing an existing faucet or replacing any part of a
faucet. Open the faucet handle to relieve water pressure
and ensure that the water is completely shut off.
Warranty
LIMITED LIFETIME WARRANTY
Glacier Bay products are manufactured with superior quality standards and workmanship and are backed by our
limited lifetime warranty. Glacier Bay products are warranted to the original consumer purchaser to be free of
defects in materials or workmanship. We will replace FREE OF CHARGE any product or parts that proves defective.
Simply, return the product / part to any of The Home Depot retail locations or call 1-855-HD-GLACIER (1-855-434-
5224) to receive the replacement item. Proof of purchase (original sales receipt) from the original consumer
purchaser must be made available for all Glacier Bay warranty claims.
This warranty excludes incidental/inconsequential damages and failures due to misuse, abuse or normal wear and
tear. This warranty excludes all industrial, commercial & business usage, whose purchasers are hereby, extended
duration of warranty.
Some states and provinces do not allow the exclusion or limitation of incidental or consequential damages, so the
above limitations may not apply to you. This warranty gives you specic legal rights and you may also have other
rights that vary from state to state and province to province. Please see a store or contact 1-855-HD-GLACIER for
more details.

3 HOMEDEPOT.COM
Please contact 1-855-HD-GLACIER for further assistance.
Pre-Installation
PLANNING INSTALLATION
Before beginning the installation of this product, ensure all parts are present. Compare parts with the Package
Contents and Hardware Included list. If any part is missing or damaged, do not attempt to install the product.
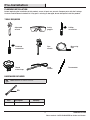
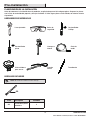
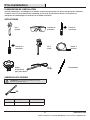
TOOLS REQUIRED
Safety
goggles
Phillips
screwdriver
Thread
sealant tape
HARDWARE INCLUDED
NOTE: Hardware not shown to actual size.
AA
Part Description Quantity
AA Escutcheon screw 2
Pipe
wrench
Strap
wrench
Adjustable
wrench
Flat blade
screwdriver
Measuring
tape
Thermometer

Pre-Installation (continued)
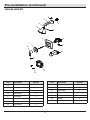
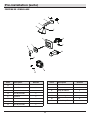
PACKAGE CONTENTS
C
E
D
I
J
B
A
F
G
H
L
K
M
O
N
Part Description Quantity
A
1
B Washer 1
C Shower arm 1
D Set screw 1
E Connector 1
F Wrench 1
G Handle 1
H Set screw 1
Shower head
I Accessorize cap 1
J Escutcheon 1
K Valve body 1
L Plug 1
M Tub spout 1
N Screw 2
O Plaster guard 1
Part Description Quantity
4

5 HOMEDEPOT.COM
Please contact 1-855-HD-GLACIER for further assistance.
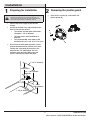
Installation
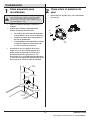
1
Preparing for installation
CAUTION: Always turn off the water supply before
removing an existing faucet or replacing any part of a
faucet. Open the faucet handle to relieve water pressure
and ensure that the water is completely shut off.
□ Shut off the water supply to the tub and
shower.
□ Verify that the hole sizes and positions of the
holes in the wall are correct
□ The shower and tub spout outlet holes
should be 1-1/4 in. diameter
□ The valve access hole should be 6 in.
diameter.
□ The recommended valve depth to the
nished wall is 2 in. min. to 2-1/2 in. max.
□ Ensure that the valve body (K) cover is ush
with the nished exterior surface of the wall.
Position the valve body (K) correctly in the
wall with the “UP” pointing up. The 8 in.
minimum from the valve body to the tub
spout is required for proper operation.
2
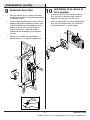
Removing the plaster guard
30 in.
Tub & Shower
8 in. Min.
48 in.
Shower Only
1 1/4 in. Diamter
1 1/4 in Diameter
48 in.
Tub & Shower
6 in.
Diameter
30 in.
Shower Only
Unscrew the screws (N), and remove the
plaster guard (O).
□
K
0
N

6
Installation (continued)
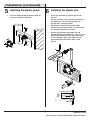
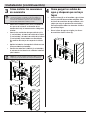
3
Installing the supply
connections
□
□ Tighten the pipes to the valve body (K) with a
pipe wrench (not included).
Wrap thread sealant tape around the pipe
threads in a clockwise direction, as shown.
□
Connect the hot and cold water supply lines (1,
not included), the shower outlet pipe (2, not
included), and tub outlet pipe (3, not included)
by threading them into the valve body (K) in a
clockwise direction.
Connect the pipe elbows (4, not included) to
the end of the shower outlet and tub outlet
pipes.
□
NOTE: Be sure to position the body (K) correctly in the
wall, with the markings "UP" facing upward. The hot water
supply lines go into the H inlet, and the cold water supply
lines go into the C inlet. Do not use PEX or CPVC between
the valve and spout.
NOTE: If you do not wish to install the tub outlet, insert
the plug (L) into the bottom of the valve body (K).
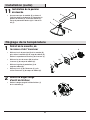
4
Flushing the water outlets
□
and checking for leaks
Place the handle (G) on the valve body (K)
inverter and turn the handle (G) to the full on
mixed position. Turn on the hot and cold water
supply lines and allow the water to ow from
the outlets for one minute, or until all foreign
matter has been ushed out. Check for leaks.
Shut off the water at the faucet and supply
lines. Remove the handle (G).
□
G
K
L
4
2
3
1
K
HOT
COLD
4
2
1
K
HOT
COLD

7 HOMEDEPOT.COM
Please contact 1-855-HD-GLACIER for further assistance.
Installation (continued)
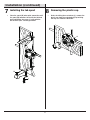
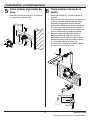
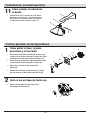
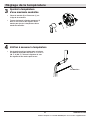
5
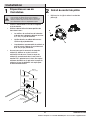
Installing the plaster guard
Place the plaster guard (O) onto the body (K)
and secure with the screws (N).
□
6
Installing the shower arm
□ Screw the connector (E) into the pipe inside
the wall.
Insert the shower arm (C) into the connector (E)
and tighten the set screw (D) with the Hex
wrench (Hex: 3.2mm) provided.
□
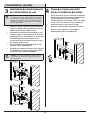
Wrap thread sealant tape around the pipe
threads of the tub spout outlet (1, not included)
in a clockwise direction, as shown.
□
Connect the tub spout outlet pipe (the tub
spout outlet pipe should project 1-3/16 in. to 3 in.
from the nished wall) to the lower pipe elbow
(2, not included). Tighten the elbow and tub
spout outlet pipe connections with a strap
wrench.
□
E
1
2
1-3/16 in. to 3 in.
Wall
C
D
O
N
K

8
Installation (continued)
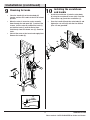
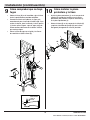
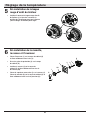
7 8
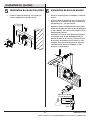
Installing the tub spout
Place the spout (M) onto quick connection until
the spout (M) becomes ush with the nished
wall and tighten the screw (1) with with the
Hex wrench (Hex: 3.97mm) provided.
□
Removing the plastic cap
□ Before installing the escutcheon (J), remove the
plastic cap from the valve body (K) by twisting
the cap in a clockwise direction.
M
1
K

9 HOMEDEPOT.COM
Please contact 1-855-HD-GLACIER for further assistance.
Installation (continued)
9
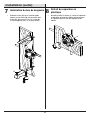
Checking for leaks
□
□
10
Place the handle (G) on the valve body (K)
inverter and turn the handle to the full on mixed
position.
When the valve is turned on, water normally
ows through the tub spout (M). To activate the
shower, turn the valve on and pull the knob (1)
up. Hold the knob (1) until the water ows
continiously from the shower arm (C). Check for
leaks.
Shut off the water at the faucet and supply lines.
Remove the handle (G).
□
Installing the escutcheon
and handle
□ Install the escutcheon (J) onto the valve body
(K) using the escutcheon screws (AA). Place the
accessorize cap (I) onto the escutcheon (J).
Place the handle (G) onto the valve body (K) and
tighten the set screw (H) with the Hex wrench
(Hex: 2.5 mm) provided.
□
UP
FOR
SHOWER
M
1
M
G
K
C
J
AA
I
G
H
K

10
Installation (continued)
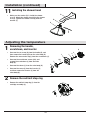
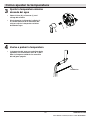
11
Installing the shower head
□ Make sure the washer (B) is inside the shower
arm (C). Attach the shower head (A) to the shower
arm (C). Tighten the shower head (A) with the
wrench (F).
Adjusting the temperature
1
Removing the handle,
escutcheon, and inverter
□ Unscrew the set screw (H) from the handle (G), and
then remove the handle (G) from the valve body (K).
Remove the accessorize cap (I) from the escutcheon (J).
□ Unscrew the escutcheon screws (AA), and
remove the escutcheon (J) from the valve
body (K).
□ Unscrew the sleeve (1) from the valve body (K).
□ Unscrew the screw (2) from the inverter (3),
and then remove the inverter (3) from the
valve body (K).
2
Remove the red limit stop ring
□ Remove the red limit stop ring (1) from the
cartridge assembly (2).
1
2
C
A
F
B
K
H
G
I
J
AA
1
2
3

11
Adjusting the temperature
3
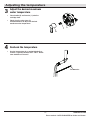
Adjust the desired maximum
water temperature
□ Place handle (G) and inverter (1) onto the
cartridge stem.
□ Slowly turn the valve stem (2)
counterclockwise to adjust the desired
maximum water temperature.
4
Recheck the temperature
□ A water temperature for a comfortable bath or
shower is typically between 90°F-100°F. Rotate
stem clockwise to turn off.
Thermometer
HOMEDEPOT.COM
Please contact 1-855-HD-GLACIER for further assistance.
G
1
2

12
Adjusting the temperature
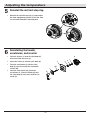
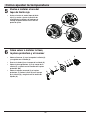
5
Reinstall the red limit stop ring
□ Reinstall the red limit stop ring (1) and readjust
the teeth engagement position so that the stem
can not move beyond the adjusted point.
6
Reinstalling the handle,
escutcheon, and inverter
□ Place the inverter (1) onto the valve body (K)
and secure with the screw (2).
1
□ Screw the sleeve (3) onto the valve body (K).
□ Place the escutcheon (J) onto the valve
body (K) and secure with the escutcheon
screws (AA).
□ Place the accessorize cap (I) onto the
escutcheon (J). Place the handle (G) onto
the valve body (K) and secure with the set
screw (H).
K
H
G
I
J
AA
3
2
1

13 HOMEDEPOT.COM
Please contact 1-855-HD-GLACIER for further assistance.
Care and Cleaning
□
□
□ Do not use abrasive cleaners when cleaning this faucet.
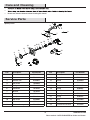
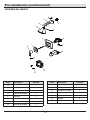
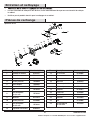
Service Parts
*Specify Finish
3
5
10
8
9
11
12
13
14
15
16
4
7
6
2
1
Part Description Part Number
1 RP38191*
2 Washer RP64190
3 Shower arm RP38065*
4 Set screw RP50054
5 O-ring RP60045
6 Connector RP70252
7 Wrench RP70253
8 3.2mm hex wrench RP70332
13 Escutcheon screw RP50066*
Shower head
Part Description Part Number
14 Escutcheon RP80256*
15 Screw RP50020
16 Inverter RP64043
17 Sleeve RP80297*
18 O-ring RP60091
19 Bonnet RP70437*
20 Cartridge RP20006
17
18
19
20
24
23
22
21
9 Handle RP13323*
10 Set screw RP50002
11 2.5mm hex wrench RP70221
12 Accessorize cap RP80255*
21 O-ring RP60101
22 Plug RP70365
23 Spout RP33060*
24 3.97mm hex wrench RP70345

Questions, problems, missing parts? Before returning to the store,
call Glacier Bay Customer Service
8 a.m. - 6 p.m., EST, Monday - Friday
1-855-HD-GLACIER
HOMEDEPOT.COM
Retain this manual for future use.
Page is loading ...
Page is loading ...
Page is loading ...
Page is loading ...
Page is loading ...
Page is loading ...
Page is loading ...
Page is loading ...
Page is loading ...
Page is loading ...
Page is loading ...
Page is loading ...
Page is loading ...
Page is loading ...
Page is loading ...
Page is loading ...
Page is loading ...
Page is loading ...
Page is loading ...
Page is loading ...
Page is loading ...
Page is loading ...
Page is loading ...
Page is loading ...
Page is loading ...
Page is loading ...
Page is loading ...
Page is loading ...
-
 1
1
-
 2
2
-
 3
3
-
 4
4
-
 5
5
-
 6
6
-
 7
7
-
 8
8
-
 9
9
-
 10
10
-
 11
11
-
 12
12
-
 13
13
-
 14
14
-
 15
15
-
 16
16
-
 17
17
-
 18
18
-
 19
19
-
 20
20
-
 21
21
-
 22
22
-
 23
23
-
 24
24
-
 25
25
-
 26
26
-
 27
27
-
 28
28
-
 29
29
-
 30
30
-
 31
31
-
 32
32
-
 33
33
-
 34
34
-
 35
35
-
 36
36
-
 37
37
-
 38
38
-
 39
39
-
 40
40
-
 41
41
-
 42
42


Glacier 873W-3004 Installation guide
- Category
- Sanitary ware
- Type
- Installation guide
- This manual is also suitable for
Ask a question and I''ll find the answer in the document
Finding information in a document is now easier with AI
in other languages
- français: Glacier 873W-3004 Guide d'installation
- español: Glacier 873W-3004 Guía de instalación
Other documents
-
Glacier Bay HD873X-0001 Installation guide
-
-
-
-
-
-
-
Glacier Bay HD833CX-0001 Installation guide
-
-