
Operating Instructions
High-Definition LCD TV
LCDVD152

The symbol means: Dangerous, High volta ge, plea se prevent from elec tric shock.
Application precautions
Important Safety precautions
Do not put the machine in open air or humid place to avoid of short circuit, fire inside machine or
danger of electric shock.
There is high voltage in the unit, do not arbitrarily open the case and conduct maintenance to
prevent electric shock.
Do not put the machine on swinging trammer, ramp and table, to avoid of damage on body caused in
falling of the machine.
Do not fall any liquid or foreign material into internal side of the machine to avoid of fire or electric
shock. Do not stack any object on top of the machine.
Do not place water container around the machine to prevent it from dripping or spattering.
For keeping excellent operating state of your high-definition color television, please read following
items carefully before application of the product:
High voltage exists on backlight of television, do not open rear cover of it without authorization. Do not
put heavy on screen.
Do not make product expose to moisture, or place it under strong light directly.
Do not use the product in condition of noise or high-magnetic field; please keep product away from fire
source or strong vibration source.
Do not contact product with chemical preparations, or use, store product in condition of chemical gas.
Please cut off power supply before assemble, disassemble or connect peripheral equipments.
Please cut off power and make contact with agent or service center of our Company if fault or abnormal
condition occurs, for example, abnormal smell occurs, or temperature is too high.
Do not receive and watch a still picture for long time.
Do not reconstruct the equipment without authorization.
Do not touch screen with hand directly.
Please wipe off dust from screen by using soft cloth after power cut; remove water or spittle on screen
immediately; clean screen with ethane while not use acetone, toluene, or alcohol etc.
Application time of standby power switch should not exceed 12 hours.
Please cut off AC power supply if no application with the television for long time.
Please take out the batteries from remote control in time if no application with remote control for long time
to prevent leakage of battery electrolyte.
Please remain a clearance of 5mm between complete machine and wall surface for heat elimination while
using it in mode of hanging it on wall.
Please pull out power plug and disassemble antenna connection during lightning strike to prevent the
machine from lightning strike.
For any modification caused in upgrading of machine, such as menu style, should be subjected to change
without prior notice.
The symbol means: Please do not replace the safety parts optionally,
when you service equipment.
Main plug or an appliance coupler is used as the disconnect device, the disconnect device shall
remain readily operable.
Class I apparatus shall be connected to a mains socket outlet with a protective earthing connection.

Contents
Feature
Technical specification
Accessories
Signal connection
1. Rear terminal chart
2. Signal connection chart
Starting preparation
1. Assemble batteries for remote controller
Illumination on control of remotor control
Illumination of panel key
Illumination on menu operation
Operating illumination
1. Turn on/Turn off power supply
2. Set input signal source
3. Automatic channel search
4. Channel option
5. Adjustment and control of image color
6. Adjustment of sound effect
7. OSD Property
8.Optimization setting
9.Parental control
10.Component screen position setting
11.PC Image setting
DVD Player function
Special function of remote controller
Support PC signal input
Failure analysis
Maintenance
Cleanness of screen
Suggestion feedback
Product recommendation
MEMO
My MEMO
Welcome purchasing CURTIS high-definition color television.
Please read the manual carefully before application,
and operate it according to normative step.
Thanks for your cooperation!
1
1
2
2
2
3
3
3
4
5
6
6
6
6
7
7
7
8
9
9
9
10
10
11
14
15
16
16
16
16
16
16

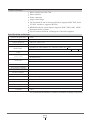
High resolution 1366×768
High brightness
High contrast
Wide visual angle
YP P high-definition input terminal, supports 480P, 720P, 1080i
B R
VGA PC interface, supports WXGA
HDMI digital input interface, supports 480P, 720P, 1080i, 1080P
Multi-system receiver
Open function menu, English interface display
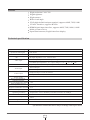
System of broadcast signal
System of video signal
Saved channels
AIR 2-69, Cable 1-125
RF
Video input
S-VIDEO Input impedance: 75Ω Input voltage: Y: 1V +C: 0.3 V +3db
P-P P-P
Feature
Technical specification
1
1
RF Input impedance: 75Ω Coaxial cable
VIDEO Input impedance: 75Ω Input voltage:1V +3db
P-P
Audio input
Audio output
Earphone output: 3.5mm Jack 50mw
Power supply
12V DC
<48W
Power consumption for standby
<3W
Desk-top: 40×18×35.5 (cm)
Height-to-width ratio of screen
16:9
Weight
Operating condition
Temperature: 3-35℃ Humidity: 20%-80% Pressure: 86-108Kpa
Specifications contained herein are subject to change without prior notice
LR sound input
PC sound input
Loudspeaker 2×2W (4Ω)
Desk-top: 3.2kg
Audio
Input impedance>10kΩ Input voltage: 0.2-2V (rms)
Fixed definition
Max visible image size
Brightness
Contrast
1366×768
40cm
2
250cd/m
500:1
Power consumption of
complete machine
External dimensions of
complete machine
NTSC
PAL/NTSC

Remote control
1
Power line
1
Instruction manual
1
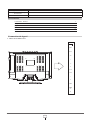
Signal connection
1. Rear terminal chart
1
2
Accessories
Batteries (AAA)
2
Visual degree (Lo/3)
o o
Horizontal direction 120 , vertical direction 80
Tailing time of motional image
<5ms
Color gamut
>30%
1
Adapter
VGA
AUDIO
PHONE
OUT
HDMI 1
VGA
Y
HDMI 2
PB
PR
S-VIDEO
VIDEO
L
R
DC 12V
HEAD
R
F

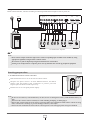
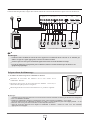
2. Signal connection chart
Note:
1
3
S-VIDEO
OUT
AUDIO OUT
L
R
Y
VCD/DVD/Set-Top Box
PBPR
AUDIO OUT
L
R
1. Assemble batteries for remote controller
Starting preparation
Note:
TV
Please connect audio line, video line according to connecting method shown in figure in state of power off.
Please connect output terminal of signal source with corresponding input terminal of the machine by using
appropriate signal line, and guarantee excellent contact.
Do not insert or pull out input/output signal terminal in state of electrified.
Starting order is important for computer, please start up machine after started up peripheral equipment.
Disassemble batteries cover on rear side of remote control.
Interpose two pieces of new 1.5V AAA alkaline batteries, and match
positive pole and negative pole of batteries to positive pole and
negative pole of remote control respectively.
Put batteries cover to original position lightly.
Do not use new battery with used battery in mix; do not use manganese battery with alkaline battery in
mix;
Please use the remote control carefully to avoid of falling, damping, or damaging it.
Please take out the batteries from remote control in time if no application with remote control for long
time, or batteries is used up, to prevent leakage of battery electrolyte.
After took out used batteries from remote control, please treat it in appropriate and green method.
PC
HDMI
PB Y
VGA HDMI 1
PR
S-VIDEOVIDEO
L
VGA
AUDIO
R
F
R
PHONE
OUT
HEAD
HDMI 2
VIDEO

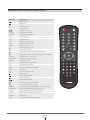
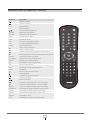
Illumination on control of remote control
1
4
-/--
VOL
PICTURE
SOUND
CH
ENTER
MENU TV/VIDEO
SLEEP CC P.G. SAP
REPEAT
AUDIO
SUBTITLE
SETUP
ANGLE
INFO
DISC
Button
INFO
SLEEP
0~9
-/--
TV/VIDEO
PICURE
SOUND
VOL+
VOL-
CH+
CH-
Function
Standby on/off
Information
Sleep timing on/off
Number selection
Digit selection
Program reviewing
Signal source menu select/exit
Picture mode selection
Sound mode selection/exit
MENU Menu selection/exit
Choose the previous item
Choose the next item
Display the previous menu/item value decrease
Display the next menu/item value increase/Confirmation
Volume decrease
Volume increase
Program number increase
Program number decrease
Mute on/off
CC
P.G.
SAP
Select the closed caption mode
Enter the parental control
Select the mode Mono/Stereo/SAP
REPEAT
SUBTITLE
AUDIO
SETUP
ANGLE
DISC
ENTER
Open or close the disc tray
Stop playback
Start or pause playback
Skip to the previous
Skip to the next chapter
Backward scene with faster speed
Forward scene with faster speed
Cycle through the options: Chapter, Title, All or noting
Select a subtitle language of the playing disc
Select an audio lunguage or audio channel
Enter or exit the DVD player setup menu
Select Angle
Enter or enit the disc contents menu
Confirm an entry or selection.

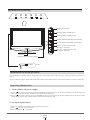
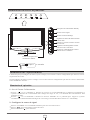
Illumination of panel key
Menu keystroke of display screen
Menu keystroke of signal source
Standby power switch
Indicator
Remote control receiving window
Decrease channel number/Menu item selection
1
5
Increase channel number/Menu item selection
Decrease volume/Decrease item
value/open sub-menu
Increase volume/increase item
value/open sub-menu
TV/VIDEO
MENU
VOL+
VOL-
POWER
CH+
CH-
Adapter
AC IN
Illumination on menu operation
Operating illumination
1. Turn on/Turn off power supply
User could preset channel, adjust image and sound, and conduct other adjustment by using operating keystrokes on
screen.
Or preset channel, adjust image and sound, and conduct other adjustment by using functional key on remote controller.
Press “ ” on (or press key of POWER on panel) to start system: Power indicator should change from
red to green, and the machine should be started several seconds later.
Press “ ”on remote control (or press POWER on panel) to finish playing: Power indicator on front panel should
change from green to red, and the machine should return standby state.
remote control
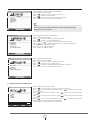
2. Set input signal source
Press “TV/VIDEO” on remote control to open source menu.
Press “ ” to select item of source.
Press “ENTER or ” to confirm

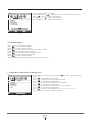
4 Channel option
5 Adjustment and control of image color
3 Automatic channel search
1
6
当 前 频 道
系 统
跳 跃
手 动 微 调
手 动 搜 台
自 动 搜 台
对 比 度
亮 度
色 饱 和 度
清 晰 度
色 调
Channel
Channel
System
Auto Search
Fine Tuning
Channel Edit
Video
Contrast
Brightness
Saturation
Sharpness
Hue
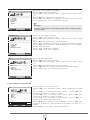
Select receiving state of TV signal.
Press “MENU” and “ ” to open TV “Channel” menu, shown as figure (a).
Press “ ” to select item of “Auto Search”
Press “Enter” or “ ” to start “Auto Search”.
Press “MEMU” to exit during auto searching.
Press “ ” to select item of “Channel”.
Press “ ” to select channel number.
Press “ ” to select item of “System”.
Press “ ” to select system of TV: STD→IRC→HRC→AIR.
Press “ ” to select item of “Fine Tuning”.
Press “ ” to repectedly until get best playing effect.
Press “ ” to select item of “Channel Edit”.
Press “ ” to select “Added/ Erased”.
Setting to ERASE, the channel will not selected by CH+/CH- key.
Press “MENU” to open menu, and press “ ”to select “Video”, shown as
figure (b).
Press “ ” to select item of “Contrast”
Press “ ” to increase or reduce value of contrast.
Press “ ” to select item of “Brightness”
Press “ ” to increase or decrease value of brightness.
Press “ ” to select item of “Saturation”.
Press “ ” to increase or decrease value of color saturation.
Press “ ” to select item of “Sharpness”.
Press “ ” to adjust level of Sharpness: 0→1→2→3→4→5→6→7
Press “MENU” to exit state of menu selection.
Access
STD
TV
Position
Menu:Exit
TV
Position
Menu:Exit
(a)
(b)

1
7
(d)
对 比 度
亮 度
色 饱 和 度
清 晰 度
色 温 选 择
(e)
(c)
对 比 度
亮 度
色 饱 和 度
清 晰 度
色 调
Video
Contrast
Brightness
Saturation
Sharpness
Hue
对 比 度
自 动 调 整
亮 度
清 晰 度
色 温 选 择
Auto Color
Contrast
Brightness
Color Temperature
音 量
低 音
高 音
平 衡
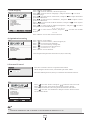
6. Adjustment of sound effect
Audio
Volume
Bass
Treble
Balance
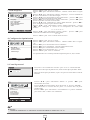
Under signal input state of AV and S-VIDEO,
Press “MENU” to open menu.
Press “ ” to select “Video”, shown as figure.( c )
Press “ ” to select item of “Hue”.
Press “ ” to decrease or increase value of color hue.
Press “MENU” to exit state of menu selection.
Under signal input state of Component
,
Press “MENU” to open menu.
Press “ ” to select “Video”, shown as figure (d).
Press “ ” to select “ Color Temperature”.
Press “Enter”or “ ” to enter into color temperature sub menu.
Press “ ” to select “Warrm/Standard/Cool”, and the compornent
will take effect currently on screen.
Press “Enter” or “ ” to confirm.
Press “Menu” to exit sub menu
Under signal input state of PC:
Press “MENU” to open menu.
Press “ ” to select “Video”, shown as figure (e).
Press “ ” to select item of “Auto Color”.
Press “ ” to achieve automatic adjustment effect of image.
Press “MENU” to exit state of menu selection.
Press “MENU” key to open menu.
Press “ ” to select menu of “Audio”, shown as figure (f).
Press “ ” to select item of “Volume”, press “ ” to increase or decrease
value of volume.
Press “ ” to select item of “Bass”, press “ ” to increase or decrease value
of volume.
Press “ ” to select item of Treble”, press “ ” to increase or decrease value
of volume.
Press “ ” to select item of “Balance”, press “ ” to increase or decrease
balance effect of left and right sound channel.
Press “MENU” to exit state of menu selection.
Position
Menu:Exit
AV
Position
Menu:Exit
Contrast
Brightness
Saturation
Sharpness
Color Temperature
Video
Compornent
PC
Video
TV
Position
Menu:Exit
Access Position
Menu:Exit
4
Note:
Item of color hue should be adjustable while displaying in high
brightness in state of NTSC.

1
8
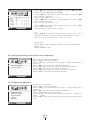
7 OSD Property
Selection: “H.Position” and “V.Position” is uncontrollable if “Menu size” is “2”.
Note:
语 言 选 择
水 平 位 置
垂 直 位 置
菜 单 时 间
透 明 度
菜 单 大 小
T V
Setup
Language
H.Position
V.Position
Menu Timeout
Menu Transparent
Zoom
(g)
8 Optimization setting
(h)
复 位
信 号 选 择
定 时 设 置
图 像 比 率
A V
Others
Press “MENU” to open menu.
Press “ ” to select “SETUP”, shown as figure (G).
Press “ ” to select item of “Language”, and press “Enter or ” to select
item of language.
Press “ ” to select item of “H.Position”, and press “ ” to adjust horizontal
position of OSD menu.
Press “ ” to select item of “V.Position”, and press “ ” to adjust vertical
position of OSD menu.
Press “ ” to select item of “Menu Timeout”, and press “ ” to set sojourn
time of OSD menu.
Press “ ” to select item of “Menu Transparent”, and press “ ” to select
transparence level of OSD menu as:
0→1→2→3→4→5
Press “ ” to select item of “Zoom”, and press “ ” to select size of OSD
menu as:
*1→*2
Press “MENU” to exit state of menu selection.
Press “MENU” to open menu.
Press “ ” to select “Others”, shown as figure (h).
Press “ ” to select item of “Default”.
Press “ ” to reset to factory setting state.
Press “ ” to select item of “Picture size”
Press “ ” to select “4:3”, “16:9”
Press “MENU” to exit submenu.
Pos. Enter:Access
Menu:Exit
Position
Menu:Exit
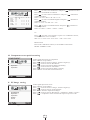
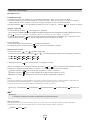
Press P.G. on renote control. to open Parental Control
When doing this for first time, enter default password “0000”
Enter the default password, then you could enter the Parental Control.
Press” ”to select “New password” and press “Enter” button,
enter new password twice, the new password will now take effect.
Press” ”to select “Status” and press “ ” button to select on or off.
Press” ”to select “TV Guidelines” and press “Enter” button to enter
TV Guidelines menu.
9 Parental Control
Password
Please Enter Password
自 动 调 整
水 平 位 置
垂 直 位 置
相 位
时 钟 频 率
TV
Parental Control
Status
New Password
TV Guidelines
Movie Guidelines
Canadian English
Canadian French
OFF
Access Position
Menu:Exit
Closed caption and parental control for TV,AV,S-video only.
Default
Closed Caption
Parental Control
Picture size

自 动 调 整
水 平 位 置
垂 直 位 置
相 位
时 钟 频 率
TV
TV Guidelines
Position
Menu:Exit
TV-Y
TV-Y7
TV-G
TV-PG
TV-14
TV-MA
ALL FV D L S V
1
9
Press ”to select “ ” and press “ ” buttonto to enter.
Press menu to set Block or Unblock.
“ TV Guidelines
Press ”to select “ ” and press “ ” buttonto to
confirm operation.
None .G .PG PG13 .R NC17 .X
“ Movie Guidelines
→ → → → → →
Press ”to select “ ” and press “ ” buttonto to
confirm operation.
None C C8+ G PG 14+ 18+
“ Canadian English
→ → → → → →
Press ”to select “ ” and press “ ” buttonto to
confirm operation.
None G 8ans+ 13ans+ 16ans+ 18ans+
“ Canadian French
→ → → → →
Press“ ” to select “Clse Caption” or p “ Remote control
to select different CC or TT status.
OFF CC1 CC2 CC3 CC4 TT1 TT2 TT3 TT4
ress CC” on ,
→ → → → → → → →
CC
Press SAP” on , to select BTSC sound status.
MONO STEREO SAP
“ Remote control
→ →
BTSC Sound
(i)
自 动 调 整
水 平 位 置
垂 直 位 置
相 位
时 钟 频 率
COMPONENT
Image
Hposition
Vposition
Under signal input state of Component:
Press “MENU” to open menu.
Press “ ” to select menu of “Image”, shown as figure (I).
Press “ ” to select item of “H.Position”.
Press “ ” to move position of image horizontally.
Press “ ” to select item of “V.Position”.
Press “ ” to move position of image vertically.
Press “MENU” to exit state of menu selection.
Position
Menu:Exit
10 Component screen position setting
Under signal input state of PC:
Press “MENU” to open menu.
Press “ ” to select menu of “Image”, shown as figure (I).
Press “ ” to select item of “Auto Settingn”.
Press “Enter” button to adjust Auto image.
Press “ ” to select item of “H.Position”,“V.Position”,“Phase”,“Clock”.
Press “ ” to adjust the value of each item respectively from 1-100
自 动 调 整
水 平 位 置
垂 直 位 置
相 位
时 钟 频 率
PC
Image
Auto Setting
Hposition
Vposition
Phase
Clock
Position
Menu:Exit
B
B
U
U
U
U
B
U
U
U
U
U
U
U
U
U
U
U
U
U
U
U
U
11 PC Image setting
(j)

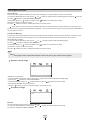
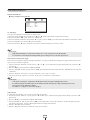
DVD Player function
DVD Operations
Basic TV/VIDEO
1.Press the TV/VIDEO button on the remote control to turn to DVD source.
2.Insert your chosen disc into the disc slot on the side panel. Be sure to face the button of the disc .
Toward the front of the screen. Unit will load the disc and play automatically.
3.Press the Eject “ ” button on the remote control or side control TV use “ ” key to remove the disc.
Stop Playback
1.Press the Stop“ ”button to stop playback.
At this time the DVD video player stops playback temporary and maintains the current playback position.
If “ ”button is pressed, playback will resume from the location where you stopped playback.
2.Press the Stop“ ”button again to stop playback fully. (At this time if you press Play/Pause“ ”button,
the disc playback starts from the beginning.)
Pause Playback
1.Press the Play/Pause“ ”button during playback.
2.Press the Play/Pause“ ”button again to return to normal playback.
Fast Forward/Backward
1.Press the“ ” or “ ”button during playback.
Each time you press the“ ”or“ ”button, the playback speed changes as shown.
2.Press the to resume normal playback.“ ”
Skip a Chapter or a Track, Press the Skip button or Skip button to locate to desired chapter during
playback. Each time you press the button, a chapter or track is skipped.
Press the “ ”button to locate succeeding chapters or tracks.
Press the “ ”button to go back to the beginning of the current chapter or track.
Press the “ ” button twice in quick succession, playback will start.
“ ” “ ”
INFO
You can display the playback status on the TV screen as follows: Title, Chapter number, Playing time.
Press the INFO button during DVD playback. Title and Chapter information appears on the screen.
Each time you press the INFO button, the OSD changes as follows.
Note:
The OSD display may be different depending on the type of DVD disc.
Repeat playback
You can play a specific track repeatedly. Press the Repeat button during playback.
Each time you press the Repeat button, the repeat mode changes as follows.
“ ”
2x
4x
8x 16x
32x
“ ”
2x
4x
8x 16x
32x
DISPLAY: Title Elapsed Title Remain Chapter Elapsed Chapter Remain Display Off
Chapter Title All
1
10

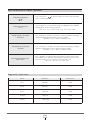
DVD Player function
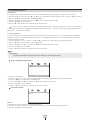
DVD Menu Options
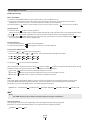
General Setup Page
TV Display
You can watch TV in various picture formats.
1.Press the button, then press or button to select General Setup page.SETUP “ ” “ ”
2.Press buttons to TV DISPLAY.“ ” enter
3.Press the button or button and then press buttons to select Normal/Ps,“Enter ” “ ” “ ”
Normal/Lb, Wide.
4.Press the or button to confirm.“Enter” “ ”
5.Press button to return or SETUP button to exit this menu.“ ”
Note:
Depending on the disc, the TV screen feature may not be available.
The functions is only available for the disc with 16:9 signal format.
Selecting angle mark
If the scene was recorded from multiple angles, you can easily change the camera angles of the scene
you are currently watching.
1.Press the SETUP button, then press“ ”or“ ”button to select General Setup page,and press“ ”to enter
2.Press“ ”buttons to select ANGLE MARK.
3.Press the“Enter”or“ ”button and then use“ ”buttons to select ON or OFF.press“Enter” again to confirm.
4.Press“ ”button to return or SETUP button to exit this menu.
5.Repeatedly press the Angle button to select the desired angle.
Note:
You can only change the angle for DVDs that provide multiple angles of scenes.
The angle function will not work on DVD video discs that do not contain scenes recorded at
different angles.
The number of angles varies from disc to disc.
OSD Language
The on-screen display can be shown on the screen in your specified language.
1.Press the SETUP button, then press“ ”or“ ”button to select General Setup page,and press“ ” to enter
2.Press“ ”buttons to select OSD LANGUAGE.
3.Press the“Enter”or“ ”button and then use“ ”buttons to select your desired language, such as English,
French and Spanish and Portuguese. All the on-screen displays will appear in the selected language.
4.Press“Enter”button to confirm.
5.Press“ ”button to return or SETUP button to exit this menu.
- - General Setup Page - -
Go To General Setup Page
TV Di splay
Ang le Mark
Osd L ang
Scr een Sav er
Las t Memor y
Lb
On
Eng
On
On
1
11

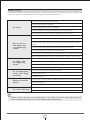
DVD Player function
Screen Saver
The screen saver appears when you leave the DVD player in stop mode for about 15 seconds.
1.Press the SETUP button, then press“ ”or“ ”button to select General Setup page,and press“ ”to enter
2.Press“ ”buttons to select SCREEN SAVER.
3.Press the“Enter”or“ ”button and then use“ ”buttons to select ON or OFF.
4.Press the“Enter” button to confirm.
5.Press“ ”button to return or SETUP button to exit this menu.
If you pause or stop a picture of a DVD video disc and leave it still for approximately 15 seconds, the
screen saver of the player automatically appears. To turn off the screen saver, press any button related DVD
on the remote control.
Last Scene Memory
This player memorizes last scene from the last disc that is viewed. The last scene remains in memory even
if you remove the disc from the player. If you load a disc that has the scene memorized, the scene is
automatically recalled.
1.Press the SETUP button, then press“ ”or“ ” button to select General Setup page.
2.Press“ ” buttons to select LAST MEMORY.
3.Press the“Enter”or“ ”button and then use“ ”buttons to select ON or OFF.
4.Press the “Enter” button to confirm.
5.Press“ ”button to return or SETUP button to exit this menu.
Note:
This player does not memorized the scene of a disc if you switch off the player.
Speaker Setup Page
Selection of Down Mix
1.Press the SETUP button, then press“ ”or“ ”button to select Speaker Setup page.
2.Press use“ ”buttons to select DOWN MIX.
3.Press the“Enter”button or“ ”button and then press“ ”buttons to select LT/RT.
4.Press the “ENTER” button to confirm
5.Press“ ”button to return or SETUP button to exit this menu.
Preference Page
Default
Use to reset the player back to factory settings.
1.Press the SETUP button, then press“ ”or“ ” button to select Preference Page.
2.Press the “ENTER” button to RESET.
- - Speaker Setup Page - -
Go To Speaker Setup Page
Dow nmix
- - Preference Page - -
Go To Preference Page
Def ault
1
12

1
13
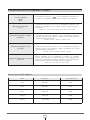
Image mode selection
(Picture)
Sound mode selection
(Sound)
Setting of closing time
(SLEEP)
Playback channel
( )
Shortcut function
(CC)
Special function of remote controller
VGA
640×480 60Hz
SVGA
800×600 60Hz
XGA
1024×768 60Hz
WXGA
1280×768
60Hz
Support PC signal input
SXGA
1280×1024
60Hz
OFF CC1 CC2 CC3 CC4 TT1 TT2 TT3 TT4→ → → → → → → →
User could press “ ” on to return to last program
while watching program.
remote control
User could press “CC” on to
information while watching program.
remote control display close capaion
User could press “Picture” on repeatedly to display
image with different effect while watching program.
Standard →User → Movie → Drama→ DV
remote control
User could press “Sound” on repeatedly to display
different sound effect on screen while watching program
→User → Movie → Music→ News
remote control
Standard
Press “SLEEP” on repeatedly to select closing time,
for example: close machine automatically 10 minutes later if 10 is
selected, of which “Close” denotes no closing time is set.
Off →10 →20 →30 →60 →90→120
remote control
Mode
Definition Refresh rate

1
14
No raster
Check if power switch is turned on
Turn off main power supply and start up machine two minutes later
Check if direction, position, and connection of antenna is temperate
Check if signal is disturbing under current playing state
Check if power voltage of the machine and signal source are steady
Check if grounding of signal line is in good condition
Check if there is a certain building that maybe reflect broadcast wave in environment of your family
Check if power line is connected well
Check if switch of main power supply or key of standby is opened
Check if signal source output is normal under current playing state
Check if setting of brightness of picture, contrast and volume are set correctly
Check if accompanying sound input is normal
Check volume setting
Check mute setting
Che ck contact, polarity of battery deposited in remot e controller or replace batteries
Check if there is a barrier between emitter window of and receiver
window of the machine
remote control
Check if the machine is in state of standby
Check if signal source output is normal under current playing state
No color with image
Check color setting
Check if signal source output is normal under current playing state
Clean emitter window of and receiver window of the machineremote control
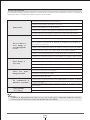
Failure analysis
Check if power supply is connected well
Note:
For abnormal condition occurring during operation, please perform inspection according to following condition, and
contact after-sale service department if abnormal condition has not be eliminated yet.
D i s t u r b a n c e
with image and
accompanying
sound
No image and
accompanying
sound
No accompanying
sound, but image
is normal
Remote controller
failure
Check if disturbance is sent out from electric application around the
machine (please adjust position of antenna to decrease disturbance to lower
degree)
(Please adopt high-direction, high-sensitivity antenna to improve picture quality)
Please contact after-sale service department if no effect occur after performed inspection
abovementioned. Do not open rear cover of machine without authorization.

1
15
Maintenance
For safety reason, please shut down main power supply, and then pull out power plug and various signal plugs of the machine.
Cleanness of screen
Refer to “Application precautions”.
Suggestion feedback
Please apprize your suggestion on the machine to us so that designer of us could improve function of machine so much the better.
Product recommendation
MEMO
My MEMO
Note:
The actual machine may vary from operation manual.
Please read the manual carefully and keep it well for
Thanks for your application!
Please apprize the special function and feature of the machine to your friends to share happiness brought from high
technology audio-visual equipment.
It is used for recording individual memo, as well as recording any rationalization proposals relating to the machine
momentarily. User could fill these proposals into “Suggestion feedback Sheet” provided during visiting tech support
of our Company so that we can treat it in time.
future possible direction.
Page is loading ...
Page is loading ...
Page is loading ...
Page is loading ...
Page is loading ...
Page is loading ...
Page is loading ...
Page is loading ...
Page is loading ...
Page is loading ...
Page is loading ...
Page is loading ...
Page is loading ...
Page is loading ...
Page is loading ...
Page is loading ...
Page is loading ...
Page is loading ...
Page is loading ...
Page is loading ...
-
 1
1
-
 2
2
-
 3
3
-
 4
4
-
 5
5
-
 6
6
-
 7
7
-
 8
8
-
 9
9
-
 10
10
-
 11
11
-
 12
12
-
 13
13
-
 14
14
-
 15
15
-
 16
16
-
 17
17
-
 18
18
-
 19
19
-
 20
20
-
 21
21
-
 22
22
-
 23
23
-
 24
24
-
 25
25
-
 26
26
-
 27
27
-
 28
28
-
 29
29
-
 30
30
-
 31
31
-
 32
32
-
 33
33
-
 34
34
-
 35
35
-
 36
36
-
 37
37
-
 38
38


Ask a question and I''ll find the answer in the document
Finding information in a document is now easier with AI
in other languages
- français: Curtis LCDVD152 Manuel utilisateur