LG ARNU12GVEA2 User manual
- Category
- Split-system air conditioners
- Type
- User manual
This manual is also suitable for

www.lg.com
OWNER’S MANUAL
AIR CONDITIONER
Please read this manual carefully before operating
your set and retain it for future reference.
TYPE : Convertible
P/NO : MFL67870208
ENGLISH ITALIANO ESPAÑOL
FRANÇAIS DEUTSCH
ΕΛΛΗΝΙΚΆ
ČEŠTINA
NEDERLANDS
POLSKI
LIMBA ROMÂNĂ
PORTUGUESE
MAGYAR
БЪЛГАРСKN
SRPSKI
HRVATSKI SVENDKA
NORSK
SUOMI
DANSK

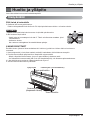
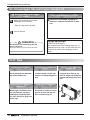
2 Indoor Unit
Convertible Type Indoor Unit Owner’s Manual
TABLE OF CONTENTS
FOR YOUR RECORDS
Write the model and serial numbers here:
Model #
Serial #
You can find them on a label on the side of each unit.
Dealer's Name
Date Purchased
■ Staple your receipt to this page in the event you need
to prove date of purchase or to issue warranty.
READ THIS MANUAL
Inside you will find many helpful hints on how to use and
maintain your air conditioner properly. Just a little preven-
tive care on your part can save you a great deal of time
and money over the life of your air conditioner.
You'll find many answers to common problems in the
chart of troubleshooting tips. If you review our chart of
Troubleshooting Tips first, you may not need to call for
service at all.
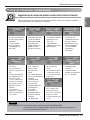
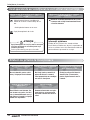
PRECAUTION
• Contact the authorized service technician for repair or
maintenance of this unit.
• Contact the installer for installation of this unit.
• The air conditioner is not intended for use by young chil-
dren or invalids without supervision.
• Young children should be supervised to ensure that they
do not play with the air conditioner.
• When the power cord is to be replaced, replacement work
shall be performed by authorized personnel only using
only genuine replacement parts.
• Installation work must be performed in accordance with
the National Electric Code by qualified and authorized
personnel only.
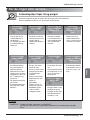
Safety Precautions.................3
Prior to Operation ..................6
Operating Instructions...........7
Name and function of wired re-
mote controller(Accessory)
......7
Maintenance and Service ......9
Before you Call for
Service ................................11

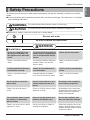
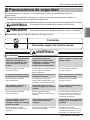
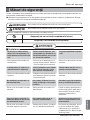
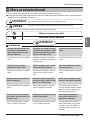
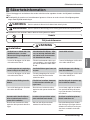
Safety Precautions
Safety Precautions
To prevent injury to the user or other people and property damage, the following instructions must be fol-
lowed.
■ Incorrect operation due to ignoring instruction will cause harm or damage. The seriousness is classified
by the following indications.
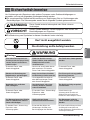
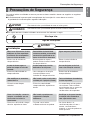
WARNING
CAUTION
This symbol indicates the possibility of death or serious injury.
This symbol indicates the possibility of injury or damage to properties only.
■ Meanings of symbols used in this manual are as shown below.
Be sure not to do.
Be sure to follow the instruction.
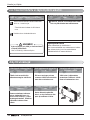
WARNING
■ Installation
Do not use a defective or un-
derrated circuit breaker. Use
this appliance on a dedicated
circuit.
• There is risk of fire or electric
shock.
For electrical work, contact the
dealer, seller, a qualified electri-
cian, or an Authorized Service
Center.
• Do not disassemble or repair the
product. There is risk of fire or
electric shock.
Always ground the product.
• There is risk of fire or electric
shock.
Install the panel and the cover
of control box securely.
• There is risk of fire or electric
shock.
Always install a dedicated cir-
cuit and breaker.
• Improper wiring or installation
may cause fire or electric shock
Use the correctly rated breaker
or fuse.
• There is risk of fire or electric
shock.
Do not modify or extend the
power cable.
• There is risk of fire or electric
shock.
Do not install, remove, or re-in-
stall the unit by yourself (cus-
tomer).
• There is risk of fire, electric shock,
explosion, or injury.
Be cautious when unpacking
and installing the product.
• Sharp edges could cause injury.
Be especially careful of the case
edges and the fins on the con-
denser and evaporator.
For installation, always contact
the dealer or an Authorized
Service Center.
• There is risk of fire, electric shock,
explosion, or injury.
Do not install the product on a
defective installation stand.
• It may cause injury, accident, or
damage to the product.
Be sure the installation area
does not deteriorate with age.
• If the base collapses, the air con-
ditioner could fall with it, causing
property damage, product failure,
and personal injury.
Owner’s Manual 3
ENGLISH

Safety Precautions
4 Indoor Unit
Do not allow water to run into
electric parts.
• It may cause There is risk of fire,
failure of the product, or electric
shock.
Do not store or use flammable
gas or combustibles near the
product.
• There is risk of fire or failure of
product.
Do not use the product in a
tightly closed space for a long
time.
• Oxygen deficiency could occur.
When flammable gas leaks,
turn off the gas and open a win-
dow for ventilation before turn
the product on.
• Do not use the telephone or turn
switches on or off.
There is risk of explosion or fire
If strange sounds, or small or
smoke comes from product.
Turn the breaker off or discon-
nect the power supply cable.
• There is risk of electric shock or
fire.
Stop operation and close the
window in storm or hurricane.
If possible, remove the product
from the window before the
hurricane arrives.
• There is risk of property damage,
failure of product, or electric
shock.
Do not open the inlet grill of the
product during operation.
(Do not touch the electrostatic
filter, if the unit is so equipped.)
• There is risk of physical injury,
electric shock, or product failure.
When the product is soaked
(flooded or submerged), con-
tact an Authorized Service Cen-
ter.
• There is risk of fire or electric
shock.
Be cautious that water could
not enter the product.
• There is risk of fire, electric shock,
or product damage.
Ventilate the product from time to time when op-
erating it together with a stove, etc.
• There is risk of fire or electric shock.
Turn the main power off when cleaning or main-
taining the product.
• There is risk of electric shock.
■ Operation
Do not plug or unplug the
power supply plug during oper-
ation.
• There is risk of fire or electric
shock.
Do not touch(operate) the prod-
uct with wet hands.
• There is risk of fire or electrical
shock.
Do not place a heater or other
appliances near the power
cable.
• There is risk of fire and electric
shock.
Do not let the air conditioner
run for a long time when the
humidity is very high and a
door or a window is left open.
• Moisture may condense and wet
or damage furniture.
Take care to ensure that power
cable could not be pulled out or
damaged during operation.
• There is risk of fire or electric
shock.
Do not place anything on the
power cable.
• There is risk of fire or electric
shock.
When the product is not be used for a long time,
disconnect the power supply plug or turn off the
breaker.
• There is risk of product damage or failure, or unin-
tended operation.
Take care to ensure that nobody could step on or
fall onto the outdoor unit.
• This could result in personal injury and product dam-
age.

Safety Precautions
■ Installation
CAUTION
Always check for gas (refrigerant) leakage
after installation or repair of product.
• Low refrigerant levels may
cause failure of product.
Install the drain hose to ensure that
water is drained away properly.
• A bad connection may cause
water leakage.
Keep level even when installing
the product.
• To avoid vibration or water leak-
age.
■ Operation
Do not install the product where the noise
or hot air from the outdoor unit could
damage the neighborhoods.
• It may cause a problem for your
neighbors.
Use two or more people to lift and
transport the product.
• Avoid personal injury.
Do not install the product where
it will be exposed to sea wind
(salt spray) directly.
•
It may cause corrosion on the product.
Corrosion, particularly on the condenser
and evaporator fins, could cause product
malfunction or inefficient operation
.
Do not expose the skin directly
to cool air for long periods of
time. (Don't sit in the draft.)
• This could harm to your health.
Do not use the product for special pur-
poses, such as preserving foods, works of
art, etc. It is a consumer air conditioner, not
a precision refrigeration system.
•
There is risk of damage or loss of property.
Do not block the inlet or outlet
of air flow.
• It may cause product failure.
Use a soft cloth to clean. Do
not use harsh detergents, sol-
vents, etc.
• There is risk of fire, electric
shock, or damage to the plastic
parts of the product.
Do not touch the metal parts of the
product when removing the air fil-
ter. They are very sharp!
• There is risk of personal injury.
Do not step on or put anyting
on the product. (outdoor units)
• There is risk of personal injury
and failure of product.
Always insert the filter securely.
Clean the filter every two weeks
or more often if necessary.
• A dirty filter reduces the efficiency of
the air conditioner and could cause
product malfunction or damage.
Do not insert hands or other objects
through the air inlet or outlet while the
product is operated.
• There are sharp and moving parts
that could cause personal injury.
Do not drink the water drained
from the product.
• It is not sanitary and could cause
serious health issues.
If the liquid from the batteries gets onto your skin
or clothes, wash it well with clean water. Do not
use the remote if the batteries have leaked.
• The chemicals in batteries could cause burns or
other health hazards.
If you eat the liquid from the batteries, brush your
teeth and see doctor. Do not use the remote if the
batteries have leaked.
• The chemicals in batteries could cause burns or
other health hazards.
Use a firm stool or ladder when
cleaning or maintaining the
product.
•
Be careful and avoid personal injury.
Replace the all batteries in the re-
mote control with new ones of the
same type. Do not mix old and new
batteries or different types of bat-
teries.
• There is risk of fire or explosion
Do not recharge or disassem-
ble the batteries.
Do not dispose of batteries in a
fire.
• They may burn or explode.
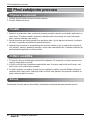
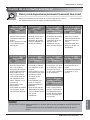
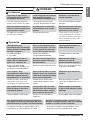
COOLING MODE
OPERATING TEMPERATURE(°C)
INDOOR OUTDOOR
MAX. MIN. MAX. MIN.
32°C
21°
C
43
°C
21°
C
HEATING MODE
INDOOR OUTDOOR
MAX. MIN. MAX. MIN.
27°C
20°
C
24°
C
1°
C
Owner’s Manual 5
ENGLISH

Prior to operation
6 Indoor Unit
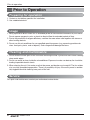
Prior to Operation
1. Contact an installation specialist for installation.
2. Use a dedicated circuit.
1. Being exposed to direct airflow for an extended period of time could be hazardous to your health.
Do not expose occupants, pets, or plants to direct airflow for extended periods of time.
2. Due to the possibility of oxygen deficiency, ventilate the room when used together with stoves or
other heating devices.
3. Do not use this air conditioner for non-specified special purposes (e.g. preserving precision de-
vices, food, pets, plants, and art objects). Such usage could damage the items.
1. Do not touch the metal parts of the unit when removing the filter. Injuries can occur when handling
sharp metal edges.
2. Do not use water to clean inside the air conditioner. Exposure to water can destroy the insulation,
leading to possible electric shock.
3. When cleaning the unit, first make sure that the power and breaker are turned off. The fan rotates
at a very high speed during operation. There is a possibility of injury if the unit’s power is acciden-
tally triggered on while cleaning inner parts of the unit.
For repair and maintenance, contact your authorized service dealer.
Preparing for operation
Usage
Cleaning and maintenance
Service

Operating Instructions
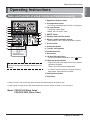
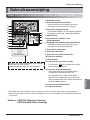
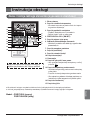
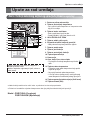
Operating Instructions
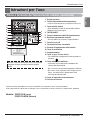
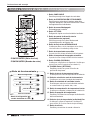
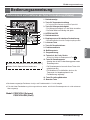
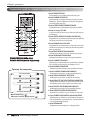
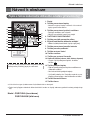
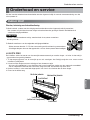
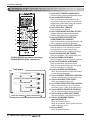
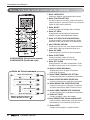
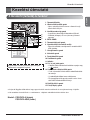
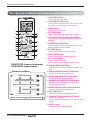
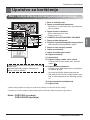
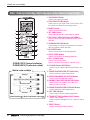
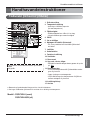
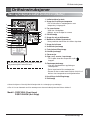
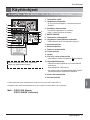
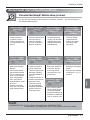
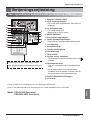
Name and function of wired remote controller(Accessory)
1
4
5
7
11
10
9
8
2
3
6
13
12
Please attach the inform label inside of the door.
Please choose proper language depend on your
country.
14
15
※ Some functions may not be operated and displayed depending on the product type.
※ It will display strange value to the room temperature if wired remote controller is not connected.
Model : PQRCVSL0 (Black Color)
PQRCVSL0QW (White Color)
1. Operation indication screen
2. Set temperature button
•
It will set not room temperature but outlet air temperature.
3. Fan speed button
• Fan Speed have 3 Steps.
• Middle and Low step is same
4. ON/OFF button
5. Opration mode selection button
6. Wireless remote controller receiver
• Some products don't receive the wireless signals.
7. Air flow button
8. Subfunction button
9. Function setting button
10. Ventilation button
11. Reservation
12. Up,down,left,right button
• To check the indoor temperature, press button.
13. Room temperature button
• Displays only the room temperature of the remote
controller perception.
• There is no control of room temperature.
• In case of fresh air intake unit, displays only the
temperature around remote controller.
14. Setting/Cancel button
15. Exit button
Owner’s Manual 7
ENGLISH

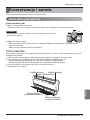
Operating Instructions
8 Indoor Unit
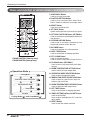
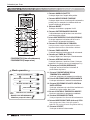
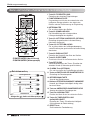
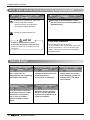
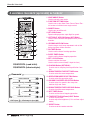
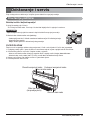
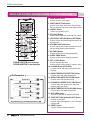
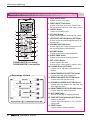
Name and function of wired remote controller(Optional)
Cooling Mode
Auto Mode or Auto Changeover
Dehumidification mode
Heating Mode
Fan Mode
• Cooling Model( ), Heat Pump Model( )
Operation Mode
2
3
4
1
5
9
7
6
8
10
12
13
14
15
17
16
11
1. VANE ANGLE Button
Used to set each vane angle.
2. FUNCTION SETTING Button
Used to set or clear Auto Clean, Smart Clean,
Electric heater or Individual vane angle control.
3. ON/OFF Button
Used to turn on/off the unit.
4. JET COOL Button
Speed cooling operates super high fan speed.
5. LEFT/RIGHT AIRFLOW Button (OPTIONAL)
Used to set the desired left/right(horizontal) air-
flow direction.
6. UP/DOWN AIRFLOW Button
Used to stop or start louver movement and set
the desired up/down airflow direction.
7. ON TIMER Button
Used to set the time of starting operation.
8. SLEEP TIMER Button
Used to set the time of sleeping operation.
9. SET / CLEAR Button
Used to set/clear the timer.
Used to set the current time(if it input for 3sec.)
10. PLASMA Button (OPTIONAL)
Used to start or stop the plasma-purification
function.
11. ROOM TEMPERATURE SETTING Button
Used to select the room temperature.
12. OPERATION MODE SELECTION Button
Used to select the operation mode.
13. INDOOR FAN SPEED SELECTION Button
Used to select fan speed in four steps low,
medium, high and chaos.
14. ROOM TEMPERATURE CHECKING Button
Used to check the room temperature.
15. OFF TIMER Button
Used to set the time of stopping operation.
16. TIMER SETTING(Up/Down)/LIGHT Button
Used to set the timer.
Used to adjust the brightness.(if it is not time
adjust mode)
17. RESET Button
Used to reset the remote controller.
PQWRCQ0FDB (Cooling only)
PQWRHQ0FDB (Heat pump)

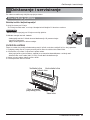
Maintenance and Service
Owner’s Manual 9
ENGLISH
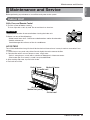
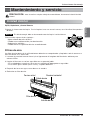
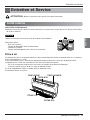
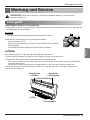
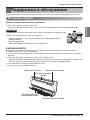
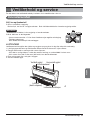
Maintenance and Service
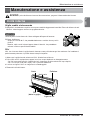
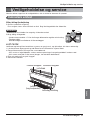
Indoor Unit
Before performing any maintenance, turn off the main power to the system.
Grille, Case, and Remote Control
❏ Turn the system off before cleaning.
To clean, wipe with a soft, dry cloth. Do not use bleach or abrasives.
: Supply power must be disconnected before cleaning the indoor unit.
NOTICE
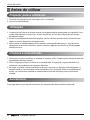
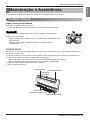
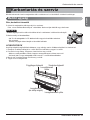
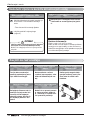
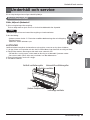
AIR FILTERS
The air filters behind the front grille should be checked and cleaned once in every 2 weeks or more often if nec-
cessary.
1. Lift the front access panel and pull the filter tab slightly forward to remove the filter.
2. Clean the filter with a vacuum cleaner or warm, soapy water.
• If dirt is conspicuous, wash with a solution of detergent in lukewarm water.
• If hot water (40°C or more) is used, it may be deformed.
3. After washing with water, dry well in the shade.
4. Re-install the air filter.
❏
Never use any of the followings:
• Water hotter than 40°C. Could cause deformation and/or discoloration.
• Volatile substances
Could damage the surfaces of the air conditioner.
Air filters
(behind front panel)
Air outlet vent
Vertical louver Horizontal louver
Air inlet vent
G
a
s
o
l
i
n
e
P
o
w
d
e
r

CAUTION
CAUTION
Clean the air filter regularly.
Blockages in the air filter re-
duce the airflow and lower
cooling and dehumidifying ef-
fects. Clean at least once
every two weeks.
Ventilate the room occasion-
ally.
Since windows are kept
closed, it is a good idea to
open them and ventilate the
room now and then.
Maintenance and Service
10 Indoor Unit
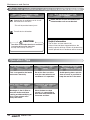
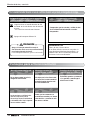
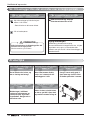
When the air conditioner is not going to be used for a long time.
Operation Tips
Helpful information
The air filters and your electiric bill.
If the air filters become clogged with dust, the
cooling capacity will drop, and 6% of the electricity
used to operate the air conditioner will be wasted.
When it is not going to be used for
a long time.
When the air conditioner is to
be used again.
Operate the air conditioner on Air circula-
tion mode for 2 to 3 hours.
• This will dry out the internal parts.
Turn off the circuit breaker.
Turn off the circuit breaker when the air conditioner
is not going to be used for a long time.
Dirt may collect and may cause a fire.
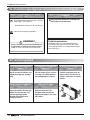
✐ Check that the air inlet and outlet of the
indoor/outdoor unit are not blocked.
Do not overcool the room.
This is not good for the health
and wastes electricity.
Keep blinds or curtains
closed.
Do not let direct sunshine
enter the room when the air
conditioner is in operation.
Make sure that the doors
and windows are shut tight.
Avoid opening doors and win-
dows as much as possible to
keep the cool air in the room.

?
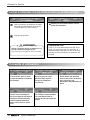
Maintenance and Service
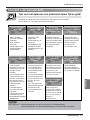
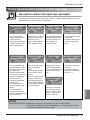
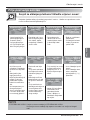
Before you call for service...
Check the following points before requesting repairs or service.... If the malfunction persists,
please contact your dealer.
Troubleshooting Tips! Save time and money!
• Have you made a mis-
take in timer operation?
• Has the fuse blown or
has the circuit breaker
been tripped?
• Check that this is not a
damp smell exuded by
the walls, carpet, furni-
ture or cloth items in
the room.
• Condensation occurs
when the airflow from
the air conditioner
cools the warm room
air.
• This is the protector of
the mechanism.
• Wait about three min-
utes and operation will
begin.
The air conditioner
does not operate.
The room has a pecu-
liar odor.
It seems that conden-
sation is leaking from
the air conditioner.
Air conditioner does
not operate for about 3
minutes when restart.
Does not cool or heat
effectively.
The air conditioner op-
eration is noisy.
Crack sound is heard. Remote control display
is faint, or no display
at all.
• Is the air filter dirty?
See air filter cleaning
instructions.
• The room may have
been very hot when the
room air conditioner
was first turned on.
Allow time for it to cool
down.
• Has the temperature
been set incorrectly?
• Are the indoor unit's air
inlet or outlet vents ob-
structed?
• For a noise that sounds
like water flowing.
-This is the sound of
freon flowing inside the
air conditioner unit.
• For a noise that sounds
like the compressed air
releasing into atmos-
phere.
-This is the sound of
the dehumidifying
water being processed
inside the air condition-
ing unit.
• This sound is generated
by the expansion/ con-
striction of the front
panel, etc. due to
changes of temperature.
• Cleaning the filter,
press the Timer button
and ◀ button of wired
remote controller at the
same time for 3 sec.
• Are the batteries de-
pleted?
• Are the batteries in-
serted in the opposite
(+) and (-) directions?
WATER RESISTANT: The outdoor side of this appliance is WATER RESISTANT.
The indoor side is not water resistant and should not be exposed to ex-
cess water.
NOTICE
Filter sign lamp
(LED) is ON.
Owner’s Manual 11
ENGLISH

Memo
12 Indoor Unit
Page is loading ...
Page is loading ...
Page is loading ...
Page is loading ...
Page is loading ...
Page is loading ...
Page is loading ...
Page is loading ...
Page is loading ...
Page is loading ...
Page is loading ...
Page is loading ...
Page is loading ...
Page is loading ...
Page is loading ...
Page is loading ...
Page is loading ...
Page is loading ...
Page is loading ...
Page is loading ...
Page is loading ...
Page is loading ...
Page is loading ...
Page is loading ...
Page is loading ...
Page is loading ...
Page is loading ...
Page is loading ...
Page is loading ...
Page is loading ...
Page is loading ...
Page is loading ...
Page is loading ...
Page is loading ...
Page is loading ...
Page is loading ...
Page is loading ...
Page is loading ...
Page is loading ...
Page is loading ...
Page is loading ...
Page is loading ...
Page is loading ...
Page is loading ...
Page is loading ...
Page is loading ...
Page is loading ...
Page is loading ...
Page is loading ...
Page is loading ...
Page is loading ...
Page is loading ...
Page is loading ...
Page is loading ...
Page is loading ...
Page is loading ...
Page is loading ...
Page is loading ...
Page is loading ...
Page is loading ...
Page is loading ...
Page is loading ...
Page is loading ...
Page is loading ...
Page is loading ...
Page is loading ...
Page is loading ...
Page is loading ...
Page is loading ...
Page is loading ...
Page is loading ...
Page is loading ...
Page is loading ...
Page is loading ...
Page is loading ...
Page is loading ...
Page is loading ...
Page is loading ...
Page is loading ...
Page is loading ...
Page is loading ...
Page is loading ...
Page is loading ...
Page is loading ...
Page is loading ...
Page is loading ...
Page is loading ...
Page is loading ...
Page is loading ...
Page is loading ...
Page is loading ...
Page is loading ...
Page is loading ...
Page is loading ...
Page is loading ...
Page is loading ...
Page is loading ...
Page is loading ...
Page is loading ...
Page is loading ...
Page is loading ...
Page is loading ...
Page is loading ...
Page is loading ...
Page is loading ...
Page is loading ...
Page is loading ...
Page is loading ...
Page is loading ...
Page is loading ...
Page is loading ...
Page is loading ...
Page is loading ...
Page is loading ...
Page is loading ...
Page is loading ...
Page is loading ...
Page is loading ...
Page is loading ...
Page is loading ...
Page is loading ...
Page is loading ...
Page is loading ...
Page is loading ...
Page is loading ...
Page is loading ...
Page is loading ...

8 beltéri egység
Kezelési útmutató
A vezetékes távvezérlő (opcionális) és funkciói
Hűtés üzemmód
Automatikus mód vagy automatikus átváltás
Páramentesítés üzemmód
Fűtés üzemmód
Ventilátor-üzemmód
•
Hűtő típus( ), Hőszivattyús típus( )
Üzemmód
PQWRCDF0 (csak hűtő)
PQWRHDF0 (hőszivattyús)
2
3
4
1
5
9
7
6
8
10
12
13
14
15
17
16
11
1. VANE ANGLE Button
Used to set each vane angle.
2. FUNCTION SETTING Button
Used to set or clear Auto Clean, Smart Clean, Elec-
tric heater or Individual vane angle control.
3. ON/OFF Button
Used to turn on/off the unit.
4. JET COOL Button
Speed cooling operates super high fan speed.
5. LEFT/RIGHT AIRFLOW Button (OPTIONAL)
Used to set the desired left/right(horizontal) airflow
direction.
6. UP/DOWN AIRFLOW Button
Used to stop or start louver movement and set the
desired up/down airflow direction.
7. ON TIMER Button
Used to set the time of starting operation.
8. SLEEP TIMER Button
Used to set the time of sleeping operation.
9. SET / CLEAR Button
Used to set/clear the timer.
Used to set the current time(if it input for 3sec.)
10. PLASMA Button (OPTIONAL)
Used to start or stop the plasma-purification func-
tion.
11. ROOM TEMPERATURE SETTING Button
Used to select the room temperature.
12. OPERATION MODE SELECTION Button
Used to select the operation mode.
13. INDOOR FAN SPEED SELECTION Button
Used to select fan speed in four steps low,
medium, high and chaos.
14. ROOM TEMPERATURE CHECKING Button
Used to check the room temperature.
15. OFF TIMER Button
Used to set the time of stopping operation.
16. TIMER SETTING(Up/Down)/LIGHT Button
Used to set the timer.
Used to adjust the brightness.(if it is not time adjust
mode)
17. RESET Button
Used to reset the remote controller.
Page is loading ...
Page is loading ...
Page is loading ...
Page is loading ...
Page is loading ...
Page is loading ...
Page is loading ...
Page is loading ...
Page is loading ...
Page is loading ...
Page is loading ...

8 Вътрешен модул
Инструкции за експлоатация
Име и функции на кабелното дистанционно управление (опционално)
Режим Охлаждане
Автоматичен режим или
Автоматично превключване
Режим Отстраняване на влажността
Режим Отопление
Режим Вентилатор
•
Модел за охлаждане( ), Термопомпен модел( )
Режим на работа
PQWRCDF0 (само охлаждане)
PQWRHDF0 (ермопомпа)
2
3
4
1
5
9
7
6
8
10
12
13
14
15
17
16
11
1. VANE ANGLE Button
Used to set each vane angle.
2. FUNCTION SETTING Button
Used to set or clear Auto Clean, Smart Clean, Elec-
tric heater or Individual vane angle control.
3. ON/OFF Button
Used to turn on/off the unit.
4. JET COOL Button
Speed cooling operates super high fan speed.
5. LEFT/RIGHT AIRFLOW Button (OPTIONAL)
Used to set the desired left/right(horizontal) airflow
direction.
6. UP/DOWN AIRFLOW Button
Used to stop or start louver movement and set the
desired up/down airflow direction.
7. ON TIMER Button
Used to set the time of starting operation.
8. SLEEP TIMER Button
Used to set the time of sleeping operation.
9. SET / CLEAR Button
Used to set/clear the timer.
Used to set the current time(if it input for 3sec.)
10. PLASMA Button (OPTIONAL)
Used to start or stop the plasma-purification func-
tion.
11. ROOM TEMPERATURE SETTING Button
Used to select the room temperature.
12. OPERATION MODE SELECTION Button
Used to select the operation mode.
13. INDOOR FAN SPEED SELECTION Button
Used to select fan speed in four steps low,
medium, high and chaos.
14. ROOM TEMPERATURE CHECKING Button
Used to check the room temperature.
15. OFF TIMER Button
Used to set the time of stopping operation.
16. TIMER SETTING(Up/Down)/LIGHT Button
Used to set the timer.
Used to adjust the brightness.(if it is not time adjust
mode)
17. RESET Button
Used to reset the remote controller.
Page is loading ...
Page is loading ...
Page is loading ...
Page is loading ...
Page is loading ...
Page is loading ...
Page is loading ...
Page is loading ...
Page is loading ...
Page is loading ...
Page is loading ...

8 Unutrašnja jedinica
Uputstvo za korišćenje
Naziv i funkcija ožičenog daljinskog upravljača (opcionalnog)
Režim hlađenja
Automatski režim ili automatska promena
Režim smanjenja vlažnosti vazduha
Režim grejanja
Režim ventilacije
•
model za hlađenjem( ), Model sa toplotnom pumpom( )
Režim rada
PQWRCDF0 (samo hlađenje)
PQWRHDF0 (toplotna pumpa)
2
3
4
1
5
9
7
6
8
10
12
13
14
15
17
16
11
1. VANE ANGLE Button
Used to set each vane angle.
2. FUNCTION SETTING Button
Used to set or clear Auto Clean, Smart Clean, Elec-
tric heater or Individual vane angle control.
3. ON/OFF Button
Used to turn on/off the unit.
4. JET COOL Button
Speed cooling operates super high fan speed.
5. LEFT/RIGHT AIRFLOW Button (OPTIONAL)
Used to set the desired left/right(horizontal) airflow
direction.
6. UP/DOWN AIRFLOW Button
Used to stop or start louver movement and set the
desired up/down airflow direction.
7. ON TIMER Button
Used to set the time of starting operation.
8. SLEEP TIMER Button
Used to set the time of sleeping operation.
9. SET / CLEAR Button
Used to set/clear the timer.
Used to set the current time(if it input for 3sec.)
10. PLASMA Button (OPTIONAL)
Used to start or stop the plasma-purification func-
tion.
11. ROOM TEMPERATURE SETTING Button
Used to select the room temperature.
12. OPERATION MODE SELECTION Button
Used to select the operation mode.
13. INDOOR FAN SPEED SELECTION Button
Used to select fan speed in four steps low,
medium, high and chaos.
14. ROOM TEMPERATURE CHECKING Button
Used to check the room temperature.
15. OFF TIMER Button
Used to set the time of stopping operation.
16. TIMER SETTING(Up/Down)/LIGHT Button
Used to set the timer.
Used to adjust the brightness.(if it is not time adjust
mode)
17. RESET Button
Used to reset the remote controller.
Page is loading ...
Page is loading ...
Page is loading ...
Page is loading ...
Page is loading ...
Page is loading ...
Page is loading ...
Page is loading ...
Page is loading ...
Page is loading ...
Page is loading ...

8 Unutarnja jedinica uređaja
Upute za rad uređaja
Naziv i funkcije kabelskog daljinskog upravljača (Dodatna mogućnost)
Hlađenje
Auto način rada ili Auto promjena
Uklanjanje vlage
Grijanje
Ventilator
• Model hlađenja( ), Model s toplinskom crpkom( )
Način rada uređaja
PQWRCDF0 (Samo hlađenje)
PQWRHDF0 (Toplinska crpka)
2
3
4
1
5
9
7
6
8
10
12
13
14
15
17
16
11
1. VANE ANGLE Button
Used to set each vane angle.
2. FUNCTION SETTING Button
Used to set or clear Auto Clean, Smart Clean, Elec-
tric heater or Individual vane angle control.
3. ON/OFF Button
Used to turn on/off the unit.
4. JET COOL Button
Speed cooling operates super high fan speed.
5. LEFT/RIGHT AIRFLOW Button (OPTIONAL)
Used to set the desired left/right(horizontal) airflow
direction.
6. UP/DOWN AIRFLOW Button
Used to stop or start louver movement and set the
desired up/down airflow direction.
7. ON TIMER Button
Used to set the time of starting operation.
8. SLEEP TIMER Button
Used to set the time of sleeping operation.
9. SET / CLEAR Button
Used to set/clear the timer.
Used to set the current time(if it input for 3sec.)
10. PLASMA Button (OPTIONAL)
Used to start or stop the plasma-purification func-
tion.
11. ROOM TEMPERATURE SETTING Button
Used to select the room temperature.
12. OPERATION MODE SELECTION Button
Used to select the operation mode.
13. INDOOR FAN SPEED SELECTION Button
Used to select fan speed in four steps low,
medium, high and chaos.
14. ROOM TEMPERATURE CHECKING Button
Used to check the room temperature.
15. OFF TIMER Button
Used to set the time of stopping operation.
16. TIMER SETTING(Up/Down)/LIGHT Button
Used to set the timer.
Used to adjust the brightness.(if it is not time adjust
mode)
17. RESET Button
Used to reset the remote controller.
Page is loading ...
Page is loading ...
Page is loading ...
Page is loading ...
Page is loading ...
Page is loading ...
Page is loading ...
Page is loading ...
Page is loading ...
Page is loading ...
Page is loading ...

8 Inomhusenhet
Handhavandeinstruktioner
Trådbunden fjärrkontroll (tillbehör)
Kylläge
Autoläge eller automatisk omställning
Avfuktningsläge
Uppvärmningsläge
Fläktläge
•
Kylläge( ), Värmepumpsmodell( )
Driftläge
PQWRCDF0 (endast kylning)
PQWRHDF0 (värmepump)
2
3
4
1
5
9
7
6
8
10
12
13
14
15
17
16
11
1. VANE ANGLE Button
Used to set each vane angle.
2. FUNCTION SETTING Button
Used to set or clear Auto Clean, Smart Clean, Elec-
tric heater or Individual vane angle control.
3. ON/OFF Button
Used to turn on/off the unit.
4. JET COOL Button
Speed cooling operates super high fan speed.
5. LEFT/RIGHT AIRFLOW Button (OPTIONAL)
Used to set the desired left/right(horizontal) airflow
direction.
6. UP/DOWN AIRFLOW Button
Used to stop or start louver movement and set the
desired up/down airflow direction.
7. ON TIMER Button
Used to set the time of starting operation.
8. SLEEP TIMER Button
Used to set the time of sleeping operation.
9. SET / CLEAR Button
Used to set/clear the timer.
Used to set the current time(if it input for 3sec.)
10. PLASMA Button (OPTIONAL)
Used to start or stop the plasma-purification func-
tion.
11. ROOM TEMPERATURE SETTING Button
Used to select the room temperature.
12. OPERATION MODE SELECTION Button
Used to select the operation mode.
13. INDOOR FAN SPEED SELECTION Button
Used to select fan speed in four steps low,
medium, high and chaos.
14. ROOM TEMPERATURE CHECKING Button
Used to check the room temperature.
15. OFF TIMER Button
Used to set the time of stopping operation.
16. TIMER SETTING(Up/Down)/LIGHT Button
Used to set the timer.
Used to adjust the brightness.(if it is not time adjust
mode)
17. RESET Button
Used to reset the remote controller.
Page is loading ...
Page is loading ...
Page is loading ...
Page is loading ...
Page is loading ...
Page is loading ...
Page is loading ...
Page is loading ...
Page is loading ...
Page is loading ...
Page is loading ...

Driftsinstruksjoner
8 Innendørsenhet
Name and function of wired remote controller(Optional)
Kjølemodus
Automatisk drift eller automatisk endring
Avfuktingsmodus
Varmemodus
Viftemodus
• Kjølemodell( ), Varmepumpemodell ( )
Driftsmodus
2
3
4
1
5
9
7
6
8
10
12
13
14
15
17
16
11
1. VANE ANGLE Button
Used to set each vane angle.
2. FUNCTION SETTING Button
Used to set or clear Auto Clean, Smart Clean,
Electric heater or Individual vane angle control.
3. ON/OFF Button
Used to turn on/off the unit.
4. JET COOL Button
Speed cooling operates super high fan speed.
5. LEFT/RIGHT AIRFLOW Button (OPTIONAL)
Used to set the desired left/right(horizontal) air-
flow direction.
6. UP/DOWN AIRFLOW Button
Used to stop or start louver movement and set
the desired up/down airflow direction.
7. ON TIMER Button
Used to set the time of starting operation.
8. SLEEP TIMER Button
Used to set the time of sleeping operation.
9. SET / CLEAR Button
Used to set/clear the timer.
Used to set the current time(if it input for 3sec.)
10. PLASMA Button (OPTIONAL)
Used to start or stop the plasma-purification
function.
11. ROOM TEMPERATURE SETTING Button
Used to select the room temperature.
12. OPERATION MODE SELECTION Button
Used to select the operation mode.
13. INDOOR FAN SPEED SELECTION Button
Used to select fan speed in four steps low,
medium, high and chaos.
14. ROOM TEMPERATURE CHECKING Button
Used to check the room temperature.
15. OFF TIMER Button
Used to set the time of stopping operation.
16. TIMER SETTING(Up/Down)/LIGHT Button
Used to set the timer.
Used to adjust the brightness. (if it is not time
adjust mode)
17. RESET Button
Used to reset the remote controller.
PQWRCQ0FDB (Kun kjøling)
PQWRHQ0FDB (Varmepumpe)
Page is loading ...
Page is loading ...
Page is loading ...
Page is loading ...
Page is loading ...
Page is loading ...
Page is loading ...
Page is loading ...
Page is loading ...
Page is loading ...
Page is loading ...

Käyttöohjeet
8 Sisäyksikkö
Name and function of wired remote controller(Optional)
Viilennystila
Automaattitoiminto tai Automaattinen tilanvaihdin
Kosteudenpoistotila
Lämmitystila
Puhanllintila
• Viilennysmalli( ), Lämpöpumppumalli( )
Toimintatila
2
3
4
1
5
9
7
6
8
10
12
13
14
15
17
16
11
1. VANE ANGLE Button
Used to set each vane angle.
2. FUNCTION SETTING Button
Used to set or clear Auto Clean, Smart Clean,
Electric heater or Individual vane angle control.
3. ON/OFF Button
Used to turn on/off the unit.
4. JET COOL Button
Speed cooling operates super high fan speed.
5. LEFT/RIGHT AIRFLOW Button (OPTIONAL)
Used to set the desired left/right(horizontal) airf-
low direction.
6. UP/DOWN AIRFLOW Button
Used to stop or start louver movement and set
the desired up/down airflow direction.
7. ON TIMER Button
Used to set the time of starting operation.
8. SLEEP TIMER Button
Used to set the time of sleeping operation.
9. SET / CLEAR Button
Used to set/clear the timer.
Used to set the current time(if it input for 3sec.)
10. PLASMA Button (OPTIONAL)
Used to start or stop the plasma-purification
function.
11. ROOM TEMPERATURE SETTING Button
Used to select the room temperature.
12. OPERATION MODE SELECTION Button
Used to select the operation mode.
13. INDOOR FAN SPEED SELECTION Button
Used to select fan speed in four steps low, medi-
um, high and chaos.
14. ROOM TEMPERATURE CHECKING Button
Used to check the room temperature.
15. OFF TIMER Button
Used to set the time of stopping operation.
16. TIMER SETTING(Up/Down)/LIGHT Button
Used to set the timer.
Used to adjust the brightness. (if it is not time
adjust mode)
17. RESET Button
Used to reset the remote controller.
PQWRCQ0FDB (Vain viilennys)
PQWRHQ0FDB (Lämpöpumppu)
Page is loading ...
Page is loading ...
Page is loading ...
Page is loading ...
Page is loading ...
Page is loading ...
Page is loading ...
Page is loading ...
Page is loading ...
Page is loading ...
Page is loading ...

Betjeningsvejledning
8 Indendørs enhed
Name and function of wired remote controller(Optional)
Køledrift
Auto Drift eller Auto skift
Affugter tilstand
VARME TILSTAND
Fan tilstand
• Køling Model ( ), varmepumpe Model ( )
Betjenings tilstand
2
3
4
1
5
9
7
6
8
10
12
13
14
15
17
16
11
1. VANE ANGLE Button
Used to set each vane angle.
2. FUNCTION SETTING Button
Used to set or clear Auto Clean, Smart Clean,
Electric heater or Individual vane angle control.
3. ON/OFF Button
Used to turn on/off the unit.
4. JET COOL Button
Speed cooling operates super high fan speed.
5. LEFT/RIGHT AIRFLOW Button (OPTIONAL)
Used to set the desired left/right(horizontal) air-
flow direction.
6. UP/DOWN AIRFLOW Button
Used to stop or start louver movement and set
the desired up/down airflow direction.
7. ON TIMER Button
Used to set the time of starting operation.
8. SLEEP TIMER Button
Used to set the time of sleeping operation.
9. SET / CLEAR Button
Used to set/clear the timer.
Used to set the current time(if it input for 3sec.)
10. PLASMA Button (OPTIONAL)
Used to start or stop the plasma-purification
function.
11. ROOM TEMPERATURE SETTING Button
Used to select the room temperature.
12. OPERATION MODE SELECTION Button
Used to select the operation mode.
13. INDOOR FAN SPEED SELECTION Button
Used to select fan speed in four steps low, me-
dium, high and chaos.
14. ROOM TEMPERATURE CHECKING Button
Used to check the room temperature.
15. OFF TIMER Button
Used to set the time of stopping operation.
16. TIMER SETTING(Up/Down)/LIGHT Button
Used to set the timer.
Used to adjust the brightness. (if it is not time
adjust mode)
17. RESET Button
Used to reset the remote controller.
PQWRCQ0FDB (kun køling)
PQWRHQ0FDB (Varmepumpe)
Page is loading ...
Page is loading ...
Page is loading ...
Page is loading ...
Page is loading ...
-
 1
1
-
 2
2
-
 3
3
-
 4
4
-
 5
5
-
 6
6
-
 7
7
-
 8
8
-
 9
9
-
 10
10
-
 11
11
-
 12
12
-
 13
13
-
 14
14
-
 15
15
-
 16
16
-
 17
17
-
 18
18
-
 19
19
-
 20
20
-
 21
21
-
 22
22
-
 23
23
-
 24
24
-
 25
25
-
 26
26
-
 27
27
-
 28
28
-
 29
29
-
 30
30
-
 31
31
-
 32
32
-
 33
33
-
 34
34
-
 35
35
-
 36
36
-
 37
37
-
 38
38
-
 39
39
-
 40
40
-
 41
41
-
 42
42
-
 43
43
-
 44
44
-
 45
45
-
 46
46
-
 47
47
-
 48
48
-
 49
49
-
 50
50
-
 51
51
-
 52
52
-
 53
53
-
 54
54
-
 55
55
-
 56
56
-
 57
57
-
 58
58
-
 59
59
-
 60
60
-
 61
61
-
 62
62
-
 63
63
-
 64
64
-
 65
65
-
 66
66
-
 67
67
-
 68
68
-
 69
69
-
 70
70
-
 71
71
-
 72
72
-
 73
73
-
 74
74
-
 75
75
-
 76
76
-
 77
77
-
 78
78
-
 79
79
-
 80
80
-
 81
81
-
 82
82
-
 83
83
-
 84
84
-
 85
85
-
 86
86
-
 87
87
-
 88
88
-
 89
89
-
 90
90
-
 91
91
-
 92
92
-
 93
93
-
 94
94
-
 95
95
-
 96
96
-
 97
97
-
 98
98
-
 99
99
-
 100
100
-
 101
101
-
 102
102
-
 103
103
-
 104
104
-
 105
105
-
 106
106
-
 107
107
-
 108
108
-
 109
109
-
 110
110
-
 111
111
-
 112
112
-
 113
113
-
 114
114
-
 115
115
-
 116
116
-
 117
117
-
 118
118
-
 119
119
-
 120
120
-
 121
121
-
 122
122
-
 123
123
-
 124
124
-
 125
125
-
 126
126
-
 127
127
-
 128
128
-
 129
129
-
 130
130
-
 131
131
-
 132
132
-
 133
133
-
 134
134
-
 135
135
-
 136
136
-
 137
137
-
 138
138
-
 139
139
-
 140
140
-
 141
141
-
 142
142
-
 143
143
-
 144
144
-
 145
145
-
 146
146
-
 147
147
-
 148
148
-
 149
149
-
 150
150
-
 151
151
-
 152
152
-
 153
153
-
 154
154
-
 155
155
-
 156
156
-
 157
157
-
 158
158
-
 159
159
-
 160
160
-
 161
161
-
 162
162
-
 163
163
-
 164
164
-
 165
165
-
 166
166
-
 167
167
-
 168
168
-
 169
169
-
 170
170
-
 171
171
-
 172
172
-
 173
173
-
 174
174
-
 175
175
-
 176
176
-
 177
177
-
 178
178
-
 179
179
-
 180
180
-
 181
181
-
 182
182
-
 183
183
-
 184
184
-
 185
185
-
 186
186
-
 187
187
-
 188
188
-
 189
189
-
 190
190
-
 191
191
-
 192
192
-
 193
193
-
 194
194
-
 195
195
-
 196
196
-
 197
197
-
 198
198
-
 199
199
-
 200
200
-
 201
201
-
 202
202
-
 203
203
-
 204
204
-
 205
205
-
 206
206
-
 207
207
-
 208
208
-
 209
209
-
 210
210
-
 211
211
-
 212
212
-
 213
213
-
 214
214
-
 215
215
-
 216
216
-
 217
217
-
 218
218
-
 219
219
-
 220
220
-
 221
221
-
 222
222
-
 223
223
-
 224
224
-
 225
225
-
 226
226
-
 227
227
-
 228
228
-
 229
229


LG ARNU12GVEA2 User manual
- Category
- Split-system air conditioners
- Type
- User manual
- This manual is also suitable for
Ask a question and I''ll find the answer in the document
Finding information in a document is now easier with AI
in other languages
- italiano: LG ARNU12GVEA2 Manuale utente
- français: LG ARNU12GVEA2 Manuel utilisateur
- español: LG ARNU12GVEA2 Manual de usuario
- Deutsch: LG ARNU12GVEA2 Benutzerhandbuch
- Nederlands: LG ARNU12GVEA2 Handleiding
- português: LG ARNU12GVEA2 Manual do usuário
- dansk: LG ARNU12GVEA2 Brugermanual
- polski: LG ARNU12GVEA2 Instrukcja obsługi
- čeština: LG ARNU12GVEA2 Uživatelský manuál
- svenska: LG ARNU12GVEA2 Användarmanual
- suomi: LG ARNU12GVEA2 Ohjekirja
- română: LG ARNU12GVEA2 Manual de utilizare
Related papers
-
LG ARNU24GCFA2.ENWALEU User manual
-
LG MC12AHV User manual
-
-
LG UV42H.NL1 User manual
-
LG ARNU48GTMC2 User manual
-
LG ARNU24GTLC2.ENWALEU Owner's manual
-
LG ARNU96GB8A2.ENWALEU User manual
-
LG LMNH186BTG0.ANWADXB User manual
-
-


