Applica GEORGE FOREMAN 360 GRILL WITH RED FINISH...INTRODUCING THE BIGGEST, MO User manual
- Category
- Barbecues & grills
- Type
- User manual
This manual is also suitable for

USA/Canada 1-800-231-9786
www.prodprotect.com/applica
Accessories/Parts (USA/Canada)
Accesorios/Partes (EE.UU/Canadá)
1-800-738-0245
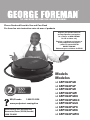
®
THE LEAN MEAN FAT REDUCING GRILLING MACHINE
®
Please Read and Save this Use and Care Book
Por favor lea este instructivo antes de usar el producto
Models
Modelos
❑ GRP106QPGB
❑ GRP106QPGP
❑ GRP106QPGR
❑ GRP106QPGW
❑ GRP106QPGBQ
❑ GRP106QPGBLQ
❑ GRP106QPGGQ
❑ GRP106QPGPQ
❑ GRP106QPGRQ
❑ GRP106QPGWQ
Register your product online at
www.prodprotect.com/applica,
for a chance to WIN $100,000!
For US residents only
Registre su producto por Internet en
www.prodprotect.com/applica
y tendrá la oportunidad de
GANAR $100,000!
Solamente para residentes de EE.UU

2
1
IMPORTANT SAFEGUARDS
When using electrical appliances, basic safety precautions should always be
followed, including the following:
❑Read all instructions.
❑Do not touch hot surfaces. Use handles or knobs.
❑To protect against electrical shock do not immerse cord, plugs or appliance
(except removable plates) in water or other liquid.
❑Close supervision is necessary when any appliance is used by or near
children.
❑Unplug from outlet when not in use and before cleaning. Allow to cool before
putting on or taking off parts, and before cleaning the appliance.
❑Do not operate any appliance with a damaged cord or plug, or after the
appliance malfunctions or has been damaged in any manner. Return
appliance to the nearest authorized service facility for examination, repair
or adjustment. Or, call the appropriate toll-free number on the cover of this
manual.
❑The use of accessory attachments not recommended by the appliance
manufacturer may cause injuries.
❑Do not use outdoors.
❑Do not let cord hang over edge of table or counter, or touch hot surfaces.
❑Do not place on or near a hot gas or electric burner, or in a heated oven.
❑Extreme caution must be used when moving an appliance containing hot oil or
other hot liquids.
❑To disconnect, remove plug from wall outlet.
❑Do not use this appliance for other than intended use.
❑Be sure that removable plates are assembled and fastened properly.
SAVE THESE INSTRUCTIONS.
This product is for household use only.
POLARIZED PLUG (120V Models Only)
This appliance has a polarized plug (one blade is wider than the other). To reduce
the risk of electric shock, this plug is intended to fit into a polarized outlet only
one way. If the plug does not fit fully into the outlet, reverse the plug. If it still
does not fit, contact a qualified electrician. Do not attempt to modify the plug in
any way.
ELECTRICAL CORD
a) A short power-supply cord is to be provided to reduce the risk resulting from
becoming entangled in or tripping over a longer cord.
b) Longer extension cords are available and may be used if care is exercised in
their use.
c) If an extension cord is used,
1) The marked electrical rating of the cord set or extension cord should be
at least as great as the electrical rating of the appliance, and
2) The cord should be arranged so that it will not drape over the countertop
or tabletop where it can be pulled on by children or tripped over
unintentionally.
If the appliance is of the grounded type, the extension cord should be a
grounding-type 3-wire cord.
TAMPER-RESISTANT SCREW
Warning: This appliance is equipped with a tamper-resistant screw to prevent
removal of the outer cover. To reduce the risk of fire or electric shock, do not
attempt to remove the outer cover. There are no user-serviceable parts inside.
Repair should be done only by authorized service personnel.
Note: If the power supply cord is damaged, it should be replaced by qualified
personnel; in Latin America, by an authorized service center.

4
3
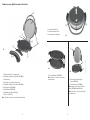
Product may vary slightly from what is illustrated.
1.
On indicator light (red)
2. Variable temperature dial
3. Ready indicator light (green)
1.
Extended metal loop carrying handle
†
2. Removable grill plate (upper) (Part # GRP106-01)
3. Floating hinge
4. Grill plate release handles (both sides)
†
5. Removable grill plate (lower) (Part # GRP106-02)
†
6. Drip tray (Part # GRP106-03)
†
7. Spatula (Part # GRP106-04)
8. Adjustable grill angle bar (in back)
9. Power cord (in back)
Note: † indicates consumer replaceable/removable parts
† 1. Quesadilla plates (GRP106-05)
Note: † indicates consumer replaceable/
removable parts
A1
† 1
Removable grill plate (upper)
(Part # GRP106-01)
† 2. Pizza / bake pan (GRP106-06)
Note: Always use the upper grill plate
(part # GRP106-01) with this plate.
Note: † indicates consumer replaceable/
removable parts
A3
A4
A2

6
5
How to use
This product is for household use only.
GETTING STARTED
• Remove all packing material and any stickers.
• Remove and save literature.
• Please go to www.prodprotect.com/applica to register your warranty.
• Wash all removable parts in hot soapy water, rinse and dry thoroughly as directed in
the CARE AND CLEANING section of this Use & Care manual.
Note: Although the grill plates are dishwasher safe, we recommend hand washing to
preserve their appearance. In dishwashing the metal will get a cloudy film that will not
affect the performance, but does not look attractive.
• Select a location where this unit is to be used allowing enough space for back of the
unit, cabinets and the wall to allow heat to flow without damage to cabinets and walls.
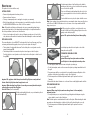
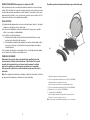
ATTACH GRILL PLATES
The removable plates of your 360 Grill™ are designed to fit on the grill one way only. If you
are having trouble attaching a plate, do not try to force the plate onto the grill!
• The top plate is the plate with the arrow. To attach the plate correctly, make sure the
arrow is pointing up (B1).
• The bottom plate has no arrow and a sloped section along one side of the plate.
To attach the plate correctly, make sure the sloped section of the plate is at the front of
the grill (B2).
Important: This appliance should always be used with 2 grill plates securely attached.
Caution: Attach all grill plates when the appliance is cool.
Important: When attaching the grill plates, be sure they are securely attached using the
release handles on each side of the plates.
Basic Grill Plates (See illustration A1)
1. Holding a plate with both hands, use your thumbs to pull out
the release handles (C).
2. Set plate against frame of grill and release the handles,
making sure the latches on each side fit into the openings
on each side of the grill (D).
3. If you are still having trouble getting both sides to latch at
once, you may wish to latch on one side first, and then the
other.
4. Once both latches are in place, the plate should be secure.
Note: If you continue to have trouble attaching or removing the plates from your grill, please
call toll-free at 1-800-231-9786 and one of our customer service representatives will be
happy to assist you.
Note: When using these grill plates, use the bar at the rear
of the grill to lift the back of the bottom grill plate to have the
drippings run into the drip tray (E).
Important: This position should only be used when grilling.
Place the drip tray under the front sloped section of the
bottom plate on the grill (F).
ATTACHING THE QUESADILLA PLATES
(See illustration A3)
Important: When using these plates make sure bottom
quesadilla plate is in the completely horizontal position.
• For the top plate, make sure the arrow on the plate is pointing up.
• For the bottom plate, make sure the arrow on the plate is pointing toward the back of
the grill.
1. If preparing quesadillas, securely attach the top and bottom quesadilla plates of the
appliance using the release handles on each side of the plates.
2. Set the temperature to Medium High and allow the grill to preheat for at least
7 minutes.
3. Quesadillas take about 4 minutes to cook to melt cheese and lightly brown the tortillas.
ATTACHING THE BAKE PAN
(See illustration A4)
Important: When using this plate, make sure the appliance is in the completely
horizontal position.
1. If using the bake pan, securely attach the top grilling plate and bake pan using the
release handles on each side of the plates.
Note: The bake pan has an indentation at the back of the plate. When attaching the bake
pan, make sure the indentation is at the back of the grill to attach the plate correctly.
2. Set the temperature to Medium High and allow the grill to preheat for at least
7 minutes.
C
E
MA
X
MI
N
F
B1 B2
D

3. This pan is versatile and allows you to prepare frittatas, bake pizzas, bake snack foods
and appetizers, such as mini quiches, chicken nuggets and hot wings appetizers, and
sauté vegetables and fillings for quesadillas.
PREHEATING THE GRILL
1. Close the lid on the grill.
2. Unwind the cord and plug it into a standard electrical outlet.
3. Both lights on top of the grill will be illuminated.
4. Allow the grill to preheat for at least 7 minutes before grilling. If desired, use a kitchen
timer.
5. The green light will go off when the grill has reached the preset temperature.
GRILLING
Important: The floating hinge position allows for grilling extra thick foods. In this
position the grilling plate rests on top of the food.
1. Using a pot holder, carefully open the preheated grill.
2. Before first use, if desired, lightly oil the cooking plates.
Note: Aerosol cooking spray should not be used on the nonstick surface. The chemicals
that allow the spray to come out of the can build up on the surface of the grill plates and
reduce their efficiency.
3. Carefully place the foods to be cooked on the bottom grilling plate of the preheated
grill. This grill usually accommodates 2 to 4 servings.
Note: Do not overload the cooking plate.
4. Close the lid in the floating hinge position (G) with the lid
closing directly onto the food.
5. Allow the food to cook for the desired time (use of a
kitchen timer may be helpful). The chart below may be
helpful in determining proper cooking times.
Important: Do not leave the appliance unattended during use.
6. Light pressure to the handle can be used to press and heat the food to your liking.
Caution: Do not use heavy pressure on the lid of the grill at any time.
7. This feature is especially handy when preparing grilled sandwiches and grilling thick
pieces of meat and poultry.
8. After cooking for the suggested time the food should be done. If you would prefer
longer cooking, simply follow the steps beginning at step 4.
9. Using a pot holder, carefully open the lid.
10. Remove the cooked food using the plastic spatula provided or a nylon heat resistant
spatula.
Note: Always use heatproof plastic, nylon or wood utensils to avoid scratching the
nonstick surface of the grill plates. Never use metal skewers, tongs, forks or knives.
11. Unplug the grill to turn the appliance off.
8
7
G
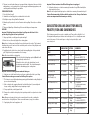
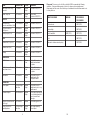
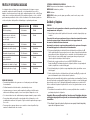
SUGGESTED GRILLING CHART FOR MEATS,
POULTRY, FISH AND SANDWICHES
The following are meant to be used as a guideline only. Times reflect a full grill of food.
Cooking time will depend upon thickness and cut being used. Use cooking thermometer
as test for doneness. If food needs longer cooking, check periodically to avoid
overcooking food.
FOOD COOKING TIME SETTING COMMENTS
MEAT
Hamburger (5 oz.) 4 - 6 minutes High ¾-inch thick
Cooked to 160ºF (71ºC)
Frozen Hamburgers (5 oz.) 5 to 6 minutes High Cooked to 160ºF (71ºC)
Flank steak (2 lb.) 7 to 9 minutes High 1-inch thick
Cooked to medium rare
(145ºF)
Skirt steak (½ lb.) 5 to 7 minutes High Cooked to 160ºF (71ºC)
NY Strip Steak 5 to 7 minutes High ¾-inch thick
(Shell Steak) (6 oz.) Cooked to medium rare,
145ºF (63ºC)
Beef Tenderloin (5 oz.) 4 - 6 minutes High ¾-inch thick
Cooked to medium rare,
145ºF (63ºC)
Beef Kabobs 5 to 7 minutes High Cooked to 160ºF (71ºC)
Pork loin chops, boneless 6 to 8 minutes Medium ¾-inch thick
High Cooked to 160ºF (71ºC)
Pork loin chops, bone in 10 to 12 minutes Medium ¾ -inch thick
High Cooked to 160ºF (71ºC)
Sausage, link or patty 4 - 6 minutes Medium Cooked to 160ºF (71ºC)
High
Hot dogs 4 to 5 minutes Medium Cooked to 160ºF (71ºC)
High
Important: The heat continues to be ON until the appliance is unplugged.
12. Allow the drip tray to cool before removing it from under the grill. Wash and dry the
drip tray after each use.
Note: Be sure the liquid in the drip tray has cooled before removing it from under the grill.
Caution: Do not remove the grill plates while the appliance is hot. Always allow them to
cool to room temperature before removing or cleaning.

10
9
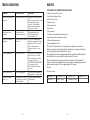
Please note: To be sure your food is fully cooked the USDA recommends the following
guidelines. Using a meat thermometer cook test for doneness by inserting the meat
thermometer into the center of the food being cooked and make sure the thermometer is not
touching the bone.
FOOD COOKING TIME SETTING COMMENTS
Smoked pork loin chops, 4 - 6 minutes Medium Cooked to 160ºF (71ºC)
boneless High
Lamb chops, loin 5 to 7 minutes Medium ¾-inch thick
High Cooked to 160ºF (71ºC)
POULTRY
Chicken breast, 11 to 13 minutes Medium Cooked to 170ºF (77ºC)
boneless and skinless (8oz.) High
Chicken tenderloins 4 to 6 minutes Medium Cooked to 170ºF (77ºC)
4 to 6 pieces High
Turkey burgers (5 oz.) 4 to 6 minutes Medium Cooked to 170ºF (77ºC)
High
FISH
Salmon fillet (8 oz. piece) 7 to 8 minutes Medium Cooked to 145ºF (63ºC)
High
Salmon steak (8 oz.) 7 to 9 minutes Medium Cooked to 145ºF (63ºC)
High
Shrimp 3 to 4 minutes Medium Cooked to 145ºF (63ºC)
High
SANDWICHES
Grilled cheese 2 to 3 minutes Medium Cook until cheese is
Low melted and sandwich
is golden
Grilled cheese with tomato 3 to 4 minutes Medium Cook until cheese is
tuna, ham or bacon Low melted and sandwich
is golden
Quesadillas 3 to 5 minutes Medium Cook until cheese is
High melted and tortilla
is lightly browned
BAKING PAN
Frozen pizzas Follow package Medium Cook until cheese is
directions High melted and crust is crisp
and browned
Homemade pizza 20 to 24 minutes Medium 12 oz. pizza dough spread
High to cover baking pan with
crust formed around
the edge
Frittata or Spanish omelet 4 to 5 minutes Medium Cook until eggs are set
4 to 6 eggs
Frozen snack foods Follow package Medium Place approximately
and aAppetizers directions High ¾-inch apart
FOOD TO BE COOKED MEDIUM WELL DONE OR
FULLY COOKED
Chicken breast 170ºF (77ºC)
Chicken thigh 180ºF (82ºC)
Beef / Lamb/Veal 160ºF (71ºC) 170ºF (77ºC)
Pork 160ºF (71ºC)
Reheated cooked meats and poultry 165ºF (74ºC)

12
11
GRILLING TIPS:
• To prevent heat loss and for even cooking, do not open the Lid frequently.
• Do not overfill the appliance; it will hold approximately 4 servings comfortably.
• When first cooking a particular food, check for doneness several minutes before
suggested time; if necessary adjust the cooking time.
• If cooking more than one piece of food, try to have them similar in size and thickness.
• Remember that since the grill is cooking from both sides cooking time will probably be
shorter than expected. Watch carefully to avoid overcooking.
• For added flavor, add dry seasonings before grilling or marinate foods before cooking.
SUGGESTED GRILL SETTINGS
LOW: Use to reheat fully cooked foods
MEDIUM LOW: Sandwiches and Wraps
MEDIUM: Vegetables
MEDIUM HIGH: Vegetables, Fish, Pizzas, Quesadillas, Pork, Poultry and Lamb
HIGH: Beef
CARE AND CLEANING
CLEANING
Caution: To avoid accidental burns, allow grill to cool thoroughly before cleaning.
1. Before cleaning, unplug grill from wall outlet and allow to cool.
Caution: To avoid sparks at outlet while disconnecting plug, make sure power is off
before disconnecting the plug from the outlet.
Important: Heating elements will continue to be ON until grill is unplugged.
2. Place drip tray under front of grill (see illustration E). Use plastic spatula to scrape off
any excess fat and food particles left on the grill plates; runoff will drip into the drip
tray. Wipe plates dry with a paper towel or sponge to avoid grease dripping onto your
counter when plates are removed.
3. Remove plates as instructed in HOW TO USE (see illustrations B and C). To clean grill
plates, wash in warm, soapy water; dry thoroughly with a paper towel.
4. Empty drip tray and wash in warm, soapy water; dry thoroughly with a paper towel.
5. Reinstall grill plates (see illustrations B and C), making sure they are securely attached
to grill body.
Note: Removable grill plates are also dishwasher-safe. If washing grill plates in a
dishwasher, wipe uncoated side with a dry towel to prevent discoloration. Dishwasher
detergent may cause oxidation on uncoated side of grill plate. This is not harmful and can
be wiped off with a damp towel.
6. To remove stubborn buildup, use a nylon or nonmetallic scrubbing pad to clean the grill
plates.
Important: Do not use metallic scrubbing pads, steel wool or any abrasive cleaners to
clean any part of your grill; use only nylon or nonmetallic scrubbing pads.
7. To clean the grill cover, wipe with a warm, wet sponge and dry with a soft, dry cloth.
Important: Do not immerse body of grill in water or any other liquid.
8. Any servicing requiring disassembly other than the above cleaning must be preformed
by a qualified electrician.
Caution: Make sure to hold grill cover by the handle while cleaning to prevent accidental
closing and injury.
STORAGE
• Always make sure grill is clean and dry before storing.
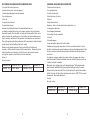
GRILLING FRUITS AND VEGETABLES
The following are meant to be used as a guideline only. The times reflect a full grill of food.
Cooking time will depend upon thickness of food. Use a fork inserted into the center of the
food to test for doneness (Be careful not to tough the grilling plate). If the food needs longer
cooking, check periodically to avoid overcooking the food.These foods can be grilled on the
grilling plates or on the shallow baking pan.
FOOD GRILLING TIME SETTING
Asparagus spears 4 to 6 minutes Medium
Bell peppers, assorted colors 5 to 7 minutes Medium
cut into ½-inch rings
Mushrooms , thickly sliced 4 to 5 minutes Medium
Onion slices, ½-inch 5 to 7 minutes Medium High
Potato slices, ½-inch 15 to 18 minutes Medium High
Portabella mushrooms, 4 to 6 minutes Medium
3-inch diameter
Zucchini slices, ½-inch 3 to 4 minutes Medium
Fresh pineapple slices, ½-inch 2 to 4 minutes Medium High

14
13
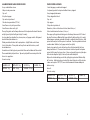
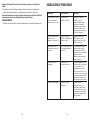
TROUBLESHOOTING
PROBLEM POSSIBLE CAUSE SOLUTION
Finish on grill plates has Metal utensils have used. Always use heatproof plastic,
cut marks. nylon or wood utensils to avoid
scratching the nonstick
surface of the grill plates.
Never use metal skewers,
tongs, forks or knives.
The grill marks are Grill was not fully Always preheat grill at
very light. preheated before use. least 7 minutes before
cooking any foods.
There is food buildup on Grill not properly cleaned Use nylon scrubbing pad
grill plates. after use. and hot, soapy water to clean
grill plates. Do not use steel
wool scrubbing pads or
abrasive cleaners to clean
grill.
Food is dry and burnt. Food is overcooked. Because grill is cooking from
both sides, food is cooked
much faster than in a skillet
or under a broiler. Use
SUGGESTED GRILLING CHART
as a guide and check
food at lowest time stated
on chart.
Grill does not turn on. Grill is not plugged in. Check to be sure appliance is
plugged in to a working outlet.
Grill plate has white The water from cleaning Dry grill plates immediately
spots on it. has dried on the surface after washing.
of the grill plates.
RECIPES
HOT & SWEET THAI SHRIMP WITH FRESH PAPAYA
2 medium cloves garlic, minced
¼ tsp. dried red pepper flakes
2 tbsp. Thai fish sauce
1 tbsp. lime juice
1 tbsp. orange juice
2 tsp. honey
1 tsp. peanut oil
1 lb. jumbo shrimp deveined (leave tails on)
1 ripe papaya, peeled, seeded and sliced
1 tbsp. minced green onion
1 tbsp. chopped fresh mint
Place the first 7 ingredients in a 1-quart plastic bag. Seal bag and squeeze
between your fingers to blend ingredients. Add shrimp; reseal bag and shake to
coat shrimp with marinade. Refrigerate for 1 hour.
Place grilling plates on the George Foreman® Grill and preheat on Medium High
for about 6 minutes (green light will notify you that grill is ready).
Remove shrimp from the marinade and discard marinade. Grill shrimp for 3-4
minutes until pink and cooked through. Serve shrimp on a bed of papaya; garnish
with green onion and mint. Place approximately ¾-inch apart.
Serves 4.
For each serving:
CALORIES: 83 TOTAL FAT: 1 g SAT FAT: 1 g CARBS: 12 g
PROTEIN: 7 g CHOL: 43 mg SODIUM: 737 mg

16
15
BEEF TENDERLOIN CHURRASCO WITH CHIMICHURRI SAUCE
1 cup fresh flat leaf parsley leaves
8 medium cloves garlic, coarsely chopped
1 medium jalapeño pepper, coarsely chopped
1 tsp. dried oregano
½ tsp. salt
½ cup extra-virgin olive oil
¼ cup red wine vinegar
4 boneless beef tenderloin steaks, fat removed (about 6 oz., ea.)
In a blender, combine the parsley, garlic, pepper, oregano, salt, oil and vinegar;
blend until smooth. Place the steaks in a large plastic bag; add half of the sauce
mixture. Reserve the remaining sauce. Seal the bag and squeeze between your
fingers to evenly coat the beef. Refrigerate for at least one hour or up to 8 hours.
Place grilling plates on the George Foreman
®
Grill and preheat for about 8 minutes
on High (green light will notify you that grill is ready).
Remove steaks from the marinade. Place steaks on the grill and discard
marinade. Grill for about 3 minutes on High for medium-rare. Remove the steaks
and let stand for several minutes. Slice thinly across the grain and fan onto
serving plate. Spoon reserved Chimichurri sauce over beef.
Serves 4.
For each serving:
CARIBBEAN JERK CHICKEN WITH SAFFRON RICE
1 tbsp. minced fresh parsley
1 tsp. ground paprika
½ cup fresh lemon juice
2 tbsp. Szechuan chili sauce
2 tbsp. oil
1 tbsp. yellow mustard
4 boneless, skinless chicken breast halves (about 4 oz., ea)
1 cup long grain white rice
¼ cup chopped yellow onion
¼ tsp. saffron threads, crumbled
½ tsp. salt
¼ tsp. white pepper
2 cups low-sodium, reduced -fat chicken broth
Combine parsley, paprika, lemon juice, chili sauce, oil and mustard in a 1-quart
plastic bag. Seal bag and squeeze between your fingers to blend ingredients. Add
chicken; reseal bag and shake to coat chicken with marinade. Refrigerate for at
least1 hour.
In a medium saucepan, combine rice, onion, saffron, salt, pepper and chicken
broth; bring to boil. Reduce heat to low; cover and simmer 25 minutes or until rice
is tender and liquid is absorbed.
Meanwhile, place grilling plates on the George Foreman
®
Grill and preheat for
about 6 minutes on Medium High (green light will notify you that grill is ready).
Remove chicken from marinade. Place chicken on the grill and discard marinade.
Grill for 7 minutes until the chicken tests done and registers 170ºF (77ºC) on a meat
thermometer. Serve with cooked rice.
Serves 4.
For each serving:
CALORIES: 304 TOTAL FAT: 15 g SAT FAT: 3 g CARBS: 3 g
PROTEIN: 38 g CHOL: 100 mg SODIUM: 787 mg
CALORIES: 300 TOTAL FAT: 8 g SAT FAT: 1 g CARBS: 25 g
PROTEIN: 30 g CHOL: 68 mg SODIUM: 806 mg

17
18
ALL-AMERICAN BEEF & BLUE CHEESE SLIDERS
¼ cup crumbled blue cheese
2 tbsp. minced green onion
1 tsp. salt
½ tsp. black pepper
1 tsp. extra-virgin olive oil
1 lb. extra-lean ground beef (7% fat)
8 small leaves curly-leaf green lettuce
8 small buns or dinner rolls, split
Place grilling plates on the George Foreman
®
Grill and preheat for about 8 minutes
on High (green light will notify you that grill is ready).
In a large bowl, toss together the, cheese, onion, salt, pepper and oil. Add ground
beef and blend; do not over mix.
Divide ground beef mixture into 8 equal portions. Lightly flatten each to form
½-inch thick patties. Place patties on the grill and cook for 3 minutes, or until
desired doneness.
Assemble each slider by placing one leaf of lettuce on the bottom half of each roll.
Place cooked beef patty on lettuce. Top each patty with the remaining half of roll.
Serves 8 as appetizers.
For each serving:
CALORIES: 225 TOTAL FAT: 16 g SAT FAT: 5 g CARBS: 13 g
PROTEIN: 15 g CHOL: 36 mg SODIUM: 747 mg
PIAZZA CHICKEN & SPINACH
1 small red pepper, seeded and chopped
1 cup loosely packed fresh spinach without stems, chopped
¼ cup chopped yellow onion
1 tbsp. chopped fresh basil
1 tsp. salt
½ tsp. pepper
1 tbsp. extra-virgin olive oil
6 boneless, skinless chicken breast halves (about 4 oz., ea.)
6 slices low fat mozzarella cheese (1 oz., ea.)
Place upper grilling plate and baking pan in the George Foreman
®
Grill. Preheat
for about 7 minutes on Medium High (green light will notify you that grill is ready).
Add red pepper and onion and cook until onion is softened, about 3 minutes. Add
spinach and cook just until the spinach is softened. Transfer vegetable mixture to
a medium bowl. Add basil, salt, pepper and oil; toss lightly.
Create a large pocket in each chicken breast by cutting horizontally half-way
through each breast. Place one slice of cheese inside each pocket and spoon
spinach stuffing over the cheese slices. Close each pocket by pressing the edges
of the chicken together lightly. If desired, fasten with a toothpick.
Replace the shallow baking pan with the grilling plate; preheat on Medium High
for 7 minutes. Add chicken breasts and grill for about 6 minutes until the chicken
is done and registers 170ºF (77ºC) on a meat thermometer. Remove toothpicks
before serving.
Serves 4.
For each serving:
CALORIES: 224 TOTAL FAT: 10 g SAT FAT: 1 g CARBS: 4 g
PROTEIN: 36 g CHOL: 68 mg SODIUM: 890 mg

20
19
INSTRUCCIONES IMPORTANTES
DE SEGURIDAD
Cuando se usan aparatos eléctricos, siempre se deben respetar las siguientes
medidas básicas de seguridad:
❑Por favor lea todas las instrucciones.
❑No toque las superficies calientes. Use las asas o las perillas.
❑A fin de protegerse contra un choque eléctrico y lesiones a las personas, no
sumerja el cable, los enchufes ni el aparato (con excepción de las placas
desmontables) en agua ni en ningún otro líquido.
❑Todo aparato eléctrico usado en la presencia de los niños o por ellos mismos
requiere la supervisión de un adulto.
❑Desconecte el aparato dl tomacorriente cuando no esté en uso y antes de
limpiarlo. Espere que el aparato se enfríe antes de instalarle o retirarle piezas
y antes de limpiarlo.
❑No use ningún aparato eléctrico que tenga el cable o el enchufe averiado,
que presente un problema de funcionamiento o que esté dañado. Acuda a un
centro de servicio autorizado para que lo examinen, reparen o ajusten o llame
gratis al número correspondiente en la cubierta de este manual.
❑El uso de accesorios no recomendados por el fabricante del aparato puede
ocasionar incendio, choque eléctrico o lesiones a las personas.
❑No use este aparato a la intemperie.
❑No permita que el cable cuelgue del borde de la mesa o del mostrador ni que
entre en contacto con superficies calientes.
❑No coloque el aparato sobre ni cerca de las hornillas de gas o eléctricas ni
adentro de un horno caliente.
❑Tome mucha precaución al mover de un lugar a otro un aparato que contenga
aceite u otros líquidos calientes.
❑Para desconectar, retire el enchufe del tomacorriente.
❑Este aparato se debe usar únicamente con el fin previsto.
❑Asegurese de que las placas desmontables esten colocadas y ajustadas
correctamente.
CONSERVE ESTAS INSTRUCCIONES.
Este aparato eléctrico es para uso doméstico
únicamente.
QUESADILLA RAPIDAS
1½ cups pepper strips
1 medium onion, thinly sliced
2 large cloves garlic, minced
½ lb. grilled pork loin, cut in strips
2 tbsp. chopped cilantro
½ tsp. oregano
½ tsp. coarse salt
½ tsp. ground cumin
¼ tsp. coarse black pepper
1 cup shredded Cheddar Jack cheese blend
4 large tortillas (9 to 10 inches)
Place upper grilling plate and baking pan in the George Foreman
®
Grill. Preheat
for about 7 minutes on Medium High (green light will notify you that grill is ready).
Add peppers, onion and garlic and cook until onion is softened, about 3 minutes.
Add pork, cilantro and seasonings. Transfer mixture to a medium bowl; toss to
blend.
Replace grill plate and baking pan with quesadilla plates; preheat on Medium High
for 5 minutes. (Green light will notify you that grill is ready.)
Meanwhile, assemble quesadillas. Place 2 tortillas on work surface; divide pork
mixture evenly between both. Top with cheese and remaining tortillas. Carefully
place one on grill and cook for about 3 minutes until cheese is melted and
tortillas are lightly browned.. Remove to serving plate and repeat with remaining
quesadilla.
Makes 6 servings.
If desired garnish with low fat sour cream, salsa and chopped cilantro.
CALORIES: 386 TOTAL FAT: 22 g SAT FAT: 9 g CARBS: 27 g
PROTEIN: 20 g CHOL: 43 mg SODIUM: 403 mg
Page is loading ...
Page is loading ...
Page is loading ...
Page is loading ...
Page is loading ...
Page is loading ...
Page is loading ...
Page is loading ...
Page is loading ...
Page is loading ...

NEED HELP?
For service, repair or any questions regarding your appliance, call the appropriate 800 number on
cover of this book. Please DO NOT return the product to the place of purchase. Also, please DO NOT
mail product back to manufacturer, nor bring it to a service center.
You may also want to consult the website listed on the cover of this manual.
Two-Year Limited Warranty
(Applies only in the United States and Canada)
What does it cover?
• Any defect in material or workmanship provided; however, Applica’s liability will not exceed the
purchase price of product.
For how long?
• Two years after the date of original purchase.
What will we do to help you?
• Provide you with a reasonably similar replacement product that is either new
or factory refurbished.
How do you get service?
• Save your receipt as proof of date of sale.
• Check our on-line service site at www.prodprotect.com/applica, or call our
toll-free number, 1-800-231-9786, for general warranty service.
• If you need parts or accessories, please call 1-800-738-0245.
What does your warranty not cover?
• Damage from commercial use
• Damage from misuse, abuse or neglect
• Products that have been modified in any way
• Products used or serviced outside the country of purchase
• Glass parts and other accessory items that are packed with the unit
• Shipping and handling costs associated with the replacement of the unit
• Consequential or incidental damages (Please note, however, that some states do not allow the
exclusion or limitation of consequential or incidental damages, so this limitation may not apply to
you.)
How does state law relate to this warranty?
• This warranty gives you specific legal rights, and you may also have other rights that vary from
state to state or province to province.
42
41
¿NECESITA AYUDA?
Para servicio, reparaciones o preguntas relacionadas al producto, por favor llame gratis al número
“800” que aparece en la cubierta de este manual. No devuelva el producto al establecimiento de
compra. No envíe el producto por correo al fabricante ni lo lleve a un centro de servicio. También
puede consultar el sitio web que aparece en la cubierta de este manual.
Dos años de garantía limitada
(Aplica solamente en Estados Unidos o Canadá)
¿Qué cubre la garantía?
• La garantía cubre cualquier defecto de materiales o de mano de obra. Applica no se
responsabiliza por ningún costo que exceda el valor de compra del producto.
¿Por cuánto tiempo es válida la garantía?
• Por dos años a partir de la fecha original de compra.
¿Qué clase de asistencia recibe el consumidor?
• El consumidor recibe un producto de reemplazo nuevo o restaurado de fábrica, parecido al
original.
¿Cómo se obtiene el servicio necesario?
• Conserve el recibo original como comprobante de la fecha de compra.
• Se puede visitar el sitio web de asistencia al consumidor
www.prodprotect.com/applica, o se puede llamar gratis al número
1-800-231-9786, para obtener información relacionada al servicio de garantía.
• Si necesita piezas o accesorios, por favor llame gratis al 1-800-738-0245.
¿Qué aspectos no cubre esta garantía?
• Los daños al producto ocasionados por el uso comercial
• Los daños ocasionados por el mal uso, abuso o negligencia
• Los productos que han sido alterados de cualquier manera
• Los productos utilizados o reparados fuera del país original de compra
• Las piezas de vidrio y demás accesorios empacados con el aparato
• Los gastos de tramitación y embarque relacionados con el reemplazo del producto
• Los daños y perjuicios indirectos o incidentales (sin embargo, por favor observe que algunos
estados no permiten la exclusión ni la limitación de los daños y perjuicios indirectos ni
incidentales, de manera que esta restricción podría no aplicar a usted).
¿Qué relación tiene la ley estatal con esta garantía?
• Esta garantía le otorga derechos legales específicos y el consumidor podría tener otros
derechos que varían de una región a otra.

Copyright © 2008 - 2009 Applica Consumer Products, Inc.
Made in People’s Republic of China
Printed in People’s Republic of China
Fabricado en la República Popular de China
Impreso en la República Popular de China
R32008/6-10-34E/S
-
 1
1
-
 2
2
-
 3
3
-
 4
4
-
 5
5
-
 6
6
-
 7
7
-
 8
8
-
 9
9
-
 10
10
-
 11
11
-
 12
12
-
 13
13
-
 14
14
-
 15
15
-
 16
16
-
 17
17
-
 18
18
-
 19
19
-
 20
20
-
 21
21
-
 22
22
-
 23
23


Applica GEORGE FOREMAN 360 GRILL WITH RED FINISH...INTRODUCING THE BIGGEST, MO User manual
- Category
- Barbecues & grills
- Type
- User manual
- This manual is also suitable for
Ask a question and I''ll find the answer in the document
Finding information in a document is now easier with AI
in other languages
Related papers
Other documents
-
George Foreman GRP46P Owner's manual
-
-
-
-
-
-
-
-
-