Page is loading ...

Quolis 5000 Chair
INSTALLATION
INSTRUCTIONS
Model Q-5000
Quolis Series
R
IMPORTANT
This manual provides installation instructions for the Quolis Chair.
The instructions contained in this booklet should be thoroughly read and understood
before operating the chair.
After the installation has been completed, keep this manual in a safe place and refer to
it for future maintenance.


Intended Use of the Product
This product is intended for the exclusive use for diagnoses, treatments and relative procedures of
dentistry, and must be operated or handled by the qualified dentists or by dental staffs under the
supervision of the dentist.
Such dentists or dental staffs should instruct and/or assist the patients to approach to and leave
from the product.
Patients should not be allowed to operate or handle the product unless he/she is so instructed.
Classification
a. Protection against electric shock : Class I Equipment, Type B Applied Parts
b. Protection against water ingress : Ordinary equipment (IPX0)
c. Equipment not suitable for use in the presence of a flammable anesthetic mixture with air or with
oxygen or nitrous oxide.
-i-

1
2
4
5
6
7
8
9
10
11
13
12
14
15
16
17
18
3
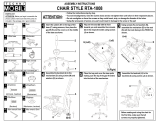
1. OVERVIEW AND MAJOR CONPONENTS
1 Headrest
2 Backrest
3 Sling
4 Armrest
5 Seat
6 Armrest Bracket
7 Main Link Cover
8 Sub Link Cover
9 Pump Cover
10 Base
11 Main Switch Panel
12 Electrical Plug
13 Headrest Assembly
14 Headrest Cover
15 Backrest Cover
16 Back Support
17 Flange
18 Touchpad Control Panel
Fig.1-1 Overview
Fig.1-2 Touchpad Control Panel
-1-
Left Side Right Side
0
1
2
3
0
1
2
3
Auto Return
Preset-1
Preset-2
Preset-3
Safety
Seat Lift
Seat Lower
Backrest Raise
Backrest Recline
Swivel Lock Release

-2-
2. DIMENSIONS AND SPECIFICATIONS
2-1. Dimensions
-inch-
Fig.2-1 Dimensions
26-1/2
7-1/8 71-3/8
493/8166
75r
18r
30r
30r
130r
10r
41-1/2
7-1/831-1/2
11-5/8
17-3/8
27-1/8 27-1/8
2-1/22-1/2
20 20
19-1/8
15-3/4
25-1/4
7-5/8
26
7-1/8 23-1/4
15
37 19-1/4
11-1/4
8

-3-
3. INTRODUCTION
3-1. Precautions For Installation
- The floor construction required to safely support the chair and delivery system is 105 lbs./ft2
(500kg/m2 ) at minimum.
- During lifting and unpacking of the chair, make sure to hold only the designated parts.
- Do not drop or hit the chair.
- After the chair is unloaded from the palette and placed at the desired location, please make sure to
remove the shipping bolt with the red tag. Damage to chair may occur if shipping bolt is not removed
prior to chair operation.
- Do not connect to power supply other than 120V 60HZ.
- Ground chair properly prior to turning power on.
- Chair base must be anchored to the floor for maximum stability.
- Refer to the installation manual of the chair and dental unit (if it is to be used) prior to, and during
installation.
- When the installation process has been completed, verify that all the mechanical and electrical
functions are working properly and that there is no evidence of oil leakage.
3-2. Required Tools
The following tools are necessary for installation of the chair:
- Philips screw drivers (No.1, No.2)
- Flat screw driver
- Wrenches (open end): 8mm, 10mm, 17mm
- Hex key wrenches: 2.5mm, 6mm, 8mm
- Socket wrench with ratchet drive 17mm

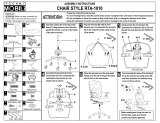
1
7
8 9 10
2
3
4
5
6
1
2
Fig. 4-1
Fig. 4-2
Fig. 4-3
Fig. 4-4
CAUTION
!
Knives or sharp objects may damage
package contents. Open with care!
-4-
4. UNPACKING OF CHAIR
The chair packaging consists of two boxes:
Box : Chair base section
Box : Upholstery section
After unpacking, make sure all components can
be located.
1
2

Lifting Bar
Pump Cover
Main Power Switch
Slotted Screw
(M5x10mm)
Electrical Plug
Armrest Bracket
Pallet
Lifting Bar
Red Tagged
Oil Plug
Oil Reservoir
Fig. 5-1
Fig. 5-2
Fig. 5-3 Fig. 5-4
Shipping Bolt
-5-
5. INSTALLATION
5-1. Positioning The Chair
1. Remove the Chair Base Section from the pallet
by holding the Armrest Bracket and Lifting Bar
and place it at the planned location. (Fig. 5-1)
2. Remove the red tagged Shipping Bolt
(M10x150mm) from the chair. (Fig. 5-2)
3. Plug chair into a 120V AC outlet.
4. Turn the Main Power Switch on and raise the chair
up. (Fig. 5-3)
Note: Refer to the Operation Manual for chair to operate.
5. Remove the pump cover by removing two slotted
screws (M5x10mm) from each side of the pump
cover. (Fig.5-3)
6.Remove the red tagged Oil Plug from the Oil
Reservoir. (Fig.5-4)
7. Remove the Lifting Bar from the chair by removing
two M10x30mm bolts . (Fig.5-4)
CAUTION!
Do not lift the chair by the upper structure
after removal of the red tagged Shipping Bolt.
CAUTION!
Do not connect in the power supply line
before removing the red tagged Shipping Bolt.

Fig. 5-5 Fig. 5-6
Fig. 5-7 Fig. 5-8
Anchor Bolt
(9x65mm)
Pan Head
Phillips Wood Screw
(4x10mm)
Pump Cover
Cap
Pump Cover
anchoring holes
Pump Cover
Main Link Cover
Plastic Cap
Slotted Screw
(M5x10mm)
-6-
5-2. Attaching The Chair Base To The Floor
Attach the chair base to the floor using the two anchor bolts (9x65mm). (Fig.5-5, 5-6)
If you don’t use a Junction box, plug the hole by a pump cover cap.
Fix this cover by 4 x 10mm screw. (Fig.5-7)
Attach the Pump Cover to the chair using the two slotted screws (M5x10mm). (Fig.5-8)
Note: Please tighten these screws firmly by a Flat screw driver so that no other personnel than qualified
technicians can open the cover.
Insert the plastic cap into the hole on the Main Link Cover. (Fig.5-8)
CAUTION!
Attach the chair base to the floor prior to installation of the Quolis dental unit.
(if it is to be installed on chair)
IMPORTANT: If you are going to the install Quolis dental unit onto the chair, please refer to the
installation manual for the dental unit before proceeding further with chair installation. Resume
assembly of the chair after installation of the dental unit onto the chair has been completed.

Fig. 5-6 Fig. 5-7
Socket Head
Screws
Backrest
Assembly
Backrest
Support
Hooks
Backrest
Cushion
-7-
5-3. Attaching The Backrest
1. Attach the Backrest Assembly to the Backrest Support using the four socket head
screws (M8x20mm) shipped in the Installation Hardware Box. (Fig.5-6)
2. Attach the backrest cushion to the backrest assembly as follows (Fig.5-7):
-Align key holes on the backside of the backrest cushion with the 4 hooks
on the backrest assembly
-Press Backrest Cushion against Backrest Assembly, then slide cushion
downward to lock in place
Note: Make sure that the cushions are hooked at four places and as illustrated below.

Fig. 5-8 Fig. 5-9
Fig. 5-11Fig. 5-10
Flat Head
Phillips Screws
Round head
Phillips Screws
Headrest
Mechanism
Backrest
Assembly
Headrest
Cushion
Seat Cushion
Seat Cushion
Headrest
Assembly
Headrest
Cover
Chair Frame
Chair Frame
-8-
5-4. Attaching The Headrest
1. Attach the Headrest Cushion to the Headrest Mechanism using thee flat head phillips screws
(M5x10mm) shipped in the Installation Hardware Box. (Fig.5-8)
2. Insert Headrest Mechanism bar through cut-out in Headrest Cover, as shown (Fig.5-8).
Slide Headrest Cover over Headrest Mechanism and press firmly together with the Headrest Cushion.
3. Insert the Headrest Assembly into the slot on top of the Backrest Assembly. (Fig.5-9)
5-4. Attaching the Seat
1. Slide the Seat Cushion onto the chair as shown,
to hook onto to chair frame. (Fig.5-10)
2. Secure the front end of the Seat Cushion to the
chair frame using the two round head phillips
screws (M5x10mm) shipped in the Installation
Hardware Box. (Fig.5-11)

Fig. 5-12
Armrest
Bracket
Armrest
Pan Head
Phillips Screws
Fig. 5-15
Fig. 5-14
Armrest
Armrest
Cushion
Sling
Round Head
Phillips Screws
Fig. 5-13
Armrest
Armrest
Cushion
Round Head
Phillips Screws
-9-
5-6. Attaching The Armrests
1. Insert the Armrest to the Armrest Bracket and
attach it with a pan head screw (M6x25mm).
After attaching, verify both of the armrests
swing outward 130 degrees only. (Fig.5-12)
2. Assemble the Armrest Cushions to the Armrest
using two round head screws (M5x10mm) per
Armrest Assembly. (Fig.5-13)
If your Quolis chair has a narrow type backrest
with slings, slide a sling onto an armrest
cushion, then fix an armrest cushion to an
armrest by using two screws. (Fig.5-14)
The left and right Armrests and cushions are
identical and may be installed on either side of
the chair.
3. Remove a protective plastic film on a touchpad
control panel. (Fig.5-15)

Fig. 6-1
Fig. 6-2 Front View (Faces Pump) Fig. 6-3 Rear View (Faces Away From Pump)
Solenoid Valve
Block
Backrest Recline
Speed Adjustment Screw
Seat Lowering
Speed Adjustment Screw
SV1
SV2
SV3
SV8 SV7
SV4 SV6
-10-
6. SPEED ADJUSTMENT
Seat lowering speed and backrest recline speed
can be adjusted with screws on the Solenoid
Valve Block.
The Solenoid Valve Block is located inside the
pump cover, as shown. (Fig.6-1)
Each solenoid valve corresponds to a specific
chair function. (Fig.6-2)
SV1 : Backrest Raising
SV2 : Backrest Reclining
SV3 : Seat Lifting
SV4 : Seat Lowering
SV6 : Swivel Brake Release
SV7 : Seat Shockless
SV8 : Backrest Shockless
By turning the each speed adjustment screw clockwise, the speed is reduced for
the corresponding chair function.
By turning adjustment screws counterclockwise, the corresponding chair function
speed is increased. (Fig.6-3)
CAUTION!
The chair movement will be locked if the speed is reduced excessively.
Oil may leak from the speed control knob if the speed is increased excessively.

Fig. 7-1 Hydraulic Diagram
Solenoid Valve Block
SV1 SV3
SV8 SV7
SV2 SV4 SV6
Relief
Valve
Solenoid
Valve
Motor Pump
Filter
Oil Reservoir Backrest
Cylinder
Seat Elevation
Cylinder
Swivel Lock
Cylinder
Air-bleeder
Restrictor
Shockless
Solenoid
Valve
M
-11-
7. HYDRAULIC DIAGRAM

-12-
8. ELECTRICAL DIAGRAM
123456789
8
4
7
3
6
2
5
1
2
1
21
SV1
SV2
SV4
SV3
1
2
3
4
5
6
12
SV6
987654321
1
2
White
Yellow
XA9P
ANFU07A0
1
1
Trunk Line B for Solenoid Valve
VL2P
Lock
Red
Brown
10
5
1
6
2
7
3
8
4
9
CN9
5566-10A
(MOLEX)
4312
VL2P
Fuse
F 10A
Black
Green/Yellow
Black
White
White
Black
LN
CN18
IL-5P-S3EN2
(JAE)
54321
FLASH
CN17
IL-7P-S3EN2
(JAE)
7654321
RY-2005
(1.2)
(3.4)
(2.5)
(3.4)
3
11V
9V
Trunk Line for Capacitor
ANFU12A0
Brown
Yellow
Orange
Red
Gray
Purple
Blue
Green
CN1-2(1-1)
IL-10P-S3EN2
(JAE)
10
98765344221
CN13
IL-3P-S3EN2
(JAE)
CN14
IL-3P-S3EN2
(JAE)
CN7
IL-3P-S3EN2
(JAE)
CN6
IL-3P-S3EN2
(JAE)
CN5
IL-3P-S3EN2
(JAE)
CN12
IL-3P-S3EN2
(JAE)
3
2
1
CN15
IL-2P-S3EN2
(JAE)
2
11
CN2-2(2-1)
IL-6P-S3EN2
(JAE)
CN1-1(1-2)
IL-10P-S3EN2
(JAE)
CN16
B03B-XASK-1
CN9
B09B-XASK-1
CN10
IL-10P-S3EN2
(JAE)
1
2
3
4
5
6
2
1
1
2
3
1
2
3
VL8P
5
6
10
98765344221
1
2
3
Potentiometer for Backrest Brown
Red
Orange
10
987654321
Control P.C.B.(AGFS13*0)
XX-STD2007/00TI
Relay P.C.B.
120V
Yellow
Black dot indicates male pin side
[Remarks]
Connector Symbol
Cap
Plug
21
Motor
1
2
3
Up
Down
Raise
Reclining
Potentiometer for Seat Brown
Red
Orange
TSM-CBC-5LP-M1-E
Transformer
TK-120V-2H
Red
White/Red
Brown
SW2 SW3
LIM
NOL
Limit STORE
EWS VDA S20 E53
M
3
2
1
1
2
3
3
2
1
1
2
3
Capacitor
45uF
1
5
2
6
3
7
4
8
4
2
3
1
6
4
5
2
3
1
2
321
54321
CN6
5566-08A
(MOLEX)
CN4
B02P-NV
CN3
B3P-VH
CN1
B2P-VH
CN2
B10B-XASK-1N-A CN8
B03B-XASK-1N-A
CN7
B04B-XASK-1N-A
CN10
5566-06A
(MOLEX)
CN5
B04P-NV
10
98765344221
Brown
544221
Yellow
Yellow
ANFT58A0
Trunk LIne for Motor / Capacitor VL6P
ANFT57A0
Transformer Section(120V)
ANET56A0
Motor Section (115V)
ANFT56A0
ANDR50A0
ANDR36A0
Trunk Line for Relay
Solenoid Valve Section
(120V)
1
2
3
4
Chair Down
Prohibition
Chair Operation
Prohibition
CN4-1(4-2)
IL-4P-S3EN2
(JAE)
CN8
B04B-XASK-1
1234
CN3
B05B-XASK-1
SW4
MODE
SW1
3
1
(Proportional Solenoid Valve)
6789 12212345
1
White
Red
10
NMF2P
N.O.
COM
1
3
2
CN11
5556-04A
Main Switch
L2N4
24
Up
Down
Raise
Reclining
CN2-1(2-2)
IL-6P-S3EN2
(JAE)
1
2
3
4
5
6
CN19
B05B-XASK-1
3
1
2
3
4
DNCS42A0
CN4-1(4-2)
IL-4P-S3EN2
(JAE)
N.O.
COM
Unused
12
CN9
IL-2P-S3EN2
(JAE)
10
98765344221
11 12 13
Armrest Membrane SW- L
(AGFS14A0)
10
98765344221
11 12 13
10
98765344221
11 12 13
10
98765344221
11 12 1310
98765344221
11 12 13
Distribution P.C.B.
(AGFS12A0)
(Distribution P.C.B. in the right side armrest)
XA9P
XA2P
Touchpad Switch
(AGFS16A0)
To Serial Communication Line for
Doctor Table
D Light PCB.
4
Rotation Lock
EWS VDA S20 E53
DNCS42A0
ANFT71A0 Main Power Switch Section
ANFT64A0
Trunk Line for Dental Light Power Source
ANFT65A0
Trunk Line ffor Chair Power Source
ANFT63A0
Earth
ANFT55B0
XA13P
XA13P XA13P
XA13P
XA13P
ANFT60A0
ANFT61A0
Trunk Line B for Membrane SW ANFT62A0
Trunk Line C for Membrane SW
ANFT67A0
Serial Communication Line
ANFT68A0
D Light Communication Line
ANFT69A0
Touchpad SW
Trunk Line A for
Safety Switch for Under Pump Cover
(AGFS15A0)
3
12234456789
10
XA10P
ANFT76A0
Assistant Side
Green
2244
ANFT70A0
Power Cable Section
Safety Switch for Under Pump Cover
Brown
Red
Brown
Red
Chair Down
Prohibition
Chair Operation
Prohibition
Motor
Up
Down
Reclining
Raise
Up/Down Slow Slide
Backrest Slow Slide
Lock Cancel
Red
Orange
Yellow
Green
Blue
Purple
Gray
Black
Red
Orange
Yellow
Green
Blue
Purple
Gray
Pink
White
Black
White/Red
Light Blue
AR
Up
Down
Reclining
Raise
P1
P2
LP
COM
5V
Lock Cancel
Safety
Safety LED.
COM
Brown
Red
Serial Transmission
Serial Reception
Serial Transmission
Serial Reception
Red
Brown
Red
Brown
Orange
Yellow
Green
Blue
Purple
Gray
Black
Touchpad SW
Trunk Line B for
AR
Up
Down
Reclining
Raise
P1
P2
LP
COM
Red
Brown
Orange
Yellow
Green
Blue
Purple
Gray
Black
Red
Brown
Orange
Yellow
Green
Blue
Purple
Gray
Black
AR
Up
Down
Reclining
Raise
P1
P2
LP
COM
Touchpad SW
Trunk Line C for
Brown
Red
Orange
Yellow
Green
Blue
Purple
Gray
White
Black
Pink
Light Blue
White/Red
Brown
Red
Orange
Yellow
Green
Blue
Purple
Gray
White
Black
Pink
Light Blue
White/Red
Brown
Red
Orange
Yellow
Green
Blue
Purple
Gray
White
Black
Pink
Light Blue
White/Red
AR
Up
Down
Reclining
Raise
P1
P2
LP
5V
Lock Cancel
Safety
Safety LED.
COM
AR
Up
Down
Reclining
Raise
P1
P2
LP
5V
Lock Cancel
Safety
Safety LED.
COM
Armrest Membrane SW- R
Yellow
Yellow
Yellow
Yellow
White
Red
Yellow
Yellow
Gray
Gray
Trunk Line A for Membrane SW
Blue
Blue
Light Blue
Blue
White
White
Black
Black
White
BlackBlack
White
White
Yellow
White
Yellow
White
Yellow
Trunk Line A for Solenoid Valve
Motor
Up
Down
Reclining
Raise
COMCom
Up/Down Slow Slide
Backrest Slow Slide
COM
COM
Lock Cancel
SV8
SV7
3
2
VL4P
4
1
Yellow
White
Yellow
White
Green
Blue
Yellow
Orange
Up/Down Slow Slide
Backrest Slow Slide
Backrest Slow
Up/Down Slow
1
2
XA2P
Thermistor
NTC Thermistor
Red
Brown
Black
Black
Thermistor for Solenoid Valves
Chair upper frame
Earth Line
Base
White

R
BELMONT EQUIPMENT, Division of Takara Belmont USA, Inc.
101 Belmont Drive Somerset, New Jersey 08873 U.S.A. TEL.:(732) 469-5000 / (800) 223-1192 Fax.:(732)526-6322 / (800) 280-7504
TAKARA CO, CANADA LTD.
2076 S. Sheridan Way, Mississauga, Ont., L5J2M4, Can. TEL.:(905) 822-2755 Fax.:(905)822-6203
NOTE
/