Page is loading ...
Not for
Reproduction
Manual No. 80105116 Rev A
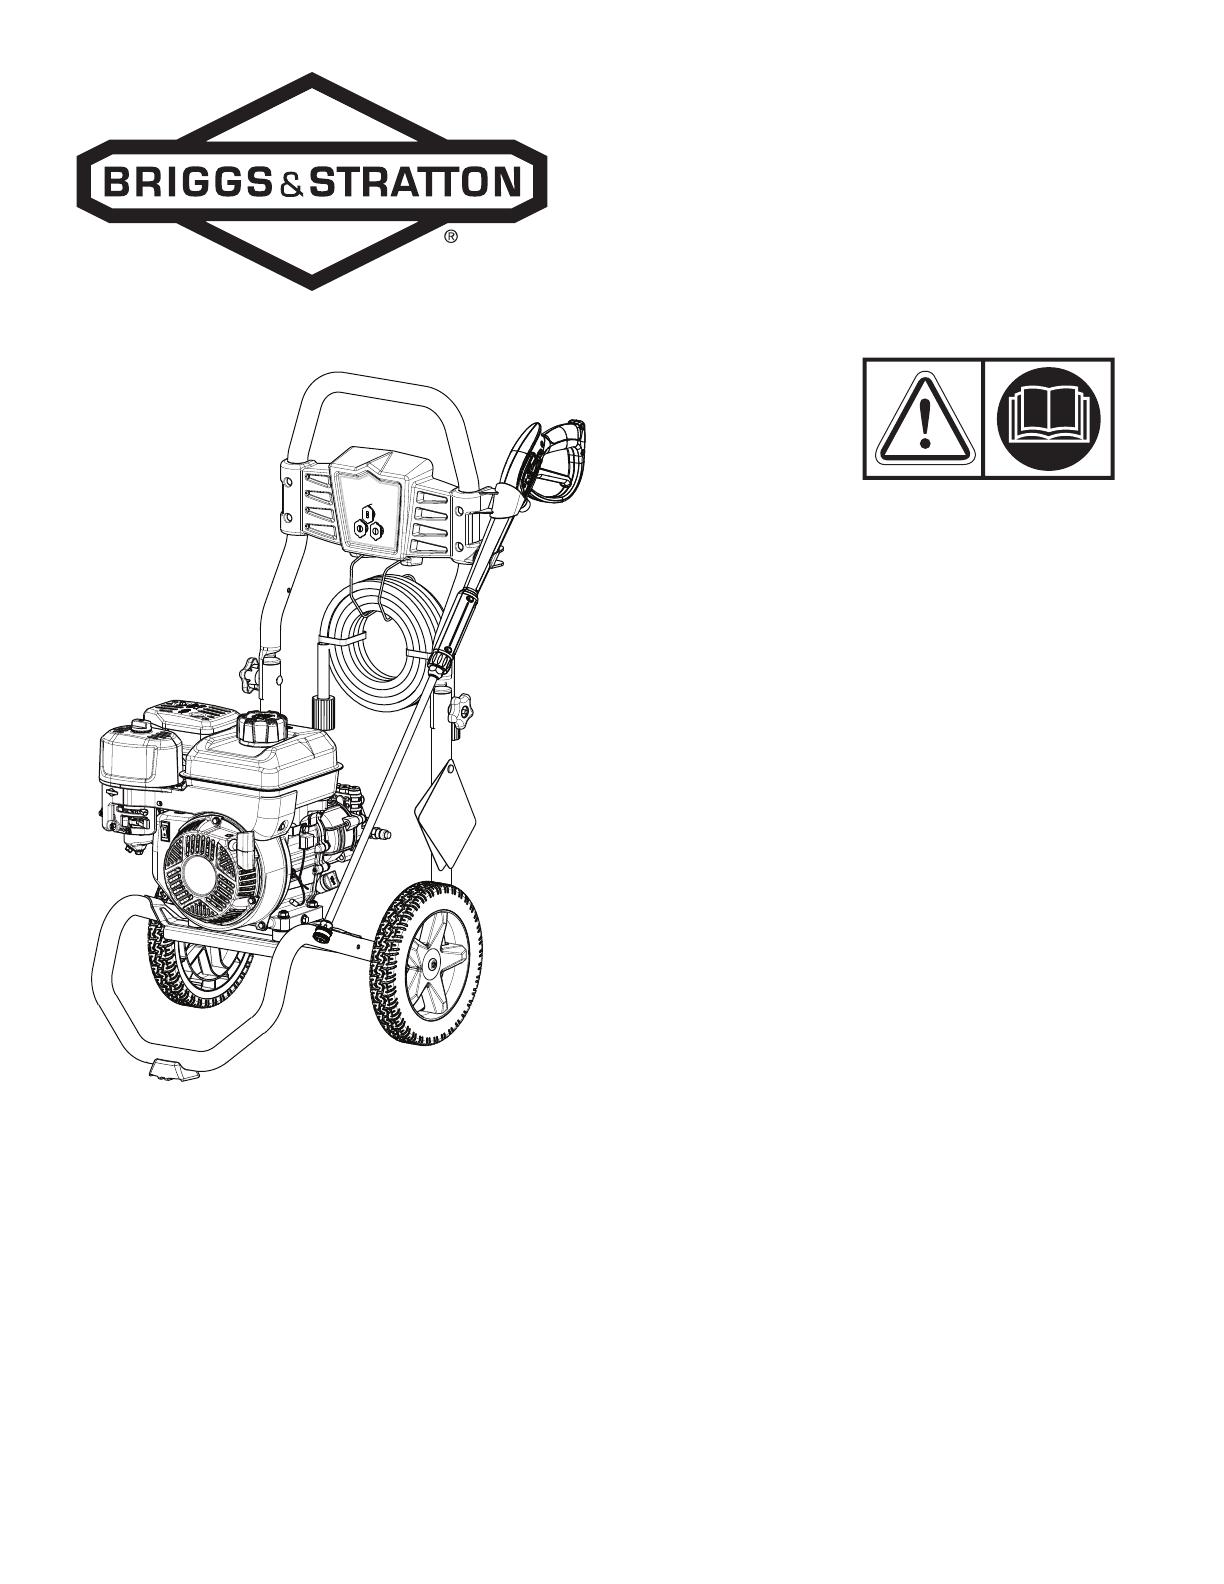
Pressure Washer
Operator’s Manual
Model Number _____________________________
Revision __________________________________
Serial Number ______________________________
Date Purchased ____________________________
Copyright © 2021. Briggs & Stratton
Milwaukee, WI, USA. All rights reserved.
(800) 743-4115
BRIGGSandSTRATTON.COM

Not for
Reproduction
Table of Contents
Symbols and Meanings ...........................2
Equipment Description............................3
Features and Controls ............................4
Operation.......................................6
Maintenance ...................................12
Storage .......................................14
Troubleshooting.................................15
Warranty ......................................16
Register Your Product
To ensure prompt and complete warranty coverage, register
your product online at www.onlineproductregistration.com.
Symbols and Meanings
Signal Meaning
DANGER Indicates a hazard which, if not avoided,
will result in death or serious injury.
WARNING Indicates a hazard which, if not avoided,
could result in death or serious injury.
CAUTION Indicates a hazard which, if not avoided,
could result in minor or moderate injury.
NOTICE Indicates information considered
important, but not hazard-related.
Symbol Name Explanation
Safety Alert
Symbol
Indicates a potential personal
injury hazard.
Read
Operator’s
Manual
Failure to follow warnings,
instructions and operator’s
manual could result in death or
serious injury.
Toxic Fumes
Engine exhaust contains carbon
monoxide, a poisonous gas that
could kill you in minutes. You
cannot smell it or see it.
Fire
Fuel and its vapors are
extremely flammable which
could cause burns or fire
resulting in death or serious
injury.
Engine exhaust could cause
fire resulting in death or serious
injury.
Symbol Name Explanation
Fluid
Injection
High-pressure water could cut
through skin resulting in serious
injury and possible amputation.
Spray,
Flying
Objects
Risk of eye injury. Spray could
splash back or propel objects
resulting in serious injury.
Hot Surface
Contact with muffler area could
cause burns resulting in serious
injury.
Electric
Shock
Contact with power source
could cause electrical shock
resulting in death or serious
injury.
Kickback
Recoil starter kickback will pull
hand and arm toward engine
faster than you can let go which
could cause broken bones,
sprains or bruises resulting in
serious injury.
Chemical
Burn
Chemicals could cause burns
resulting in death or serious
injury.
Slippery
Surface/Fall
Slippery wet surfaces could
cause you to fall resulting in
death or serious injury.
Fall
Kickback from spray gun could
cause you to fall resulting in
death or serious injury.
WARNING! This product can expose you to
chemicals including gasoline engine exhaust, which
is known to the State of California to cause cancer,
and carbon monoxide, which is known to the State of
California to cause birth defects or other reproductive harm.
For more information go to www.P65Warnings.ca.gov.
WARNING! This product contains lead and lead
compounds, known to the state of California to
cause birth defects or other reproductive harm.
Wash your hands after handling this product. Cancer and
Reproductive Harm - www.P65Warnings.ca.gov
2 BRIGGSandSTRATTON.COM

Not for
Reproduction
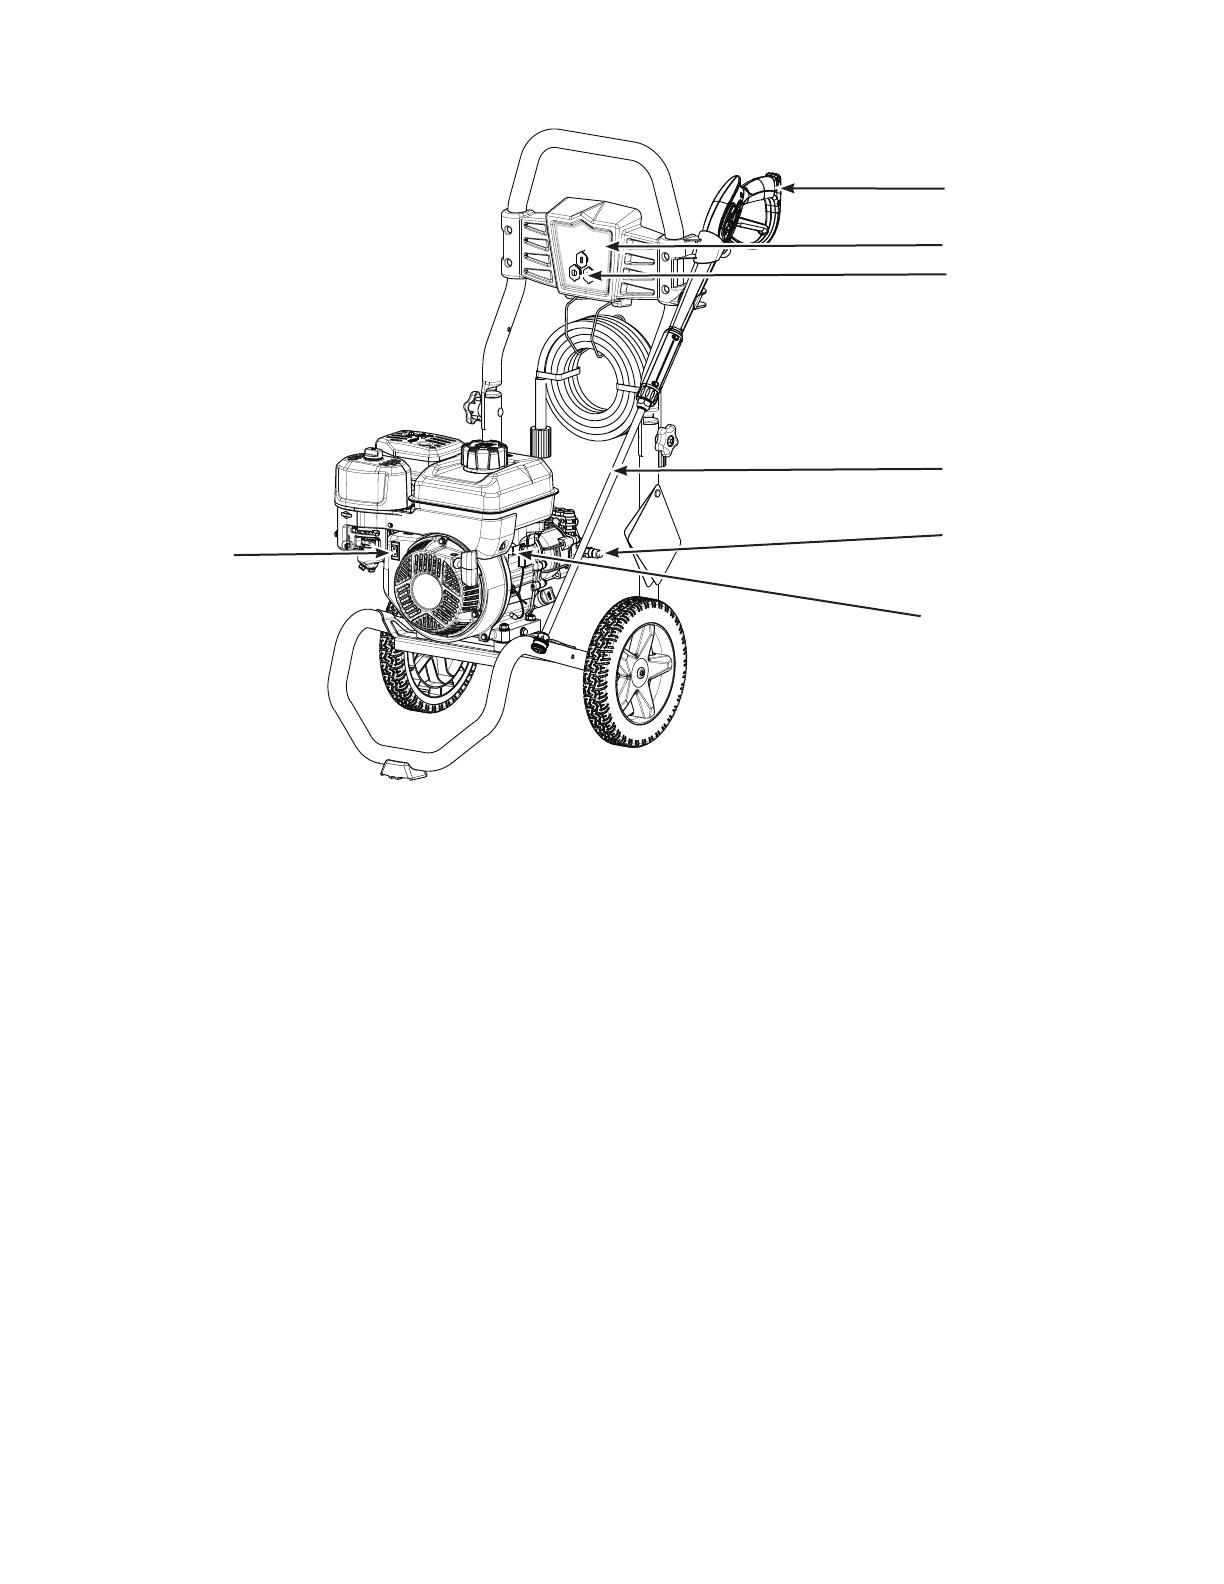
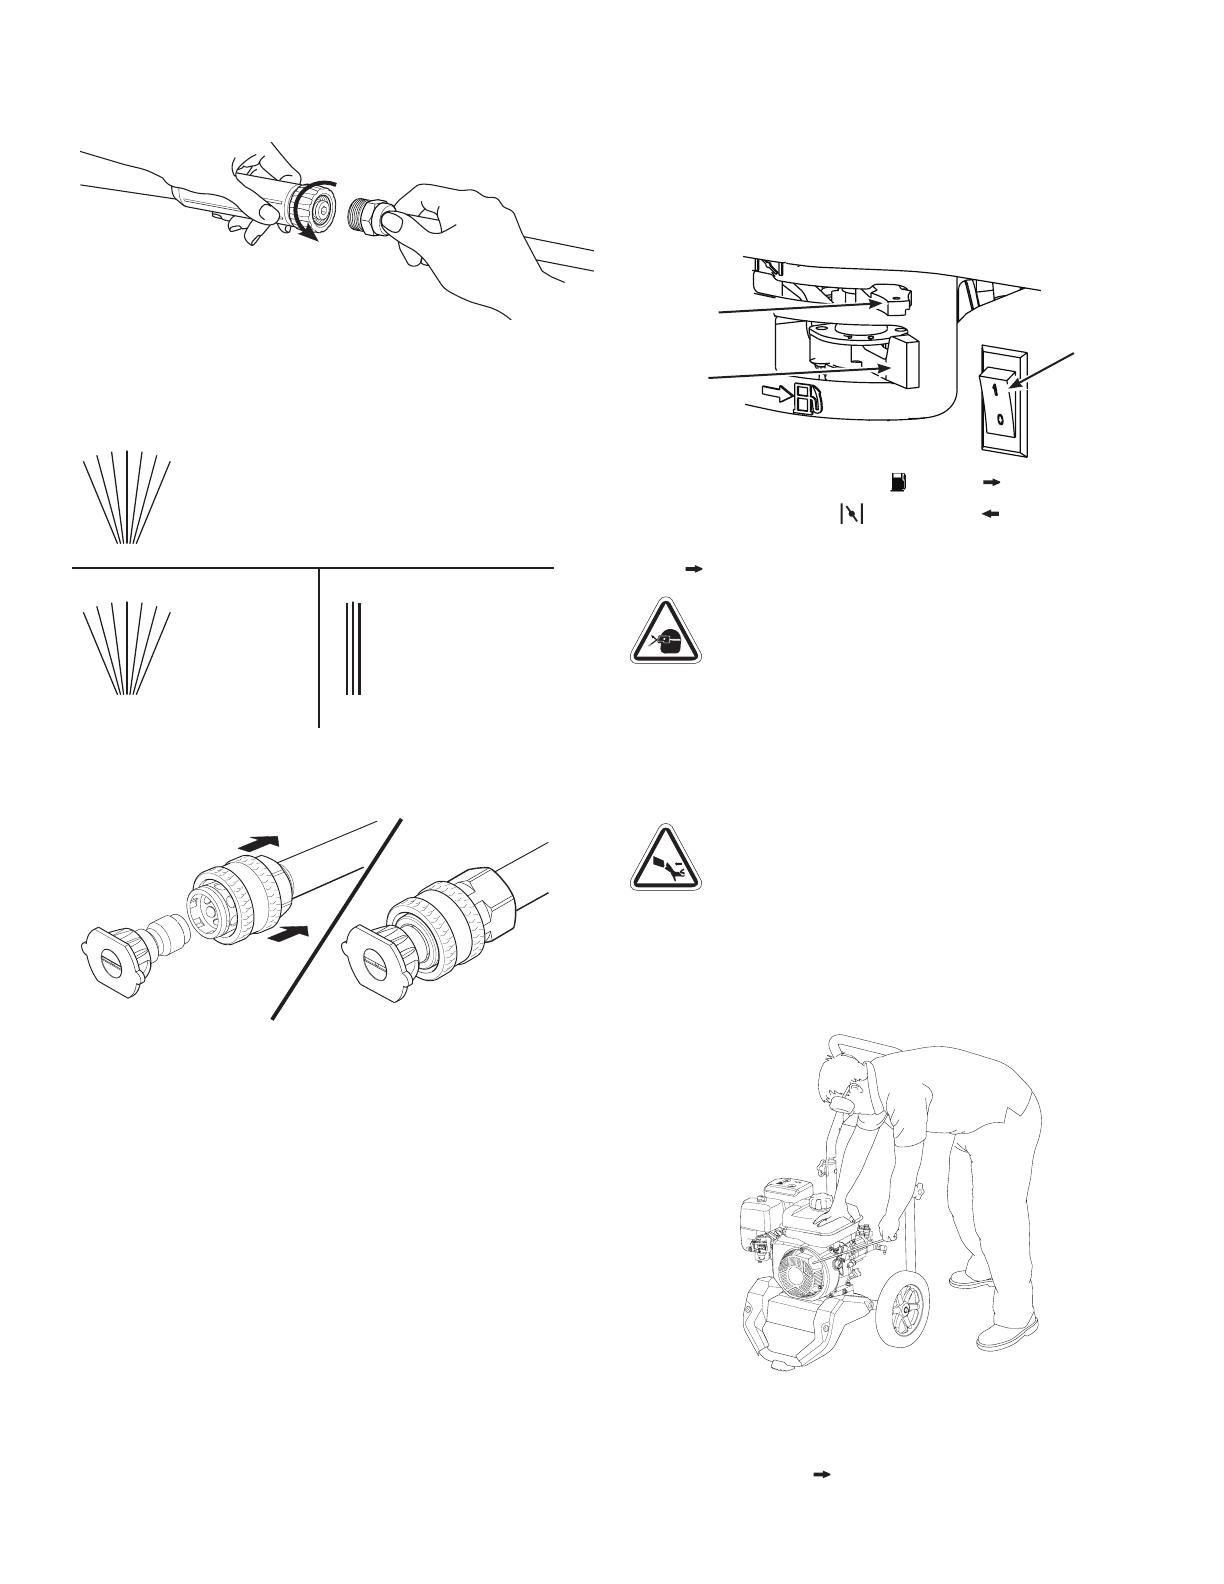
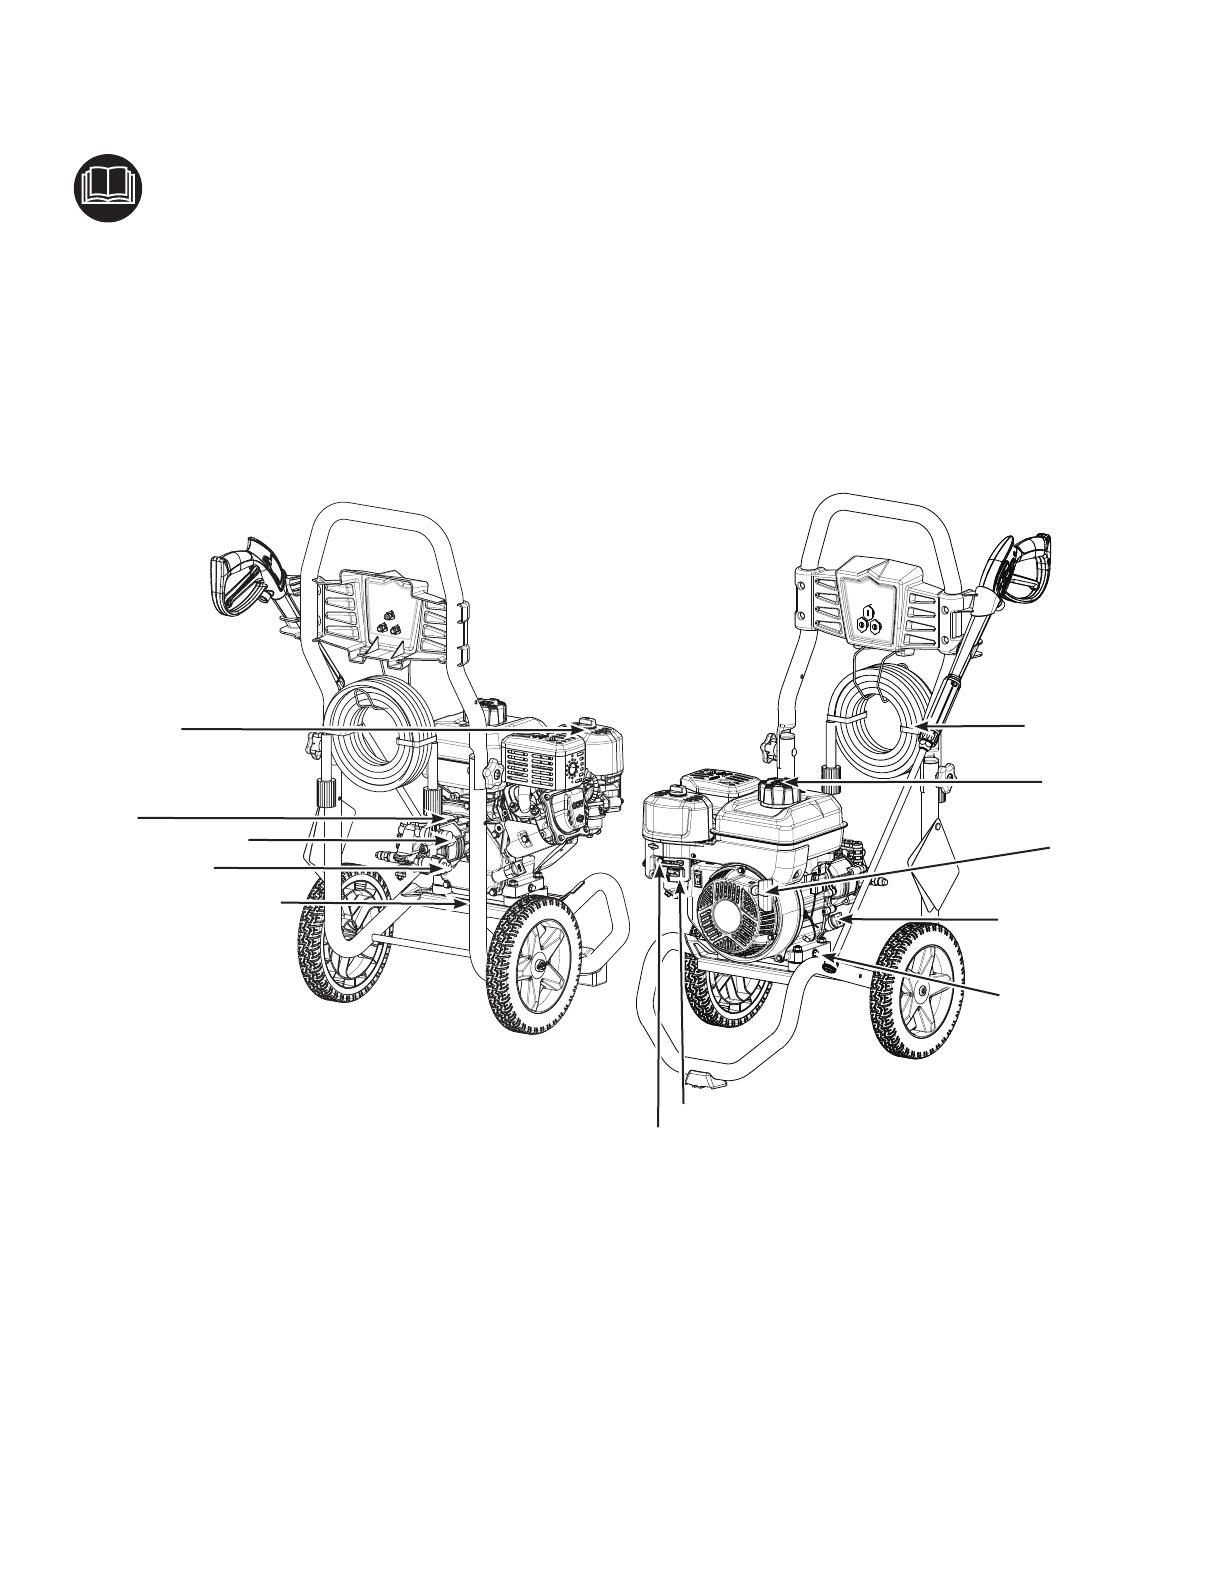
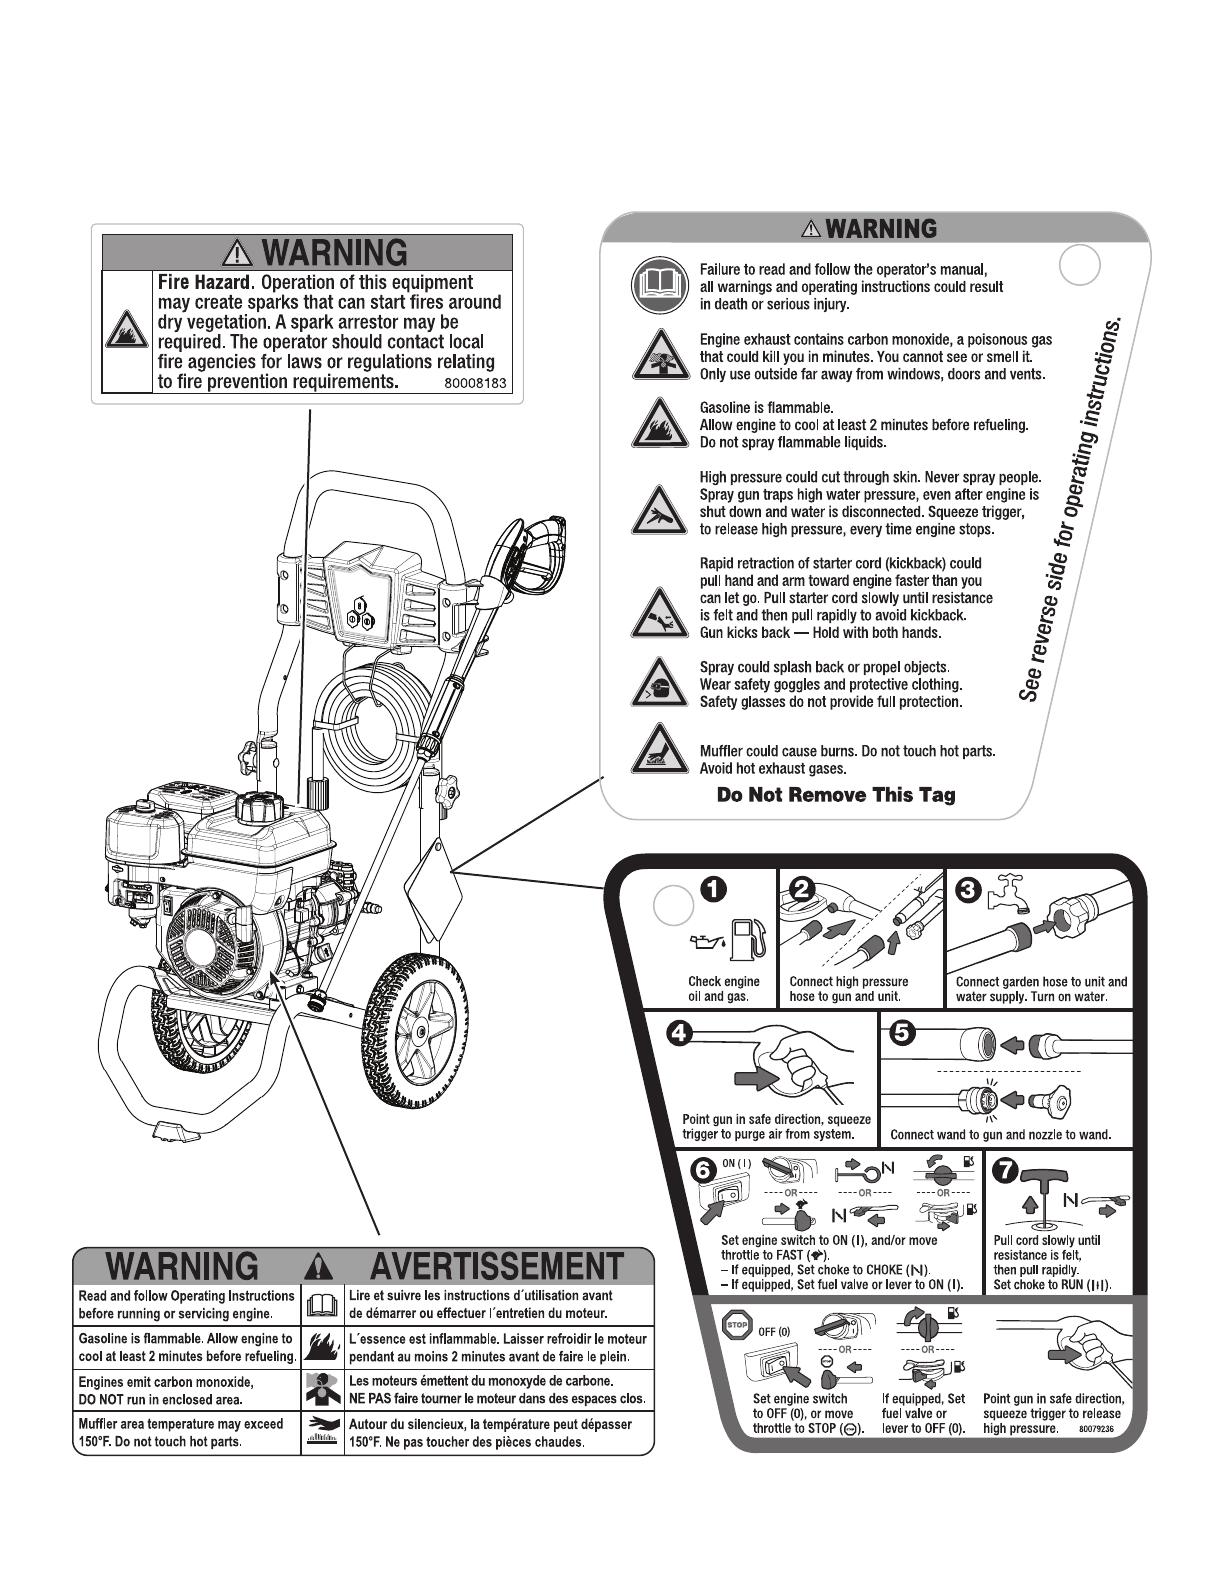
Air Filter — Filters engine intake air.
Choke Lever — Prepares a cold engine for starting.
Fuel Cap — Add unleaded fuel here.
Fuel Shut-off Lever— Used to turn fuel supply on and off to
engine.
High Pressure Hose — Connect one end to water pump
and the other end to spray gun.
High Pressure Outlet — Connection for high pressure hose.
Identification Label — Provides model and serial number of
pressure washer.
Oil Drain Plug — Drain engine oil here.
Oil Fill/Dipstick — Check and ll oil here.
Pump — Stainless steel piston, axial cam pump that
develops high pressure.
Recoil Starter — Used to start the engine.
Water Inlet — Connection for garden hose.
Equipment Description
Read this manual carefully and become familiar
with your product. Know its applications, its
limitations, and any hazards involved. Save these
original instructions for future reference.
To aid in outdoor cleaning projects, this engine-driven,
high-pressure cleaning machine uses a variety of spray tips
and detergent.
Know how to stop the product and reduce pressure quickly.
Keep operating area clear and do not allow children to
operate pressure washer.
Stay alert—watch what you are doing. Do not operate
pressure washer when fatigued or under the influence of
alcohol or drugs.
Every effort has been made to ensure that information in
this manual is accurate and current. However, we reserve
the right to change, alter, or otherwise improve the product
and this document at any time without prior notice.
NOTICE If you have questions about intended use,
contact an authorized service dealer. This equipment is
designed to be used with Briggs & Stratton® authorized
parts only.
This spark ignition system complies with the Canadian
Standard CAN ICES-2/NMB-2.
Recoil Starter
Oil Fill/Dipstick
High Pressure Outlet
Fuel Cap
Water Inlet
Identication Label
Air Filter High Pressure
Hose
Pump
Fuel Shut-o Lever
Choke Lever
Oil Drain
3

Not for
Reproduction
Features and Controls
Compare the illustrations with your pressure washer to familiarize yourself with the locations of various controls and
product warnings.
4 BRIGGSandSTRATTON.COM
Not for
Reproduction
Accessory Tray — Provides convenient storage for
accessories.
Automatic Cool Down System — Prevents internal pump
damage by discharging warm water to the ground.
Detergent Siphoning Tube (not shown) — Use to siphon
pressure washer safe detergents into the low pressure
stream.
Engine Switch — Set switch to ON (I) before starting
engine. Set switch to OFF (0) to shut o engine.
Low Oil Shutdown — This unit is equipped with a low oil
protection device. Oil must be at proper level for engine
to run. If the engine oil drops below a preset level, an oil
switch will stop the engine. Check oil level with dipstick.
Spray Wand — Allows you to switch between spray tips.
Spray Gun — Controls spray using trigger. Includes
trigger lock.
Spray Tips — Multiple patterns for various cleaning
applications.
Accessory Tray
Spray Tips
Engine Switch
Spray Wand
Spray Gun
Automatic Cool
Down System
Low Oil Shutdown
5
Not for
Reproduction
Operation
Step 1: Safe Location
Before starting the pressure washer, there are two equally
important safety concerns regarding carbon monoxide
poisoning and fire that must be addressed.
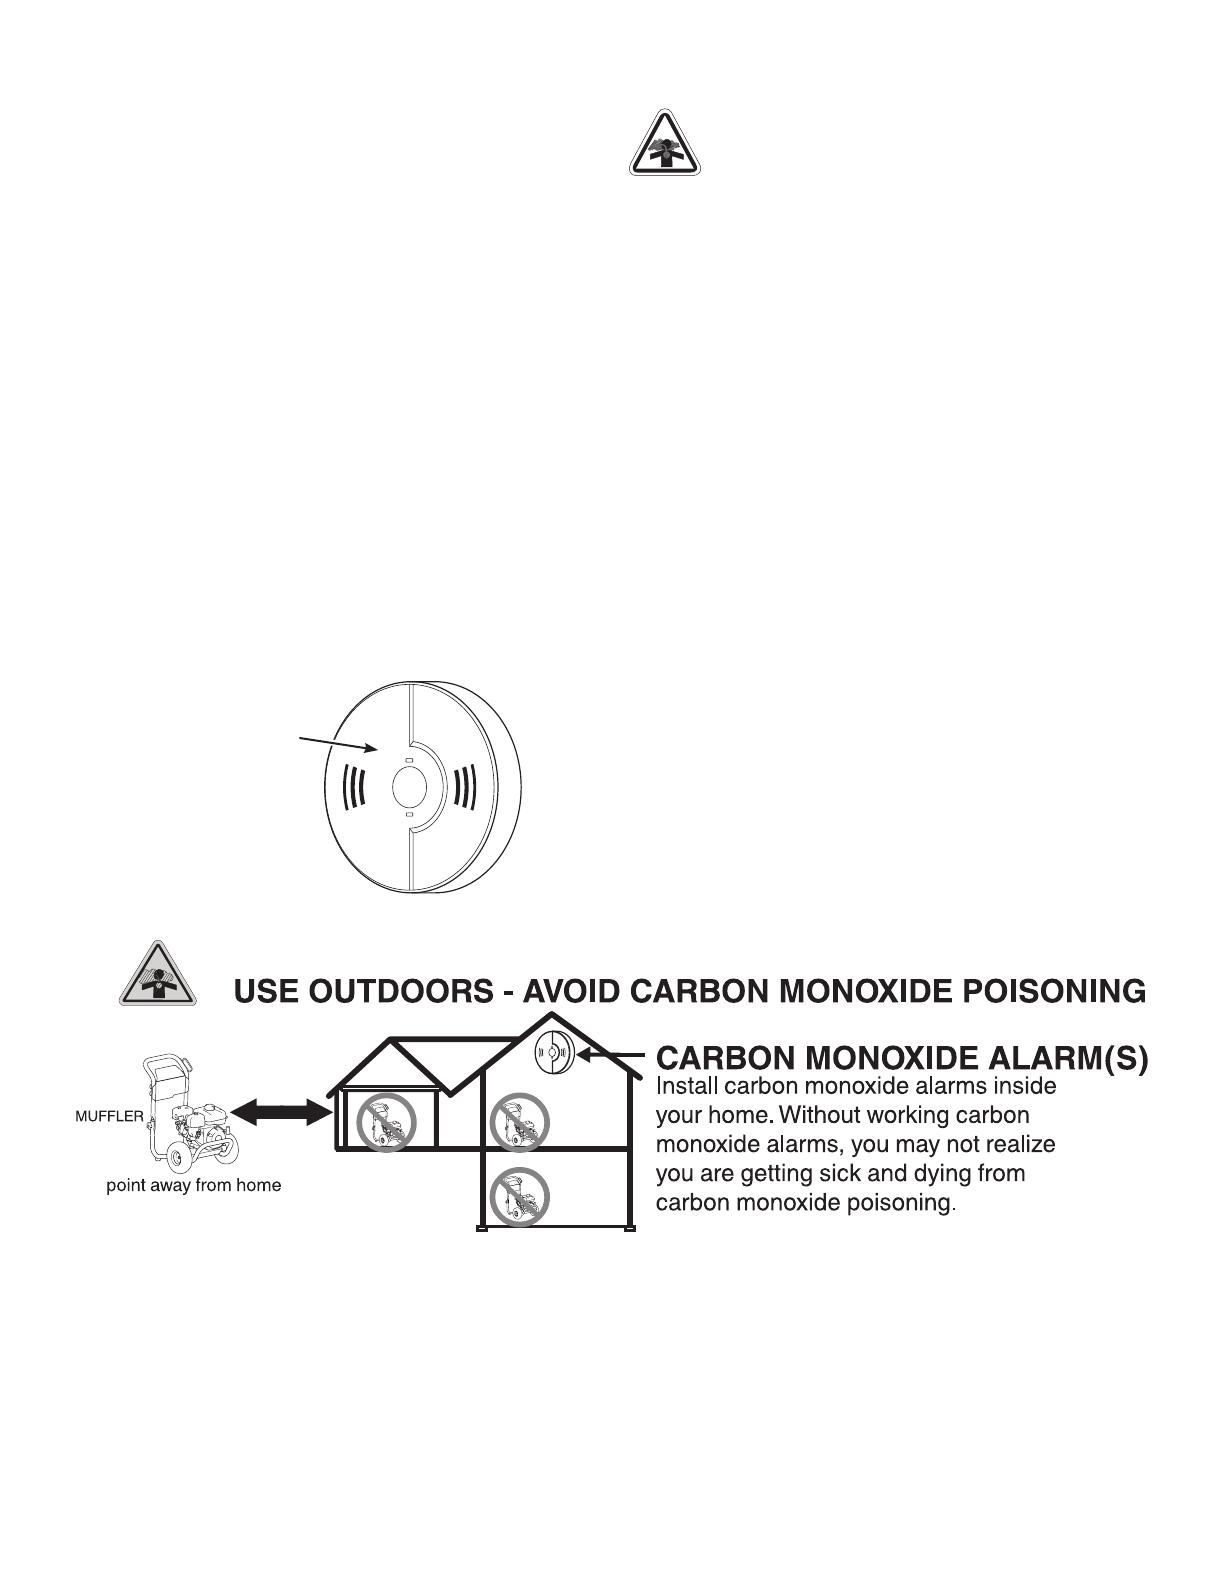
Operation Location to Reduce the Risk of Carbon
Monoxide Poisoning
The engine exhaust of all fossil fuel burning equipment,
such as a pressure washer, contains carbon monoxide, a
poisonous gas that could kill you in minutes. You cannot
smell it, see it, or taste it. Even if you do not smell exhaust
fumes, you could still be exposed to carbon monoxide gas.
By law, it is required in many states to have a carbon
monoxide alarm in operating condition in your home.
A carbon monoxide alarm is an electronic device that
detects hazardous levels of carbon monoxide. When there
is a buildup of carbon monoxide, the alarm will alert the
occupants by flashing a visual indicator light and an alarm.
Smoke alarms cannot detect carbon monoxide gas.
WARNING! Engine exhaust contains carbon
monoxide, a poisonous gas that could kill you in
minutes. You cannot smell it, see it, or taste it.
Even if you do not smell exhaust fumes, you could still be
exposed to carbon monoxide gas.
• Operate this product only outdoors, far away from
windows, doors and vents to reduce the risk of carbon
monoxide gas accumulating and the potential of being
drawn towards occupied spaces.
• Install battery-operated carbon monoxide alarms or
plug-in carbon monoxide alarms with battery back-up
according to the manufacturer’s instructions. Smoke
alarms cannot detect carbon monoxide gas.
• Do not run this product inside homes, garages,
basements, crawlspaces, sheds, or other partially-
enclosed spaces even if using fans or opening doors and
windows for ventilation. Carbon monoxide can quickly
build up in these spaces and can linger for hours, even
after this product has shut off.
• Point exhaust away from all homes and occupied spaces.
If you start to feel sick, dizzy, or weak while using this
product, get to fresh air right away. See a doctor. You may
have carbon monoxide poisoning.
Carbon monoxide alarm
6 BRIGGSandSTRATTON.COM
Not for
Reproduction
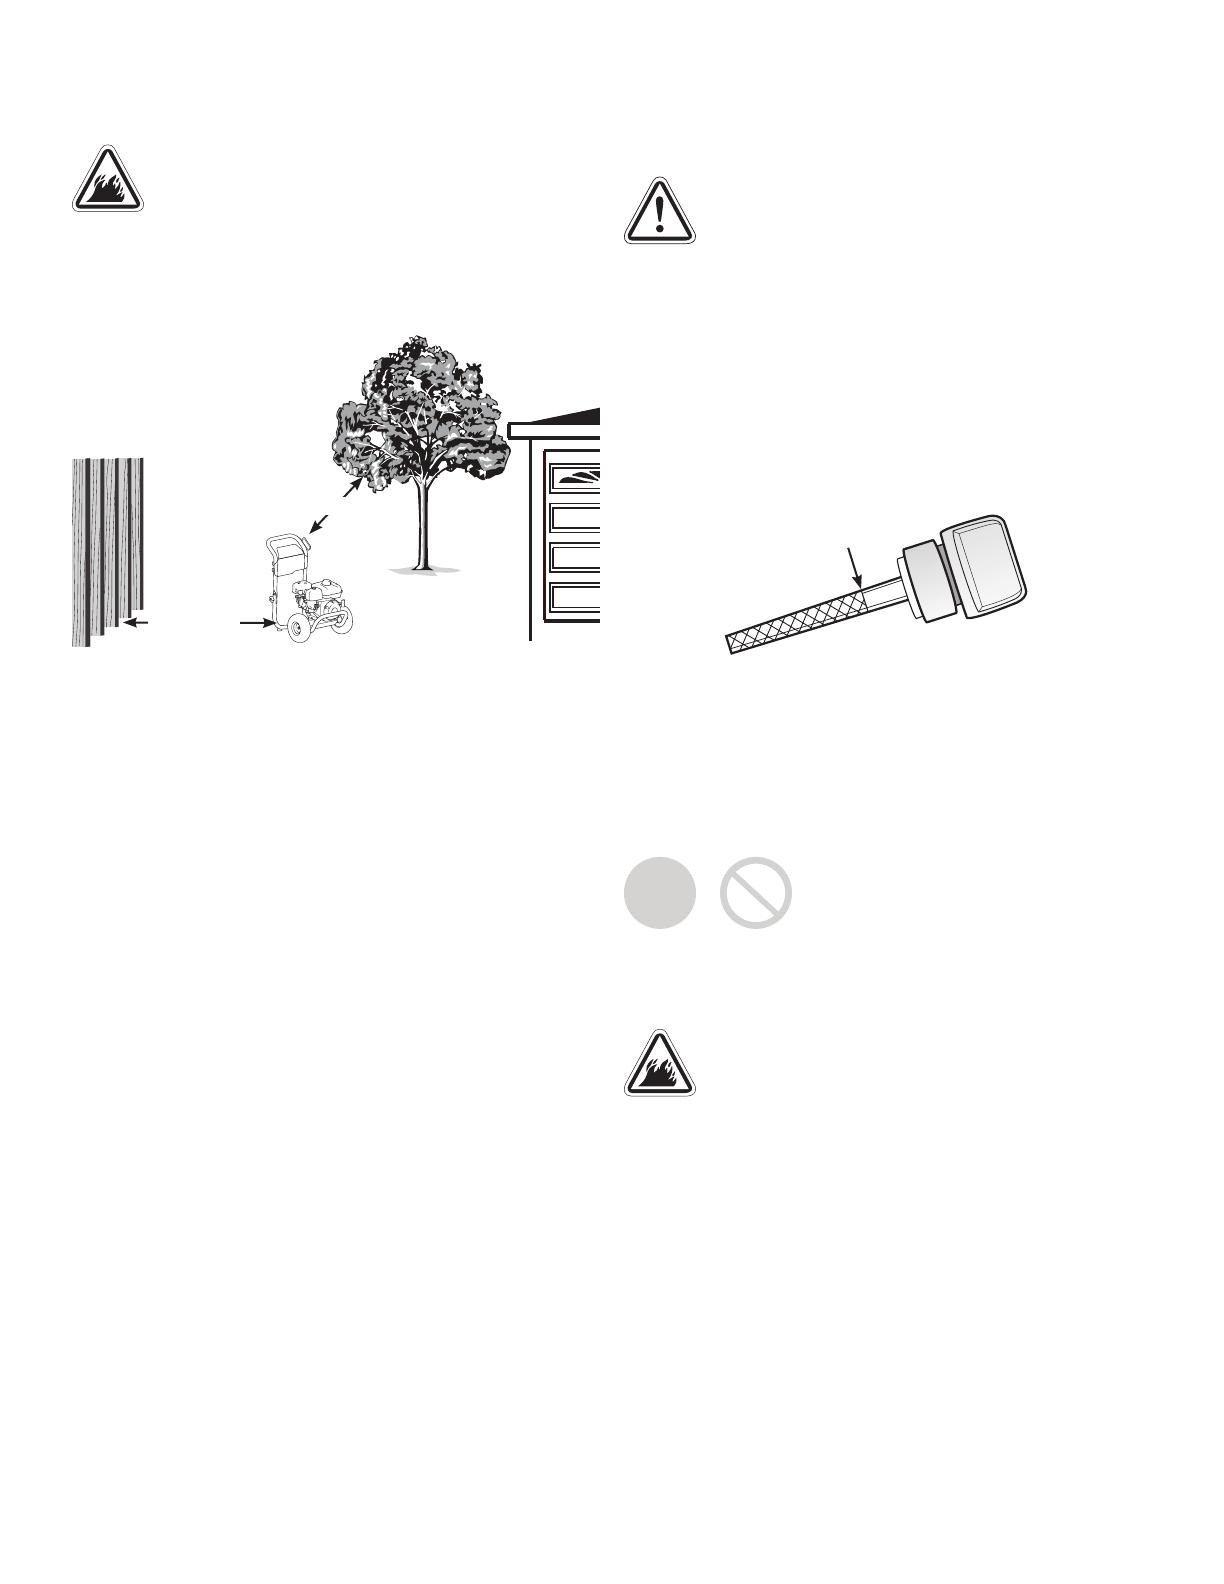
Operation Location to Reduce the Risk of Fire
WARNING! Exhaust heat/gases could ignite
combustibles, structures or damage fuel tank
causing a fire, resulting in death or serious injury.
• Pressure washer must be at least 5 ft (1.5 m) from any
structure, overhang, trees, windows, doors, and any wall
opening, shrubs, or vegetation over 12 in. (30.5 cm) in
height.
• Do not place pressure washer under a deck or other type
of structure that may confine airflow. Smoke alarm(s)
must be installed and maintained indoors according to the
manufacturer’s instructions /recommendations.
• Carbon monoxide alarms cannot detect smoke.
• It is a violation of California Public Resource Code Section
4442, to use or operate the engine on any forest-covered,
brush-covered, or grass-covered land unless the exhaust
system is equipped with a spark arrester, as defined
in Section 4442, maintained in effective working order.
Other states or federal jurisdictions may have similar laws,
reference Federal Regulation 36 CFR Part 261.52.
• Contact the original equipment manufacturer, retailer, or
dealer to obtain a spark arrester designed for the exhaust
system installed on this engine.
• Replacement parts must be the same and installed in the
same position as the original parts.
Step 2: Oil and Fuel
Check Oil Level
CAUTION! Avoid prolonged or repeated skin
contact with used motor oil. Used motor oil has
been shown to cause skin cancer in certain
laboratory animals. Thoroughly wash exposed areas with
soap and water.
1. Make sure pressure washer is on a level surface.
2. Clean the oil fill area of any debris.
3. Remove oil dipstick and wipe dipstick with clean cloth.
Replace and tighten dipstick. Remove and check oil
level.
4. Verify oil is at full mark on dipstick. Replace and tighten
dipstick.
5. If needed, see Maintenance section for instructions to
add oil.
Add Fuel
Fuel must meet these requirements:
• Clean, fresh, unleaded fuel with a minimum of 87 octane.
• Gasoline with an ethanol content up to 10% is acceptable.
NOTICE Do not mix oil in fuel or modify engine to run on
alternate fuels. Unapproved fuels could damage engine.
See High Altitude for operation above 5,000 ft. (1524 m).
WARNING! Fuel and its vapors are extremely
flammable which could cause burns or fire
resulting in death or serious
injury.
• Do not refuel during operation.
• Do not smoke during refueling.
• Turn engine off and let it cool at least 2 minutes before
removing fuel cap.
• Fill fuel tank outdoors. Keep fuel away from ignition
sources.
E15
E10
MUFFLER
5 ft (1.5 m)
min.
5 ft (1.5 m) min.
Full
7

Not for
Reproduction
1. Slowly remove fuel cap to relieve pressure in tank.
2. Slowly add fuel to fuel tank. Do not fill above bottom of
fuel tank neck to allow for fuel expansion.
3. Install fuel cap and let any spilled fuel evaporate
before starting engine.
High Altitude
At altitudes over 5,000 ft (1524 m), a minimum 85 octane
fuel is acceptable. To remain emissions compliant, high
altitude adjustment is required. Operation without this
adjustment will cause decreased performance, increased
fuel consumption, and increased emissions.
See an authorized Briggs & Stratton dealer for high altitude
adjustment information. Operation of the engine at altitudes
below 2,500 ft (762 m) with the high altitude kit is not
recommended.
Transporting
When transporting equipment with a vehicle or trailer, turn
fuel shutoff valve to off (0) position. Do not tip engine or
equipment at an angle which causes fuel to spill.
Step 3: Set Up
Clean Debris
Clean any accumulated debris. Keep area around muffler
free from any debris.
• Use a soft bristle brush to loosen caked on dirt or oil.
• Use a damp cloth to wipe exterior surfaces clean.
Lubricate O-rings
Lubricate all connections shown to extend the life of the
o-rings.
1. Inspect and clean connecting surfaces prior to
lubrication and assembly. Replace o-rings that are
damaged or missing. See Common Service Parts.
NOTICE Never repair leaking connections with sealant of
any kind. Replace o-ring.
2. Use a small brush or cotton swab to apply a light
coating of grease directly to o-rings.
Check / Connect Gun and Hose
1. If spray gun trigger depresses without pressing
trigger lock or if spray gun remains depressed when
released, replace spray gun immediately.
2. If high pressure hose is damaged, exposing inner
mesh, replace immediately.
3. Attach high pressure hose to spray gun and high
pressure outlet on pump. Tighten by hand.
WARNING! The high pressure fluid could cut
through skin and its underlying tissues, resulting
in serious injury and possible amputation. Never
attach spray wand directly to high pressure hose.
Check Water Inlet Screen / Connect Garden Hose
1. Inspect inlet screen. Remove debris or replace if
damaged.
2. Run water through garden hose (not to exceed 50 ft
(15 m) to clean out debris, then connect to water inlet.
NOTICE There must be at least 10 ft (3 m) of unrestricted
garden hose between the pressure washer inlet and
any device, such as a vacuum breaker, to prevent pump
damage.
3. Turn on water, point spray gun in safe direction, press
trigger lock and depress trigger to purge pump system
of air.
Maximum Fill Level
Trigger Lock
Spray Gun
High
Pressure
Hose
Spray Wand
8 BRIGGSandSTRATTON.COM
Inlet Screen
Not for
Reproduction
4. Attach spray wand to spray gun. Tighten by hand.
Step 4: Spray Tips
1. Select desired spray tip:
2. Pull spray wand quick connect collar back, insert
spray tip and release. Tug spray tip to ensure it is
secure.
Step 5: Start Up
NOTICE Do not start engine without water supply
connected and turned on.
1. Level product before starting.
2. Turn engine switch to ON (I) position.
3. Move fuel shut-off lever ( ) to ON ( ) position.
4. Move choke lever ( ) to CHOKE ( ) position.
NOTICE For a warm engine, be sure choke lever is in
RUN ( ) position.
WARNING! Risk of eye injury. Spray could
splash back or propel objects, resulting in serious
injury.
• Always wear indirect vented (chemical splash) safety
goggles when using or near this product. (Safety glasses
do not provide full protection).
• Always wear protective clothing such as long-sleeved
shirts, long pants and closed-toed shoes.
WARNING! Recoil starter kickback (rapid
retraction) will pull hand and arm toward engine
faster than you can let go, which could cause
broken bones, fractures, bruises, or sprains and result in
serious injury.
5. Position yourself as shown below, grasp recoil starter
and pull slowly until you feel some resistance. Then
pull rapidly to start engine.
6. Return recoil starter slowly. Do not let rope “snap back”
against starter.
NOTICE If engine fails to start after two attempts, move
choke lever to RUN ( ) position and repeat steps 5 and 6.
Engine
Switch
Choke
Lever
Fuel
Lever
9
Low Pressure
Black Soap
Use to apply detergent
General Rinse
Green, 25°
Siding /
Patios Decks
Driveways /
Garage Floors
Maximum
Rinse
Red, 0°
Paint Removal /
Oil Stains / Rust
Removal

Not for
Reproduction
7. When engine starts, move choke lever to RUN ( )
position.
NOTICE If engine starts but fails to run, see Low Oil
Shutdown in Features and Controls.
WARNING! High-pressure water could cut
through skin resulting in serious injury and
possible amputation.
• Do not direct discharge at self or others.
• Call physician immediately if cut by fluid. Do not treat as
a simple cut.
• Do not touch spray tips while spraying.
WARNING! Use of pressure washer
could create slippery surfaces causing
you to fall, resulting in death or serious
injury. Kickback from spray gun could cause you to fall
resulting in death or serious injury. Operate pressure
washer from a stable surface.
8. Firmly grasp spray gun with both hands, point spray
gun in safe direction, press trigger lock and depress
trigger to begin spraying.
9. Apply high pressure spray to a small area first, then
check the surface for damage. If no damage is found,
it is okay to continue cleaning.
WARNING! Risk of electrocution. Contact with
power source could cause electric shock or burn
resulting in death or serious injury. Never spray
near power source.
Usage Tips
• For most effective cleaning, keep spray tip 8 to 24 in (20
to 61 cm) away from cleaning surface.
• Do not use high pressure spray tips closer than 6 in (15
cm) to prevent damage to the cleaning surface.
• Start at the top of the area to be rinsed, working down
with long, even, overlapping strokes.
Step 6: Applying Detergent
WARNING! Chemicals could cause burns
resulting in death or serious injury.
• Follow chemical manufacturer’s label instructions for
proper use and handling of the chemical.
• Only use products marketed for use with pressure
washers.
• Never spray flammable liquids.
Check Detergent Siphoning Tube
Clean detergent tube if clogged or replace if leaking.
To apply detergent, follow these steps:
1. Attach detergent siphon tube to the barbed fitting on
the pump.
2. Prepare pressure washer detergent per manufacturer’s
instructions.
3. Place detergent siphoning tube into detergent
container making sure end is fully submerged while
applying detergent.
4. Install black detergent spray tip. See Spray Tips.
5. Apply per manufacturer’s instructions.
NOTICE Detergent cannot be applied with the high
pressure spray tips (Green or Red).
Step 7: Shut Down
1. Release spray gun trigger and let engine idle for one
minute.
2. Push engine switch to OFF (0) position.
WARNING! Spray gun traps high water
pressure, even after engine shut down and water
disconnection, which could result in serious injury.
3. Point spray gun in safe direction. Press trigger lock
and depress trigger to relieve high water pressure.
Step 8: Clean Up
1. Turn off water and purge system.
2. Move fuel shut-off lever to OFF ( ) position.
3. Turn engine switch to OFF (0) position.
WARNING! Spray gun traps high water
pressure, even after engine shut down and water
disconnection, which could result in serious injury.
4. Point spray gun in safe direction. Press trigger lock
and depress trigger to relieve high water pressure.
10 BRIGGSandSTRATTON.COM
Not for
Reproduction
Maintenance
Maintenance Schedule
Follow the hourly or calendar intervals, whichever occurs
first.
1 Service more often under dirty or dusty conditions.
2 See any authorized dealer for service.
General Recommendations
Regular maintenance will improve the performance and
extend the life of the pressure washer. See any authorized
dealer for service.
Emissions Control
Maintenance, replacement, or repair of the emissions
control devices and systems may be performed by any
non-road engine repair establishment or individual.
However, to obtain ”no charge” emissions control service,
the work must be performed by a factory authorized dealer.
See Emissions Warranty.
The emissions control system for carbureted engines is
EM (Engine Modifications). The emissions control systems
for engines with electronic fuel injection are ECM (Engine
Control Module), MPI (Multi Port Injection), and if equipped
an O2S (Oxygen Sensor).
Pump Oil
Do not attempt any oil maintenance on this pump. The
pump is pre-lubricated and sealed from the factory,
requiring no additional maintenance for the life of the pump.
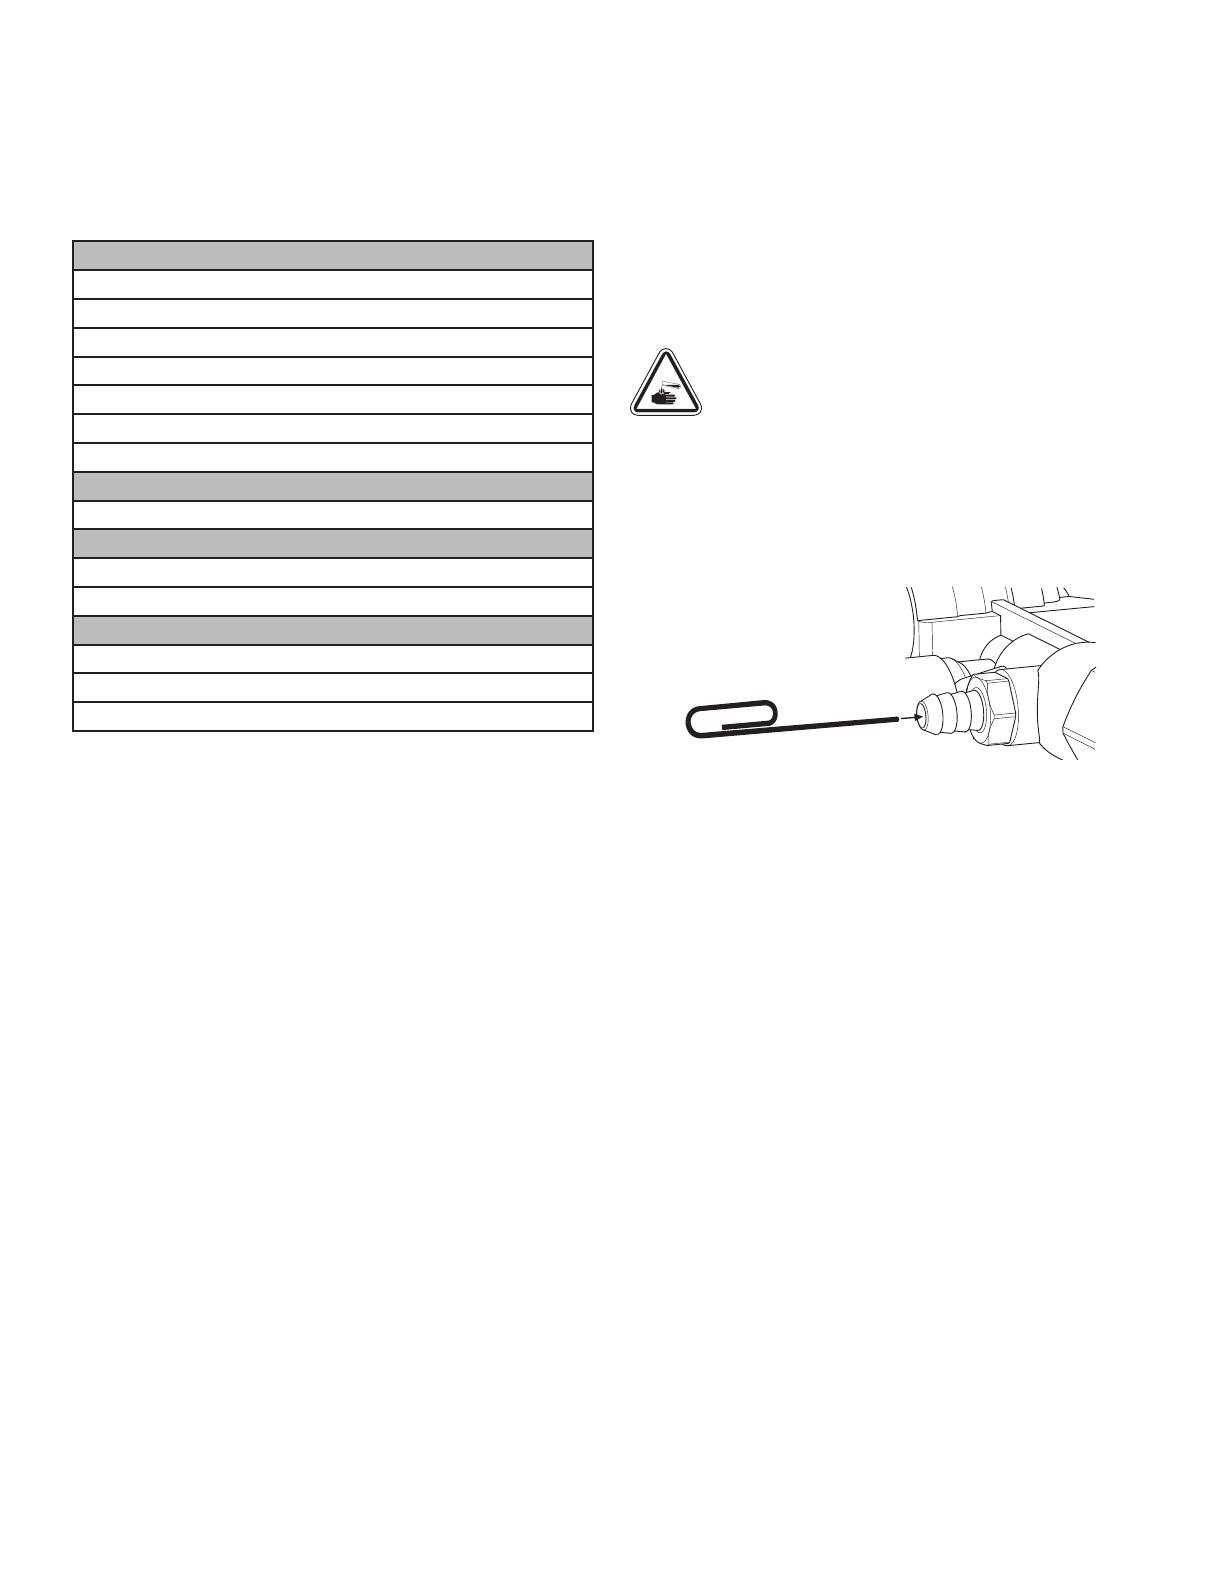
Detergent Siphoning Check Ball
The check ball in detergent siphoning system may become
stuck from dried soap or minerals in water. The check ball
can be freed by performing the following:
WARNING! Chemical Burn Hazard. Chemicals
could cause burns resulting in death or serious
injury. Follow chemical manufacturer’s label
instructions for proper use and handling of the chemical.
Following Shut Down, remove detergent siphoning hose
from barbed fitting on pump and drain detergent into a
container.
1. Insert paper clip, or similar device, into barbed fitting
on pump and push down until ball moves.
2. Reinstall detergent siphoning hose.
Spray Tip Maintenance
Clean an obstructed spray tip to correct a pulsing sensation
when squeezing the spray gun trigger.
1. Following Shut Down, remove spray tip from spray
wand.
2. Use a paper clip, or similar device, to free foreign
material.
Every 8 Hours or Daily (see Operation Section)
• Check engine oil level
• Clean debris
• Lubricate o-rings
• Check spray gun
• Check high pressure hose
• Check / clean water inlet screen
• Check detergent siphoning tube
Every 25 Hours or Yearly
• Clean engine air filter1
Every 50 Hours or Yearly
• Change engine oil
• Service exhaust system
Yearly
• Replace spark plug
• Replace engine air filter1
• Service cooling system1, 2
11

Not for
Reproduction
Engine Maintenance
Oil Recommendations
We recommend the use of Briggs & Stratton Warranty
Certified oils for best performance. Other high-quality
detergent oils are acceptable if classified for service SF,
SG, SH, SJ or higher. Do not use special additives.
Outdoor temperatures determine the proper oil viscosity
for the engine. Use the chart to select the best viscosity for
the outdoor temperature range expected. Engines on most
outdoor power equipment operate well with 5W30 Synthetic
oil. For equipment operated in hot temperatures, Vanguard®
15W50 Synthetic oil provides the best protection.
* Below 40°F (4°C) the use of SAE 30 will result in hard starting.
** Above 80°F (27°F) the use of 10W30 may cause increased oil
consumption. Check oil level more frequently.
Add Engine Oil
1. Place pressure washer on level surface.
2. Clean area around oil fill and remove yellow oil fill cap/
dipstick.
3. Slowly pour oil into oil fill opening. Checking oil level
frequently, fill to Full mark on dipstick.
NOTICE Pause to permit oil to settle. Wipe dipstick clean
each time oil level is checked. Do not overfill.
4. Replace and tighten dipstick.
5. Wipe up any remaining oil.
NOTICE Do not attempt to start engine before it has been
properly serviced with oil. This could result in engine failure.
CAUTION! Avoid prolonged or repeated skin
contact with used motor oil. Used motor oil has
been shown to cause skin cancer in certain
laboratory animals. Thoroughly wash exposed areas with
soap and water.
KEEP OUT OF REACH OF CHILDREN. DO NOT
POLLUTE. CONSERVE RESOURCES. RETURN
USED OIL TO COLLECTION CENTERS.
Changing Engine Oil
Change oil while engine is still warm from running, as
follows:
1. Make sure unit is on a level surface.
2. Disconnect spark plug wire and keep it away from
spark plug.
3. Clean area around oil drain plug. The oil drain plug is
located at base of engine.
4. Remove oil drain plug and drain oil completely into a
suitable container.
5. Reinstall oil drain plug and tighten securely.
6. Add recomended oil as described in Add Engine Oil.
7. Reconnect spark plug wire to spark plug.
Service Air Filter
WARNING! Fuel and its vapors are extremely
flammable, which could cause burns or fire,
resulting in death or serious injury.
• Do not start and run engine with air filter removed.
Your engine will not run properly and may be damaged if
you run it with a dirty or missing air cleaner.
1. Remove fastener and cover.
2. Remove fastener and filter.
3. To loosen debris, gently tap filter on a hard surface. If
filter is excessively dirty, replace with a new filter.
Full Fastener Fastener
Cover
Filter
Seal Washer
Base
Stud
12 BRIGGSandSTRATTON.COM
Not for
Reproduction
4. Install seal washer and filter into base and onto stud.
Make sure filter is properly assembled into base and
secure with fastener.
5. Install cover and secure with fastener. Make sure
fastener is tight.
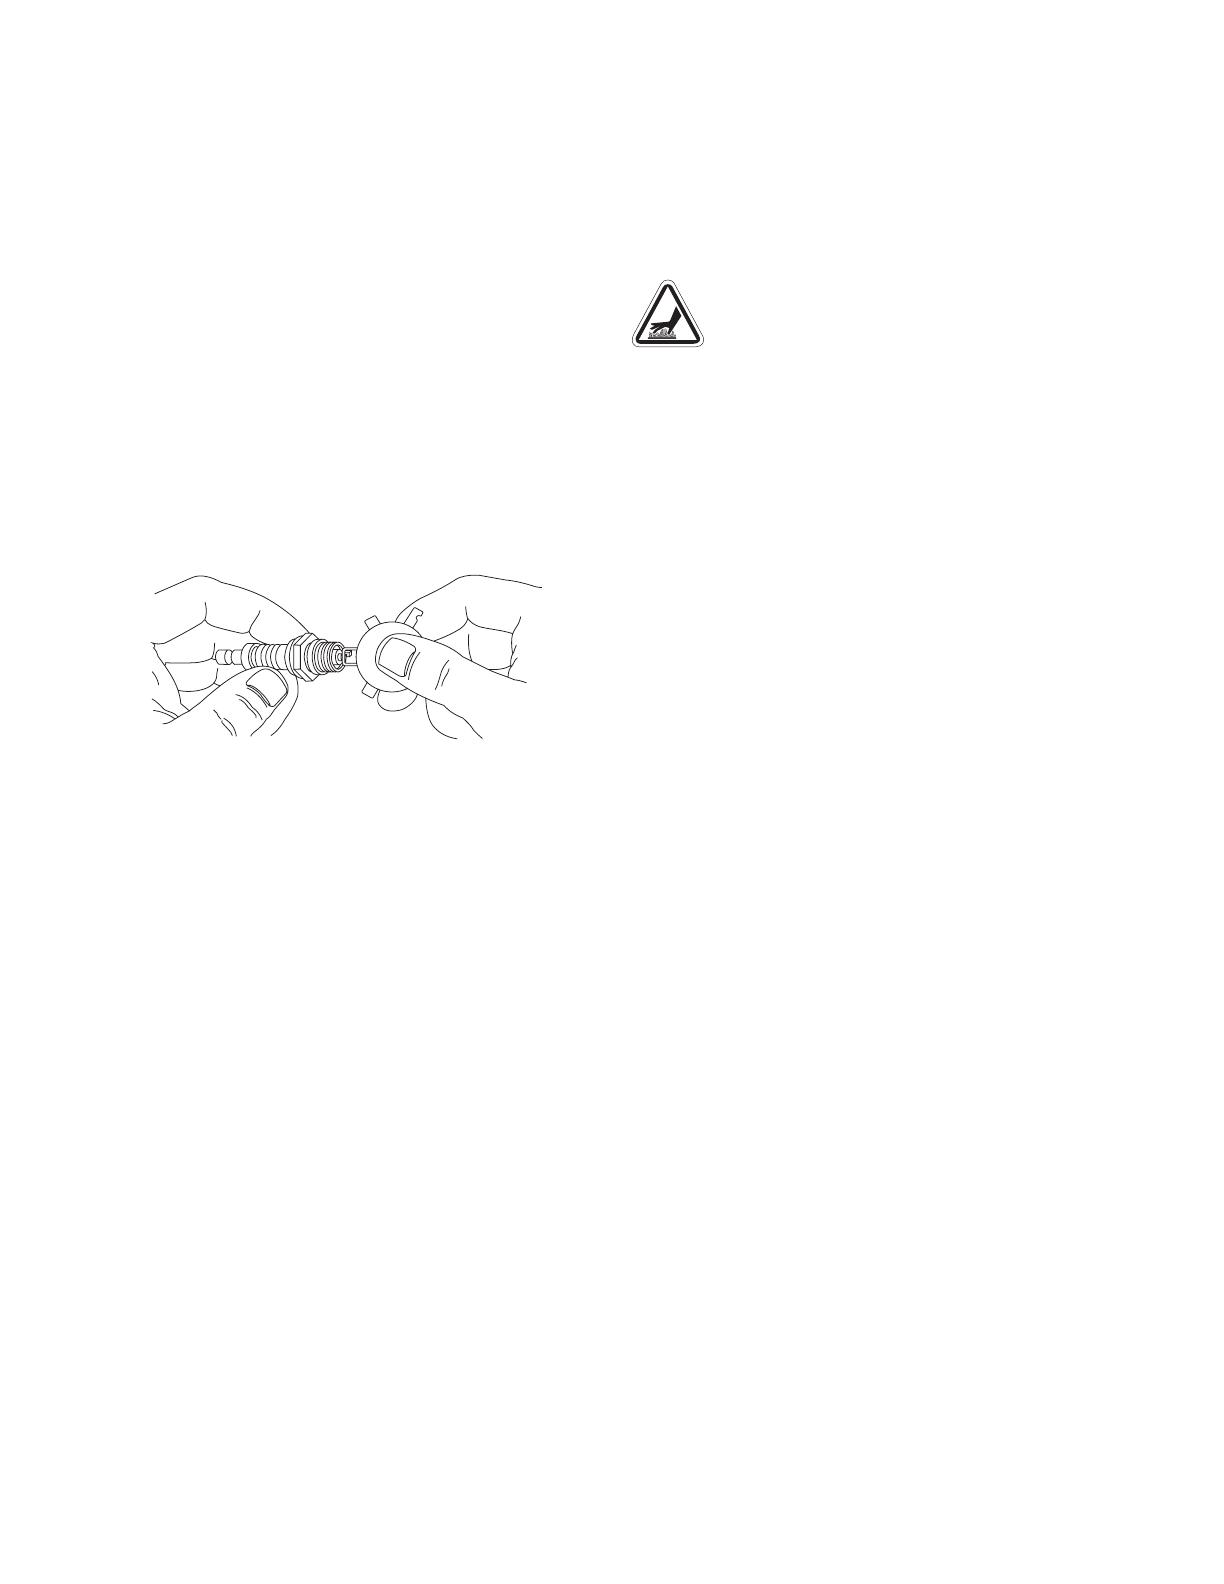
Service Spark Plug
Changing the spark plug will help your engine to start
easier and run better.
1. Clean area around spark plug.
2. Remove and inspect spark plug.
3. Replace spark plug if electrodes are pitted, burned
or porcelain is cracked. Use the recommended
replacement plug. See Specifications.
4. Check electrode gap with wire feeler gauge and reset
spark plug gap to recommended gap if necessary
(see Specifications).
5. Install spark plug and tighten firmly.
Inspect Muffler and Spark Arrester
Inspect the muffler for cracks, corrosion, or other damage.
Remove the spark arrester, if equipped, and inspect for
damage or carbon blockage. Clean if carbon blockage is
found using brush and commercial solvent or replace if
damaged.
WARNING! Contact with muffler area could
cause burns resulting in serious injury. Do not
touch hot parts.
Common Service Parts
Pump Saver™................................6039
O-ring Maintenance Kit ..................... 705001
Water Inlet Screen ........................B2384GS
Air Filter .................................. 796970
Spark Plug................................ 798615
Engine Oil Bottle .................. 100005 or 100028
Contact an authorized service dealer or
BRIGGSandSTRATTON.com for a full list of parts and
diagrams.
13

Not for
Reproduction
Storage
WARNING! Fuel and its vapors are extremely
flammable, which could cause burns or fire,
resulting in death or serious injury. Do not store fuel
near ignition source.
1. Place detergent siphon tube in water and flush
detergent from system by running pressure washer
with black spray tip.
Protecting Fuel System
2. Treat or drain fuel from pressure washer as fuel can
become stale when stored over 30 days.
Each time you fill the container with fuel, add STA-BIL
360°® PROTECTION™ to the fuel as specified by the
manufacturer’s instructions. This keeps fuel fresh and
decreases fuel-related problems or contamination in the
fuel system.
It is not necessary to drain fuel from the engine when STA-
BIL 360°® PROTECTION™ is added as instructed. Before
storage, turn the engine ON for 2 minutes to move the fuel
and stabilizer through the fuel system.
If fuel in the engine has not been treated with STA-
BIL 360°® PROTECTION™, it must be drained into an
approved container. Then run the engine until it stops from
lack of fuel.
Protecting the Pressure Washer
3. Turn off water and purge system.
4. Disconnect and drain all hoses, spray gun and spray
wand.
5. Empty pump of all liquids by pulling recoil handle
about six times.
NOTICE Store spray gun indoors and keep from freezing.
Protecting the Pump
6. Treat pump with Pump Saver.
Use Pump Saver to protect pump from damage caused by
mineral deposits and freezing. It also lubricates pistons and
seals. See Common Service Parts.
Read and follow all Pump Saver warnings and instructions.
If Pump Saver is not available, connect a 3 ft. (1 m)
section of garden hose to water inlet. Pour RV-antifreeze
(antifreeze without alcohol) into hose. Pull recoil handle
twice. Disconnect hose.
NOTICE You must protect your product from freezing
temperatures. Failure to do so will permanently damage
your pump and spray gun rendering your product
inoperable.
7. Store unit in a clean and dry area.
WARNING! Storage covers could cause a fire
resulting in death or serious injury. Do not place a
storage cover over a hot pressure washer. Let
product cool before installing cover.
14 BRIGGSandSTRATTON.COM

Not for
Reproduction
Troubleshooting
Problem Cause Correction
Pump has following
problems: failure to
produce pressure, loss
of pressure, low water
volume.
1. Low pressure spray tip installed.
2. Inadequate water supply.
3. Clogged inlet hose screen.
4. Spray tip is obstructed.
5. Connections leak.
6. High pressure hose or spray gun
leaks.
1. Replace with high pressure spray tip.
2. Provide adequate water flow.
3. Check and clean inlet hose screen.
4. Clean spray tip. See Spray Tip
Maintenance.
5. Tighten connections or replace o-rings.
6. Replace.
Detergent fails to mix
with spray.
1. High pressure spray tip installed.
2. Check ball stuck in detergent
siphoning system.
3. Detergent siphoning tube is clogged
or cracked.
1. Replace with low pressure black spray tip.
2. Free check ball. See Detergent Siphoning
Check Ball.
3. Clean or replace detergent siphoning tube.
Engine will not start;
starts and runs rough
or shuts down during
operation.
1. Engine switch set to off (0) position.
2. Fuel shut-off lever is in off position.
3. Low oil level.
4. Dirty air cleaner.
5. Out of fuel.
6. Spark plug wire not connected to
spark plug.
7. Flooded with fuel.
1. Set switch to on (I) position.
2. Move fuel shut-off lever to on position.
3. Fill crankcase to proper level or place
pressure washer on level surface.
4. Clean or replace air cleaner.
5. Fill fuel tank.
6. Connect wire to spark plug.
7. Wait 5 minutes and re-crank engine.
For all other issues, see an authorized dealer.
*This pressure washer is rated in accordance to the Pressure Washer Manufacturers’ Association (PWMA) standard
PW101-2018 (Testing and Rating Performance of Pressure Washers).
Specifications
Green, 25° ...................................2200 PSI (152 bar) @ 2.0 GPM (7.6 L/min)*
Red, 0° ......................................2200 PSI (152 bar) @ 2.0 GPM (7.6 L/min)*
Water Supply Temperature......................................41°F (5°C) - 100°F (38°C)
min Water Supply Flow Rate ...................................... 3.0 GPM (11.35 L/min)
min Water Supply Pressure ............................................20 PSI (1.38 bar)
Engine Displacement .................................................7.74 in3 (127 cc)
Spark Plug Gap....................................................0.030 in. (0.76 mm)
Oil Capacity ............................................................20 oz (0.6 L)
15

Not for
Reproduction
80082391_EN Rev A
BRIGGS & STRATTON WARRANTY POLICY
LIMITED WARRANTY
Briggs & Stratton warrants that, during the warranty period specified below, it will repair or replace, free of charge, any part that is defective in material or workmanship
or both. Transportation charges on product submitted for repair or replacement under this warranty must be borne by purchaser. This warranty is effective for
and is subject to the time periods and conditions stated below. For warranty service, find the nearest Authorized Service Dealer in our dealer locator map at
BRIGGSANDSTRATTON.COM. The purchaser must contact the Authorized Service Dealer, and then make the product available to the Authorized Service Dealer for
inspection and testing.
There is no other express warranty. Implied warranties, including those of merchantability and fitness for a particular purpose, are limited to the
warranty period listed below, or to the extent permitted by law. Liability for incidental or consequential damages are excluded to the extent exclusion is
permitted by law. Some states or countries do not allow limitations on how long an implied warranty lasts, and some states or countries do not allow the exclusion or
limitation of incidental or consequential damages, so the above limitation and exclusion may not apply to you. This warranty gives you specific legal rights and you may
also have other rights which vary from state to state or country to country.**
WARRANTY PERIOD
* Applies to Briggs & Stratton engines only. Warranty coverage of non-Briggs & Stratton engines is provided by that engine manufacturer. Emissions-related components
are covered by the Emissions Warranty Statement.
** In Australia - Our goods come with guarantees that cannot be excluded under the Australian Consumer Law. You are entitled to a replacement or refund for a major
failure and for compensation for any other reasonably foreseeable loss or damage. You are also entitled to have the goods repaired or replaced if the goods fail to be
of acceptable quality and the failure does not amount to a major failure. For warranty service, find the nearest Authorized Service Dealer in our dealer locator map at
BRIGGSandSTRATTON.COM, or by calling 1300 274 447, or by emailing or writing to salesenquires@briggsandstratton.com.au, Briggs & Stratton Australia Pty Ltd, 1
Moorebank Avenue, NSW, Australia, 2170.
The warranty period begins on the date of purchase by the first retail or commercial consumer. “Consumer use” means personal residential household use by a retail
consumer. “Commercial use” means all other uses, including use for commercial, income producing or rental purposes. Once a product has experienced commercial use,
it shall thereafter be considered as a commercial use product for purposes of this warranty.
Save your proof of purchase receipt. If you do not provide proof of the initial purchase date at the time warranty service is requested, the manufacturing date of the
product will be used to determine the warranty period. Product registration is not required to obtain warranty service on Briggs & Stratton products.
ABOUT YOUR WARRANTY
Warranty service is available only through Briggs & Stratton Authorized Service Dealers. This warranty covers only defects in materials or workmanship. It does not cover
damage caused by improper use or abuse, improper maintenance or repair, normal wear and tear, or stale or unapproved fuel.
Improper Use and Abuse - The proper, intended use of this product is described in the Operator’s Manual. Using the product in a way not described in the Operator’s
Manual or using the product after it has been damaged will not be covered under this warranty. Warranty coverage will also not be provided if the serial number on the
product has been removed or the product has been altered or modified in any way, or if the product has evidence of abuse such as impact damage or water/chemical
corrosion damage.
Improper Maintenance or Repair - This product must be maintained according to the procedures and schedules provided in the Operator’s Manual, and serviced or
repaired using genuine Briggs & Stratton parts or equivalent. Damage caused by lack of maintenance or use of non-original parts is not covered by warranty.
Normal Wear and Tear - Like most mechanical devices, your unit is subject to wear even when properly maintained. This warranty does not cover repairs when normal
use has exhausted the life of a part or the equipment. Maintenance and wear items such as filters, belts, cutting blades, and brake pads (except engine brake pads) are
not covered by warranty due to wear characteristics alone, unless the cause is due to defects in material or workmanship.
Stale or Unapproved Fuel - In order to function correctly, this product requires fresh fuel that conforms to the criteria specified in the Operator’s Manual. Engine or
equipment damage caused by stale fuel or the use of unapproved fuels (such as E15 or E85 ethanol blends) is not covered by warranty.
Other Exclusions - This warranty excludes damage due to accident, abuse, modifications, alterations, improper servicing, freezing or chemical deterioration.
Attachments or accessories that were not originally packaged with the product are also excluded. There is no warranty coverage on equipment used for primary power in
place of utility power or on equipment used in life support applications. This warranty does not include used, reconditioned, second-hand, or demonstration equipment or
engines. This warranty also excludes failures due to acts of God and other force majeure events beyond the manufacturer’s control.
Item Consumer Use Commercial Use
Equipment 24 months 3 months
Engine* 24 months 3 months
Frame 36 months 3 months
16 BRIGGSandSTRATTON.COM

Not for
Reproduction
Limpiadora a presión
Manual del operador
Número de modelo __________________________
Revisión __________________________________
Número de serie ____________________________
Fecha de compra ___________________________
Copyright © 2021. Briggs & Stratton
Milwaukee, WI, USA. Reservados todos los derechos.
(800) 743-4115
BRIGGSandSTRATTON.COM

Not for
Reproduction
Índice de contenidos
Símbolos y sus significados........................2
Descripción del equipo............................3
Características y controles.........................4
Operación ......................................6
Mantenimiento .................................12
Almacenamiento................................15
Solución de problemas...........................16
Garantía.......................................18
Registrar su producto
Para asegurar pronta y completa cobertura de
la garantía, registre su producto en línea en
www.onlineproductregistration.com.
Símbolos y sus significados
Señal Significado
PELIGRO Indica un riesgo que, si no se evita,
ocasionará la muerte o lesiones graves.
ADVERTENCIA
Indica un riesgo que, si no se evita,
podría ocasionar la muerte o lesiones
graves.
ATENCIÓN
Indica un riesgo que, si no se evita,
podría ocasionar lesiones menores o
moderadas.
AVISO
Indica una información que se considera
importante pero que no está relacionada
con un peligro potencial.
Símbolo Nombre Explicación
Símbolo de
alerta de
seguridad
Indica un posible riesgo para su
integridad física.
Lea el
Manual del
operador
La omisión de las advertencias,
las instrucciones y el manual
del operador podría redundar
en lesiones graves o incluso la
muerte.
Gases
tóxicos
La descarga de escape del
motor contiene monóxido de
carbono, un gas tóxico que
puede matar en minutos. No
puede olerse ni verse.
Incendio
El combustible y sus vapores
son extremadamente
inflamables, lo que podría
causar quemaduras o incendios
que resulten en lesiones graves
o la muerte.
El escape del motor puede
causar un incendio y ocasionar
lesiones graves o la muerte.
Símbolo Nombre Explicación
Inyección
de fluido
La alta presión de agua puede
cortar la piel y causar heridas
graves y posible amputación.
Spray,
objetos
que salen
volando
Riesgo de lesión ocular. El
agua rociada podría salpicar o
expulsar objetos, lo que puede
provocar lesiones graves.
Superficie
caliente
El contacto con el área
del mofle podría provocar
quemaduras y causar lesiones
graves.
Descarga
eléctrica
El contacto con los cables
eléctricos podría provocar
choque eléctrico y ocasionar
lesiones graves o la muerte.
Retroceso
El contragolpe del cable del
arrancador retráctil jalará la
mano y el brazo hacia el motor
más rápido de lo que usted
pueda soltarlo, lo que puede
causar huesos rotos, esguinces
o hematomas que resulten en
lesiones graves.
Quemadura
química
Los productos químicos
podrían causar quemaduras
que resulten en la muerte o en
lesiones graves.
Superficie
resbaladiza/
Caída
Superficies resbaladizas
mojadas podrían provocar
caídas que resulten en la
muerte o en lesiones graves.
Caída
El retroceso de la pistola puede
hacerle caer, lo que puede
ocasionarle la muerte o una
lesión grave.
¡ADVERTENCIA! Este producto puede
exponerlo a sustancias químicas, entre las que
se incluyen emisiones de escape de motor de
gasolina, reconocidas por el Estado de California como
causantes de cáncer, y monóxido de carbono, reconocido
por el Estado de California como causante de defectos de
nacimiento u otros problemas reproductivos. Para obtener
más información, visite www.P65Warnings.ca.gov.
¡ADVERTENCIA! Este producto contiene plomo
y compuestos de plomo que, de acuerdo al
estado de California, pueden causar defectos de
nacimiento u otros problemas reproductivos. Lávese las
manos después de manipular este producto. Cáncer y
Problemas Reproductivos – www.P65Warnings.ca.gov
2 BRIGGSandSTRATTON.COM
Not for
Reproduction
Descripción del equipo
Lea este manual cuidadosamente y familiarícese
con el producto. Conozca sus aplicaciones, sus
limitaciones y cualquier riesgo implicado.
Conserve estas instrucciones originales para futuras
consultas.
Para facilitar los proyectos de limpieza para exteriores, esta
máquina limpiadora a alta presión impulsada por motor
utiliza una variedad de boquillas rociadoras y detergente.
Sepa cómo detener el producto y disminuir la presión
rápidamente. Mantenga el área de operación libre y no
permita que niños operen la lavadora a presión.
Manténgase alerta, observe lo que está haciendo. No haga
funcionar la lavadora a presión si está cansado o bajo la
influencia de alcohol o drogas.
Se ha hecho todo lo posible para garantizar que la
información contenida en este manual sea precisa y actual.
Sin embargo, nos reservamos el derecho de realizar
cambios, alterar o mejorar el producto y este documento, en
cualquier momento sin previo aviso.
AVISO Si tiene alguna pregunta acerca del uso previsto,
póngase en contacto con el distribuidor autorizado. Este
equipo se ha diseñado para usarse con partes autorizadas
de Briggs & Stratton® únicamente.
Este sistema de encendido por chispa cumple con la
norma canadiense CAN ICES-2/NMB-2.
Arrancador retráctil— permite arrancar el motor.
Bomba— pistón de acero inoxidable, bomba de leva axial
que desarrolla la alta presión.
Entrada de agua— conexión para la manguera de jardín.
Etiqueta de identificación— proporciona el modelo y
número de serie de la lavadora a presión.
Filtro de aire— filtra el aire de admisión del motor.
Identificación del motor— proporciona el modelo, el tipo y
el código del motor.
Manguera para alta presión— conecte un extremo de
la manguera a la bomba de agua y el otro a la pistola
rociadora.
Perilla del Cebador — usada para arranque de motores
fríos.
Tapa de combustible— agregue combustible sin plomo
aquí.
Tapa de llenado de aceite/Varilla indicadora de nivel de
aceite — revise y llene el aceite aquí.
Tapón para el vaciado de aceite — vacíe el aceite del
motor aquí.
Toma de alta presión— conexión para la manguera de alta
presión.
Válvula de combustible — permite abrir y cerrar la
alimentación de combustible al motor.
Etiqueta de identicación
Tapa de
combustible
Filtro de aire
Entrada de agua
Bomba
Toma de alta presión
Manguera para
alta presión
Arrancador
retráctil
Tapa de llenado
de aceite y varilla
indicadora de
nivel de aceite
Tapón para el
vaciado de aceite
Perilla del cebador
Válvula de combustible
3
Not for
Reproduction
Características y controles
Compare las ilustraciones con su lavadora a presión para familiarizarse con la ubicación de los diversos controles y
advertencias del producto.
4 BRIGGSandSTRATTON.COM
/