Page is loading ...

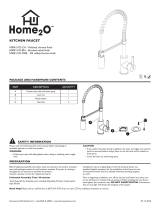
Installing the Cartridge/Installing the Cartridge
□Remove the set screw (2) with a Hex wrench (Hex: 2.5 mm, 1).
Model# / Modelo núm. RP90153
1
3
45
6
2
□Remove the handles (3) , the flanges (4) and the Bonnet nut (5) by unscrewing it from the valve body (7).
□Replace the Cartridge (6) .
□Reinstall the handles (3) , the flanges (4) and the Bonnet nut (5) back onto valve body (7) .
□Remove the set screw (2) with a Hex wrench (Hex: 2.5 mm, 1).
□Remove the handles (3) , the flanges (4) and the Bonnet nut (5) by unscrewing it from the valve body (7).
□Replace the Cartridge (6) .
□Reinstall the handles (3) , the flanges (4) and the Bonnet nut (5) back onto valve body (7) .
7
CAUTION: Always shut off the water supply before removing an existing faucet or replacing any part of a faucet. Open the faucet handle
to relieve water pressure and ensure that the water is completely shut off.
PRECAUCIÓN: Cierra siempre el suministro de agua antes de retirar un grifo existente o reemplazar alguna parte del mismo. Abre la
llave del grifo para liberar la presión de agua y asegúrate de que el suministro de agua esté completamente cerrado.
/