Page is loading ...

www.burg.biz
BURG-WÄCHTER KG
Altenhofer Weg 15
58300 Wetter
Germany
Initial setup
secuENTRY easy
ENTRY 7601 PIN
Contents index
Dear Customer,
Thank you very much for deciding on the secuENTRY Set
ENTRY 7601 PIN, consisting of the ENTRY 7600 CYL cylinder and
the ENTRY 7711 Keypad PIN.
The system was developed in Germany according to the most
modern technical capabilities and fulls the latest high safety
requirements.
The ENTRY 7600 CYL electronic cylinder can be easily installed
in any door with amortise lock, up to adoor thickness of
118mm (59/59mm, measured in the centre of the forend
screw). No drilling or laying of cables is required and it is
ideally suited for both new installations and retrotting. The
ENTRY 7600 CYL can be tted to house and interior doors.
Using the ENTRY 7711 Keypad PIN, you can unlock and lock the
door with a6-digit user code. The ENTRY 7711 Keypad PIN can
be installed up to approx. four metres from the locking unit,
depending on preference and conditions.
The ENTRY 7600 CYL is setup and operated using the free
smartphone app BURGsmart*. The transmission is wireless, the
cylinder uses the modern Bluetooth 5.2 standard.
* Alternatively, the cylinder can also be operated by keypad (e.g. ENTRY 7712
Keypad FP), the radio key ENTRY sE-Key 7713, as well as other add-on products
(all items available separately. For acomplete list of all compatible products,
please refer to page 14 of these instructions). The BURGsmart app is however
always required for the setup.
Important:
Please read the entire operating instructions
before you start the installation.
We hope you enjoy your new locking system!
!
Foreword
Setup with app
BURGsmart
English 2
Further languages at:
www.burg.biz
Video instructions
Simple instructions on the
setup and operation of your
secuENTRY components.
Follow the QR code or go to...
https://t1p.de/burgsmart-app

2 I English secuENTRY easy | ENTRY 7601 PIN
Cylinder unit power supply 2x Mignon LR6 AA Alkaline
Permitted ambient conditions -15 °C/+50 °C / up to 95 %
relative humidity (non-condensing)
Radio standard Bluetooth 5.2 LE
Transmission power ≤ 10 dBm
Frequency range 2.4 - 2.483 GHz
Range Approx. 4 m
Number of access media Up to 2,000 user codes (incl. one administrator
code)*, sE keys** or BURGsmart connections,
of which max. 45 ngerprints*** when using
angerprint keypad or 300 when using the
PC software****.
Blocking times After 3x incorrect entries of an opening media
1 minute, thereafter 3 minutes each time
* The user code can only be used as an opening media in conjunction with the ENTRY 7711 keypad PIN, ENTRY 7712 keypad FP or
ENTRY 7722 keypad FP (available as an option. ENTRY 7711 PIN included in the set).
** Radio key ENTRY sE-Key 7713 available as an option.
*** The ngerprint can only be used as an opening media in conjunction with the ngerprint keypad ENTRY 7712 Keypad FP or
ENTRY 7722 Keypad FP (available as an option).
**** Additional input of ngerprints is possible using Windows software ENTRY 7783 Pro and the programming device ENTRY 7073 Enrolment
(both available as an option).
Technical data - ENTRY 7600 CYL CylinderSet contents
I ENTRY easy 7600 CYL Cylinder
II ENTRY 7711 Keypad PIN
III
Adapter 1 incl. 2x M2x10 screws
IV
Adapter 2 incl. 1x 2.9x13 screw
V Emergency lock cover (2x)
VI Emergency key
VII Forend screw
VIII
Adhesive pads (4x)
IX Dowels (3x)
X Screws (3x)
XI Hexagon spanner SW2
XII
Screwdriver TX8
XIII
QR-Code sticker
XIV
Quick Start Guide plus warranty
and disposal instructions
Fig. 1
I
III
IV
V
VI
VII
IX
X
Keypad power supply 2x Mignon LR6 AA Alkaline
Permitted ambient conditions -15 °C/+50 °C / up to 95 %
relative humidity (non-condensing)
Radio standard Bluetooth 5.2
Transmission power ≤ 10 dBm
Frequency range 2.4 - 2.483 GHz
Range Approx. 4 m
Weather protection class (IP class) IP53
Technical data - ENTRY 7711 Keypad PIN
II
VIII
XI
XII
XIII
XIV
QR
!
!
Fig. 1
Cylinder QR code sticker Keypad QR code sticker
QR code/Administrator code
QR
The QR codes (I) are required later when setting
up the set using the BURG-WÄCHTER BURGsmart
app (Fig.1).
The sets are delivered from the factory with aran-
dom administrator code (II) (Fig.1), consequently
acode change is not mandatory.
Note:
The integrated manipulation protection in the cylinder ensures that the cylinder is blocked for
one minute after three incorrect entries of an opening media. From the fourth incorrect entry,
the cylinder is blocked for three minutes each time.
Attention:
Neither the QR codes nor the factory-gen-
erated administrator code are stored by
BURG-WÄCHTER. Recovery is not possible
if the codes are lost. It is important to keep
the QR code stickers enclosed with the set
in asafe place. We further recommend that
you photograph the stickers and also archive
them digitally.
I I
II

3 I English secuENTRY easy | ENTRY 7601 PIN
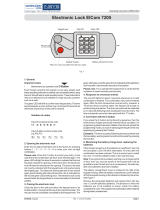
Fig. 1
ON button Activates the keypad. An entry "Opened" (ON button) or "Closed"
(CLOSE button) is generated in the secuENTRY cylinder history.
This allows for the "Open" and "Close" operations to be dierentiated
in the history.
CLOSE button
Error message The two LEDs next to the X symbol will illuminate if an invalid number
combination is entered or if general errors occur.
Battery status
The system monitors the keypad and cylinder battery voltage.
The user is alerted as soon as the battery voltage reaches acritical
range. Batteries must be changed as soon as possible after the battery
status symbol illuminates.
Cylinder status When the number combination entered is correct, the cylinder status
symbol will illuminate and the door can be unlocked or locked.
Status LED The LEDs illuminate one after the other in aclockwise direction when
the keypad is in programming mode (see chapter below).
ENTRY 7711 Keypad PIN
The ENTRY 7711 Keypad PIN can be used to operate electronic secuENTRY cylinders from
BURG-WÄCHTER. Communication between the keypad and the prole cylinder is 128-bit AES
encrypted.
Operation on the illuminated keypad is carried out via push-buttons. Consequently, the keypad
can be easily operated even in poor lighting conditions.
The ENTRY 7711 Keypad PIN enables the door to be opened and closed with the aid of a6-digit PIN
code (= 1 million number combinations).
The keypad is splash-proof on all sides according to IP53 certication.
!
!
!
Please refer to this chapter if the keypad
has to be set to programming mode
in the course of the setup. Position the
smartphone and keypad within Blue-
tooth range of each other and carry out
the following steps.
When you reach the view shown in
the illustration (Fig.1), briey lay the
smartphone aside and set the keypad
to programming mode using the
following steps.
Attention: In order for the data transfer
between smartphone and keypad to
occur, the smartphone must be in direct
proximity to the keypad for the follow-
ing step (Bluetooth range)
Activate the keypad with the ON button
(Fig.2).
Enter the security code (SCD) provided
using the keypad.
Note: The security code can be found
on the enclosed QR code sticker (Fig.3).
Note: The security code (SCD) serves as
manipulation and theft protection
Press and hold the CLOSE button for
ve seconds (Fig.4) until the signal
LEDs on the keypad illuminate one
after the other in aclockwise direction
(Fig.5).
The keypad is now in programming
mode. Perform the further steps using
the smartphone again (Fig.6).
1
2
4
5
3
Fig. 4
Fig. 3
Fig. 2
Fig. 5 Fig. 6
Fig. 1
5 seconds
Set the keypad to programming mode
ON button
CLOSE button Cylinder status
Battery status
Entry prompt
Status LED Status LED

4 I English secuENTRY easy | ENTRY 7601 PIN
Fig. 2
Fig. 4
Fig. 1
Fig. 3
ENTRY easy 7601 PIN activation
First of all, download the BURGsmart
app in order to be able to set up your
new locking system. This can be found
in the iOS App Store and Google Play
Store (Fig.1).
Note: The Android version of the
BURGsmart app has been used for these
instructions. The iOS version can be
slightly dierent visually, but the work
steps are identical.
You will be shown licence provisions
for the use of the app when you open
it for the rst time. Carefully read them
and then conrm by clicking "OK" in the
bottom right-hand corner (Fig.2).
Enter your name and amail address
(Fig. 3).
Select them the item: "BURG-WÄCHTER
Cloud" this is not required for the setup
and can therefore be ignored for the
time being ( Fig. 3). An explanatory
note on this subject can be found in the
master operating instructions on our
website (see link on the title page).
Read through and agree to the terms of
use and privacy policy (Fig.3).
Tap on "Register" (Fig.3).
Note: An e-mail window opens with
amail template which you can use to
send the registration data to the spec-
ied e-mail address. This is necessary,
for example, when using the secuENTRY
Windows software. It is not required for
the setup described here. The data can
also be called up again in the app at
alater time if required.
The BURGsmart app main screen
appears. Open the "My System" menu
at the bottom left (Fig.4).
BURGsmart
1
2
3
4
5
6
7
!
!
3
4
5
6
Fig. 1
Tap on the menu item "I - User" (Fig.1).
A list of the users that have already
been created is displayed. A user prole
with alock opening via smartphone has
already been automatically created for
the administrator. Tap on this (I) (Fig.2).
Note: Alternatively, anew additional
user prole can be created at this point.
To do so, tap the "+" in the top right-
hand corner (II) (Fig.2).
User data
An overview of the user data appears.
If you have created anew user, rst
enter the rst name and surname of
the user (I) (Fig.3).
Access data
Note: This section allows you to enter
the desired opening media (e.g. user
code or ngerprint) for the user (II)
(Fig.3). The lock opening by smart-
phone is automatically stored in the
administrator's user prole.
Access data | User code
Enter arequired 6 digit user code under
"Enter 6-digit code" (III) (Fig.3).
1
2
3
4
!
!
Fig. 2
Fig. 3
II
III
I
I
II
I - User

5 I English secuENTRY easy | ENTRY 7601 PIN
Access data | Enter RFID tag
An RFID transponder ENTRY 7710 RFID
(optionally available) can be entered
at this point. Instructions on how to
set this up can be found in the RFID
transponder instructions (I) (Fig.4).
Attention: This cylinder in this set
requires the add-on article ENTRY
7174 RFID Extender for the use of RFID
transponders. For acomplete list of all
compatible products, please refer to
page 14 of these instructions.
Access data | Enter sE-Key
A radio key ENTRY sE-Key 7713
(optionally available) can be stored
at this point (II) (Fig.4). Instructions
on how this is setup can be found in
the radio key instructions.
Access data | Smartphone as key
Note: The lock opening by smartphone
is automatically stored in the adminis-
trator's user prole (III) (Fig.4). A dier-
ent smartphone as the electronic key
can be stored in this eld for additional
users. An instructions on this subject
can be found in the master operating
instructions on our website (see link on
the title page).
Manage ngerprint
If you have the optional ngerprint
keypad (e.g. ENTRY 7712 FP), you
can store then register anger as
the opening media in this section.
Instructions on how to set this up can
be found in the instructions for the
respective item (Fig.5).
Note: The ENTRY 7711 PIN pincode
keypad is included in this set.
Fig. 4
I
II
III
5
6
7
8
!
!
!
!
Fig. 5 Fig. 6
Note: If you wish to enter opening
media for other users, go back one
menu and select the respective user
(Fig.7). Repeat the steps in this chapter
for this user.
You can now leave the menu (I - User).
Return to the "My System" menu (Fig.8).
Fig. 7 Fig. 8

6 I English secuENTRY easy | ENTRY 7601 PIN
Fig. 2
Fig. 4
Fig. 3
Fig. 5
The capture window of the camera
opens. Scan the QR code.
A message appears containing data
regarding your cylinder; conrm this
with "OK" at the bottom right (Fig.4).
In the following window, you will be
prompted to assign aname for the
cylinder. Where several cylinders and
secuENTRY components are used, it is
recommended to name the cylinder in
such away that you can directly identify
what it is and where the cylinder is
located or attached. In the example in
these instructions, the cylinder is titled
"Front door cylinder". Conrm the name
with "OK" (Fig.5).
A message appears informing you that
you can change your administrator
code. As you received arandomly gen-
erated administrator code at the time
of delivery, this step is optional. You can
bypass this with "Skip" (Fig.6).
Note: The randomly generated ad-
ministrator code can be found on the
enclosed QR code sticker under "ADM"
(Fig.8). The administrator code can be
changed at any time at alater date. Re-
fer to the master operating instructions
on our website for an explanation on
this subject (see link on the title page).
Return to the "My System" menu (Fig.7).
1
2
3
4
5
6
7
!
QR
QR
Fig. 4
Cylinder QR code sticker
Fig. 8
Cylinder QR code sticker
Fig. 1
Tap on the second menu item
"II - secuENTRY Cylinder/Relay" (Fig.1).
The app displays alist of the cylinders
that have already been registered. This
is empty during the initial setup. Setup
anew cylinder by
tapping on the "+" in
the top right-hand corner (Fig.2).
A prompt will appear asking you to scan
the cylinder QR code provided using
your smartphone camera (Fig.3). The
QR code is on the sticker enclosed in
the packaging (Fig 4.).
Attention: The set comes with two
QR code stickers, one for the cylinder
and one for the keypad. You can
identify the QR code required here
for the cylinder by the administrator
code at the bottom of the sticker,
marked "ADM" (Fig.4).
Tap on "Next" (Fig.3). You may be
asked to conrm the app's access to
the camera.
Fig. 6 Fig. 7
!
8
9
II - secuENTRY Cylinder / Relay

7 I English secuENTRY easy | ENTRY 7601 PIN
Fig. 3 Fig. 4
The cylinders registered in the app
are displayed in the subsequent
menu. Select the cylinder which the
previously specied user is to be
able to open (I) (Fig.3). If there are
anumber of cylinders and you wish to
assign several of them, select all the
cylinders you require. Save at the top
right (II) (Fig.3). A short conrmation
will be displayed (III) (Fig.3).
Repeat the procedure for any additional
users.
Return to the "My System" menu (Fig.4).
4
5
6
I
III
II
Fig. 1
Fig. 3
Fig. 2
Fig. 4
Note: To ensure that user and locking
plan data is transferred, aprogramming
le must be generated from it which
bundles all the data. Create the pro-
gramming le as follows:
Tap the menu item "V - Transfer locking
plan" in the "My System" menu (Fig.4).
Tap the "+" in the top right-hand corner
(Fig.1).
Select the cylinder for which you want
to transfer information (I) (Fig.2) and
then tap on "Prog. File" at the top right
(II) (Fig.1).
Here you will be asked to verify yourself
with your administrator code. Enter the
code and conrm with "OK" (Fig.3).
Note: The factory administrator code
can be found on the QR code sticker of
the cylinder under "ADM".
After ashort moment, amessage
appears informing you that your
programming le has been created.
Conrm with "OK" (Fig.4).
1
2
3
4
5
I
II
!
!
V - Transfer locking plan
IV - Locking plan
!
Fig. 1 Fig. 2
Note: A locking plan must be created
before the data can be transmitted to
the cylinder. This determines which user
is allowed to open which lock. This is
of particular interest if you have more
than one cylinder.
Open the "My System" menu (I) (Fig.1).
Tap on the fourth menu item
"IV - Locking plan" (Fig.1).
Tap on your user name or on the rst
user if you have created more than one.
(Fig.2).
1
2
3
I
II
III - secuENTRY keypad
!Note: The keypad of the ENTRY 7602
PIN set is already set up at the factory
and connected to the locking cylinder.
Consequently, you can skip this menu
item and continue directly to the next
chapter.

8 I English secuENTRY easy | ENTRY 7601 PIN
8
9
I
II
!
Fig. 5
Fig. 7 Fig. 8
Fig. 6
Tap on the programming le you
have just created (I) (Fig.5) and tap
on "Update unit" (II) in the menu that
appears (Fig.5).
To transfer the cylinder data, tap on
Program File <Cylinder name> (In this
example "Front door cylinder") (Fig.6).
Here you will be asked to verify yourself
with your administrator code. Enter the
code and conrm with "Start" (Fig.7).
Note: The factory administrator code
can be found on the QR code sticker of
the cylinder under "ADM" (Fig.9).
After ashort moment, amessage
appears informing you that the data
has been transmitted. Conrm with
"OK" (Fig.8).
The setup is now completed.
Repeat the steps in the respective
chapters if you wish to integrate further
components into your system at alater
date, change access data or create
additional users.
Please note: All changes and additions
are carried out within the app and must
then be transferred to the respective
secuENTRY component. The last two
chapters, "Locking plan" (page 7) and
"Transfer locking plan" (page 7) must be
completed in each case in order to be
able to use them in your components.
6
7I
II
QR
Fig. 9
Cylinder QR code sticker
DO NOT TAKE
OUT SCREWS
Low strength.
max. ca. 0,4 Nm
DO NOT TAKE
OUT SCREWS
Low strength.
max. ca. 0,4 Nm
Opening the secuENTRY lock
Using the cylinder and keypad
Opening the secuENTRY lock with the BURGsmart app
Proceed as follows to open the ENTRY
7600 CYL cylinder and consequently
also the door:
Open the BURGsmart app and press the
"ACCESS" button in the middle (Fig.1).
Note: The BURGsmart app is pro-
grammed so that when more than one
cylinder is used, it automatically adjusts
to the cylinder that is within the short-
est distance of the smartphone. Each
cylinder can be opened by pressing the
"ACCESS" button.
The cylinder is now released and the
lock can be opened (Fig.2) or locked
(Fig.3).
Note: Depending on the door stop, the
direction of rotation may be reversed.
To use the cylinder (Fig.1) and
keypad (Fig.2), remove the battery
protection strips.
The ENTRY 7601 PIN set enables you to open the lock via the BURGsmart app or the keypad
using auser code, provided you have set up the corresponding opening media in accordance
with these instructions.
1
2
!
!
Fig. 3Fig. 2
Fig. 2
Fig. 1
Fig. 1
DO NOT TAKE
OUT SCREWS
Low strength.
max. ca. 0,4 Nm

9 I English secuENTRY easy | ENTRY 7601 PIN
DO NOT TAKE
OUT SCREWS
Low strength.
max. ca. 0,4 Nm
DO NOT TAKE
OUT SCREWS
Low strength.
max. ca. 0,4 Nm
Opening the secuENTRY lock via the keypad (user code)
Fig. 6
Fig. 5
Activate the keypad by pressing either
the ON key or the CLOSE key (I) (Fig.4).
An entry "Opened" (ON button) or
"Closed" (CLOSE button) is generated in
the cylinder history. This allows for the
"Open" and "Close" operations to be
dierentiated in the history.
Note: Further details on the history
function can be found in the master
operating instructions on our website
(see link on the title page).
Enter your 6-digit administrator code or
programmed user code (II) (Fig.4).
Note: Further details on the subjects
of administrator and user codes can be
found in the chapters "QR code/admin-
istrator code" on page 2 and "I - User" on
page 4, as well asin the in the master
operating instructions on our website
(see link on the title page).
When the number combination entered
is correct, the cylinder status symbol
( ) will illuminate and the door can
be unlocked (Fig.5) or locked (Fig.6).
Note: Depending on the door stop, the
direction of rotation may be reversed.
1
2
I
II
I
Fig. 4
!
!
3
!
Fig. 11
Should the batteries in the locking
cylinder be completely discharged, the
lock can still be opened mechanically.
The emergency lock is located on the
outer side, below the knob attachment.
Note: When the assembly steps in these
instructions have been completed, the
emergency lock is behind acover and is
not directly visible.
To open the lock, open the emergency
key at the joint and then insert it
through the indicated slot on the
emergency lock cover (Fig.11).
Turn the key 90 degrees clockwise.
If required, move the outside knob
slightly to the right and left in order
to release the mechanism. The lock is
open after at least two full turns of the
cylinder knob.
After opening the door, turn the emer-
gency key back to its original position
(90 degrees counterclockwise) and
remove it.
To return the locking cylinder to its
regular locking position, turn the out-
side knob two complete turns in both
directions. This engages the mechanism
and the emergency lock is fully closed.
Note: When the emergency lock is
used, the keyhole indication on the
emergency lock cover is torn. A second
cover is included in the set so that it can
be replaced for aesthetic reasons.
Attention: Please note, the emergency
lock is designed for emergency openings
only. Please do not use it as apermanent
alternative to the standard locking options.
!
!
!
2
3
4
1
Opening the secuENTRY lock with the emergency lock

10 I English secuENTRY easy | ENTRY 7601 PIN
DO NOT TAKE
OUT SCREWS
Low strength.
max. ca. 0,4 Nm
DO NOT TAKE
OUT SCREWS
Low strength.
max. ca. 0,4 Nm
Assembly of the ENTRY easy 7600 CYL
The installation of the ENTRY easy
7600 CYL is explained below. Prior to
installation, please read the installation
instructions carefully.
Remove the existing door lock cylinder
by loosening the forend screw in the
door and pulling out the cylinder with
the key inserted (Fig.1).
The loosening and xing of the outer
and inner knob is achieved by means of
an integrated grub screw in the rotary
knob. Loosen the two grub screws
in the two knobs with the enclosed
hexagonal spanner (Fig.2).
Attention: Use the long side of the
hexagonal spanner for this. Turn the
screw four times anticlockwise. Do not
remove the screws from the knob.
Pull o the knob on the outside com-
pletely and pull the knob on the inside
as far back as possible (Fig.3).
Tip: The knob is in the inner side of the
battery compartment. Pay attention to
the battery compartment cover with
the screw hole (see diagram).
Attention: The knob on the inside
cannot be pulled o. Do not try to loos-
en it by force, as pulling the knob from
the shaft will destroy the electronics.
The grub screw in the knob serves as
apull-o protection.
DO NOT TAKE
OUT SCREWS
Low strength.
max. ca. 0,4 Nm
2 mm
4x
1.
2.
3
2
1
!
!
!
Fig. 1
Fig. 2
Fig. 3
4
5
Adapters may be required depending on
the door thickness.
If the distance between the forend screw
and the outer side of the door (Fig.4) is...
• < 43mm = no adapter required
(Fig.5)
• 44 - 53mm = Adapter 1 required
(Fig.6)
Push adapter 1 onto the lock shaft
and screw it tight with the two
M2x10 screws provided.
• 54 - 59mm = Adapter 1 and 2 required
(Fig.7)
After adapter 1 has been attached
(see above), then also push adapter 2
onto the lock shaft. Screw it tight with
the 2.9x13 screw provided.
From inside the door, push the cylinder
into the mortise lock. Push the emer-
gency lock cover onto the outer side of
the locking shaft (Fig.8).
Note: Before assembling the cover,
the protective lms of the adhesive
pads on the back of the cover must be
removed so that the three adhesive
pads securely fasten the cover to the
cut-out/door.
Note: When the emergency lock is
used, the keyhole indication on the
emergency lock cover is torn. A second
cover is included in the set so that it
can be replaced for aesthetic reasons.
Fig. 4
Fig. 5
Fig. 6
Fig. 7
DO NOT TAKE
OUT SCREWS
Low strength.
max. ca. 0,4 Nm
< 43mm =
44 - 53mm =
54 - 59mm =
!
OUTDOOR INDOOR
1
1
2
2
3
3
Distance inmm
Forend screw
Door inner sideDoor outer side
Adapter 1
Without adapter
Adapter 2
!
!
Fig. 8

11 I English secuENTRY easy | ENTRY 7601 PIN
DO NOT TAKE
OUT SCREWS
Low strength.
max. ca. 0,4 Nm
Screw the cylinder into the door and
push the inside and outside knobs up
to the door (Fig.9).
Screw the grub screws back into
the two knobs (Fig.10).
ATTENTION: Ensure that the
knob is at least one millimetre
away from the door.
Attention: Use the long side of
the hexagonal spanner for this.
Turn the screw clockwise with
minimal force (max. torque ap-
prox. 0.4 Nm).
If you have not already done so,
remove the battery protection
strip from the battery compart-
ment on the inside knob (Fig.11).
min. 1 mm
2 mm
min. 1 mm
6
7
8
!
Fig. 10
Fig. 11
DO NOT TAKE
OUT SCREWS
Low strength.
max. ca. 0,4 Nm
DO NOT TAKE
OUT SCREWS
Low strength.
max. ca. 0,4 Nm
DO NOT TAKE
OUT SCREWS
Low strength.
max. ca. 0,4 Nm
Fig. 9
QR
ENTRY 7711 Keypad PIN installation
ENTRY 7711 Keypad PIN installation - function test prior to installation
The installation of the ENTRY 7711 Keypad PIN is explained below.
There are two options to choose from for installation. The ENTRY 7711 Keypad PIN wall bracket
can either be screwed or adhered directly to the wall.
Prior to installation, please read the installation instructions carefully.
!
1
2
3
ATTENTION:
The distance between the cylinder and
the keypad can be up to amaximum
of four metres. This distance may vary,
however, depending on external condi-
tions. In order to ensure that the keypad
functions correctly in the desired
position, we recommend testing it rst
before installation.
Place the keypad in the desired installa-
tion location (Fig.1).
Enter your administrator or user code
and check that the cylinder is activated
(Fig.2).
Note: The administrator code, if you ha-
ven't already changed it, can be found
on the QR code sticker enclosed with
the secuENTRY cylinder (Fig.3). For in-
formation on how to create auser code,
see the chapter "I - User" on page 4.
If the cylinder activates, the signal
strength is sucient and the keypad
can be installed in the desired location.
If not, try again with ashorter distance
between cylinder and keypad.
Fig. 3:
QR code sticker for
secuENTRY cylinder.
Factory-assigned
administrator code
max. 4 m
!
Fig. 1
Fig. 2

12 I English secuENTRY easy | ENTRY 7601 PIN
ENTRY 7711 Keypad PIN installation - screw mounting
1
3
4
5
2
Drill three holes according to the
dimensions shown in the illustration.
Use a6mm diameter drill bit (Fig.1).
Insert the dowels supplied into
the holes and screw in the screws
provided (Fig.2).
Remove the screw from the bottom of
the keypad using the Tx8 screwdriver
supplied with the keypad and pull
the battery compartment downwards
(Fig.3).
Place the keypad on the screw heads as
shown in the illustration (Fig.4).
Insert the battery compartment back
into the housing and screw it tight
(Fig.5).
61 mm
40 mm
Ø 6mm Fig. 1
Fig. 2
Fig. 3
Fig. 4
Fig. 5
ENTRY 7711 Keypad PIN installation - adhesive mounting
1
2
Clean the surface to which the keypad
is to be attached (Fig.6).
Attach the enclosed adhesive pads to
the positions shown in the illustration
and peel o the backing strips (Fig.7).
Mount the keypad on the wall in the
desired position (Fig.8).
Press the keypad against the wall for
approx. one minute (Fig.9).
Attention:
Only press the outer edges of the hous-
ing. To avoid damage to the electronics,
do not press within the keypad area.
Fig. 6
Fig. 7
Fig. 8
Fig. 9
3
4
!
!1 Min.

13 I English secuENTRY easy | ENTRY 7601 PIN
Battery status display and replacing the batteries
The battery status is shown on the
display each time asecuENTRY cylinder
is activated via the BURGsmart app
(Fig.1). When the batteries in the
cylinder are running low, replace them
as soon as possible.
Note: The batteries are located in the
cylinder knob on the inside of the
door. If the battery status is ignored
and the batteries become completely
discharged, you can only open the
cylinder from the outside using the
emergency lock. For further informa-
tion, please refer to chapter "Opening
the secuENTRY lock with the emergency
lock" on page 9.
Instructions on replacing the batteries
are given below:
Using the TX8 screwdriver provided,
loosen the screw on the inner side of
the door at the front end of the knob
and open the cover. The screw can only
be unscrewed up to the opening of the
cover and will not fall out. (Fig.2).
Remove the old batteries and dispose
of them appropriately.
Tip: Instructions for proper disposal
can be found on page 15 of these
instructions.
Insert two new batteries. Make sure that
the polarity is correct according to the
drawing (Fig.3).
Replace the front cover and screw it on
tightly (Fig.4).
Fig. 1
!
!
2
3
4
1
Fig. 2
Fig. 3
Fig. 4
TX8
TX8
ENTRY 7600 CYL cylinder
ENTRY 7711 Keypad PIN
The system monitors the keypad and
cylinder battery voltage. The user is
alerted as soon as the battery voltage
reaches acritical range. Batteries must
be changed as soon as possible after
the battery status symbol illuminates
on the keypad (Fig.5).
Tip: It is recommended that the
batteries in the cylinder and keypad
are always replaced at the same time.
Nonetheless, the battery status of the
cylinder can be checked separately at
any time. The current battery status is
displayed on the BURGsmart app main
screen (Fig.6).
Instructions on replacing the batteries
are given below:
Remove the screw from the bottom
of the keypad using the Tx8
screwdriver supplied (Fig.7) with
the keypad and pull the battery
compartment downwards (Fig.8).
Remove the old batteries and dispose
of them appropriately.
Tip: Instructions for proper disposal
can be found on page 15 of these
instructions.
Insert two new batteries. Make sure that
the polarity is correct according to the
drawing (Fig.9).
Insert the battery compartment back
into the housing and screw it tight
(Fig.10).
!
!
2
3
1
Fig. 8Fig. 7
Fig. 10Fig. 9
Fig. 6
Fig. 5

14 I English secuENTRY easy | ENTRY 7601 PIN
Fig. 2
Fig. 3
Fig. 4
Fig. 1
Whether for one front door, several doors or acomplete locking system: Simply congure your
individual unit with the secuENTRY modular system.
Your ENTRY 7600 CYL cylinder can be extended with the following components:
secuENTRY Keypad
ENTRY 7711 PIN / 7712 FP
Using the ENTRY 7711 Keypad PIN,
you can unlock and lock the door
with a6-digit user code. In addition,
with the ENTRY 7712 Keypad FP also
with ngerprint.
A keypad ENTRY 7711 Keypad PIN is
already included in this ENTRY 7601
PIN set.
secuENTRY Keypad
ENTRY 7722 FP
The ENTRY 7722 FP display keypad
enables opening with a6-digit user
code or ngerprint.
secuENTRY Radio key
ENTRY sE-Key 7713
The cylinder is opened simply by
pressing abutton using the ENTRY
sE-Key 7713 radio key. The transmis-
sion is encrypted at ahigh security
level (AES encryption).
secuENTRY Transponder
ENTRY 7710 RFID
The modern passive transponder
provides door opening with contact-
less data transmission.
Attention: The ENTRY 7174 RFID
Extender add-on is additionally
required for use with the
ENTRY 7600 CYL cylinder.
Compatibility with other secuENTRY products
ENTRY 7711 PIN:
4003482507117
Further information
can be found on
our website:
ENTRY 7712 FP:
4003482507124
Further information
can be found on
our website:
ENTRY 7722 FP:
4003482507223
Further information
can be found on
our website:
www.burg.biz
www.burg.biz
www.burg.biz
Article number:
4003482507131
Further information
can be found on
our website:
Article number:
4003482568200
Further information
can be found on
our website:
www.burg.biz
www.burg.biz
Fig. 5
secuENTRY Add-on
ENTRY 7174 RFID-Extender
RFID transponder reader. Can be used
for cylinders or, in conjunction with
an ENTRY 7171 Relay, for external
electronic devices.
Article number:
4003482501740
Further information
can be found on
our website: www.burg.biz
Fig. 8
Fig. 9
Fig. 10
Fig. 7
Fig. 6
secuENTRY Add-on
ENTRY 7172 REMOTE
For automatic remote activation.
Control of electronic garage motors,
alarm systems, etc.
secuENTRY Windows-Software
ENTRY 7750 Software Light
Provides convenient user manage-
ment of up to 15 users and 8 locks.
secuENTRY Windows-Software
ENTRY 7783 Software Pro
Designed specically for companies
and public authorities. Allowing the
management of up to 2,000 users
and up to 1,000 doors per client
(database) or up to 500 doors in
hotel mode.
secuENTRY Add-on
ENTRY 5670 Bridge
Your new found freedom: Using the
secuENTRY Bridge via the internet
you can open your door even when
you are out and about.
secuENTRY Add-on
ENTRY 7171 Relay
Control unit for switching external
electronic devices (shutters, barriers,
light sources, etc.).
Article number:
4003482501726
Further information
can be found on
our website:
Article number:
4003482507506
Further information
can be found on
our website:
Article number:
4003482507834
Further information
can be found on
our website:
Article number:
4003482562802
Further information
can be found on
our website:
Article number:
4003482506707
Further information
can be found on
our website:
www.burg.biz
www.burg.biz
www.burg.biz
www.burg.biz
www.burg.biz

15 I English secuENTRY easy | ENTRY 7601 PIN
In order to deliver aawless and high quality product to you and to better assist you in case of
service or repair, it is necessary that faulty or defective devices along with the valid administrator
code and the QR code(s) be presented to your dealer together with the original documentation.
When returning goods due to your right of withdrawal, all parts of the appliance must also be in
their factory settings. Failure to comply with this will invalidate the warranty.
Dear customer,
Please help to reduce waste. Should you intend to dispose of this device at any time, please re-
member that many components of this device contain valuable materials that can be recycled.
Printing and typesetting errors as well as technical changes reserved.
Please note that electrical and electronic devices as well as batteries must not be
disposed of with household waste but rather apart from it or separately. Please obtain
information on the collecting points for electrical waste from the responsible authority
of your city/municipality.
BURG-WÄCHTER KG hereby declares that this device complies with the Directives
2014/53/EU, (RED) and 2011/65/EU (RoHS).
The complete text of the EU Declaration of Conformity is available at the following
Internet address www.burg.biz.
Warranty
Disposal of the device
Notes

www.burg.biz
BURG-WÄCHTER KG
Altenhofer Weg 15
58300 Wetter
Germany
www.burg.biz
secuENTRY easy
ENTRY 7601 PIN
BD Initial setup ENTRY easy 7601 PIN EN HBG/SWI 200423
/