Page is loading ...

Rodtech Click
User Manual

Our Rodtech Click Range come with a 12 month replacement guarantee. The guarantee covers all Non-
wearable parts and joints on our Rodtech click range. It does NOT cover misuse of equipment or when
the equipment is used with the tile breakers It does not cover parts that will wear with use, such as head
inserts (Nylons, Chain and Wire etc) You must read the manual for guidance. In the unlikely event you
will ever need to use this guarantee, you will be required to return the product to Rodtech or a Rodtech
Agent before a replacement part is supplied (subject to our misuse policy).
PLEASE NOTE: The simpatico range is not covered by this guarantee and has its own warranty.
1. Always follow manufacturer’s instructions when using powered equipment.
2. Liner Manufactures and Insurers approve RODTECH POWER SWEEPING equipment (please see
our website for more details). This includes the replacement nylons for the heads, in order to safeguard
their warranties. The nylons used by Rodtech are hexagonal and allow the flat sides of the strands to
scrape the deposits off within a flue. Other shaped nylons have been tested but DO NOT produce the
same effect. The Rodtech Click Rods can be used for both manual and power sweeping and duct
cleaning. All new click rod equipment comes with a 1 year warrantee (excluding when used with the tile
removers).
3. Only use professional drills for power sweeping that have a safety clutch that will stop the drill
immediately when the trigger is released. We recommend using a minimum of 18V Cordless drills that
have at least a 3ah battery, and above 70Nm of torque; these can be angle or conventional drills
however we do not recommend using drills with a speed greater than 1800rpm or less than 400rpm. We
find these are preferable to mains versions as they do not involve dangling leads. It is advisable to have
two batteries along with a spare drill and drill adaptor. We recommend that the spare drill is minimum
24v or preferred 36v for the 18mm rods when sweeping larger flues, removing bird nests, removing clay
liners or any other application where you may put strain onto the drill and could cause it to burn out.
Recommended drills are; 18V angled or standard drills together with a 24v+ drill of personal choice.
Alternatively, you will be able to use just one drill unit as recommended on our site, being the Hitachi
DV18 DSDL 18 Volt Combi Drill, this particular drill has 92 NM of torque and should handle the toughest
of chimneys.
4. When using power sweeping to clean chimneys it is important not to put too much of a bend on the
rods as they can distort, heat up and break. Also never keep the rods spinning in the chimney if you are
not moving the rods up or down as friction can cause the rods to heat up and possibly break.
5. In Extreme cold weather (-30c and below overnight temperatures) we do advise you store your tools
and batteries in the warm as in cold conditions batteries can lose their charge and the rods can become
brittle and could snap.
6. Always hold the drill in a manner that, if the head gets snagged on something in the chimney the drill
will pull out of your hand and not twist your wrist. The angle of the drill should be such that the handle of
the drill should be upright opposed to the way you would normally use a drill, trying to keep the rods as
straight as possible at all times

7. When power sweeping, never grip the rods tightly as this could pull your gloves off your hands or
burn your hands. Never allow loose clothing or material to get too close to spinning rods as any snags
that may occur on the rods could catch and pull. If this should ever start to happen immediately release
the power trigger on your drill and STOP. To remedy this, reverse the direction on your drill and slowly
spin your drill until the catch/snag is released.
8. When connecting the rods, keep them as straight as possible to ensure a smooth action. When using
the click range you will not need to depress any buttons as they have been designed to click together
easily, and when they lock together they will make a click, whereas if you are using the button lock
range you will have to depress the button to connect the rods to each other.
When disconnecting the rods, first remove the drill, make sure you do this as straight as possible as this
will aid the easy removal, if you try and disconnect the drill without being straight it will feel as if the drill
driver is stuck.
When disconnecting the rod it is important to take the weight (pressure) off the rod nearest the opening
with one hand, keep the rods as straight as possible, slightly twist the rod you wish to disconnect in the
opposite rotation used on the drill, and remove in a straight fashion. Trying to uncouple the rods with a
bend can be very difficult and will again feel as if the rods are locked together.
The art of undoing the rods once mastered is simplicity itself. If you are finding it hard then it is down to
not keeping the rods as straight as possible.
It is advised to spray the drill adaptor and the ends of the rods with PTFE dry lube or silicon spray
frequently (at least daily) to keep them in tip-top condition, which will also aid disconnecting the rods
and drill driver. Although our rods have brass ferrules and are non-ferrous, please remember that
smokeless fuel is very corrosive & must be removed from your equipment as soon as possible as it will
cause rust to ferrous metals. Never leave your equipment in a moist environment.
9. There are two types of drill adaptor;
9.1. Button less drill adaptor, for sweeping upwards.
9.2. With Button, for sweeping or breaking liners from the top down, also these are used for horizontal
flues (usually ducting or industrial).
Please always ensure that the drivers are fully inserted into the drill chuck and must always be tight
fitting, failure to do so will cause the drill adaptor to fail and would not be covered by under warranty.
Drill drivers are therefore regarded as a consumable item & we recommend that you always have
a spare one available.
10. DO NOT tamper with the button connections on any of this equipment.
11. With traditional rods, if your brush gets stuck or you are trying to remove a nest you are limited to
only being able to turn the rods one way unless you use lock tight rods which can be difficult to connect
and disconnect.

12. With traditional sweeping your brush creates surface friction / tension as it passes through the
chimney sometimes causing the flue to move while you are trying to sweep it. Any build up in the flue
will cause the chimney to narrow and even more surface friction / tension will occur, making sweeping
harder. It has been proved traditional sweeping is more damaging to the structure of the chimney (as
demonstrated in our educational video on our website www.rodtechuk.com).
13. With power sweeping, the brush head utilizes centrifugal force to expand the brush to suit the flue
size you are sweeping, it also centres itself and navigates corners and bends more effectively, and
therefore you do not require a vast range of brushes. Because it is not a traditional brush there is
minimal surface tension being created in the sweeping process as the head adjusts to fit the flue. You
adjust the force of the sweeping action by increasing the speed of the drill. This has the effect of
stiffening the brushing action on fast speeds and softening the brush on slower speeds. So if you are
doing an older style chimney with loose or worn sides then you would use a low speed (1st gear/lowest
speed), however if you are doing a heavily built up clay/ stainless steel flue then you can increase the
speed giving you an increased effectiveness at cleaning.
14. There are two methods used when sweeping;
14a. Push the rods manually to the top of the chimney and power sweep down. On a lower speed, then
back up again on the lower speed. Once you are sure that there is no damage to the liner, you can put
the drill to the higher speed to remove creosote should there be the necessity. If the rods should ever be
hard to get around a bend, you can use the drill on a lower speed to gently guide the rods up the flue.
14b. Power the rods gently up the flue using the lower speed (1st gear) when going up or down on the
first pass of the flue, in case there is anything that could snag the head (nesting material etc) This will
also help with dust control. When you are sure the flue is safe increase the speed up a gear, should you
require it, and where there is creosote in the liner.
15. Always use the correct heads and rods for the flue you are sweeping;
A guide is given below, but further instruction on rods and heads is given later in this document;
8mm Rods (mini click system) should only be used in gas and oil flues no bigger than 5 inches
(125mm).
10mm Rods (mini click system) should only be used in flues from 4 to 6 inches (100-150mm).
The Mini click range of rods only have 3 brushes that connect to them;
100mm Bio Duct bullet (a stainless stainless steel stranded brush for cleaning induction tubes in
Biomass boilers). The 300mm Duct cleaning brush (2x 300mm strands), and a 450mm twin bullet brush
for use with the 10mm rods.
The Click Lock rods come in;
12mm which are excellent for lined flues of 6 to 8 inches (150-200mm)

15mm which are for lined and unlined flues of 8 to 18 inches (200mm- 450mm)
18mm which are for flues greater than 18 inches with or without bends (450mm+)
18mm Aluminium, which must be used on straight flues only, and must be used with the solid 18mm
rods in-between each aluminium rod.
The heads come in;
100mm bio bullet head (for use with the 8mm or 10mm rods) is used for biomass tubes and duct
cleaning
200mm Nest Punch, is exactly what is suggests. It is a hard-wired head that tears the most stubborn
twigs and debris out of a flue. If you are using this product ensure you have your torque setting on lower
than normal.
250mm button lock bullet tool less (for use with the 12mm and 15mm rods) is used for cleaning soot
and dust in lined flues. This does not require tools to re-strand the head
300mm Power brush (for use with the 12mm rods) is used for cleaning soot and dust in lined flues.
300mm SuperScrub (for use with the 12mm rods) is used to remove tar in all lined flues and bird nests
in stainless steel lined flues.
300mm Chain tar remover (for use with 12, 15 or 18mm rods) this has multiple uses, but must never be
used in stainless steel or Furan Flex flues!
300mm bullet head (for use with the 12mm rods) is used for cleaning soot and dust in lined flues. This
does not require tools to re-strand the head
300mm SuperScrub deluxe (for use with the 12mm rods) is perfect for removing heavy tar from flexible
liners and to remove debris from inside the cowls
450mm twin duct bullet head is used for getting into small openings and removing soot and dust from
lined flues.
550mm button lock bullet tool less) is used for cleaning soot and dust in lined flues. This does not
require tools to re-strand the head
600/300mm SuperScrub deluxe (for use with 12mm or 15mm rods) this is perfect for removing debris
from inside cowls, whilst still cleaning open unlined flues.
600mm Power brush (for use with 12mm or 15mm rods) is used for cleaning soot and dust from lined or
unlined flues, and is less abrasive on loose lining (pargetting).
600mm SuperScrub brush (for use with 15mm rods) can be used to remove tar and bird nests in lined
and unlined flues.

600mm mid rod head (for use with 12mm 15mm and 18mm rods) is used for cleaning horizontal shafts
and can help the removal of bird’s nests, and if put behind a SuperScrub deluxe adds 12 more cleaning
strands to the 24 on the deluxe SuperScrub.
600mm Bird nest remover (for use with the 15 and 18mm rods) this head can be used for multiple
purposes but must never be used in stainless steel flues!
900mm SuperScrub brush (for use with 15mm and both 18mm rods) is used for flues and ducts greater
than 18 inches (450mm).
Camera holder this attaches the camera to 12mm 15mm and 18mm rods to cctv a chimney. NEVER
use this when spinning the rods.
16. When sweeping a square/rectangular flue ascend in one direction and descend in the opposite
direction.
17. There are different coloured rods (white and black) this is to allow you to mark the first rod and any
change in size within the flue so that you can adjust the speed and direction giving you a visual aid
when the brush head is about to exit or there is a structural change within the flue.
18. When power sweeping in larger chimneys the action of sweeping clockwise pulls the brush head to
the right. Likewise if you reverse the drill direction (anti-clockwise) the head will gravitate to the left.
19. In short power sweeping cleans chimneys more effectively while causing less strain on the structure
of the flue, and also speeds up the sweeping process while making lighter work for you. It also reduces
the need to have a van full of occasionally used brushes.
20. Although power sweeping has been proven to increase the amount of deposits that can be
removed from a chimney, it is worth remembering that with this method of sweeping (as with anything
new), the sweep has to adapt to it.
It is unusual to break or damage rods in the learning process with our Rodtech solid rods, provided you
adhere to this manual as well as using and maintaining the equipment properly, should there be a
manufacturing fault with the Click Rod joints or ferrules etc, they are covered under our 1 year
guarantee.
21. When sweeping a chimney if you come to a point where the head stops, due to an obstruction, DO
NOT force the brush to keep going. Simply bring the rods down 30 to 60 cm (a foot or two) change the
direction of the head from clockwise to anti clockwise or vice-versa (making sure your drill is in 1st gear)
and try again. This will allow the head to be re-positioned within the flue and then you should be able to
carry on sweeping easily. Should this not work, there is a high likelihood that there is a nest or integral
damage to the flue. You as the operative will have to make this judgment call and using the appropriate
equipment (camera to CCTV, or Birds nest remover should there be evidence of twigs and debris? We
stock both of these items should you require them) to solve the problem. Remember do not force the
equipment.

22. Please ensure that any shallow slopes are cleared thoroughly as deposits accumulate in these
areas. Additional passes of the heads may be required to ensure the deposits have been fully removed.
23. Cowls;
Some cowls can be very sharp, and the effect of spinning the rod against these objects can cut a rod.
To sweep these flues it is important to try not to exit the cowl as this could damage your rod, so from the
start of the job, judge the height, when you get towards the top of the flue, stop spinning the drill and
check if you can see the head. If the head is not visible push the rod until you feel or hear the head hit
the inside top of the cowl (now visually check). If the head has exited the hat, please judge the distance
the head is out and pull the rods back into the flue manually (check again). Now the head is at the top of
the flue (not out of the cowl), you can continue to power sweep downwards safely. These can be tricky,
and it is your job to make sure that the flue is clear of burning by products.
24. It is advisable to check your equipment. It is good practice to maintain your van and equipment on a
daily basis & have a set time at the end of each week for general maintenance and cleaning of
equipment used. Make sure there are no stress marks in your rods. Make sure that the nuts are tight on
the heads and that the strands are fit for use. Drills & batteries etc are clean. In short your appearance
and that of your equipment and vehicle are what makes you stand apart from your competition and is a
sign of a true professional.
25. This could be a new sweeping method to you and the feeling you gained with traditional sweeping
will not be the same as power sweeping. It is only experience that will teach you the best way to adapt
to each situation. After using the equipment for a period of time (just as traditional sweeping) the
feelings of what the equipment is doing will come to you.
26. There are many different heads designed for the power sweeping method, which cover; Oil, gas,
ducting, chimney sweeping, tar removal, bird nest removal and clay liner removal. We also have
adaptors for the Click rods which enable the rods to be used for other applications.
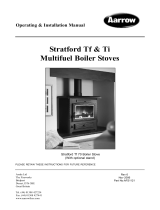
27. To re-strand the 300mm (12”) Bullet head, you must locate the grub screw, housed in the
connection area at the bottom of the head. Remove this grub screw (5mm hex) to release the existing
Co-polymer strands, remove the strands. Thread the new Co-polymer strand into the top hole as
illustrated, and then bend the strand, so that the Co-polymer is centralised and allows the second strand
to be pushed into the lower hole easily. Repeat the bending of the Co-polymer to locate it centrally,
some people find it easier to use a tape measure for greater accuracy.
Remember that if the strands are not centralised the head will be off balance and could cause a
juddering motion, the head is designed to allow a moderate deviation from the exact centre, so you can
use your eye should you feel confident. Finally tighten the grub screw with an Allen key and your Bullet
head is now ready to use.
28. To re-strand the 450mm (18”) Twin Bullet head please follow the same instructions as the 300mm
Bullet (Item 27).
29. To Re-strand the 250mm or 550mm Bullet Head, simply get a pair of grips and pull the existing
stranding straight out. To replace the strands, fold the length of strand in half and grip as to form a
crease in the centre of the strand and use the grips to help you do this.

Put the ends of the strands (horizontally) in each hole and pull until the strand is fully locked in. Do the
same on the opposing side so that the strands are balanced. Repeat this process for all six strands and
the head is now re-stranded.
30. 300mm Power Sweeping Brush. This 300mm (12”) head is designed to allow you to do the day-to-
day cleaning of flues from 150mm to 200mm (6” to 8”). The design has a unique feature in that it can fit
through a narrow gap such as bolted in throat-plates and dampers, which have been fitted in stoves and
flues sometimes without sweeping access points. It also can fit through most firebox openings without
the need to remove the plate. The whip heads contain co-polymer strands, which aid the sweeping of
chimneys cleanly. The strands are six sided strands, which generate flat sides to enhance the cleaning
process. As the heads can turn clockwise and anti-clockwise they are able to cover small chimneys with
ease. The co-polymer strands are very simple to replace (see separate illustrations on how to re-strand
later in this document), so the tool can be used for years to come which makes them far more cost
effective than the tradition brush equivalents. The speed of the drill determines the force generated to
clean the chimney. It is always advised to use low speeds in pre 1966 chimneys (rendered flues), and to
always use battery power tools to safe guard yourself.
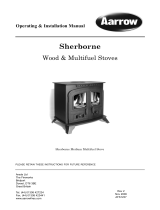
31. To re-strand the 300mm or 600mm Power Sweeping Brush you will need a 13mm spanner or
ratchet and a small bottle of Loctite 243 thread locker or similar.
Firstly unscrew ball end, this will be tight as it has thread locking glue on it to hold it in place. Should you
find it very difficult, wrap the ball in a small amount of cloth and use mole grips or vice to turn this off.
Use your 13mm spanner to remove the nut and it will then separate into 5 component parts. Using your
Rodtech replacement strands follow the steps as illustrated below. You will need to gently hold both
ends of the strands together to give you an approx. midpoint, and then place in the appropriate
channels as shown. The groves on the central cylinder have been designed so that they will grip the
replacement strands in place, making this a simple process.
The cylinder now holding the strands can be placed on the ferrule spindle. Remember that the cylinder
can only go one way round as the pins have to locate. Making sure that the pins have slotted in
correctly, now replace the nut, and tighten with your spanner. If you do not feel that the strands look
equidistant, you can use a tape measure to check, prior to totally tightening the nut. You must now drip
some Loctite 243 or equivalent onto the thread, and locate your ball end back on. Without this thread
lock your ball end could fall off. If you are replacing the stainless steel strands of the bird nest remover
or nest punch follow the same procedure as described above. If you are replacing the chain, then the
chain has to be located at the end of the chain and not in a central position.
32. 600mm Power Sweeping Brush. This 600mm (24”) head is designed to allow you to do the day-to-
day cleaning of flues greater than 200mm (8” & greater). The design has a unique feature in that it can
fit through a narrow gap such as bolted in throat-plates and dampers, which have been fitted in stoves
and flues sometimes without sweeping access points. It also can fit through most firebox openings
without the need to remove the plate. The heads contain nylon strands, which aid the sweeping of
chimneys cleanly. They are six sided strands, which generate flat sides to enhance the cleaning
process. As the heads can turn clockwise and anti-clockwise they are able to sweep small chimney
flues with ease. The nylon strands are very simple to replace (see section 30 on how to re-strand), so
the tool can be used for years to come which makes them far more cost effective then the tradition
brush equivalents. In Flues greater than 450mm (18”) you must ensure that you use one direction going
up the flue and the reverse on its decent (clockwise/anticlockwise) you may also have to repeat this

process a couple of times. The speed of the drill determines the force generated to clean the chimney. It
is always advised to use low speeds in pre 1966 chimneys (rendered flues), and to always use battery
power tools to safe guard yourself.
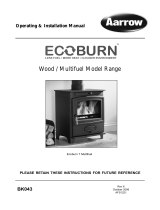
33. The Super Scrub heads come in three sizes, 300mm (12”), 600mm (24”) and Inglenook 900mm
(36”). They are strung differently; the 300mm head has strands going sideways while the 600mm and
900mm head has strands going up and down.
34. The smaller Super Scrub head (300mm) is designed for sweeping flues attached to appliances
such as wood burners and multi-fuel stoves etc. The Medium Super Scrub head 600mm is for all other
flues, with the exception of extremely large flues where the 900mm Inglenook SuperScrub is advised.
The head size should be chosen according to the flue you are sweeping. Please refer to the guide given
with each rod size towards the back of this Document in section 46.
How to re-string your SuperScrub head
35. Chain Tar remover. This head is designed to clear tar and creosote within round clay lined flues
and chimney pots.
THIS MUST NOT BE USED IN STAINLESS STEEL LINERS, FURAN FLEX LINERS OR
OTHER FRAGILE FLUES.
It is advised that in tarry flues with a build-up of creosote it is very likely that cold spots will be
particularly choked. It is advised that you use the chain tar remover to remove these deposits usually
found in the chimney pot.
This is not designed for general power sweeping, Warning this product may cause structural damage to
the chimney if not used in correct application and with caution.
36. The Bird nest remover can also be used as a tar/creosote remover within unlined flues and lined
flues. This product must never be used within stainless steel liners.
37. The bird nest remover & nest punch.
THIS MUST NOT BE USED IN STAINLESS STEEL LINERS.
The Tips of the stainless steel strands have been welded to protect the user and allow longer use of this
product, however with use they can unwind and will be sharp! Handle with caution as these can cut and
leave metal splinters if not handled with care! The bird nest remover should remove a bird’s nest with
ease
38. When using the nest punch, YOU MUST USE your torque control, and set it low enough that if the
tool snags in a nest it does not snatch your hand, as this could injure you.
39. When using the Bird nest remover or nest punch, be advised that the nesting material can drop
down the chimney and reform behind the brush head, so try and make sure that you remove the nest

slowly making sure that the nest debris clears all the way down before removing more. With the Click
Rod system you can purchase additional mid-rod heads to aid in the smooth removal of a nest.
40. All birds their nests and eggs are protected by law: The Wildlife & Countryside Act of 1981. This
makes it an offence, with certain exceptions, to deliberately take, damage or destroy the nest of any wild
bird while it is in use or being built. It is also illegal to take or destroy the egg of any wild bird. The
maximum penalty that can be imposed for an offence under the Wildlife and Countryside Act - in respect
of a single bird, nest or egg - is a fine of up to £5,000, and/or six months’ imprisonment.
The Wildlife & Countryside Act 1981 is one of the most important pieces of Wildlife legislation in this
country.
It states it is an offence to:
• Intentionally kill, injure or take any wild bird
• Intentionally take, damage or destroy the nest of any wild bird while that nest is in use or being
built
• Intentionally take or destroy an egg of any wild bird.
If you are unsure there is a nesting Jackdaw, then the best advice is to wait until the end of August -
September. The breeding season for Jackdaw’s is April - July.
They only have one brood so if they lay early in April incubation takes 20 days. The nestlings then
fledge at 32 - 33 days, so the first weeks of June would be when you would see the Juveniles.
If they were late breeders in July then the nestlings would fledge late August early September.
Due to this fact Bird nests should only be removed between Mid-September through to the end of
March.
41. You can kill some wild birds during the nesting season, but only those listed on the WML-GL05,
these include; crows, collared doves, jackdaws, jays, magpies, pigeons (feral and woodpigeon) & rooks
You must be able to prove the reason why you have removed the nest and eggs etc (I.E. a health and
safety reason).
42. To re-strand the bird nest remover and nest punch, please see how to re-strand the Power
sweeping brush 300mm and 600mm in section 31.
43. Small clay liner removing tool. This 100mm x 100mm (4” x 4”) small clay liner removing tool
attaches ideally to the 1M x 18mm rods. This product removes the clay liner by breaking it to pieces.
Ideal size of flue for removal is 150mm (6”) to 200mm (8”). Must be used with care and dust control.
When using the clay liner removing tools it is recommended that you use a 24 or 36v cordless drill
together with the 18mm Liner Breaking Rods.
Due to the weight and the speed in which the clay liner tools are used, you must always slow down the
speed of your drill when stopping, thus avoiding snapping rods unnecessarily. The forward momentum
of the weight on the end of the rods can be so great as to snap the rods or even pull the drill out of the
operators’ hand. It may be advisable to allow for a rod replacement within a quote of this type of work.

44. Large clay liner removing tool. This 100mm x 150mm (4” x 6”) Large clay liner removing tool
attaches ideally to the 1M x 18mm rods. This product removes the clay liner by breaking it to pieces.
Ideal size of flue for removal is 200mm (8”) and above. Must be used with care and dust control.
When using the clay liner removing tools it is recommended that you use a 36v cordless drill together
with the 18mm rods.
Due to the weight and the speed in which the clay liner tools are used, you must always slow down the
speed of your drill when stopping, thus avoiding snapping rods unnecessarily. The forward momentum
of the weight on the end of the rods can be so great as to snap the rods or even pull the drill out of the
operators’ hand. It may be advisable to allow for a rod replacement within a quote of this type of work.
45. The retrieval tool is to aid in the removal of bird nests and can also be used to retrieve rods and
brushes that customers may have lost in chimneys.
THIS ATTACHMENT MUST NOT BE USED WITH A DRILL AS IT CAN SNAG INSIDE A
CHIMNEY AND CAUSE DAMAGE.
46. In the Click range there are 6 different sizes of rods available for rotary power sweeping. The 8mm
and 10mm are a mini click system. 12-18mm are Click Lock. You can use an 8mm rod as a leader on
the 10mm rod. The 12mm as a leader for 15mm rods, and 15mm as a leader for the 18mm.
47. 1M x 8mm Solid Mini Click lock rod for use in gas/oil/lint and small ducted flues. This extremely
flexible and versatile rod enables you to efficiently clean up to 125mm/5 inch oil/gas and other ducting
flues with the appropriate Mini Click attachments.
48. 1M x 10mm Mini Click Lock Rod. These highly flexible and hard wearing solid section rods are
ideally suited to the same applications as the 8mm Mini Click rods but offer slightly more rigidity making
them ideal for use in biomass boiler tubes using the 100mm steel Bio Duct cleaning brush. The rods
should not be used in flues greater than 6 inches (150mm).
49. 1M x 12mm Solid Click Rod. These highly flexible and hard wearing solid section rods are ideally
suited for flues and ducting within a range of sizes from 150mm (6”) to 200mm (8”), such as lined
appliances. They can be used with a verity of attachments for power sweeping/cleaning.
50. 1M x 15mm Solid Click Rod. These flexible and hard wearing solid section rods are ideally suited
for flues and ducting within a range of sizes from 150mm (6”) to 450mm (18”), usually open fire flues.
They come with a verity of attachments for power sweeping/cleaning.
51.1M x 18mm Solid Click lock Rod. These minimal flex and hard wearing solid section rods are ideally
suited for flues and ducting with a range of sizes upwards of 450mm (18 inches) mainly inglenooks.
They come with a verity of attachments for power sweeping/ cleaning. These rods are also used for
breaking old or damaged clay liners by the use of the Tile breaker attachments.

These rods are best used with a high torque 36v Drill when used with the tile breaker attachments or in
very tall or very wide chimneys.
52. 1M x 18mm Aluminium Click Lock Rod. These Aluminium rods are ideally suited for flues and
ducting with a range of sizes upwards of 600mm (24 inches). When confronted by a large flue, such as
an inglenook, (600 mm/24 inches and above) you MUST use this rod together with the Rodtech Click
18mm x 1000mm Solid Rod. When using this rod in conjunction with the 18mm solid rods, you must
start with the solid rod, then every other rod must be either solid or aluminium. Should you try and use
just aluminium rods, these will shake causing skittering and will possibly break quickly.
53. The Rodtech Click to Quarter Inch Whitworth Adaptor is to allow quarter inch Whitworth brushes to
be used with Rodtech Click rods should the operator desire to manual sweep. It comes with a grub
screw so that you can secure your desired brush to the adaptor to be able to turn your Rodtech Click
rods clockwise and Anti-clockwise when manually sweeping providing the grub screw has been
tightened sufficiently. Traditional brushes should never be used when power sweeping and should only
be used for manual sweeping.
54. There are many methods of dust control that can be used with power sweeping, however we only
advise on 3; Inflation bags, Sponge blocking system, and lastly sheets and poles method. We stock the
sponge blocking systems and sheets and poles. We also run training courses on all aspects of rotary
power sweeping including dust control.
55. If you are sweeping wet or dirty flues where the rods could exit the flue and dirt be spun, it is
advised to hold a piece of towelling or cloth in the flat of your hand and clean the rods as they exit the
flue.
56. The Rodtech Chimney Rod Guide is designed to make sweeping easier and cleaner.
With this piece of equipment the rod travels through the tube and the vacuum fits on the side of the T
piece to insure better dust control it also helps protect your rods from damage.
Dimensions 80 cm long (31.5 inches) internal diameter (30mm 1.25 inches)
How to use:
• Put the rod into the rod guide.
• Attach the brush head.
• Put the brush into the flue.
• Slide the rod guide into the flue.
• Use standard dust control as you would usually but with the vacuum tube on the rod guide.
57. As with any new technology the best practice guide as it stands is just that BEST PRACTICE. The
guide will always be updated and adjusted as and when improvements can be made. But it does not
eliminate the risk of hazards occurring. It is ultimately down to you the sweep to use the power
sweeping method in
a responsible manner.
We believe once you have tried power sweeping and adapted it to your own requirements you will be

pleased with the results you will achieve, and the speed at which the cleaning is done. Further the
customer always gets the cleanest, fastest sweep making them happier in the process.
If you discover a technique or manner of sweeping not described in this best practice guide that you
believe will benefit others please let us know so we can continue to keep our customers up to date with
the best sweeping methods.
Disclaimer
All details in this guide are correct at time of publication.
Whilst every attempt is made to ensure the information in this guide is helpful and accurate, Rodtech UK
Ltd, or its affiliates cannot be held responsible for any mishap that may occur whilst using the equipment
or techniques detailed in this guide.
This is a best practice guide only and should not be used solely as a reference.
Rodtech actively supports all trade associations, and believes that the users of our equipment should
adhere to the code of conduct (of their chosen trade body), Building Regulations and the Health and
safety at work act should be followed at all times.
Rodtech UK Limited
Unit 11, Ironside Way. Hingham. Norfolk. England. NR9 4LF
www.rodtech.co.uk • 01953 852 952 • [email protected] • VAT Registration Number: 992 6932
65
March 2022 -V9
www.rodtechuk.com
Liner Manufactures and Insurers approve RODTECH POWER SWEEPING equipment (please see our
website for more details). This includes the replacement nylons for the heads, in order to safeguard their
warranties. The nylons used by Rodtech are hexagonal and allow the flat sides of the strands to scrape
the deposits off within a flue. Other shaped nylons have been tested but DO NOT produce the same
effect.
The Rodtech Click Rods can be used for both manual and power sweeping and duct cleaning.
All new click rod equipment comes with a 12 Month Guarantee.
(excluding when used with the tile removers).
/