IDEAL INDUSTRIES IDEAL 5009-1 User manual
- Category
- Paper shredders
- Type
- User manual
This manual is also suitable for
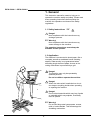
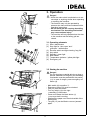
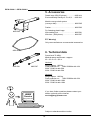
IDEAL INDUSTRIES IDEAL 5009-1 is a modular conveyor belt system designed for heavy-duty shredding tasks. With its powerful shredding mechanism and large capacity waste cart, this machine can handle large volumes of paper, cardboard boxes, and other materials. The conveyor belt automates the feeding process, making it easy to shred large amounts of material without manual labor. The machine's safety features, such as the grid that prevents access to the cutting mechanism, make it safe to operate, even in busy environments.
IDEAL INDUSTRIES IDEAL 5009-1 is a modular conveyor belt system designed for heavy-duty shredding tasks. With its powerful shredding mechanism and large capacity waste cart, this machine can handle large volumes of paper, cardboard boxes, and other materials. The conveyor belt automates the feeding process, making it easy to shred large amounts of material without manual labor. The machine's safety features, such as the grid that prevents access to the cutting mechanism, make it safe to operate, even in busy environments.


-
 1
1
-
 2
2
-
 3
3
-
 4
4
-
 5
5
-
 6
6
-
 7
7
-
 8
8
-
 9
9
-
 10
10
-
 11
11
-
 12
12
-
 13
13
-
 14
14
-
 15
15
-
 16
16


IDEAL INDUSTRIES IDEAL 5009-1 User manual
- Category
- Paper shredders
- Type
- User manual
- This manual is also suitable for
IDEAL INDUSTRIES IDEAL 5009-1 is a modular conveyor belt system designed for heavy-duty shredding tasks. With its powerful shredding mechanism and large capacity waste cart, this machine can handle large volumes of paper, cardboard boxes, and other materials. The conveyor belt automates the feeding process, making it easy to shred large amounts of material without manual labor. The machine's safety features, such as the grid that prevents access to the cutting mechanism, make it safe to operate, even in busy environments.
Ask a question and I''ll find the answer in the document
Finding information in a document is now easier with AI