Page is loading ...

Operating and Installation
Instructions
Steam oven
DG 4080
To prevent accidents
and appliance damage
read these instructions
before
installation or use.
M.-Nr. 06 546 610
en - US, CA

IMPORTANT SAFETY INSTRUCTIONS. . . . . . . . . . . . . . . . . . . . . . . . . . . . . . . . . 4
Guide to the steam oven . . . . . . . . . . . . . . . . . . . . . . . . . . . . . . . . . . . . . . . . . . . . 9
Accessories . . . . . . . . . . . . . . . . . . . . . . . . . . . . . . . . . . . . . . . . . . . . . . . . . . . . . 11
Before using for the first time. . . . . . . . . . . . . . . . . . . . . . . . . . . . . . . . . . . . . . . 13
Setting the water hardness ..........................................13
Setting the altitude .................................................13
Suitable containers . . . . . . . . . . . . . . . . . . . . . . . . . . . . . . . . . . . . . . . . . . . . . . . 14
Using the steam oven . . . . . . . . . . . . . . . . . . . . . . . . . . . . . . . . . . . . . . . . . . . . . 15
Before each use...................................................15
Selecting a function ................................................15
Adjusting the temperature (if necessary) ...............................15
Selecting the duration ..............................................16
Starting a function .................................................16
Interrupting the cooking process......................................17
At the end of the cooking process.....................................17
After use.........................................................18
System lock ......................................................19
Cooking tips . . . . . . . . . . . . . . . . . . . . . . . . . . . . . . . . . . . . . . . . . . . . . . . . . . . . . 20
Steaming ........................................................20
Defrosting .......................................................23
Reheating........................................................25
Meal planning . . . . . . . . . . . . . . . . . . . . . . . . . . . . . . . . . . . . . . . . . . . . . . . . . . . . 26
Special uses . . . . . . . . . . . . . . . . . . . . . . . . . . . . . . . . . . . . . . . . . . . . . . . . . . . . . 27
Canning .........................................................27
Blanching........................................................28
Making Yogurt ....................................................28
Disinfecting baby bottles ............................................29
Guide to the functions. . . . . . . . . . . . . . . . . . . . . . . . . . . . . . . . . . . . . . . . . . . . . 30
Automatic Functions ...............................................30
Favorites ........................................................30
Contents
2

Settings. . . . . . . . . . . . . . . . . . . . . . . . . . . . . . . . . . . . . . . . . . . . . . . . . . . . . . . . . 31
Language J ......................................................31
Clock ...........................................................31
Temperatures.....................................................32
Temperature °F / °C ................................................33
Water Hardness ...................................................33
Steam Reduction ..................................................33
Warming Function .................................................33
Tone Options .....................................................34
Display ..........................................................35
Start Settings .....................................................35
System Lock .....................................................35
Reset ...........................................................35
Cleaning and Care . . . . . . . . . . . . . . . . . . . . . . . . . . . . . . . . . . . . . . . . . . . . . . . . 36
Descaling........................................................41
Frequently asked questions . . . . . . . . . . . . . . . . . . . . . . . . . . . . . . . . . . . . . . . . 42
After sales service . . . . . . . . . . . . . . . . . . . . . . . . . . . . . . . . . . . . . . . . . . . . . . . . 44
Installation instructions . . . . . . . . . . . . . . . . . . . . . . . . . . . . . . . . . . . . . . . . . . . 45
IMPORTANT SAFETY INSTRUCTIONS. . . . . . . . . . . . . . . . . . . . . . . . . . . . . . . . 46
Appliance and cut out dimensions . . . . . . . . . . . . . . . . . . . . . . . . . . . . . . . . . . 48
Installation . . . . . . . . . . . . . . . . . . . . . . . . . . . . . . . . . . . . . . . . . . . . . . . . . . . . . . 51
Electrical connection. . . . . . . . . . . . . . . . . . . . . . . . . . . . . . . . . . . . . . . . . . . . . . 52
Caring for our environment . . . . . . . . . . . . . . . . . . . . . . . . . . . . . . . . . . . . . . . . 53
Contents
3

WARNING- When using your
appliance follow basic
precautions, including the
following:
Read all instructions before
installation or use of the steam
oven to prevent injury and
appliance damage.
Use the steam oven only for its
intended purpose. This appliance
is intended for residential cooking
only.
This appliance conforms to all
uniform safety codes and
regulations. The manufacturer
cannot be held responsible for
damage or injury caused by
improper use of this appliance.
Keep these operating instructions
in a safe place and pass them on
to any future user.
SAVE THESE INSTRUCTIONS
Technical Safety
~
Before installation make sure that
the voltage and frequency listed on the
data plate correspond with the
household electrical supply. This data
must correspond in order to avoid risk
of damage to the appliance. If in doubt,
consult a qualified technician.
~
Installation, repair and maintenance
work should be performed by a Miele
authorized service technician. Work by
unqualified persons could be
dangerous and may void the warranty.
This data must correspond to prevent
injury and appliance damage. If in
doubt consult a qualified electrician.
~
Be certain your appliance is
properly installed and grounded by a
qualified technician. To guarantee the
electrical safety of this appliance,
continuity must exist between the
appliance and an effective grounding
system. It is imperative that this basic
safety requirement be met. If there is
any doubt, have the electrical system of
the house checked by a qualified
electrician. The manufacturer cannot be
held responsible for damage caused
by the lack, or inadequacy, of an
effective grounding system.
IMPORTANT SAFETY INSTRUCTIONS
4

~
Do not use an extension cord to
connect this appliance to electricity.
Extension cords do not guarantee the
required safety of the appliance, e.g.
danger of overheating.
~
Do not operate any appliance with a
damaged cord or plug, or if the
appliance has been damaged in any
manner. Call Miele’s Technical Service
Department.
~
Always attach the cord to the
appliance first, then plug it into the wall
outlet. To disconnect, turn the
appliance off by pressing the left jog
shuttle, then remove the plug from the
wall outlet.
~
Do not submerge the plug, cord or
steam generator (water tank) into water
or attempt to wash the steam generator
in the dishwasher. Danger of electric
shock!
~
Do not tamper with electrical
connections, components or
mechanical parts. Never open the outer
casing of the appliance.
Use
~
The steam oven should be installed
at a safe height for users to safely
access all cooking levels and
containers. Otherwise spills could
cause burns or scalding and children
may be put at risk by the hot appliance
door.
~
This appliance must only be
operated after it has been correctly
installed into cabinetry. This is
necessary to ensure that all electrical
components are shielded.
~
This appliance is intended for
domestic use only and is not to be used
for commercial purposes.
~
Only use the appliance for its
intended purpose. Any other use is at
the owner’s risk and could be
dangerous.
~
This appliance must not be installed
or operated outdoors.
~
Do not use plastic containers. They
may melt at high temperatures in the
oven.
~
To avoid injuries allow the steam
oven to cool before cleaning and
putting on or taking off parts. Unplug
the steam oven from the outlet when not
in use and before cleaning.
IMPORTANT SAFETY INSTRUCTIONS
5

Scalding and Burning hazards
~
When in use the oven, particularly
the inside of the door as well as the
outer side by the vent, may become
very hot and remain so for a while after
the oven has been turned off. Keep
children at a safe distance.
~
Use pot holders when working with
a hot appliance.
~
When handling cooking containers
take care not to let the contents spill.
~
Do not touch hot surfaces. Use
handles or knobs.
~
Avoid hot steam, serious burns and
scalds could result.
~
Use caution when handling the
steam generator. Danger of scalding.
Children
~
Close supervision is necessary
when any appliance is used by or near
children.
~
To reduce the risk of injury, do not
allow children to play in, on or near the
steam oven.
~
Do not allow children to stand or
hang on the appliance door.
~
Do not store items of interest to
children in cabinets near the appliance.
~
Use the Child Safety Lock to prevent
children from turning on the appliance
or changing its settings.
~
The door hinges of the appliance
could be hazardous. Ensure that
children are kept at a safe distance.
~
Ensure that any plastic wrap, is
disposed of safely and kept out of the
reach of children. Danger of
suffocation!
~
Before discarding an old appliance,
switch off and disconnect it from the
power supply. Cut off and render the
plug useless and remove any doors to
prevent hazards.
IMPORTANT SAFETY INSTRUCTIONS
6

Appliance maintenance
~
Empty the steam generator after
every use for hygienic reasons and to
avoid condensate water in the
appliance.
~
Wipe out the appliance after each
use and leave the door open until the
moisture in the cooking compartment
has evaporated.
~
If the oven is not used for an
extended period of time, clean it
thoroughly to avoid odors. See "Before
using for the first time". Leave the door
open after cleaning.
~
Do not use a steam cleaner to clean
this appliance. Steam could penetrate
electrical components and cause a
short circuit. Pressurized steam could
cause permanent damage to the
surface and to components for which
the manufacturer cannot accept
responsibility.
~
The appliance is programmed so
that after each use residual water will
remain in the steam generator. If there
is no residual water there is a fault.
Contact the Miele Service Department.
~
When descaling the appliance, only
use descaling agents available from
Miele. Follow the manufacturer’s
instructions. Do not use vinegar, it will
damage the appliance.
Appliance damage
~
Do not heat unopened food
containers. Pressure can build up
causing an explosion that will damage
the cooking compartment. There is also
a danger of personal injury and
scalding.
~
To prevent condensation which
could corrode the appliance, do not
leave cooked foods in the oven for an
extended period of time.
~
Do not use items in the steam oven
which may rust.
~
Do not lean, sit or place heavy items
on the open door of the appliance. The
door can support a maximum of 17 lbs
(8 kg).
IMPORTANT SAFETY INSTRUCTIONS
7

Further safety notes
~
In the event of damage or a defect,
turn off the appliance immediately. After
it has been turned off, isolate it from the
main power supply and contact the
Miele Technical Service Department.
Ensure that power is not restored to the
appliance during maintenance or repair
work.
~
Repairs should only be carried out
by a Miele authorized service
technician in accordance with local and
national safety regulations. Repairs and
other work by unqualified persons
could be dangerous.
~
While the appliance is under
warranty repairs should only be
performed by an authorized service
technician. Otherwise the warranty is
void.
~
Be sure that cords of other electrical
appliances do not come in contact with
the appliance door. The insulation of
the cords could become damaged
creating a hazard.
~
To protect against electric shock
keep the appliance cord clear of
liquids.
~
Do not let the cord hang over the
edge of tables or counters, or come in
contact with hot surfaces.
~
The use of accessories not
recommended by Miele may cause
injury.
SAVE THESE
INSTRUCTIONS
IMPORTANT SAFETY INSTRUCTIONS
8

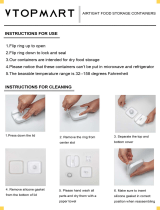
a Automatic door opener for steam
reduction
b Control panel
c Vent for moist air
d Door gasket
e Steam channel
f Steam generator (with insert)
g Steam generator compartment
h Steam generator outlet
i Side runners with 4 levels
j Steam inlet
k Drip channel
l Bottom heating element
m Temperature sensor
n Air outlet
Guide to the steam oven
9

Control panel
o Touch controls
to select or set a function
p Keypad
to enter times or temperatures
q On
to turn the oven on
r Off
to turn the oven off
s Display
t "Timer" touch control
to set a timer independent of an oven
function
u "Clear" touch control
to delete the last entry or to clear
menu items
Display
This oven uses soft key technology and
an LCD display to assist in the selection
of functions.
To select a function, touch the control
next to the desired function. The arrow
next to each displayed function points
to its corresponding control.
Additional functions are displayed by
touching the "more" control.
The previous display can be recalled
by touching the "back" control.
Dots after a function indicate a
submenu. The submenu will appear
when the function is selected.
K The display shows information for
use. Follow the requests or press
"OK" to cancel them from the display.
Guide to the steam oven
10

All accessories can be reordered if necessary.
Drip tray
For catching excess liquids
1 cooking container
(4.2 pints/2 liters)
For steaming
2 cooking containers
(3.17 pints/1.5 liters)
For steaming
Rack
To support cookware
Silicone grease
For lubricating the connection valve of
the steam generator
Accessories
11

Optional
The following stainless steel cooking
containers for steaming can be ordered
as optional accessories:
Container Capacity
in pt (l)
Height in
inches (cm)
DGG 2 solid 4.2 (2) 2.5 (6)
DGG 3 solid 6.3 (3.1) 2.5 (6)
DGGL 4 perforated 6.3 (3.1) 2.5 (6)
DGGL 5 perforated 4.2 (2) 2.5 (6)
DGGL 6 perforated 6 (2.8) 4 (10)
DGG 7 solid 6 (2.8) 4 (10)
Container lid DGD
For containers DGG 2, 5, 6, 7
Ceramic cooktop cleaner
Also suitable for cleaning stainless steel
Descaling tablets
To descale the steam generator
Accessories
12

Setting the water hardness
If your water hardness level differs from
the factory setting you will need to
reprogram the appliance.
The appliance is factory set to:
8 - 14 gr/gal.
Use the supplied test strip to check
your water hardness level or call your
local water supplier for the water
hardness in your area.
Black
squares in
the Display
gr/gal ppm
4 1-7 <20-130
8 8-14 140-250
12 15-21 270-380
16 >21 >380
^ Touch the "On/Off" control.
^
Select "more" until "Settings J..."
shows in the list.
^
Select "Settings J...".
^
Select "Water hardness".
^
Set the water hardness by touching
the "Softer" or Harder" control.
^
Select "OK" to confirm the setting.
Setting the altitude
This process rinses the water lines and
sets the unit to the water boiling
temperature which varies depending on
the altitude in your area.
^
Take the steam generator from the
appliance and take the insert out, see
"Cleaning and Care".
^
Rinse the steam generator and insert
with hot water. Do not use any soap.
Do not wash the steam generator or
the insert in a dishwasher!
Do not submerge the steam
generator in water!
^ Start the cooking program "Custom"
212°F (100°C) for 15 minutes.
Proceed as described in "Using the
steam oven".
When relocating to a new area, reset
the unit’s water boiling temperature by
descaling the appliance. See "Cleaning
and Care" for more information.
Setting the altitude for the first time and
after relocation will produce more
steam than usual. This is not a fault.
Before using for the first time
13

Stainless steel cooking containers are
supplied with the appliance.
Other containers are available in a
variety of sizes, both perforated and
solid, as optional accessories.
Please note when selecting cookware:
–
Use perforated cooking containers
whenever possible. The steam can
reach the food from all sides and
cook evenly.
–
For thicker items, e.g. potatoes, build
larger spaces between them. It is
best to space food as much as
possible so steam can surround
each piece. Larger and deeper
containers can be used for larger
items.
– Dense dishes such as casseroles or
food such as peas or asparagus
which have little space between
them will take longer to cook
because the steam has less space to
work in. The more of this type of food
the container becomes filled with, the
longer the cooking time will be. It is
best to use 2 or 3 shallow containers
for these foods. The recommended
cooking times are for shallow
containers. For larger fill heights the
cooking time is extended.
See "Cooking tips" for more information.
You can also use your own containers
and dishes. However, please note the
following:
–
The container must be heat resistant
up to 212°F (100°C). Heat resistant
glass, ceramics, porcelain
(chinaware), plastics, stainless steel
or enamel dishes are all suitable.
–
Food will take longer to cook in a
dish with thick sides.
–
Place the dish on the supplied rack.
–
Ensure that there is a gap of at least
1" (3 cm) between the upper rim of
the container and the top of the
cooking compartment to allow
sufficient steam into the container.
Suitable containers
14

Before each use
^
Insert the drip tray to catch
condensed water.
^
Fill the steam generator with water.
The insert can must remain inside.
Only use tap water! Never use
distilled or mineral water. Hot water
will shorten the heat-up time.
The water level must be between the
min and max markings. The marks are
on the outside and the inside of the
steam generator.
Never exceed the "max" level
marker!
The water level in the steam generator
is shown in the display by a symbol.
^ Insert the steam generator into the
appliance until it connects.
Selecting a function
^
Open the door and place the food in
the oven.
^
Touch the "On/Off" sensor.
^
Select the sensor of the desired
function.
Adjusting the temperature
(if necessary)
This oven has been factory tested for
the optimum operating temperature of
each function.
When using the function "Custom" it is
possible to change the default
temperature during programming.
^ Select the "Temperature" sensor.
^ Using the number keys, select the
desired temperature.
The default temperatures for the
functions "Custom", "Defrost", "Reheat"
and "Canning" can be adjusted
permanently in the menu "Settings" to
customize the oven to your needs. See
"Settings - Temperatures" for more
information.
Using the steam oven
15

Selecting the duration
A duration between 1 minute (0:01) and
5 hours 59 minutes (5:59) can be
selected for the cooking process.
If the duration is longer than
59 minutes, it has to be set in hours and
minutes.
Example: Duration 80 minutes = 1:20.
^
Select the desired duration using the
number keys.
Cooking time (duration)
recommendations are shown in the
following tables, see "Cooking tips".
The cooking time depends on the size
of the food not on the amount. For
example, potatoes with a large
diameter need a longer cooking time
then ones with a smaller diameter.
The recommended times are stated for
an overall amount of8-10portions.
Use suitable cookware.
Starting a function
The oven is factory set to start
automatically a few seconds after the
duration is selected. To start the oven
right away select the "Start" sensor.
See "Settings" for more information to
set the start permanently to a manual
start.
After the start a fan noise and a steam
generating noise is heard.
During the heating phase the rise in
temperature is displayed.
Once the selected temperature is
reached, the cooking process starts
and the cooking time will elapse.
When cooking cooled or frozen food,
the interior temperature is lowered in
the beginning then rises very slowly.
The overall time is reached by adding
the heat up time and the selected
cooking time. The heat up and cooking
times depend on the food amount and
the food temperature.
Using the steam oven
16

Interrupting the cooking
process
^
You can interrupt the cooking
process at any time by opening the
door or selecting the "Stop" sensor.
The heating is turned off, the remaining
time is stopped.
,
Hot steam will escape when the
door is opened.
Use caution when taking containers
out of the oven. Spilled liquids,
steam and the interior walls are hot.
Danger of burns!
^ Close the oven door to continue
cooking.
Once the door is closed, pressure
compensation takes place with a
whistling sound.
The oven heats up again. Once the
selected temperature is reached, the
display changes and the remaining
time elapses.
At the end of the cooking
process
Shortly before the selected time ends,
the steam is reduced and the door
opens a small gap to release steam.
A tone sounds after the set time has
elapsed. The door closes.
^
Once the display shows "Ready",
open the door and remove the food.
The oven is factory set so that the food
will be kept warm at a temperature of
158°F (70°C) for a maximum of
15 minutes if it is not removed from the
oven immediately after cooking.
Please note that some food, e.g. fish,
can overcook when kept warm.
See "Settings - Steam reduction" and/or
"Warming function" to turn off these
options.
,
Use caution when taking
containers out of the oven.
Do not touch hot surfaces.
Avoid hot steam, serious burns and
scalds could result.
Using the steam oven
17

After use
^
Turn the appliance off.
^
Remove and empty the drip tray.
^
Remove and empty the steam
generator. Push the steam generator
upwards when taking out.
^
Clean and dry the appliance after
each use. See "Cleaning and Care".
^
Leave the steam oven door open to
allow the interior to completely dry.
The fan will continue to run for a short
time after the appliance is turned off.
The fan running time can be shortened
by taking out the steam generator
immediately after the oven is turned off.
The appliance is set that after each
use residual water remains in the
steam generator. If there is no
residual water, there is a fault.
Contact the Miele Service
Department.
Using the steam oven
18

Timer
The timer can be used to time any
activity in the kitchen and can be set
independently of a cooking function.
Two alarms (Timer 1 and 2) can be
selected simultaneously.
A time between 1 second (00:01 min)
and 59 minutes, 59 seconds
(59:59 min) can be set.
To set a timer
^
Touch the "Timer" control.
^ Use the keypad to enter the desired
time in minutes and seconds.
^ Repeat for the second timer.
The countdown for Timer 1 and 2 is
shown in the lower area of the display.
At the end of the timed period, a tone
will sound.
^ Touch "Clear" to cancel the timer
tone.
To cancel a timer
^
Touch the "Clear" control.
^
Select the control for the timer to be
canceled or to cancel both timers
and a running function touch "All
Functions".
^
Select "OK".
System lock
The appliance has a safety lock to
prevent it from being accidentally
turned on by children.
The appliance comes with the safety
lock deactivated. To activate it see
"Settings - System lock".
Locking the oven
^
Select the symbol ).
^
Select "On" and confirm with "OK".
Unlocking the oven
^ Select the symbol $.
^ Select "Off" and confirm with "OK".
Using the steam oven
19

Steaming
Food Function Custom
Temperature in °F (°C) Time in minutes
Vegetables
Cauliflower, florets 212 (100) 3 - 7
Green beans 212 (100) 5 - 10
Broccoli, florets 212 (100) 2 - 8
Peas, Green 212 (100) 40
Peas, Black 212 (100) 60
Carrots, cut 212 (100) 3 - 12
Potatoes, peeled and halved 212 (100) 20 - 25
Potatoes, unpeeled 212 (100) 25 - 28
Brussels sprout 212 (100) 12 - 14
Asparagus 212 (100) 4 - 8
Turnips, cubed 212 (100) 7 - 14
Meat or Deli
Sausage 194 (90)* 2 - 4
Smoked pork chops 212 (100) 6 - 8
Chicken 212 (100) 50 - 60
Fish
Salmon fillet 212 (95) 4 - 12
Flounder fillet 185 (75) 4 - 12
* This temperature does not reflect the default temperature.
Cooking tips
20
/