Page is loading ...


TABLE OF CONTENTS
Specifications….................................................................................. 2
Safety Instructions.............................................................................. 3
Know Your Screwdriver……………………………………………. 6
Operation............................................................................................. 7
Maintenance........................................................................................ 9
Warranty ............................................................................................. 10
SPECIFICATIONS
3.6 V Screwdriver Item: 49036
Motor: 3.6Volt DC
Speed (no load): 200RPM
Bit size: 1/4" hex collet
Max torque: 34 in.lbs
Battery capacity: 1.3 Ah lithium ion
Charge time: 3-5 hours
Charger input: 120Volt, 60Hz AC only
Weight: 1.32 lbs
WARNING: Read all safety warnings and instructions. Failure to follow the
warnings and instructions may result in electric shock, fire and/or serious injury.
SAVE ALL WARNINGS AND INSTRUCTIONS FOR FUTURE REFERENCE.
2

SAFETY INSTRUCTIONS
GENRAL SAFETY RULES
WARNING! Read all safety warnings and instructions. Failure to follow the warnings and
instructions may result in electric shock, fire and / or serious injury.
Save all warnings and instructions for future reference.
WORK AREA SAFETY
1. Keep work area clean and well lit. Cluttered or dark areas invite accidents.
2. Do not operate power tools in explosive atmospheres, such as in the presence of flammable liquids, gases
or dust. Power tools create sparks which may ignite the dust or fumes.
3. Keep children and bystanders away while operating a power tool. Distractions can cause you to lose control.
ELECTRICAL SAFETY
1. Power tool plugs must match the outlet. Never modify the plug in any way. Do not use any adapter plugs
with earthed (grounded) power tools. Unmodified plugs and matching outlets will reduce risk of electric
shock.
2. Avoid body contact with earthed or grounded surfaces such as pipes, radiators, ranges and refrigerators.
There is an increased risk of electric shock if your body is earthed or grounded.
3. Do not expose power tools to rain or wet conditions. Water entering a power tool will increase the risk of
electric shock.
4. Do not abuse the cord. Never use the cord for carrying, pulling or unplugging the power tool. Keep cord
away from heat, oil, sharp edges or moving parts. Damaged or entangled cords increase the risk of electric
shock.
5. When operating a power tool outdoors, use an extension cord suitable for outdoor use. Use of a cord
suitable for outdoor use reduces the risk of electric shock.
PERSONAL SAFETY
1. Stay alert, watch what you are doing and use common sense when operating a power tool. Do not use tool
while tired or under the influence of drugs, alcohol, or medication. A moment of inattention while operating
power tools may result in serious personal injury.
2. Use personal protective equipment. Always wear eye protection. Protective equipment such as dust mask,
non-skid safety shoes, hard hat, or hearing protection used for appropriate conditions will reduce personal
injuries.
3. Prevent unintentional starting. Ensure the switch is in the off-position before connecting to power source
and / or battery pack, picking up or carrying the tool. Carrying power tools with your finger on the switch or
energising in power tools that have the switch on invites accidents.
4. Remove any adjusting key or wrench before turning the power tool on. A wrench or a key left attached to a
rotating part of the power tool may result in personal injury.
5. Do not overreach. Keep proper footing and balance at all times. This enables better control of the power
tool in unexpected situations.
6. Dress properly. Do not wear loose clothing or jewellery. Keep your hair, clothing and gloves away from
moving parts. Loose clothes, jewelry or long hair can be caught in moving parts.
7. If devices are provided for the connection of dust extraction and collection facilities, ensure these are
connected and properly used. Use of these devices can reduce dust-related hazards.
3

POWER TOOL USE AND CARE
1. Do not force the power tool. Use the correct power tool for your application. The correct power tool will do
the job better and safer at the rate for which it was designed.
2. Do not use the power tool if the switch does not turn it on and off. Any power tool that cannot be controlled
with the switch is dangerous and must be repaired.
3. Disconnect the plug from the power source and/or the battery pack from the power tool before making
any adjustments, changing accessories, or storing power tools. Such preventive safety measures reduce the
risk of starting the power tool accidentally.
4. Store idle power tools out of the reach of children and do not allow persons unfamiliar with the power
tool or these instructions to operate the power tool. Power tools are dangerous in the hands of untrained
users.
5. Maintain power tools. Check for misalignment or binding of moving parts, breakage of parts and any
other condition that may affect the power tool’s operation. If damaged, have the power tool repaired
before use. Many accidents are caused by poorly maintained power tools.
6. Use the power tool, accessories and tool bits etc., in accordance with these instructions, taking into
account the working conditions and the work to be performed. Use of the power tool for operations
different from those intended could result in a hazardous situation.
BATTERY TOOL USE AND CARE
1. Recharge only with the charger specified by the manufacturer. A charger that is suitable for one type of
battery pack may create a risk of fire when used with another battery pack.
2. Use power tools only with specifically designated battery packs. Use of any other battery packs may create a
risk of injury and fire.
3. When battery pack is not in use, keep it away from other metal objects, like paper clips, coins, keys, nails,
screws or other small metal objects that can make a connection from one terminal to another. Shorting the
battery terminals together may cause burns or a fire.
4. Under abusive conditions, liquid may be ejected from the battery; avoid contact. If contact accidentally
occurs, flush with water. If liquid contacts eyes, additionally seek medical help. Liquid ejected from the
battery may cause irritation or burns.
SERVICE
Have your power tool serviced by a qualified repair person using only identical replacement parts. This will
ensure that the safety of the power tool is maintained.
SPECIFIC SAFETY RULES FOR CORDLESS DRILL
1. Hold power tools by insulated gripping surfaces when performing an operation where the cutting tool
may contact hidden wiring or its own cord. Contact with a live wire will make exposed metal parts of the tool
live and shock the operator.
2. Use protective gloves when removing the bit from the tool, or first allow the clamp to cool down. The bit may
be hot after prolonged use.
3. Use protective gloves when operating the tool. Protective gloves can help to keep you from being burnt and hurt.
4. Keep your hands away from the motor-housing vents. Hot gas comes from the vents during operation.
5. Do not operate the tool at full-load for more than 30 seconds, as this can cause the motor to become too hot,
which may damage the motor.
6. Release the trigger immediately when the screws are tightened to avoid breaking the screw.
4

7. For best results, your battery tool should be charged in a location where the temperature is more that 41 °F
(5 °C) but less that 104 ° F (40 °C). Do not store outside or in vehicles.
SAFETY RULES FOR CHARGER
WARNING! Read and understand all instructions. Failure to follow all instructions listed below may result in
electric shock, fire, and/or serious personal injury.
1. Before using the battery charger, read all instructions and cautionary markings in this manual and on the battery
charger, the battery, and the product using the battery to prevent misuse of the products and possible injury or
damage.
CAUTION: To reduce the risk of electric shock or damage to the charger and battery, charge only these
rechargeable batteries specifically designated on your charger’s label. Other types of batteries may burst, causing
personal injury or damage.
2. Do not use the charger outdoors or expose it to wet or damp conditions. Water entering the charger will increase
the risk of electric shock.
3. Use of an attachment not recommended or sold by the battery-charger manufacturer may result in a risk of fire,
electric shock or injury to persons.
4. Do not abuse the cord or charger. Never use the cord to carry the charger. Do not pull the charger cord to
disconnect the plug from receptacle. Damage to the cord or charger could occur and create an electric shock
hazard. Replace damaged cords immediately.
5. Make sure that the cord is located so that it will not be stepped on, tripped over, come in contact with sharp
edges or moving parts, or otherwise subjected to damage or stress. This will reduce the risk of accidental falls,
which could cause injury and damage to the cord, which could then result in electric shock.
6. Keep the cord and charger from heat to prevent damage to the housing or internal parts.
7. Do not allow gasoline, oils, petroleum-based products, etc. to come in contact with plastic parts. These
materials contain chemicals that can damage, weaken, or destroy plastic.
8. An extension cord should not be used unless absolutely necessary. Use of an improper extension cord could
result in a risk of fire and electric shock. If an extension cord must be used, make sure that:
• The cord is properly wired and in good electrical condition;
• The size is large enough for AC ampere rating of charger as specified below:
The Cord Length (Feet) 25’ 50’ 100’
Cord Size (AWG) 16 16 16
NOTE: AWG = American Wire Gauge
9. Do not operate the charger with a damaged cord or plug, which could cause shorting and electric shock. If
damaged, have the charger repaired or replaced by an authorized service technician at Service Center.
10. Do not operate the charger if it has received a sharp blow, been dropped, or has otherwise been damaged in any
way. Take it to an authorized service technician at Authorized Service Center for an electrical check to
determine if the charger is in good working order.
11. Do not disassemble the charger. Take it to an authorized service technician at a Service Center when service or
repair is required. Incorrect reassembly may result in a risk of electric shock or fire.
12. Unplug the charger from the electrical outlet before attempting any maintenance or cleaning to reduce the risk
of electric shock.
5

13. Disconnect charger from the power supply when not in use. This will reduce the risk of electric shock or
damage to the charger if metal items should fall into the opening. It will also help prevent damage to the charger
during a power surge.
14. Risk of electric shock. Do not touch the uninsulated portion of output connector or uninsulated battery terminal.
15. Save these instructions. Refer to them frequently and use them to instruct others who may use this tool. If you
lend this tool to someone else, also lend these instructions to them to prevent misuse of the product and possible
injury.
KNOW YOUR SCREWDRIVER
1-1/4" bit collet 2-Power indicator
3-Pivot release button 4-Direction of rotation selector
(Forward/Center Lock/Reverse)
5-Charger port 6-Trigger switch
7-LED worklight switch 8-LED worklight
9-Charger adapter 10-Charger jack
Screwdriver bit collet.
To hold 1/4" bits, bit holder, and socket adaptor should be a separate line.
Power indicator.
The screwdriver is equipped with a power indicator which is used
to display the battery’s
remaining run time.
Stick/Pistol pivot release button.
The screwdriver has been designed so that it can be operated as a stick
screwdriver or a pistol screwdriver.
Direction of rotation selector (forward/center lock/reverse).
The direction-of-rotation selector
located above the trigger switch changes the direction of bit rotation. Setting the trigger switch in the OFF (center
lock) position helps to reduce the possibility of accidental starting when not in use.
Charger port.
Insert the jack from the charger adapter to charge the driver. Tool should be
charged for 3–5
hours for optimum performance.
Trigger switch.
To turn tool on, press the trigger switch. To turn the tool off, release the trigger switch.
LED worklight.
For low-light situations.
6

OPERATION
CHARGING THE BATTERY
WARNING: The charger and battery pack are specifically designed to work together so do not attempt to use any
other devices. Never insert or allow metallic objects into your charger or battery pack connections because an
electrical failure and hazard will occur.
Your battery pack is UNCHARGED and you must charge once before use. The charger is designed to use standard
household 120volt 60Hz power.
1. Insert the charger jack into the charger port.
2. Plug the charger into any standard 120 Volt 60 Hz electrical outlet and let the tool charge 3-5 hours.
NOTE: Do not charge by means of an engine generator or DC power source. Use only 120V AC.
3. Disconnect the charger from the outlet, then disconnect the charger from the tool.
CAUTION: Do not use the tool while it is connected to the charger.
TRIGGER SWITCH & REVERSING BUTTON
The screwdriver is turned ON and OFF by pulling and releasing the trigger switch.
A forward/reverse control button determines the direction of the tool and also serves as a lock off button.
To select forward rotation, release the trigger switch and depress the forward/reverse control button to the left.
To select reverse, depress the forward/reverse control button the opposite direction.
NOTE: The center position of the control button locks the tool in the off position. When changing the position of
the control button, be sure the trigger is released.
LED WORKLIGHT
The LED worklight, located on the front of the Drill/Driver, will illuminate when the LED worklight switch is
turned on. This provides additional light on the surface of the workpiece for operation in lower-light areas.
The LED worklight will turn off when the LED worklight is turned off.
FITTING SCREWDRIVER BITS
Insert a 1/4” bit into the screwdriver collet.
Note: Your drill is intended for light-duty use. For best results, 1⁄4” screwdriver bits are recommended.
Never engage the trigger switch when changing screwdriver bits.
Always lock the trigger switch when changing drill bits. (See Trigger switch & reversing button section.)
7

PIVOTING THE TOOL HEAD
The head of the tool can be pivoted for optimum versatility.
1. Press the pivot release button.
2. Pivot the tool head to the inline position until an audible click is heard.
WARNING: Check to make sure tool handle is locked after pressing pivot release button and changing screwdriver
positions.
WARNING:
• To avoid being pinched at the areas indicated with black arrows, hold the screwdriver at both ends and use your
thumb to depress the pivot release button when changing positions.
• Do not use screwdriver as a pry bar in any position.
• To avoid screwdriver being turned on accidentally, do not carry in your pocket.
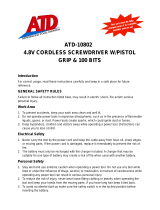
POWER INDICATOR
This drill is equipped with a power indicator which is used to display the battery pack’s remaining run time. Press
the power indicator button to display the LED lights. When the battery capacity indicator is red, the battery has less
than 30% of its capacity and should be charged.
(1) (2) (3) (4)
Pivot Release Button
(1) Power Indicator Button- Press it to display the LED lights
(2) Red Light
(3) Yellow Light
(4) Green Light
Full Power Green, yellow and red lights are on.
Full Power But Will Require Charging Shortly (70%-
80% Charge)
Yellow and red lights are on.
Needs charging the battery Only red light is on.
8

MAINTENANCE
Your tool requires no additional lubrication or maintenance. There are no user serviceable parts in your power tool.
Never use water or chemical cleaners to clean your power tool. Wipe clean with a dry cloth. Always store your
power tool in a dry place. Keep the motor ventilation slots clean. Keep all working controls free of dust.
Occasionally you may see sparks through the ventilation slots. This is normal and will not damage your power tool.
Avoid using solvents when cleaning plastic parts. Most plastics are susceptible to damage from various types of
commercial solvents. Use clean clothes to remove dirt, dust, oil, grease, etc.
WARNING! To avoid serious personal injury, always remove the battery pack from the tool when
cleaning or performing any maintenance.
WARNING! When servicing, use only identical replacement parts. Use of any other parts may create a
hazard or cause product damage. To ensure safety and reliability, all repairs should be performed by a
qualified service technician at an Authorized Service Center.
9

10
LIMITED ONE YEAR WARRANTY
WEN Products is committed to build tools that are dependable for years. Our warranties are consistent with this
commitment and our dedication to quality
LIMITED WARRANTY OF WEN CONSUMER POWER TOOLS PRODUCTS FOR HOME USE
GREAT LAKES TECHNOLOGIES, LLC ("Seller") warrants to the original purchaser only, that all WEN consumer
power tools will be free from defects in material or workmanship for a period of one (1) year from date of purchase.
Ninety days for all WEN products, if the tool is used for professional use.
SELLER'S SOLE OBLIGATION AND YOUR EXCLUSIVE REMEDY under this Limited Warranty and, to the
extent permitted by law, any warranty or condition implied by law, shall be the repair or replacement of parts,
without charge, which are defective in material or workmanship and which have not been misused, carelessly
handled, or misrepaired by persons other than Seller or Authorized Service Center. To make a claim under this
Limited Warranty, please contact us at 1-800-232-1195 or write to us at WEN Products, 501 Davis Road, Elgin, IL
60123. To acquire service, you will have to provide proof of purchase and may be asked to ship the tool back to us
freight prepaid.
THIS LIMITED WARRANTY DOES NOT APPLY TO ACCESSORY ITEMS SUCH AS CIRCULAR SAW
BLADES, DRILL BITS, ROUTER BITS, JIGSAW BLADES, SANDING BELTS, GRINDING WHEELS AND
OTHER RELATED ITEMS.
ANY IMPLIED WARRANTIES SHALL BE LIMITED IN DURATION TO ONE (1) YEAR FROM DATE OF
PURCHASE. SOME STATES IN THE U.S., SOME CANADIAN PROVINCES DO NOT ALLOW
LIMITATIONS ON HOW LONG AN IMPLIED WARRANTY LASTS, SO THE ABOVE LIMITATION MAY
NOT APPLY TO YOU.
IN NO EVENT SHALL SELLER BE LIABLE FOR ANY INCIDENTAL OR CONSEQUENTIAL DAMAGES
(INCLUDING BUT NOT LIMITED TO LIABILITY FOR LOSS OF PROFITS) ARISING FROM THE SALE OR
USE OF THIS PRODUCT. SOME STATES IN THE U.S. AND SOME CANADIAN PROVINCES DO NOT
ALLOW THE EXCLUSION OR LIMITATION OF INCIDENTAL OR CONSEQUENTIAL DAMAGES, SO THE
ABOVE LIMITATION OR EXCLUSION MAY NOT APPLY TO YOU.
THIS LIMITED WARRANTY GIVES YOU SPECIFIC LEGAL RIGHTS, AND YOU MAY ALSO HAVE
OTHER RIGHTS WHICH VARY FROM STATE TO STATE IN THE U.S., PROVINCE TO PROVINCE IN
CANADA AND FROM COUNTRY TO COUNTRY.
THIS LIMITED WARRANTY APPLIES ONLY TO PORTABLE ELECTRIC TOOLS, BENCH POWER TOOLS,
OUTDOOR POWER EQUIPMENT AND PNUMATIC TOOLS SOLD WITHIN THE UNITED STATES OF
AMERICA, CANADA AND THE COMMONWEALTH OF PUERTO RICO. FOR WARRANTY COVERAGE
WITHIN OTHER COUNTRIES, CONTACT THE WEN CUSTOMER SUPPORT.
/