HP iPAQ RX-5725 Operating instructions
- Category
- Navigators
- Type
- Operating instructions

HP iPAQ


© 2006 Hewlett-Packard Development
Company, L.P.
Microsoft, Windows, the Windows logo,
Outlook, and ActiveSync are trademarks of
Microsoft Corporation in the U.S. and other
countries.
HP iPAQ Products are Powered by
Microsoft® Windows Mobile® 5.0 software
for Pocket PC.
SD Logo is a trademark of its
proprietor.
Bluetooth® is a trademark owned by its
proprietor and used by Hewlett-Packard
Development Company, L.P. under license.
All other product names mentioned herein
may be trademarks of their respective
companies.
Hewlett-Packard Company shall not be liable
for technical or editorial errors or omissions
contained herein. The information is
provided “as is” without warranty of any kind
and is subject to change without notice. The
warranties for Hewlett-Packard products are
set forth in the express limited warranty
statements accompanying such products.
Nothing herein should be construed as an
additional warranty.
This document contains proprietary
information that is protected by copyright. No
part of this document may be photocopied,
reproduced, or translated to another
language without the prior written consent of
Hewlett-Packard Development Company,
L.P.
HP iPAQ Product Information Guide
First Edition (September 2006)
Part Number: 432647-001

Table of contents
HP iPAQ Product Information Guide
Welcome .............................................................................................................................................. 1
Box Contents ........................................................................................................................................ 2
Components ......................................................................................................................................... 3
Top Components ................................................................................................................. 3
Front Components ............................................................................................................... 4
Back Components ............................................................................................................... 5
Left and Right Side Components ......................................................................................... 6
Getting Started CD Contents ................................................................................................................ 7
Navigation Quick Start .......................................................................................................................... 8
Installing the Battery ............................................................................................................ 8
Powering On and Setting Up ............................................................................................... 9
HP Quick Launch ................................................................................................................. 9
Navigation Setup ............................................................................................................... 10
Car Kit Setup ..................................................................................................................... 10
Using TomTom Navigator 6 ............................................................................................... 13
Navigating to Destinations ................................................................................ 13
Menus ............................................................................................................... 13
Saving Destinations .......................................................................................... 14
Preferences ....................................................................................................... 14
Points of Interest (POI) ...................................................................................... 15
TomTom Plus .................................................................................................... 15
Travel Tools ....................................................................................................................... 16
WorldMate Standard Edition ............................................................................. 16
Organizer Features ........................................................................................... 16
Continuing Setup ................................................................................................................................ 16
Setting Up the Travel Companion ...................................................................................... 16
Finding the Serial Number and Model Number ................................................................. 20
Protecting Your HP iPAQ with a Password ....................................................................... 20
Today Screen .................................................................................................................... 21
Status Icons ...................................................................................................... 21
iPAQ Wireless ................................................................................................... 22
Checking the Battery Charge Level ................................................................................... 23
Battery Saving Tips ............................................................................................................ 23
Entering Text ...................................................................................................................................... 23
Entering Text Using Block Recognizer .............................................................................. 24
Entering Text Using the On-screen Keyboard ................................................................... 24
Entering Text Using Letter Recognizer .............................................................................. 25
Writing with Transcriber ..................................................................................................... 25
iii

Resetting Your HP iPAQ .................................................................................................................... 25
Performing a Soft Reset .................................................................................................... 25
Performing a Factory Reset ............................................................................................... 26
Entertainment ..................................................................................................................................... 26
Windows Media Player 10 Mobile ...................................................................................... 26
Listening to Music and Watching Videos .......................................................... 27
Clearing the Now Playing List ........................................................................... 27
Updating a Library ............................................................................................. 28
HP Photosmart Mobile ....................................................................................................... 28
Attaching a Voice Note to a Picture .................................................................. 28
E-mailing Pictures ............................................................................................. 28
Viewing a Slideshow ......................................................................................... 29
Print Pictures ..................................................................................................... 29
Add a Picture to a Contact ................................................................................ 29
Assign a Picture to the Today Screen Background ........................................... 30
Mobile Office ...................................................................................................................................... 30
Calendar ............................................................................................................................ 30
Accessing Calendar .......................................................................................... 30
Viewing Today's Agenda ................................................................................... 31
Viewing Appointments ....................................................................................... 31
Scheduling an Appointment .............................................................................. 31
Sending a Meeting Request .............................................................................. 32
Contacts ............................................................................................................................. 32
Accessing Contacts ........................................................................................... 32
Creating a Contact ............................................................................................ 32
Finding a Contact .............................................................................................. 33
Tasks ................................................................................................................................. 33
Creating a Task ................................................................................................. 33
Locating a Task ................................................................................................. 33
E-mail ................................................................................................................................. 34
Different Ways to Access E-mail Messages ..................................................... 34
Setting up an E-mail Account on an Exchange Server ..................................... 34
Setting up a POP3, HTTP, or IMAP4 E-mail Account ....................................... 35
Composing and Sending Outlook E-mail Messages ......................................... 36
Replying to or Forwarding an Outlook E-mail Message .................................... 36
Sorting the Message List ................................................................................... 36
Internet Explorer Mobile ..................................................................................................... 36
Word Mobile ....................................................................................................................... 37
Excel Mobile ...................................................................................................................... 37
PowerPoint Mobile ............................................................................................................. 37
WLAN ................................................................................................................................................. 38
Turning WLAN On or Off ................................................................................................... 38
Searching for WLAN Networks to Access ......................................................................... 39
Configuring Network Security Settings .............................................................................. 39
Bluetooth ............................................................................................................................................ 39
Turning Bluetooth On or Off ............................................................................................... 40
Protecting the HP iPAQ Screen from Cracking or Damage ............................................................... 40
Obtaining Services for a Cracked or Damaged Screen ..................................................................... 41
Additional Guidelines for Using Your HP iPAQ .................................................................................. 41
iv

Frequently Asked Questions .............................................................................................................. 41
Finding More Information ................................................................................................................... 42
Index ................................................................................................................................................................... 43
v

HP iPAQ Product Information Guide
CAUTION Text set off in this manner indicates that failure to follow directions could result in
damage to equipment or loss of information.
Welcome
Thank you for purchasing the HP iPAQ Travel Companion. This guide has been designed to help you
begin using your device quickly. For more detailed information, please refer to the Finding More
Information section. In this guide you will learn how to:
●
Use the travel-related functionality of the Travel Companion, including the built-in Global
Positioning System (GPS) and WorldMate travel assistant.
●
Set the Travel Companion to synchronize digital media and personal information such as Calendar,
Contacts, and E-mail with a personal computer.
●
Protect the Travel Companion from unintended damage by showing how to properly replace the
battery cover on the device and by providing important information about protecting the device
screen.
●
Improve the device battery life, allowing for longer use between charges.
●
Perform a soft reset or a factory reset to adjust device performance.
●
Troubleshoot common device issues, including synchronizing.
●
Use the on-screen keyboard, function keys, Calendar, Contacts, and Tasks.
●
Use messaging, WLAN*, and Bluetooth.
*WLAN is available on rx5900 series models only.
1

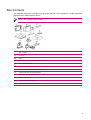
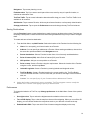
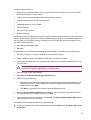
Box Contents
This illustration depicts the items that come in the box with the Travel Companion. Use this illustration
to become more familiar with the device.
NOTE Box contents vary by model.
Box Contents
(1) HP iPAQ
(2) Case
(3) Mini-USB synchronization cable/power cable (2 ea)
(4) HP iPAQ Documentation
(5) Stylus
(6) 1,700mAH li-ion removable/rechargeable battery
(7) Getting Started CD with special software
(8) AC adapter with interchangeable plug
(9) Car kit — holder
(10) Car kit — Travel power adapter
(11) Car kit — windshield mounting bracket
2

Components
NOTE Not all models or features are available in all regions.
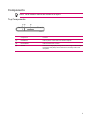
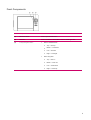
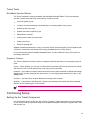
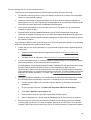
Top Components
Component Function
(1) Reset Button Press to perform a soft reset of the Travel Companion.
(2) Record Button Press to record voice or sound.
(3) SD Slot Insert a Secure Digital (SD) storage card for data storage or a Secure Digital
Input/Output card (SDIO) card to extend the functionality of the Travel
Companion.
3

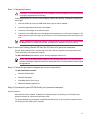
Front Components
Component Function
(1) Start Menu Button Press to open the Start menu.
(2) OK Button Press to close the current window or exit the current application.
(3) 9–Way Navigation Button
●
When in Standard mode:
●
Top — Scroll up
●
Bottom — Scroll down
●
Left — Scroll left
●
Right — Scroll right
●
When using GPS:
●
Top — Zoom in
●
Bottom — Zoom out
●
Left — Volume down
●
Right — Volume up
4

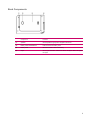
Back Components
Component Function
(1) Speaker Use the speaker to get spoken navigation instructions.
(2) Battery Cover Release Button Press to remove the battery cover.
(3) Battery Cover Remove to install or remove the battery.
(4) Stylus Use to input information. Slide out to remove the stylus. Slide in to replace
the stylus.
5

Left and Right Side Components
Component Function
(1) MMCX External Antenna Port Connects to 3V active external GPS antenna.
(2) Charging/Communications Port Connects to mini-USB synchronization cable.
(3) Headset Connector Plug a headset into this connector to listen to music.
(4) Stylus Use to input information. Slide out to remove the stylus. Slide in to replace
the stylus.
(5) Internal WLAN Antenna* Allows connection to wireless networks. (rx5900 series models only)
(6) Microphone Speak into the microphone to record voice notes.
(7) Quick Launch Button Press to access the HP Quick Launch screen. Press and hold to launch
Calendar.
(8) Navigation Button Press to launch GPS navigation. Press and hold to launch Contacts.
(9) Windows Media Player Button Press to launch Windows Media Player. Press and hold to launch Pocket
Internet Explorer.
(10) Rotate Screen Button Press to rotate the screen to portrait or landscape orientation. Press and
hold to launch Photosmart Mobile.
(11) Wireless LED
●
Blue LED—WLAN*, Bluetooth, or GPS is on.
●
LED off—WLAN*, Bluetooth, or GPS is off.
*WLAN is available on rx5900 series models only.
(12) Internal Bluetooth Antenna Allows connection to other Bluetooth devices.
(13) Power Button and LED Press to turn the unit on and off.
●
Solid amber light — Battery is charging
●
Solid green light — Battery is fully charged
●
Flashing amber light — Reminder or alarm
6

Getting Started CD Contents
The Getting Started CD includes:
●
Microsoft ActiveSync 4.1 or later
●
Microsoft Outlook 2002
●
Additional Product Information
●
Important Safety Information
●
WorldMate Active Sync Plug-in
●
HP Photosmart Premier
●
Additional software for the Travel Companion and personal computer
All software and documents are designed to be installed on a personal computer to enable use of the
Travel Companion to its full potential.
NOTE All current Microsoft operating systems are supported by ActiveSync 4.1, except
Windows 98SE and Windows ME.
7

Navigation Quick Start
The Travel Companion can be used as a GPS navigation system right out of the box. The sections that
follow provide instruction to prepare and use the Travel Companion immediately after purchase.
CAUTION Drive with due care and attention when using the Travel Companion for navigation.
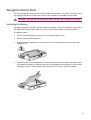
Installing the Battery
The battery provides power for the Travel Companion to operate. The Travel Companion comes with a
mini-USB synchronization cable, which you must use with a power adapter to charge the device.
To install the battery:
1. Turn the Travel Companion over so you can see the back battery cover.
2. Press the battery release button (1).
3. Slide the battery compartment cover down about 1/2 inch, and then lift the cover off the Travel
Companion (2).
4. Insert the battery into the compartment (1) so that the connectors on the battery mate with the pins
in the battery compartment, and then press down until the battery locks into place (2). As you insert
the battery, be sure to pull the battery removal tab out so it is on the outside of the battery.
8

5. Replace the cover by first laying the cover on the battery compartment opening, aligning the tabs,
and then sliding the cover until it locks into place.
Do not attempt to insert the battery cover tabs into the compartment slots without first placing the cover
onto the compartment and sliding it closed.
Powering On and Setting Up
The first time you turn on the Travel Companion, follow the on-screen set up instructions. After
completing this initial setup, the Travel Companion displays the Quick Start Tour, which provides
information about using the Travel Companion. View as much of the Quick Setup Tour as needed. When
exiting the tour, the Travel Companion initiates the HP Quick Launch screen, which provides the ability
quickly and easily open applications on your iPAQ.
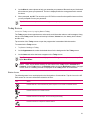
HP Quick Launch
HP Quick Launch is a simple way to open the most frequently used programs on the Travel Companion.
●
Tap the Today icon to access the Today page.
●
Tap the Travel Assistant icon to access WorldMate travel applications, Calendar, Contacts, and
the Calculator.
●
Tap the Entertainment icon to access entertainment applications like Windows Media Player 10,
Photosmart Mobile, and games.
●
Tap the Internet icon to access the Internet browser.
●
Tap the Navigation icon to use GPS navigation.
9

HP Quick Launch is configured by default to be the home screen of the Travel Companion. Switch to
use the Today screen as the home screen by tapping Menu > Settings and clearing the check boxes.
You can also access the Today screen from the Start menu.
You can also configure Quick Launch by tapping Menu > Settings and:
●
Selecting Launch On Reset to automatically start Quick Launch every time the device is soft reset.
●
Selecting Launch on Wakeup to automatically start Quick Launch every time the device is
switched on.
To learn more about the capabilities of the Travel Companion, refer to this guide as well as the Additional
Product Information on the Getting Started CD. To begin navigation, proceed to the next step.
Navigation Setup
If you do not want to navigate now, continue learning about the Travel Companion and refer back to this
section when you do want to use navigation.
You can use the navigation features of the Travel Companion right out of the box. The easiest way to
open the GPS application is from the HP Quick Launch screen. When launching the GPS application
for the first time, follow the on-screen instructions to configure and set up personal preferences.
The Travel Companion includes a built-in GPS receiver. To navigate to a destination, the GPS
application must determine your current position, for which it uses the Global Positioning System (GPS).
Available for free and without subscription, GPS uses satellites to transmit signals to GPS receivers.
GPS signals work in all weather, anywhere in the world.
To establish a GPS signal, use the GPS receiver outdoors with a clear view of the sky. The GPS
application can take several minutes to find your current position during its first use. If it takes longer,
make sure that you are in an open place without tall buildings or trees nearby. In subsequent uses, the
GPS application will find your position much faster. Once the GPS application locates your current
position, the application shows your position on the map.
NOTE To reduce connection time, you should not be moving the first time you attempt to
establish a GPS connection.
If you want to immediately start navigating:
1. Press the power button to power on the Travel Companion.
2.
Start the GPS application by tapping Navigation from the HP Quick Launch screen.
3. Place the Travel Companion in a location with a clear view of the sky.
4. Install the car kit.
5. Insert the Travel Companion and plug it in using the travel power adapter.
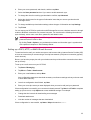
Car Kit Setup
The car kit allows you to mount the Travel Companion in a location in your car that provides the best
access to a GPS signal.
To install the car kit:
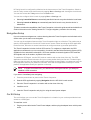
1. Plug the power cable into the Travel Power Adapter, and then plug the adapter into a vehicle power
outlet.
10

2. Attach the power cable to the clips on the back of the Travel Companion holder. Be sure to leave
enough cable to plug into the Travel Companion, and that the connector is turned the correct way
to plug into the unit.
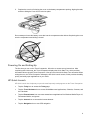
3. Install the holder onto the windshield mounting bracket.
4. Place the car kit assembly onto the windshield (1), and then press the locking lever (2) to securely
mount the assembly into place.
11

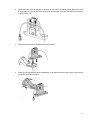
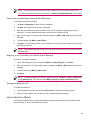
5. To install the Travel Companion:
a. Insert the Travel Companion into the mounted car kit holder (1).
b. Insert the securing clip into the slot on the top of the Travel Companion (2).
c. Plug the power cable into the Travel Companion (3).
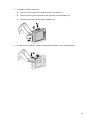
6. Use the knobs to adjust the vertical and horizontal orientation of the Travel Companion.
12

Using TomTom Navigator 6
For more detailed information about TomTom Navigator 6, see the TomTom user guide on the Getting
Started CD.
CAUTION Drive with due care and attention when using the Travel Companion for navigation.
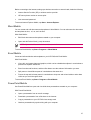
Navigating to Destinations
NOTE TomTom Navigator 6 must first locate its current position before it can plan a route.
To plan a route:
1. With TomTom open, tap the screen to display the main menu.
2. Tap Navigate to. There are several options to navigate to. This procedure demonstrates navigating
to an address.
NOTE Travel Companion/GPS integration also allows you to navigate to any entry in your
personal Contact list that has an address entered.
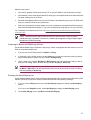
3. Tap Address. When entering an address, select from the following options:
●
City center: Tap to set the destination as the center of a city or town.
●
Street and house number: Tap to set an exact address as the destination.
●
Zip Code: Tap to enter a zip code as the destination.
●
Cross street or intersection: Tap to set the destination as the point where two streets meet.
This procedure demonstrates navigating to an exact address.
4. Tap Street and house number.
5. Start to type the name of the town to which to navigate. As you type, names of towns display that
match what you have typed. When the correct town displays, select it.
6. Start to type the name of the street. As you type, the names of the streets display that match the
street you typed. When the correct street displays, select it.
7. Type the house number of the destination, and then tap Done.
8. TomTom asks whether you need to arrive at a particular time. If you tap YES and select an arrival
time, TomTom indicates whether you will arrive on time.
9. After TomTom calculates the route, tap Done.
TomTom immediately starts guiding you to your destination with spoken and visual instructions.
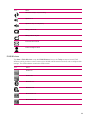
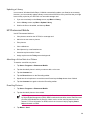
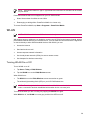
Menus
To open the main menu, tap the screen at any time when TomTom displays the Driving View.
NOTE The following list is only a subset of all of the available menus. For a complete list, see
the TomTom Navigator 6 documentation on the Getting Started CD.
13

Navigate to: Tap to start planning a route.
Find alternative: Tap if you want to avoid part of the route, travel by way of a specific location, or
calculate an alternative route.
TomTom Traffic: Tap to access information about the traffic along your route. TomTom Traffic is not
available in all countries.
Add favorite: Tap to create a Favorite, which may be a favored location, or a frequently visited location.
Change preferences: Tap to open the Preferences menu and change the way TomTom behaves.
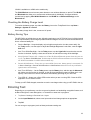
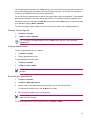
Saving Destinations
Use the Favorites feature to save destinations to make it easy to navigate to them later. Favorites are
frequently visited places. Create Favorites to avoid entering an address every time you want to navigate
there.
To create and save a favorite destination:
1. From the Main Menu, tap Add Favorite. Select the location of the Favorite from the following list :
●
Home: You can specify your Home location as a Favorite.
●
Address: You can specify an address as a Favorite. When entering an address, choose from
the same four options available in the Navigate to menu.
●
Recent destination: Select a Favorite location from a list of recently used destinations.
●
Point of interest (POI): Add a Point of Interest (POI) as a Favorite.
●
GPS position: Add your current position as a Favorite.
●
Point on map: Create a Favorite using the map browser. Select the location of the Favorite
using the cursor, and then tap Done.
●
Latitude/Longitude: Create a Favorite by entering latitude and longitude values.
●
TomTom Buddy: Create a Favorite based on the current position of a TomTom Buddy.
TomTom Buddies are other TomTom users that you can track, exchange Points of Interest
with, etc.
●
Contact: You can specify any of your Contacts with an address as a Favorite.
2. Assign the favorite a name that is easy to remember. TomTom suggests a name, usually the
address of the Favorite. Start typing to specify a different name.
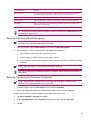
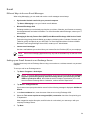
Preferences
To change the behavior of TomTom, tap Change preferences in the Main Menu. Some of the options
include:
●
Use night colors: Tap to reduce the brightness and use darker colors on the map.
●
Turn off 3D display: Tap to view the map from above while navigating. When you turn off the 3D
display, you can choose whether the map shows north or your direction of travel at the top.
●
Enable/disable POIs: Tap to set which Point of Interest categories display on the map.
14
Page is loading ...
Page is loading ...
Page is loading ...
Page is loading ...
Page is loading ...
Page is loading ...
Page is loading ...
Page is loading ...
Page is loading ...
Page is loading ...
Page is loading ...
Page is loading ...
Page is loading ...
Page is loading ...
Page is loading ...
Page is loading ...
Page is loading ...
Page is loading ...
Page is loading ...
Page is loading ...
Page is loading ...
Page is loading ...
Page is loading ...
Page is loading ...
Page is loading ...
Page is loading ...
Page is loading ...
Page is loading ...
Page is loading ...
Page is loading ...
-
 1
1
-
 2
2
-
 3
3
-
 4
4
-
 5
5
-
 6
6
-
 7
7
-
 8
8
-
 9
9
-
 10
10
-
 11
11
-
 12
12
-
 13
13
-
 14
14
-
 15
15
-
 16
16
-
 17
17
-
 18
18
-
 19
19
-
 20
20
-
 21
21
-
 22
22
-
 23
23
-
 24
24
-
 25
25
-
 26
26
-
 27
27
-
 28
28
-
 29
29
-
 30
30
-
 31
31
-
 32
32
-
 33
33
-
 34
34
-
 35
35
-
 36
36
-
 37
37
-
 38
38
-
 39
39
-
 40
40
-
 41
41
-
 42
42
-
 43
43
-
 44
44
-
 45
45
-
 46
46
-
 47
47
-
 48
48
-
 49
49
-
 50
50


HP iPAQ RX-5725 Operating instructions
- Category
- Navigators
- Type
- Operating instructions
Ask a question and I''ll find the answer in the document
Finding information in a document is now easier with AI
Related papers
-
HP Laptop RZ1700 User manual
-
HP iPAQ Data Messenger User guide
-
-
HP iPAQ Voice Messenger User guide
-
-
HP iPAQ Glisten Quick start guide
-
-
HP 914c - iPAQ Business Messenger Smartphone Owner's manual
-
-