
Not For Resale – Free Download at http://www.joe-chan.com/manuals

The LEICAFLEX® SL 2 is a modern
single-lens-reflex camera with selective
light metering through the lens.
The large, bright LEICAFLEX viewfinder
gives you all the necessary information.
At the same time it functions as the
control and composing centre for focusing,
spot exposure measurement, assessment
of the pictorial effect, and perspective.
Both the shutter speed set on the dial and
the lens stop can be read at the same time.
All controls are arranged conveniently so
that you will soon carry out the few
operations almost in your sleep.
But please spend a little time on reading
these instructions: you will have even
more fun when you take photographs
with your new LEICAFLEX SL 2.
2
Not For Resale – Free Download at http://www.joe-chan.com/manuals

Contents
Brief description for the reader
in a hurry 4
Inserting and changing the lens 6
Holding the camera correctly 7
The composing and control centre 8
Focusing 10
Exposure meter 12
Setting film speed and -type 13
Use of filters 16
Testing and changing the battery 17
Rapid transport lever, shutter speed
dial, release button 18
The LEICAFLEX lenses 19
Automatic diaphragm 19
Depth-of-field button 20
Depth-of-field scale 20
Lens hoods 21
Series filters 22
Self-timer 22
Flash synchronization, flash table 23
Inserting the film 24
Taking out the film 26
Tips for the care and maintenance of
the LEICAFLEX and its lenses 26
Accessories for the LEICAFLEX SL 2
Interchangeable lenses 28
Follow-focus lenses 30
LEICA lenses on the LEICAFLEX 30
Focusing Bellows-R 31
Motor for the LEICAFLEX SL2 MOT 31
Ring combination for the
close-up range 32
ELPRO close-up attachments 32
Cases 34
Enlargers 34
Projectors 35
LEITZ Warranty 36
After-sales service 36
LEITZ Information Service 37
"LEICA FOTOGRAFIE" journal 38
Available accessories 39
Not For Resale – Free Download at http://www.joe-chan.com/manuals
3

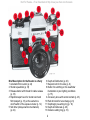
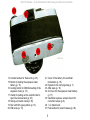
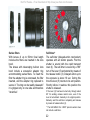
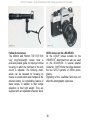
Brief Description for the Reader in a Hurry
1 Automatic film counter (p. 24)
2 Shutter speed dial (p. 18)
3 Release button with thread for cable release
(p. 18)
4 Rapid transport lever for shutter wind and
film transport (p. 18), at the same time
on/off switch of the exposure meter (p. 12)
5 Self-timer (delayed-action mechanism)
(p. 22)
6 Depth-of-field button (p. 20)
7 Bayonet lock for the lens (p. 6)
8 Button for switching on the viewfinder
illumination in poor lighting conditions
(p. 15)
9 Accessory shoe with central contact (p. 23)
10 Red dot mark for lens change (p. 6)
11 Diaphragm pre-setting ring (p. 19)
12 Depth-of-field scale (p. 20)
13 Distance setting ring (p. 10)
Not For Resale – Free Download at http://www.joe-chan.com/manuals
4

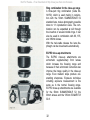
14 Contact bushes for flash units (p. 23)
15 Button for testing the exposure meter
battery (p. 17)
16 Locking button for DIN/ASA setting of the
exposure meter (p. 13)
17 Clamp for pulling out the rewind crank to
open the camera back (p. 25)
18 Swing-out rewind crank (p. 25)
19 Disc with film-type symbols (p. 13)
20 DIN scale (p. 13)
21 Cover of the battery for viewfinder
illumination (p. 15)
22 Eyelets for the carrying strap (p. 7)
23 ASA scale (p. 13)
24 24 Cover for the exposure meter battery
(p.17)
25 Viewfinder eyelens, accepts mount for
correction lenses (p. 8)
26 ¼ in tripod bush
27 Push-button for rewind release (p. 25)
Not For Resale – Free Download at http://www.joe-chan.com/manuals
5

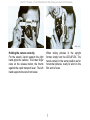
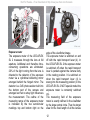
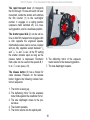
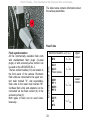
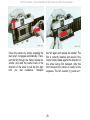
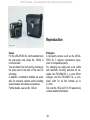
Inserting the lens
For insertion of the lens in the bayonet ring
on the camera body the red dot (10) on the
lens mount must face the bayonet lock (7)
marked in red. After a slight turn to the right
the lens clicks into position.
Change lenses in the shadow of your body.
Taking out the lens
Irrespective of the distance and diaphragm
settings the LEICAFLEX lenses are
changed as follows:
Grip the lens on the fixed ring (12), de-
press the bayonet lock (7), turn the lens
to the left and take it out.
Not For Resale – Free Download at http://www.joe-chan.com/manuals
6

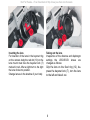
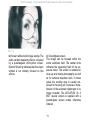
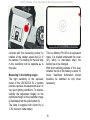
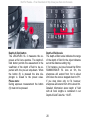
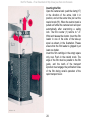
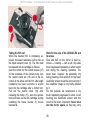
Holding the camera correctly
For the steady 3-point support the right
hand grips the camera. The index finger
rests on the release button, the thumb
against the rapid transport lever. The left
hand supports the lens from below.
When taking pictures in the upright
format, simply turn the LEICAFLEX. The
hands remain in the same position as for
horizontal pictures, ready to wind on the
film and to focus.
Not For Resale – Free Download at http://www.joe-chan.com/manuals
7

Not For Resale – Free Download at http://www.joe-chan.com/manuals
8

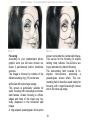
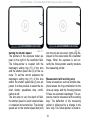
The composing and control centre
The viewfinder of the LEICAFLEX SL 2 is
the centre both for pictorial composition
and for control of all important data:
sharpness, picture area and perspective,
measuring field and exposure meter
pointer, shutter speed set on the dial and
lens stop.
Spectacle wearers, too, can normally sur-
vey the viewfinder image without
difficulty. In special cases, correction
lenses in a mount can be pushed onto
the eyelens mount.
The viewfinder of the LEICAFLEX SL 2
has been adjusted with micro-precision.
This ensures optimum sharpness as well
as exact agreement of viewfinder image
and picture area on the film.
A scale below the viewfinder field
indicates on the left the shutter speed set
on the dial, and on the right the pre-set
lens stop.
Not For Resale – Free Download at http://www.joe-chan.com/manuals
9

Focusing
According to your predominant photo-
graphic work you will have chosen be-
tween 3 permanently built-in viewfinder
screens.
The image is focused by rotation of the
distance setting ring (13) on the lens.
a) Screen with split-image wedge
This screen is particularly suitable for
quick focusing with wide-angle and stan-
dard lenses. Unless focusing is critical,
edges and lines of the object are mu-
tually displaced in the horizontal split
image.
A ring-shaped quadrangular micro-prism
screen surrounds the central split image.
This serves for the focusing of objects
lacking crisp outlines. Out-of-focus set-
ting is indicated by distinct flickering.
The surrounding field consists of tri-
angular micro-prisms, producing a
ground-glass screen effect. This sur-
rounding field is therefore used mainly for
focusing with longer-focal-length lenses
and in the close-up range.
Not For Resale – Free Download at http://www.joe-chan.com/manuals
10

b) Screen without split-image wedge The
entire central measuring field is occupied
by a quadrangular micro-prism screen.
Distinct flickering indicates that the object
sighted is not critically focused on this
screen.
c) Groundglass screen
The image can be focused within the
entire viewfinder field. The central circle
indicates the measuring field for the ex-
posure meter. This screen is suitable for
close-up and macro-photography as well
as for extreme telephoto work. In these
cases the working stop is usually em-
ployed for focusing etc. because a trans-
mission of the automatic diaphragm is no
longer possible. The LEICAFLEX SL 2
MOT special version is supplied with a
ground-glass screen unless otherwise
ordered.
Not For Resale – Free Download at http://www.joe-chan.com/manuals
11

Exposure meter
The exposure meter of the LEICAFLEX
SL 2 measures through the lens at full
aperture. Additional and therefore time-
consuming operations are eliminated.
20% of the light coming from the lens is
directed to the detector of the exposure
meter via a cylindrical deflecting mirror
arranged behind the hinged mirror. The
detector is a CdS photo-resistor built into
the bottom part of the camera and
arranged so that no stray light influences
the measurement. The outline of the
measuring range of the exposure meter
is indicated by the two semicircular
markings top and bottom right on the
edge of the viewfinder image.
The exposure meter is switched on and
off with the rapid transport lever (4). In
the LEICAFLEX SL 2 the exposure meter
is switched off when the rapid transport
lever is parked against the camera body
in the resting position. It is switched on
when the rapid transport lever (4) is
swung into the measuring position (in the
LEICAFLEX SL 2 MOT special model the
exposure meter is constantly switched
on).
The measuring field of the exposure
meter is exactly defined in the viewfinder
by the large central circle. Thus the target
area for the focal length of all the lenses
Not For Resale – Free Download at http://www.joe-chan.com/manuals
12

is outlined clearly and at the same size.
The part of the subject representative of
the exposure can be measured precisely.
Unfavourable influences such as
extremely bright or dark portions of the
subject, open light sources, and other
undesirable features can be eliminated
by the measurement of an undisturbed
area of the object representative of the
total subject. In most cases a rule of
thumb can be used: measure the feature
you are focusing on. Generally do not
measure extremes such as dark shadow
portions, bright clouds, open light
sources, or reflections on the water.
Our special leaflet "Selective Light Mea-
surement" No. 111-77 contains further
details.
Setting the film speed and -type
Correct setting of the film speed is essen-
tial to correct exposure measurement.
The setting ring (20) displays the DIN/ASA
values. To set the value for the film in the
camera depress the locking button (16) and
simultaneously turn the ring until the desired
number faces the corresponding index on the
front (DIN) or back (ASA).
The film indicator disc (19) can be set at the
following symbols to denote the type of film in
the camera:
= Black-and-white film
= Daylight colour film
= Artificial-light colour film
= Colour negative film
The locking button (16) serves as index mark
for the setting.
Not For Resale – Free Download at http://www.joe-chan.com/manuals
13

Setting the shutter speed
The pointers of the exposure meter ap-
pear on the right of the viewfinder field.
The follow-pointer is coupled with the
diaphragm setting ring (11) of the lens
and the shutter speed dial (2) of the ca-
mera. To set the correct exposure the
diaphragm setting ring (11) of the lens
and/or the shutter speed dial (2) are ad-
justed. It is thus possible to select the de-
sired shutter speed/lens stop combi-
nation at will:
The lens stop to vary the depth of field,
the shutter speed to avoid camera shake
or undesired movement blur. The shutter
speed set on the shutter speed dial (left)
and the pre-set lens stop (right) are dis-
played on the scale below the viewfinder
image. When the exposure is set cor-
rectly the follow-pointer exactly brackets
the measuring pointer.
Measurement with working stop
Some accessories, such as extreme tele-
photo lenses, the ring combination for the
close-up range, and the focusing bellows
R have no automatic diaphragm. The ex-
posure must be measured at the working
stop. The deflection of the measuring
pointer is influenced by a change in the
lens stop. The follow-pointer is made to
Not For Resale – Free Download at http://www.joe-chan.com/manuals
14

coincide with the measuring pointer by
rotation of the shutter speed dial (2) of
the camera. The reading for the lens stop
in the viewfinder will be opposite H in
this case.
Measuring in the limiting ranges
The high sensitivity of the exposure
meter of the LEICAFLEX SL 2 permits
precise exposure measurements even in
very poor lighting conditions. To improve
visibility the adjustment display on the
right-hand margin of the viewfinder image
is illuminated with the push-button (8).
The lamp is supplied with current by a
1.35v mercuric oxide battery.
This is a Mallory PX 625 or an equivalent
make. It is located underneath the cover
(21), which is unscrewed when the
battery has to be changed.
With short switching periods of 3 to 4sec
duration the life of the battery is about 10
hours. Viewfinder illumination should
therefore be switched on only when
necessary.
Not For Resale – Free Download at http://www.joe-chan.com/manuals
15

Use of filters
When light is measured through the lens
the energy reduction owing to filters is
generally allowed for automatically. But
the various films have different sensi-
tivities in the various spectral regions.
Deviations from the measured exposure
value can therefore occur with dense and
extreme filters.
Thus an orange filter, for instance, re-
quires an increase by about 1 stop value,
red filters on average about 2 stop
values. A completely accurate value
cannot be given since the red sensitivity
of black-and-white films varies a great
deal.
With circular-polarizing filters as supplied
with our lenses measurement and
settings can be carried out as with
ordinary filters. With ordinary polarizing
filters without circular effect the longest
exposure is determined by rotation of the
filter and set; now the desired effect is
found and the exposure made.
Not For Resale – Free Download at http://www.joe-chan.com/manuals
16

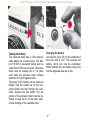
Testing the battery
The exposure meter has a 1.35v mercuric
oxide battery as current source. The Mal-
lory PX 625 or equivalent brands such as
Varta Pertrix 7002 can be used. These bat-
teries have an average life of 1-2 years
even when the exposure meter remains
switched on for prolonged periods.
The power of the battery can be tested as
follows: hold the camera as for the hori-
zontal format and look through the view-
finder. Depress the test button (15): the
pointer of the exposure meter must be de-
flected at least as far as the lower semi-
circular marking of the viewfinder field.
Changing the battery
Unscrew the cover (24) on the underside of
the body with a coin. This exposes the
battery, which can now be exchanged.
When inserting the new battery make sure
that the engraved data are on top.
Not For Resale – Free Download at http://www.joe-chan.com/manuals
17

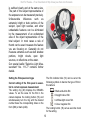
The rapid transport lever (4) transports
the film through 1 frame with each full lever
movement, winds the shutter and switches
the film counter (1) to the next-higher
number. It engages in a resting position
(exposure meter switched off), in a mea-
suring position, and in a readiness position.
The shutter speed dial
(2) can be set be-
fore or after film transport and engages with
a click opposite the engraved speeds.
Intermediate values can be set as required
and are fully operative except between
1
/
8
and
1
/
4
,
1
/
30
and
1
/
60
sec. At the "B" setting
the shutter remains open as long as the
release button is depressed. Electronic
flash units can be used at the speeds B, 1
to J =
1
/
100
sec (see p. 23).
The release button
(3) has a thread for
cable releases. Pressure on the release
button triggers the following camera func-
tions in sequence:
1. The mirror is swung up.
2. The deflecting mirror for the exposure
meter folds against the viewfinder mirror.
3. The lens diaphragm closes to the pre-
set value.
4. The shutter operates.
5. The mirror returns into the optical path.
6. The deflecting mirror of the exposure
meter returns to the measuring position.
7. The lens diaphragm reopens.
Not For Resale – Free Download at http://www.joe-chan.com/manuals
18

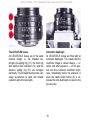
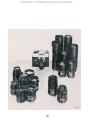
The LEICAFLEX lenses
All LEICAFLEX-R lenses are of the same
external design, i.e. the rotatable dia-
phragm pre-setting ring (11), the fixed ring
with depth-of-field indication (12), and the
distance setting ring (13) are arranged
identically. The left hand thus becomes very
easily accustomed to rapid and reliable
operation with all focal lengths.
Automatic diaphragm
All LEICAFLEX-R lenses are fitted with an
automatic diaphragm. This means that the
viewfinder image is viewed always — i.e.
before and after exposure — at full aper-
ture and thus maximum viewfinder bright-
ness. Immediately before the exposure or
when the depth-of-field button (6) is de-
pressed the lens diaphragm is closed to the
pre-set value.
Not For Resale – Free Download at http://www.joe-chan.com/manuals
19

Depth-of-field button
The LEICAFLEX SL 2 measures the ex-
posure at full lens aperture. The depth-of-
field button permits the assessment in the
viewfinder of the depth of field to be ex-
pected with the pre-set stop-down. When
the button (6) is pressed the lens dia-
phragm is closed to the preset value.
Please note:
During exposure measurement the button
(6) must not be pressed.
Depth-of-field scale
The depth-of-field scale indicates the range
of the depth of field for the object distance
set on the distance setting ring.
If, for instance, you have focused the 50mm
SUMMICRON-R f/2. lens on 5m, the
sharpness will extend from 3m to about
20m when the lens is stopped down to f/11.
If you stop down only to f/4, however,
sharpness will extend from 4m to about 8m.
Detailed information about depth of field
with all focal lengths is contained in our
Depth-of-field Table No. 110-57.
Not For Resale – Free Download at http://www.joe-chan.com/manuals
20
Page is loading ...
Page is loading ...
Page is loading ...
Page is loading ...
Page is loading ...
Page is loading ...
Page is loading ...
Page is loading ...
Page is loading ...
Page is loading ...
Page is loading ...
Page is loading ...
Page is loading ...
Page is loading ...
Page is loading ...
Page is loading ...
Page is loading ...
Page is loading ...
Page is loading ...
Page is loading ...
-
 1
1
-
 2
2
-
 3
3
-
 4
4
-
 5
5
-
 6
6
-
 7
7
-
 8
8
-
 9
9
-
 10
10
-
 11
11
-
 12
12
-
 13
13
-
 14
14
-
 15
15
-
 16
16
-
 17
17
-
 18
18
-
 19
19
-
 20
20
-
 21
21
-
 22
22
-
 23
23
-
 24
24
-
 25
25
-
 26
26
-
 27
27
-
 28
28
-
 29
29
-
 30
30
-
 31
31
-
 32
32
-
 33
33
-
 34
34
-
 35
35
-
 36
36
-
 37
37
-
 38
38
-
 39
39
-
 40
40


Leica Leicaflex SL 2 User manual
- Type
- User manual
- This manual is also suitable for
Ask a question and I''ll find the answer in the document
Finding information in a document is now easier with AI
Related papers
-
Leica M6-TTL Owner's manual
-
-
-
-
-
-
-
Leica M-D User manual
-
-
Leica M-ADAPTER L Operating instructions
Other documents
-
Panasonic H-FS045200E Datasheet
-
-
-
Minolta Super A User manual
-
Canon E-F User manual
-
Canon F-1 User manual
-
-
Hasselblad XPan II User manual
-
-