Dell PowerEdge R840 Quick start guide

Type
Quick start guide

Dell PowerEdge R840: A versatile server designed for demanding workloads, offering exceptional performance, scalability, and reliability. Its powerful processors, ample memory capacity, and flexible storage options make it ideal for virtualization, databases, high-performance computing, and other intensive applications. With advanced security features, remote management capabilities, and comprehensive support services, the R840 is the ultimate solution for businesses seeking a robust and adaptable server infrastructure.

Dell PowerEdge R840: A versatile server designed for demanding workloads, offering exceptional performance, scalability, and reliability. Its powerful processors, ample memory capacity, and flexible storage options make it ideal for virtualization, databases, high-performance computing, and other intensive applications. With advanced security features, remote management capabilities, and comprehensive support services, the R840 is the ultimate solution for businesses seeking a robust and adaptable server infrastructure.

Processor Upgrade
Tech Sheet
CAUTION: Many repairs may only be done by a certified service
technician. You should only perform troubleshooting and simple repairs
as authorized in your product documentation, or as directed by the
online or telephone service and support team. Damage due to servicing
that is not authorized by Dell is not covered by your warranty. Read and
follow the safety instructions that are shipped with your product.
To install a processor
1. To install a processor remove the existing processor and heat sink
module(PHM), see the Removing a processor and heat sink module
section.
2. Install the processor and heat sink module on the processor socket, see the
Installing the new processor and heat sink module section.
Removing a processor and heat
sink module
Prerequisites
Remove the system cover and the air shroud.
For more information, refer to your system’s Installation and Service
Manual available at Dell.com/poweredgemanuals.
© 2017 Dell Inc. or its subsidiaries.
2017-09
CAUTION: Never remove the heat sink from a processor unless
you intend to replace the processor. The heat sink is necessary
to maintain proper thermal conditions.
WARNING: The heat sink may be hot to touch for some time after the
system has been powered down. Allow the heat sink to cool before
removing it.
1. Using a Torx #T30 screwdriver, loosen the screws on the heat sink in the
order below:
a. Loosen the first screw three turns.
b. Loosen the second screw completely.
c. Return to the first screw and loosen it completely.
NOTE: It is normal for the heat sink to slip off the blue retention clips
when the screws are partially loosened, continue to loosen the screw(s).
2. Pushing both blue retention clips simultaneously, lift the processor and heat
sink module out of the system.
3. Set the processor and heat sink module aside with the processor side
facingup.
Installing the new processor and
heat sink module
WARNING: To avoid any damage to the processor, do not remove the
processor from the processor tray when the bracket and the heat sink is
attached to it.
NOTE: Before placing the bracket on the processor, ensure that pin 1
indicator
on the bracket is aligned with the pin 1 indicator on the processor
and the processor tray.
1. Flex the outer edges of the bracket around the processor ensuring that the
processor is locked into the clips on the bracket.
WARNING: Do not reuse a previously removed heat sink.
2. Remove the plastic heat sink shipping cover to expose the thermal grease
surface. Place the heat sink on the processor and push down until the
bracket locks onto the heat sink.
NOTE: Ensure that the two guide pin holes on the bracket match the guide
holes on the heat sink.
NOTE: Ensure that the pin 1 indicator on the heat sink is aligned with the pin1
indicator on the bracket before placing the heat sink onto the processor and
bracket.
NOTE: Heat sink may vary from the depiction in the image depending on the
model of your system or system configuration.
3. Remove the processor and heat sink module from the processor tray.
4. Align the pin 1 indicator of the heat sink to the system board and then place
the processor and heat sink module on the processor socket on the system
board.
CAUTION: To avoid damaging the fins on the heat sink, do not press
down on the heat sink fins.
NOTE: Ensure that the processor and heat sink module is held parallel to the
system board to prevent damaging the components.
5. Push the blue retention clips inward to allow the heat sink to drop into place.
6. Using the Torx #T30 screwdriver, tighten the screws on the heat sink in the
order below:
a. Partially tighten the first screw (approximately 3 turns).
b. Tighten the second screw completely.
c. Return to the first screw and tighten it completely.
7. If the processor and heat sink module slips off the blue retention clips when
the screws are partially tightened, follow these steps to secure the PHM:
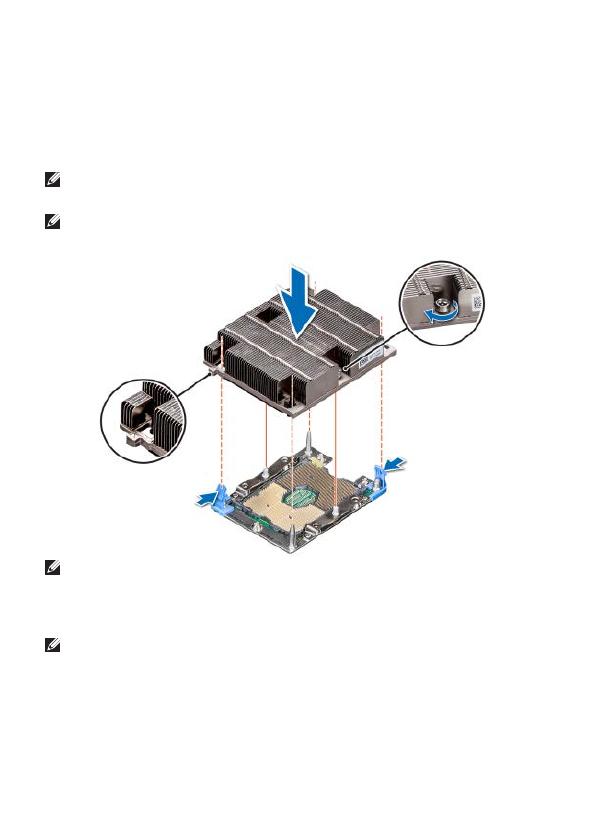
a. Loosen both the heat sink screws completely.
b. Lower the PHM on to the blue retention clips, follow the procedure
described above in step 2.
c. Secure the PHM, follow the procedure described above in step 2.
NOTE: Ensure that the screw is tightened completely before moving onto the
next screw.
NOTE: The processor and heat sink module retention screws should not be
tightened to more than 0.13 kgf-m (1.35 N.m or 12 in-lbf).
NOTE: Populate all empty DIMM slots associated with the new processor with
the supplied DIMM blanks, only if the original processor in the server had DIMM
blanks. If not, the air shroud accommodates for air flow without the need for
DIMM blanks and the blanks in the processor upgrade kit should be discarded.
NOTE: If the new processor came with new fans, remove the existing fans and
replace them with the new fans.
处理器升级技术表
小心:多数维修只能由经认证的维修技术人员执行。您仅应按照产品说明文
档中的授权,执行疑难排除和简单的维修,或者是在支持团队在线或电话服
务指导下进行。由于进行未被 Dell 授权的维修所造成的损坏不在保修之内。
阅读并遵循产品附带的安全说明。
安装处理器
1. 要安装处理器以及卸下现有的处理器和散热器模块 (PHM),请参阅“卸下
处理器和散热器模块”部分。
2. 要在处理器插槽中安装处理器和散热器模块,请参阅“安装新的处理器和
散热器模块”部分。
卸下处理器和散热器模块
前提条件
卸下系统护盖和空气导流罩。
有关更多信息,请参阅 Dell.com/poweredgemanuals 上的系统安装
和服务手册。
小心:切勿从处理器上卸下散热器,除非您打算同时卸下处理器。
必须配备散热器才能维持适当的温度条件。
警告:在关闭系统电源后一段时间内,散热器摸上去会很烫。在卸下散热器
之前,请先使其冷却。
1. 使用梅花头 T30 号螺丝刀,按照以下顺序拧下散热器上的螺钉:
a. 转动三次拧松第一个螺钉。
b. 完全拧下第二个螺钉。
c. 然后再回到第一个螺钉并将其完全拧下。
注:当螺钉部分拧松时散热器从蓝色固定夹滑落是正常现象,请继续
拧下螺钉。
2. 同时推动两个蓝色固定夹,将处理器和散热器模块提离系统。
3. 将处理器和散热器模块放在一旁,并且处理器一面朝上。
安装新的处理器和散热器模块
警告:避免对处理器造成任何损坏,在已连接支架和散热器的情况下,请勿
将处理器从处理器托盘中卸下。
注:在处理器上放置支架之前,确保将支架上的插针 1 标记 与处理器和处
理器托盘上的插针 1 标记对齐。
1. 将支架外部边缘沿处理器弯曲,确保处理器卡入支架中的固定夹中。
警告:请勿重复使用一个先前卸下的散热器。
2. 卸下塑料散热器包装盖,以露出导热油脂的表面。将散热器放在处理器上
并向下压,直至支架锁入散热器中。
注:确保支架上的两个导梢孔与散热器上的导孔对齐。
注:确保将散热器上的插针 1 标记与支架上的插针 1 标记对齐,然后再将散热
器放在处理器和支架上。
注:散热器与图中的描述可能会有所不同,具体取决于系统的型号或系统配
置。
3. 从处理器托盘上卸下处理器和散热器模块。
4. 将散热器上的插针 1 标记与系统板对齐,然后再将处理器和散热器模块放
在系统板上的处理器插槽中。
小心:为避免损坏散热器上的插针,请勿按压散热器插针。
注:确保按照与系统板平行的方向持拿处理器和散热器模块,以避免损坏组
件。
5. 向内推动蓝色固定夹,以使散热器卡入到位。
6. 使用梅花头 T30 号螺丝刀,按照以下顺序拧紧散热器上的螺钉:
a. 部分拧紧第一个螺钉(约转动 3 次)。
b. 完全拧紧第二个螺钉。
c. 返回到第一个螺钉并将其完全拧紧。
7. 如果在螺钉部分拧紧时,处理器和散热器模块从蓝色固定夹滑落,则遵循
以下步骤以固定 PHM
a. 完全拧下两个散热器螺钉。
b. PHM 向下放到蓝色固定夹上,请遵循上述步骤 2 中所述的步骤进
行操作。
c. 固定 PHM,请遵循上述步骤 2 中所述的步骤进行操作。
注:确保该螺钉已完全拧紧,然后再拧紧下一个螺钉。
注:拧紧处理器和散热器模块固定螺钉时力矩不得超过 0.13 kgf-m1.35 N.m
12 in-lbf)。
注:只有当服务器中原来的处理器已有 DIMM 挡片的情况下,才使用随附的
DIMM 挡片填充与新处理器关联的所有空 DIMM 插槽。如果没有,则空气导
流罩可以实现通风而不需要 DIMM 挡片,并且应丢弃处理器升级套件中的
挡片。
注:如果新处理器附带新风扇,请卸下现有的风扇,然后更换为新风扇。
1.
PHM
2.
Dell.com/poweredgemanuals
1. T30
a. 1 3
b. 2
c. 1
2.
3.
1
1
1.
2.
2
1 1
3.
4. 1
5.
6. T30
a. 1 3
b. 2
c. 1
7.
PHM
a.
b. PHM 2
c. PHM 2
0.13 kgf-m
1.35 N.m 12 in-lbf
DIMM
DIMM DIMM
DIMM
프로세서 업그레이드
기술 시트
주의: 대부분의 수리는 공인된 서비스 기술자만이 수행할 있습니다.
사용자는 제품 설명서에서 허가한 경우나 온라인 또는 전화서비스/
지원팀에서 지시한 경우에만 문제 해결 절차 단순 수리 작업을 수행할
있습니다. Dell사에서 공인하지 않은 서비스로 인한 손상에 대해서는
보상하지 않습니다. 제품과 함께 제공된 안전 지침을 읽고 따르십시오.
프로세서를 설치하려면
1. 프로세서를 설치하려면 기존 프로세서 방열판 모듈 (PHM)
분리합니다. 프로세서 방열판 모듈을 분리 섹션을 참조하십시오.
2. 프로세서 소켓에 프로세서 방열판 모듈을 설치합니다. 모듈
프로세서 방열판을 설치 섹션을 참조하십시오.
프로세서 방열판 모듈 분리
필수 구성 요소
시스템 덮개 공기 덮개를 분리합니다.
자세한 내용은 Dell.com/poweredgemanuals에서 제공되는 시스템
설치 서비스 설명서를 참조하십시오.
주의: 프로세서를 분리할 의도가 아니라면 프로세서에서 방열판을
분리하지 마십시오. 적절한 온도를 유지하려면 방열판이 있어야
합니다.
경고: 시스템의 전원을 후에도 방열판이 매우 뜨거우므로 만지지
마십시오. 방열판을 분리하기 전에 충분히 냉각시켜야 합니다.
1. 아래의 순서로 Torx #t30 드라이버를 사용하여, 방열판의 나사를 풉니다.
a. 번째 나사를 3 돌려 풉니다.
b. 번째 나사를 완전히 풉니다.
c. 번째 나사를 완전히 풉니다.
: 나사 일부분이 풀렸을 방열판이 청색 고정 클립에서 빠져나오는
것은 정상입니다. 계속 나사를 푸십시오.
2. 청색 고정 클립을 동시에 누른 다음, 프로세서 방열판 모듈을 들어
올려 시스템에서 꺼냅니다.
3. 프로세서 쪽이 위를 향하도록 프로세서 방열판 모듈을 놓습니다.
프로세서 방열판 모듈 장착
경고: 프로세서 손상을 방지하려면, 브래킷 방열판이 프로세서 트레이에
연결되어 있는 경우 프로세서 트레이에서 프로세서를 분리하지 마십시오.
: 프로세서에 브래킷을 배치하기 전에 브래킷의 1 표시등 ( )
프로세서 프로세서 트레이의 1 표시등과 정렬되는지 확인합니다.
1. 프로세서가 브래킷의 클립에 잠기도록 프로세서 주변 브래킷의 바깥쪽
가장자리를 구부립니다.
경고: 이전에 분리한 방열판을 다시 사용하지 마십시오.
2. 그리즈 표면을 노출시키려면 플라스틱 방열판 배송 덮개를 제거합니다.
프로세서에 방열판을 놓고 브래킷이 방열판에 잠길 때까지 아래로
누릅니다.
: 브래킷의 2 가이드 구멍이 방열판의 가이드 구멍과 일치하는지
확인합니다.
: 프로세서와 브래킷에 방열판을 놓기 전에 브래킷의 1 표시등이
방열판의 1 표시등과 정렬되는지 확인합니다.
: 시스템 모델 또는 시스템 구성에 따라 방열판은 이미지의 모양과 다를
있습니다.
3. 프로세서 방열판 모듈을 프로세서 트레이에서 분리합니다.
4. 방열판의 1 표시등을 시스템 보드에 정렬하고 시스템 보드의 프로세서
소켓에 프로세서 방열판 모듈을 놓습니다.
주의: 방열판의 핀이 손상되지 않도록 하려면, 방열판 아래로 누르지
마십시오.
: 구성요소 손상을 방지하려면 프로세서 방열판 모듈이 시스템 보드에
병렬로 고정되어 있는지 확인합니다.
5. 청색 고정 클립을 안쪽으로 밀어 방열판을 제자리에 끼웁니다.
6. 아래의 순서로 Torx #t30 드라이버를 사용하여, 방열판의 나사를 조입니다.
a. 부분적으로 번째 나사를 조입니다 ( 3).
b. 번째 나사를 완전히 조입니다.
c. 번째 나사를 완전히 조입니다.
7. 나사를 부분적으로 조였을 프로세서 방열판 모듈이 청색 고정
클립에서 빠져나오는 경우 PHM 고정하려면 다음 단계를 수행하십시오.
a. 방열판 나사를 완전히 풉니다.
b. PHM 청색 고정 클립으로 내리고 2단계에서 위에 설명된 절차를
따릅니다.
c. PHM 고정하고 2단계에서 위에 설명된 절차를 따릅니다.
: 다음 나사를 조이기 전에 나사가 완전히 조여졌는지 확인합니다.
: 프로세서 방열판 모듈 고정 나사를 0.13kgf-m (1.35N.m 또는 12in-lbf)
이상 조여서는 됩니다.
: 서버의 원래 프로세서에 DIMM 보호물이 있는 경우에만 프로세서와
관련된 모든 DIMM 슬롯에 DIMM 보호물을 장착합니다. 그렇지 않은
경우, DIMM 보호물 없이 공기 흐름을 위해 공기 덮개를 장착하며 프로세서
업그레이드 키트의 보호물은 필요가 없습니다.
: 프로세서와 팬이 함께 제공된 경우, 기존 팬을 제거하고 팬으로
교체합니다.
  • Page 1 1
  • Page 2 2
  • Page 3 3
  • Page 4 4
  • Page 5 5
  • Page 6 6
  • Page 7 7
  • Page 8 8
  • Page 9 9
  • Page 10 10
  • Page 11 11
  • Page 12 12
  • Page 13 13
  • Page 14 14
  • Page 15 15
  • Page 16 16
  • Page 17 17
  • Page 18 18
  • Page 19 19
  • Page 20 20

Dell PowerEdge R840 Quick start guide

Type
Quick start guide

Dell PowerEdge R840: A versatile server designed for demanding workloads, offering exceptional performance, scalability, and reliability. Its powerful processors, ample memory capacity, and flexible storage options make it ideal for virtualization, databases, high-performance computing, and other intensive applications. With advanced security features, remote management capabilities, and comprehensive support services, the R840 is the ultimate solution for businesses seeking a robust and adaptable server infrastructure.

Ask a question and I''ll find the answer in the document

Finding information in a document is now easier with AI