Page is loading ...

Owner’s
Manual
Side-by-Side
36″,42″,48″
Built-In Refrigerators
06-09 JR
monogram.com
49-60559-3
224D1893P005

Consumer Information
Built-In Refrigerators
2
Contents
Consumer Services
Important Phone Numbers . . . . . . . . . . . . . . . . . .29
Model and Serial Numbers . . . . . . . . . . . . . . . . . . .3
Problem Solver . . . . . . . . . . . . . . . . . . . . . . . . .23–26
Product Registration . . . . . . . . . . . . . . . . . . . . . . . . .3
Safety Instructions . . . . . . . . . . . . . . . . . . . . . . . . 4–7
Smartwater Filter Performance
Data Sheet . . . . . . . . . . . . . . . . . . . . . . . . . . . . . . . . .27
State of California
Water Treatment Device Certificate . . . . . . . . .28
Warranty . . . . . . . . . . . . . . . . . . . . . . . . . Back Cover
Care and Cleaning
Cleaning—Outside and Inside . . . . . . . . . . . . . . .19
Light Bulb Replacement . . . . . . . . . . . . . . . . 20–21
Moving and Vacation . . . . . . . . . . . . . . . . . . . . . . .22
Master Light Switch . . . . . . . . . . . . . . . . . . . . . . . .21
Operating Instructions
Automatic Icemaker . . . . . . . . . . . . . . . . . . . . . . . .12
Climate Control Drawer . . . . . . . . . . . . . .13, 14, 16
Control Lock . . . . . . . . . . . . . . . . . . . . . . . . . . . . . . . .14
Ice and Water Dispenser . . . . . . . . . . . . . . . .10, 11
Shelves and Bins . . . . . . . . . . . . . . . . . . . . . . . .17, 18
Storage Pans . . . . . . . . . . . . . . . . . . . . . . . . . . .15, 16
Temperature Controls . . . . . . . . . . . . . . . . . . . . . . . .8
Water Filter Cartridge . . . . . . . . . . . . . . . . . . . . . . . .9
Sabbath Mode Product Kit, ZSAB1 . . . . . . . . . . .18

3
If you
received a
damaged
refrigerator
Immediately contact the dealer (or builder) that
sold you the refrigerator.
Save time
& money
Before you request service, check the
Problem Solver in the back of this manual.
It lists causes of minor operating problems that
you can correct yourself.
If you
need
service
To obtain service, see the Consumer Services
page in the back of this manual.
We’re proud of our service and want you to be
pleased. If for some reason you are not happy
with the service you receive, here are steps to
follow for further help.
For customers in the USA:
FIRST, contact the people who serviced your
appliance. Explain why you are not pleased.
In most cases, this will solve the problem.
NEXT, if you are still not pleased, write all the
details—including your phone number—to:
Manager, Customer Relations
GE Appliances
Appliance Park
Louisville, KY 40225
For customers in Canada:
FIRST, contact the people who serviced your
appliance. Explain why you are not pleased.
In most cases, this will solve the problem.
NEXT, if you are still not pleased, write all
the details–including your phone number to:
Manager, Consumer Relations
Mabe Canada Inc.
1 Factory Lane, Suite 310
Moncton, N.B. E1C 9M3
Consumer Information
Built-In Refrigerators
Before
using your
refrigerator
Read this manual carefully. It is intended
to help you operate and maintain your new
refrigerator properly.
Keep it handy for answers to your questions.
If you don’t understand something or need more
help, there is a list of toll-free consumer service
numbers included in the back section of this
manual.
OR
Visit our website at: monogram.com
Write
down the
model &
serial
numbers
You’ll see them on a label in the lower right hand
side of the fresh food compartment beneath
the climate control drawer.
Before sending in this card, please write these
numbers here:
Model Number
Serial Number
Use these numbers in any correspondence or
service calls concerning your refrigerator.

4
IMPORTANT SAFETY INSTRUCTIONS
REFRIGERANTS
All refrigeration products contain refrigerants,
which under federal law must be removed prior
to product disposal. If you are getting rid of
an old refrigeration product, check with the
company handling the disposal about what
to do.
w DANGER: RISK OF CHILD ENTRAPMENT
Child entrapment and suffocation are not
problems of the past. Junked or abandoned
refrigeration products are still dangerous… even
if they will sit for “just a few days.” If you are
getting rid of your old appliance, please follow
these instructions to help prevent accidents.
Before You Throw Away Your Old Refrigeration
Product:
• Take off the doors.
• Leave the shelves in place so that children
may not easily climb inside.
READ AND SAVE THESE INSTRUCTIONS
w WARNING – When using
this appliance, always exercise basic safety
precautions, including the following:
• Use this appliance only for its intended
purpose as described in this Owner’s Manual.
• This refrigerator must be properly installed
in accordance with the Installation
Instructions before it is used.
• Do not allow children to climb, stand or
hang on the shelves in the refrigerator.
They could damage the refrigerator and
seriously injure themselves.
• After your refrigerator is in operation,
do not touch the cold surfaces in the
freezer compartment, particularly when
hands are damp or wet. Skin may adhere
to these extremely cold surfaces.
• Do not store or use gasoline or other
flammable vapors and liquids in the
vicinity of this or any other appliance.
• In refrigerators with an automatic icemaker,
avoid contact with the moving parts of the
ejector mechanism, or with the heating
element located on the bottom of the
icemaker. Do not place fingers or hands
on the automatic icemaking mechanism
while the refrigerator is plugged in.
• Keep fingers out of the “pinch point” areas:
clearances between the doors and between
the doors and cabinet are necessarily small.
Be careful closing doors when children are
in the area.
• Unplug your refrigerator before cleaning
and making repairs. NOTE: We strongly
recommend that any servicing be performed
by a qualified individual.
• Before replacing a burned-out light bulb,
set the Master Light switch in the OFF position
to turn off the lights in order to avoid contact
with a live wire filament. (A burned-out light
bulb may break when being replaced.)
NOTE: Setting the refrigerator temperature
controls to OFF does not remove power
to the light circuit.
• Do not refreeze frozen foods which have
thawed completely.

6
SAVE THESE INSTRUCTIONS
IMPORTANT SAFETY INSTRUCTIONS
HOW TO CONNECT ELECTRICITY
Do not, under any circumstances, cut or
remove the third (ground) prong from the
power cord. For personal safety, this appliance
must be properly grounded.
The power cord of this appliance is equipped
with a 3-prong (grounding) plug which mates
with a standard 3-prong (grounding) wall outlet
to minimize the possibility of electric shock
hazard from this appliance.
Have the wall outlet and circuit checked
by a qualified electrician to make sure the outlet
is properly grounded.
Where a standard 2-prong wall outlet is
encountered, it is your personal responsibility
and obligation to have it replaced with
a properly grounded 3-prong wall outlet.
Use of a GFI (Ground Fault Interruptor) is not
recommended for the refrigerator outlet.
The appliance should always be plugged into
its own individual electrical outlet which has
a voltage rating that matches the rating plate.
This provides the best performance and also
prevents overloading house wiring circuits
which could cause a fire hazard from
overheated wires.
DO NOT USE AN ADAPTER PLUG TO CONNECT
THE REFRIGERATOR TO A 2-PRONG OUTLET.
DO NOT USE AN EXTENSION CORD WITH
THIS APPLIANCE.
Never unplug an appliance by pulling on
the power cord. Always grip the plug firmly
and pull straight out from the outlet.
Repair or replace immediately all power cords
that have become frayed or otherwise damaged.
Do not use a cord that shows cracks or abrasion
damage along its length or at either end.
When moving the appliance, be careful not to
roll over or damage the power cord.

8
Temperature Controls
Built-In Refrigerators
Temperature
controls
Changing
display
temperatures
from °F to °C
To change the temperature display
between Fahrenheit and Celsius, press
Temp Display °C/°F.
The temperature display shows the actual
temperature of the freezer and fresh food
compartments. The actual temperature will vary
from the set temperature based on factors such
as door opening, amount of food, defrost cycling
and room temperature.
NOTE: Frequent door openings or door left open
for periods of time may increase the internal
temperature of the freezer and fresh food
compartments temporarily.
To turn off the cooling system in both
the freezer and fresh food compartments, press
either pad until both displays show OFF.
To turn the cooling system on, press either
pad. The preset temperatures of 0°F and 37°F
will appear in the display.
To check the current temperature setting
for the fresh food or freezer compartment,
press the or pad once. After 5 seconds,
the display will return to the actual temperature.
To change the temperature settings, press
the or pads to desired temperature set
point for fresh food and freezer separately.
Allow 24 hours for the refrigerator to reach
the temperature you have set.
Temperature Ranges
Low High
Fresh Food
Freezer
NOTE: Setting the controls to OFF stops
cooling, but does not shut off electrical power
to the refrigerator.
34°F
1°C
–6°F
–21°C
45°F
7°C
+6°F
–14°C
Door
alarm
To turn the Door Alarm feature on, press
DOOR ALARM once. The ACTIVE light will come
on. To turn it off, press it again.
On models with a dispenser, the Door Alarm
feature is located on the dispenser panel on
the front of the freezer door.
When the DOOR ALARM
is active, the alarm will flash
and beep if you keep the door
open for more than 2 minutes.
Preset Settings:
Allow 24 hours to reach these preset temperatures.

9
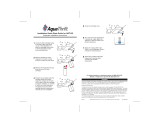
Water filter
cartridge
Cartridge
Holder
Slowly turn it to the right.
Do not overtighten.
Filter
Cartridge
The water filter cartridge is located in the top
machine compartment of the refrigerator.
To Replace the Filter:
The filter cartridge is designed
to filter 300 gallons of water
(lasting approximately 12 months).
There is a replacement indicator light
for the water filter cartridge on the temperature
control panel. This light will turn yellow to tell
you that you need to replace the filter soon.
The filter cartridge should be replaced when
the replacement indicator light turns red
or if the flow of water to the dispenser
or icemaker decreases.
Installing the Filter Cartridge:
1. Remove the old cartridge by slowly turning
it to the left. A small amount of water may
drip down. Do not pull down on the cartridge.
2. Fill the new cartridge with water from the tap
to allow for better flow immediately after
installation.
3. Line up the arrow on the cartridge with
the center of the holder. Do not push it up
into the holder.
4. Slowly turn it to the right until the cartridge
stops. It will rotate about 1/4 turn. DO NOT
OVERTIGHTEN.
To Reset the Filter Status Light:
Press and hold the RESET pad for 3 seconds.
Filter Bypass Plug:
You must use the filter bypass plug:
a) if you have a household
reverse osmosis water system
and/or another form of home
water filtration system
b) if a replacement filter is not
available.
The bypass plug and the mini-manual are located
in the top machine compartment.
The icemaker and dispenser will not operate
without the filter or filter bypass plug installed.
Replacement filters:
To order additional filter cartridges in the United
States, visit our Website at monogram.com, or
call GE Parts and Accessories, 800.626.2002.
Replacement filter cartridge: MWF
Customers in Canada should consult the yellow
pages for the nearest Mabe Service Center.
Filter
Bypass
Plug
Water Filter Cartridge
Built-In Refrigerators
IMPORTANT NOTE: Remove the water filter to
immediately stop any water leak from the
Icemaker/Dispenser system. The water filter
cartridge holder (bracket) acts as a cut-off valve
when the filter is removed and will prevent
further leaking.
Call 1.800.844.1845 to schedule a service call
to repair the leak.

10
Dispenser
with
glass-touch
controls
How it Works
The electronic controls on the dispenser are
truly interactive. The control panel is equipped
with a proximity sensor that causes the panel to
light up as you approach the dispenser (approx.
2 inches). To make a selection, simply touch
the graphic for the feature you want, and the
halo for that feature will light up. When you walk
away from the refrigerator, the lighted graphics
switch off automatically.
Spill Shelf
Ice & Water Dispenser (on some models)
Built-In Refrigerators
How to Use
To dispense water or ice: select WATER , CUBED
ICE or CRUSHED ICE . Then press the glass
gently against the top of the dispenser cradle.
The spill shelf is not self-draining. To reduce
water spotting, the shelf and its grille should be
cleaned regularly.
If no water is dispensed when the refrigerator
is first installed, there may be air in the water
line system. Press the dispenser cradle for at
least two minutes to remove trapped air from
the water line and to fill the water system.
To flush out impurities in the water line,
throw away the first gallon of water.
CAUTION:Never put fingers
or any other objects into the ice crusher
discharge opening.
Locking the Dispenser:
Touch CONTROL LOCK for
3 seconds to lock the dispenser
and control pad. To unlock, touch
it again for 3 seconds.
Dispenser Light:
This feature turns the night light
on and off. The light also comes
on when the dispenser cradle is
pressed. If this light burns out, it
should be replaced with a 6 watt
12V maximum bulb. The bulb is available
through GE Parts and Accessories, 800.626.2002.
Order part number WR02X10675.
Door Alarm:
To turn the Door Alarm feature on,
touch DOOR ALARM once. To turn
it off, press it again.
When the DOOR ALARM
is active, the alarm will flash and beep if you
keep the door open for more than 2 minutes.

11
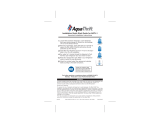
Ice storage
bin
To remove:
Lift up the access door to reach the icemaker.
Set the icemaker power switch to the OFF
position. With the access door closed, support
the storage bin at the bottom while slightly
lifting. Pull bin straight out.
To replace:
Slide the bin back until the tab on the bin locks
into the slot on the shelf. If the bin does not go
all the way back, remove it and rotate the drive
mechanism 1/4 turn. Then push the bin back
again.
Important
facts about
your ice
& water
dispenser
• Do not add ice from trays or bags to
the storage bin. It may not crush or
dispense well.
• Avoid overfilling glass with ice and use
of narrow or extra-tall glasses. Backed-up
ice can jam the chute or cause the door in
the chute to freeze shut. If ice is blocking
the chute, poke it through with a wooden
spoon.
• Beverages and foods should not be
quick-chilled in the ice storage bin. Cans,
bottles or food packages in the storage bin
may cause the icemaker or auger to jam.
• To keep dispensed ice from missing
the glass, put the glass close to, but not
touching, the dispenser opening.
• Some crushed ice may be dispensed even
though you selected CUBES. This happens
occasionally when a few cubes accidentally
get directed to the crusher.
• After crushed ice is dispensed, some water
may drip from the chute.
• Sometimes a mound of ice chips will form
on the door in the ice chute. This condition
is normal and usually occurs when you have
dispensed crushed ice repeatedly. The ice
chips will eventually evaporate.
• Dispensed water is not ice cold. For colder
water, simply add crushed ice or cubes before
dispensing water.
• The first glass of water dispensed may
be warmer than the following ones.
This is normal.
• To eliminate drips on the spill shelf, tilt
the glass in slightly when dispensing water.
Rotate
Drive
Mechanism
Ice Storage Bin
Access Door
Ice & Water Dispenser (on some models)
Built-In Refrigerators

12
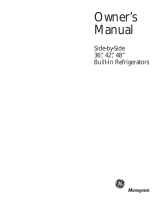
Automatic
icemaker
A newly-installed refrigerator may take
12–24 hours to begin making ice.
The icemaker will produce seven cubes per
cycle—approximately 15 cycles in a 24-hour
period, depending on freezer compartment
temperature, room temperature, number of
door openings and other use conditions.
If the refrigerator is operated before the water
connection is made to the icemaker, set the
power switch to OFF.
When the refrigerator has been connected
to the water supply, set the power switch to
ON
.
Throw away the first full bucket of ice.
Be sure nothing interferes with the sweep
of the feeler arm.
When the bin fills to the level of the feeler arm,
the icemaker will stop producing ice.
It is normal for several cubes to be joined
together.
If ice is not used frequently, old ice cubes
will become cloudy, taste stale and shrink.
After the icemaker has been turned on again,
there will be a delay of about 45 minutes before
the icemaker resumes operations.
NOTE: In homes with lower-than-average
water pressure, you may hear the icemaker
water valve cycle on several times when
making one batch of ice.
NOTE: Icemaker works best between
40 and 120 PSI home water pressure.
Automatic Icemaker
Built-In Refrigerators
Icemaker
Feeler Arm
Power
Switch

13
Climate
Control
drawer
How it Works
The Climate Control feature is a system of
dampers, a fan, a temperature thermistor, and a
heater. The Climate Control drawer can be used to
chill items quickly, thaw foods quickly or store items
at their optimum temperatures.
The drawer is tightly sealed to prevent the drawer’s
temperature from causing temperature fluctuations
in the rest of the refrigerator.
SELECT TEMP—Use this feature to store items at
their optimum temperatures. The CITRUS setting
will maintain a drawer temperature of 39–47°F
by cycling a small heater off and on as needed.
The PRODUCE setting will maintain the drawer
temperature at 31–38°F by drawing in additional
cold air as needed. The MEAT setting will
maintain the drawer temperature at 27–37°F
by drawing in additional cold air as needed.
EXPRESS CHILL—This feature can be used
to cool items in minutes, rather than hours.
Extra cool air is circulated throughout the
drawer. Once the cycle is complete, the drawer
will revert to the pre-set fresh food temperature.
EXPRESS THAW—This feature thaws items
in hours rather than days. Food is gently
thawed in a cool environment by circulating
air throughout the drawer. Temperature is
maintained in the drawer by cycling a small
heater off and on as needed. Once the thaw
cycle is complete, the pan will automatically
adjust to a temperature of 27–37°F to store
the food at its optimum temperature.
NOTE: By turning the controls on the Climate
Control drawer off, the drawer can be used as
a standard sealed produce pan.
How to Use
1 Empty the drawer. Place the items in
the drawer.
2 Select the Express Thaw,™ Express Chill™
or Select Temp™ pad. The display will come
on. Press the pad until the light appears next
to the desired setting. Use the chart on
the next page to determine the best setting.
• To stop a feature before it is finished,
press that feature’s pad until no options
are selected and the display is off.
• During Express Thaw™ and Express Chill,™
the display on the controls will count down
the time remaining in the cycle.
• After the Express Thaw™ cycle is
complete, the drawer will reset to the MEAT
setting (27–37°F) to help preserve thawed
items until they are used.
• The displayed actual temperature of
the Climate Control drawer may vary slightly
from the SET temperature based on usage
and operation environment.
NOTE: For food safety reasons, it is
recommended that foods be wrapped in
plastic wrap when using Express Thaw.™
This will help contain meat juices and
improve thawing performance.
Express Thaw™
Express Chill™
Climate Control Drawer
Built-In Refrigerators

14
Citrus Setting (39–47°F)
• Oranges, Lemons, Limes,
Pineapple, Cantaloupe
• Beans, Cucumbers, Tomatoes,
Peppers, Eggplant, Squash
Produce Setting (31–38°F)
• Strawberries, Raspberries,
Kiwifruit, Pears, Cherries,
Blackberries, Grapes, Plums,
Nectarines, Apples
• Asparagus, Broccoli, Corn,
Mushrooms, Spinach,
Cauliflower, Kale, Green
Onions, Beets, Onions
Meat Setting (27–37°F)
• Raw Meat, Fish and Poultry
15 Minutes
• 1 Beverage Can (12 oz)
• 2 Small Juice Boxes
(6–8 oz each)
30 Minutes
• Wine (750 ml bottle)
• 2 to 6 Beverage Cans
(12 oz each)
• 2 Plastic 20 oz Bottles
of Beverage
• 4 to 6 Small Juice Boxes
(6–8 oz each)
• 3 Foil Juice Packets
45 Minutes
• 2 Liter of Beverage
• 1/2 Gallon of Juice
• Gelatin—1 package
0.5 Lbs. (4 hours)
• Individually Wrapped
Filet Mignon (0.5 lb)
• Hamburger Patties (0.5 lb)
1.5 Lbs. (8 hours)
• Chicken Breasts (1.5 lbs)
• Ground Beef (1.5 lbs)
• Steak (1.5 lbs)
3.0 Lbs. (12 hours)
• Chicken Breasts (3.0 lbs)
• Ground Beef (3.0 lbs)
• Steak (3.0 lbs)
Climate
Control
chart
NOTE: Results may vary depending on packaging, starting temperature and other food traits.
Climate Control Drawer
Built-In Refrigerators
Control
lock
Control Lock
Press and hold this pad for 3 seconds to lock
the settings for the Climate Control drawer.
To unlock, press and hold for another 3 seconds.

15
Sealed
deli pan
Use the Sealed Deli Pan for the convenient
storage of lunch meats and cheese, hors
d’oeuvres, spreads and snacks. The pan and
shelf to which it is attached can be adjusted
to any height.
Storage Pans and Climate Control Drawer
Built-In Refrigerators
Sealed
produce
pans
The top pan is designed to provide constant high
humidity levels.
Make sure the drawers are closed completely
to maintain the correct humidity level.
Drawer
and pan
removal
To remove a drawer or pan:
1. Pull the pan out to the stop position.
2. Lift the front of the pan up and out of
the wire holder.
3. Lift the back of the pan up and out.
To replace a pan:
1. Place the back of the pan in the wire
holder, making sure the wire holder fits
into the grooves on the back of the pan.
2. Lower the front of the pan into the wire holder.
3. Press firmly on the top of the pan to snap it
into the wire holder.

The lighted vegetable drawer shelf provides
lighting for the lower compartments. The lights
are recessed into the shelf to illuminate
the drawers below.
To remove shelf:
1. Remove the top drawer (see Drawer and pan
removal section).
2. Push down gently on the back center of the
climate control drawer top surface to release
the bottom of the water tank cover. Pull out
and down to remove the water tank cover
and expose the wire harness.
3. Lift the shelf and carefully pull forward
to expose the wires.
4. Unplug the shelf and carefully remove it from
the refrigerator.
To replace shelf:
1. Carefully set the shelf onto the side rails,
leaving the plug exposed.
2. Plug the shelf into the refrigerator.
3. Carefully slide the shelf into place.
4. Insert the water tank cover top first so that it
goes up behind the gasket hanging down
from the vegetable drawer shelf. Gently push
the bottom of the water tank cover until the
bottom snaps into the the top of the Climate
Control Drawer cover.
5. Replace the drawer (see Drawer and pan
removal section).
16
Drop Down Shelf and Lighted Drawer Cover
Built-In Refrigerators
Drop down
shelf
The drop-down shelf gives you the use
of another full-size shelf when you need extra
storage. It conveniently folds back out
of the way when not in use, giving you room
for storage of larger items.
To use drop down shelf:
1. Pull forward and down to drop the shelf
into place.
2. Pull forward while lifting up to place the shelf
out of the way.
Lighted
vegetable
drawer
shelf
Water Tank
Cover
Water Tank Cover
Climate Control
Drawer Top
Surface
Lighted
Vegetable
Drawer Shelf

17
How to
rearrange
your shelves
Tempered glass shelves in the fresh food
compartment and wire shelves in the freezer
compartment are adjustable, enabling you to
make efficient shelf arrangements to fit your
family’s food storage needs.
To remove shelves:
Tilt shelf up at front, then lift it up and out
of tracks on rear wall of refrigerator.
To replace shelves:
Select desired shelf height. With shelf front
raised slightly, engage top lugs in tracks at rear
of cabinet. Then lower front of shelf until it locks
into position.
Shelves and Bins
Built-In Refrigerators
Door bins
All door bins, except for the deep gallon door bin,
are adjustable using one of 2 tabs on each end
of the bin. They can be moved up and down to
many different positions to meet your storage
needs. The deep gallon door bin can be removed
for cleaning.
To remove any bin:
Lift the bin up and slide it toward you.
Adjustable
Door Bin
Gallon
Door Bin

18
Freezer
baskets
Wire slide-out freezer baskets can be pulled out
for easy access to frozen foods.
To remove:
Pull basket out. Lift the front of the basket up
and then take it out.
Shelves and Bins
Built-In Refrigerators
Sabbath
Mode
Product Kit
(available at
extra cost)
The Sabbath Mode Product Kit was designed
for use on the Jewish Sabbath and Holidays.
The Sabbath Mode feature makes it possible
for observant Jews to refrigerate and freeze
food during the duration of the holiday.
The Sabbath Mode feature can be set to override
typical reactions to actions in your refrigerator.
While in the Sabbath Mode, your refrigerator will
still operate normally. However, the refrigerator
will not respond to your actions.
While in the Sabbath Mode, you may notice
the fan running when the door is opened;
however, this is not a result of your actions.
The fan will operate at random times.
The defrost heater will continue to defrost
the refrigerator and freezer and will be activated
on a timer. The defrost heater will not defrost
as a result of door openings or any consumer
actions.
ON/OFF—To activate, raise the top grille
panel and set the Sabbath Mode switch to
the ON position. A green LED light will be visible
below the Sabbath Mode Kit switch. The light will
be visible when the grille is closed between the
grille door and compartment doors.
DISPLAYS, ALARMS and LIGHTS—The main
temperature control and Express Chill displays
will be deactivated; therefore they will not be lit,
sound a tone or operate when touched. Door
alarms and lights will be disabled.
ICE and WATER DISPENSER—The proximity
sensor and dispenser touch sensor icons will
not operate. Ice or water cannot be retrieved
from the dispenser.
ICEMAKER—The icemaker will continue
to operate. The icemaker can be disabled by
opening the freezer, opening the ice storage bin
door and setting the icemaker power switch to
the OFF position (see Automatic Icemaker).
To obtain ice, open the freezer door and remove
the cubed ice from the ice bin.
This Sabbath Mode Product Kit can be purchased
from your local appliance dealer. The ZSAB1 Kit
is designed for use with all Monogram Built-In
Refrigerators manufactured after 2008.
To locate your nearest dealer, visit our web site
monogram.com or call 1.800.626.2000. In Canada,
call 1.800.561.3344. Order Kit # ZSAB1.
NOTE: The Sabbath Mode Product Kit must
be installed by a qualified service technician.

19
Cleaning
outside
The dispenser spill shelf
and the area beneath it
should be cleaned
periodically with a mild liquid dish detergent.
Dispenser cradle—Before cleaning, lock
the dispenser by touching CONTROL LOCK for
3 seconds to prevent activating the dispenser.
Clean with warm water and a mild liquid dish
detergent. Rinse thoroughly and wipe dry.
Unlock the dispenser by touching CONTROL
LOCK for 3 seconds.
Do not use chemical cleaners to clean
the dispenser or any part of the dispenser.
Door handles and trim—Clean with a cloth
dampened with soapy water. Dry with a soft
cloth.
Keep the outside clean. Wipe with a clean
cloth lightly dampened with mild liquid dish
detergent. Dry with a clean, soft cloth.
Do not wipe the refrigerator with a soiled
dish cloth or wet towel. These may leave
a residue that can damage the finish. Do not
use scouring pads, powdered cleaners, bleach
or cleaners containing bleach because these
products can scratch and damage the finish.
Stainless steel—Regularly clean and polish
the stainless steel door panels and handles
(on some models) with a commercially available
stainless steel cleaner such as Stainless Steel
Magic™ to preserve and protect the fine finish.
Stainless Steel Magic and the Monogram
polishing cloth are available through GE Parts
and Accessories, 800.626.2002, or monogram.com.
For Stainless Steel Magic, order part number
WX10X15. For Monogram polishing cloth,
order part number WX72X10001.
Do not use appliance wax or polish on
the stainless steel.
Care and Cleaning
Built-In Refrigerators
Cleaning
inside
Turn off power at the circuit breaker or fuse
box before cleaning. If this is not practical, wring
excess moisture out of sponge or cloth when
cleaning around switches, lights or controls.
Use warm water and baking soda solution—
about a tablespoon (15 ml) of baking soda
to a quart (1 liter) of water. This both cleans
and neutralizes odors. Thoroughly rinse
and wipe dry.
Other parts of the refrigerator—including
door gaskets, meat and vegetable drawers,
ice storage bin and all plastic parts—can be
cleaned the same way.
Do not wash any plastic refrigerator parts
in the dishwasher.
Avoid cleaning cold glass shelves with hot
water because the extreme temperature
difference may cause them to break. Handle
glass shelves carefully. Rough handling of
tempered glass can cause it to shatter.
NOTE: Interior lights may get too hot and turn
off automatically if the refrigerator door is left
open too long. This is normal and they will turn
back on when they cool down.

WARNING – Halogen lights generate
intense heat. Be certain power is off and lamps
have sufficient time to cool before attempting
to replace.
Power to the lamps can be turned off at
the Master Light switch located behind
the grille panel at the top of the refrigerator.
There is a switch for the freezer and a switch
for the fresh food compartment.
Turning the temperature control to OFF
does NOT remove power to the light circuits.
AVERTISSEMENT :
Les ampoules halogènes produisent une chaleur
intense. Assurez-vous de bien couper le courant
et de laisser suffisamment de temps aux
ampoules pour leur permettre de se refroidir
avant d’essayer de les remplacer.
Vous pouvez couper le courant en utilisant
le commutateur de lumière principale situé
derrière le panneau grillagé en haut du
réfrigérateur. Il y a un commutateur pour le
compartiment congélateur et un commutateur
pour le compartiment réfrigérateur.
Vous NE COUPEZ PAS l’alimentation électrique
du réfrigérateur des circuits de lumières en
mettant le bouton de contrôle de température
en position OFF (arrêt).
The refrigerator uses a halogen bulb:
The columns along the back wall
of the fresh food and freezer compartments
are lit up by lamps located behind the top pan
in the fresh food compartment and the bottom
basket in the freezer compartment.
These bulbs have a life expectancy of
about 2000 hours. However, if the bulbs
do need to be replaced, they can be
purchased at hardware, general retail
and home improvement stores or through
GE Parts and Accessories, 800.626.2002.
20
Light bulb
replacement
Care and Cleaning
Built-In Refrigerators
Bulbs
This is a 35 watt, 12 volt,
Type MR11 bulb.
If ordering through
GE Parts and Accessories,
order part WR02X11183.
Light
Columns

21
Using
the Master
Light switches
This feature turns off the lights in the fresh food
and freezer compartments.
The switches are located behind the grille panel
at the top of the refrigerator. Lift up the panel
to access the switches.
Fresh Food and Freezer
Master Light Switches
Halogen bulb
replacement
NOTE: Before replacing the bulbs, review
the light bulb information and WARNING.
Replacing bulbs located in lamps behind
the top pan in the fresh food compartment
and the bottom freezer basket in the freezer
compartment:
1. Set the Master Light switches to the OFF
position (see Using the Master Light switches)
and allow the lamps to cool.
2. To access the lamps in the fresh food
compartment, remove the vegetable drawer,
water tank cover and lighted vegetable
drawer cover. See Drawer and Pan Removal
and Lighted Vegetable Drawer Cover sections.
2. To access the lamps in the freezer
compartment, remove the bottom freezer
basket. See Freezer Baskets section.
3. The lamps are hidden by a metal clip.
Grasp the clip and pull toward you to expose
the bulbs.
NOTE: Always follow bulb manufacturer’s
directions for handling and replacing bulbs.
4. Remove the bulb by holding the base and
pulling straight up. Replace with a new bulb.
5. Replace the metal clip by inserting the clip
behind the front smaller tabs, with the larger
tabs behind the clip. Press down gently on
the shield until the tops of the larger tabs slip
into the slots on the shield.
6. Replace the lighted vegetable drawer cover
and water tank cover (see Lighted Vegetable
Drawer Cover section). Replace the vegetable
drawer (see Drawer and Pan Removal section).
7. Reset the Master Light switches to the ON
position.
WARNING – The metal clip must
be replaced or the heat from the bulb could
damage the refrigerator.
AVERTISSEMENT :
Vous devez remettre en place le collier de métal
pour ne pas endommager votre réfrigérateur
avec la chaleur produite par l’ampoule.
Care and Cleaning
Built-In Refrigerators
Grille
Panel
Metal Clip

22
Care and Cleaning
Built-In Refrigerators
Preparing
for vacation
For long vacations or absences, remove food
and shut off power to the refrigerator at the fuse
box or circuit breaker. Clean the interior (see
Cleaning Inside). Leave doors open.
For shorter vacations, remove perishable foods
and leave controls at regular settings. However, if
the room temperature is expected to drop below
60°F (16°C), follow the same instructions as for
long vacations.
Set the icemaker power switch to the OFF
position and be sure to shut off the water supply
to the refrigerator.
/