
TO BE REMOVED BY THE CUSTOMER AFTER INSTALLATION IS COMPLETE.
INSTALLATION CHECKOFF LIST
Doors
Handles are secure and tight
Door seals completely to cabinet on all sides
Doors are level across the top
Leveling
Refrigerator is level, side to side and tilted 1/4” (6mm) front to back
Toe grille is properly attached to refrigerator
Cabinet is setting solid on all corners
Electrical Power
House power turned on
Refrigerator plugged in
Ice Maker
House water supply connected to refrigerator
Water & power couplings connected at door
No water leaks present at all connections - recheck in 24 hours
Ice Maker is turned ON.
Ice & Water Dispenser operates correctly
Front filter must be flush with filter housing (some models)
Final Checks
Shipping material removed
Fresh Food and Freezer controls set
Crisper Humidity controls set
Registration Card sent in
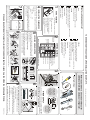
Adjustable
Wrench
Socket
Wrench Set
OR
Phillips head
™
Tools You Will Need:
3/8”
Fixed
W
rench
Refer to your Owner’s
Use and Care Manual
for
additional information about your refrigerator.
• Load refrigerator from side of cabinet
only.
• Do not run retaining straps over
handles.
• Do not over-tighten retaining straps.
• Never use refrigerator handles to
move the refrigerator.
• Remove tape from doors only after
unit is in place.
HAND TRUCKING
1
23
4
5
6
7
9
eçìëÉ
éäìãÄáå
Ö
äáåÉ
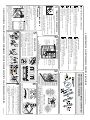
t~íÉêäáåÉ=Üççâìé
WATER SUPPL
Y
_É=ÅÉêí~áå
íÜÉ=ï~íÉê=î~äîÉ=áë
çéÉå=~åÇ=íÜÉêÉ
~êÉ= åç=äÉ~âëK
qÜÉ=ï~íÉê=î~äîÉ
çå=íÜ É=Ä~Åâ=çÑ
íÜÉ=êÉÑêáÖÉê~íçê
ïáää=`äáÅâL_ìòò=áÑ
íÜÉ=ï~íÉê=î~äîÉ
áë=ÅäçëÉÇK
INSTALLATION CLEARANCES
Allow the following clearances for ease of installation,
proper air circulation, and plumbing and electrical
connections:
• Sides & Top..........3/8”
• Back.......................1”
NOTE: If you are installing your refrigerator beside a wall,
leave 1/2” minimum between hinges and wall to allow for
the door to swing open.
All four corners of refrigerator must rest firmly on a solid
floor. Your refrigerator has adjustable rollers to help level it
and to adjust the doors.
To level cabinet or change door height:
1. Remove toe grille.
2. Use a screwdriver, 3/8” wrench, or nutdriver to adjust the
rollers. To raise cabinet or door, turn screw clockwise. To
lower cabinet or door, turn screw counterclockwise.
LEVELING AND ADJUSTING
pí~êí=ïáíÜ=ëÉííáåÖë=~í=“c~Åíçêó=pÉííáåÖÒ
CONTROLS
Colder
Wa rmer
tÜÉå=ÅÜ~åÖáåÖ =Åçåíêçä=ëÉííá åÖëI=ï~áí=OQ=Üçìêë=ÄÉÑçêÉ=ã ~âáåÖ=~ÇÇáíáçå~ä=~ÇàìëíãÉåíëK
Lower Humidity
Higher Humidity
Toe Grille
Cabinet
Co
pp
er water line
from household water su
pp
l
y
(
Include enou
g
h tubin
g
in loo
p
to allow
moving refrigerator out for cleaning.)
Steel
Clam
p
Plastic Water Tubin
g
to Ice Maker
Fill Tube
Brass
Compression
Nut
Remove Shipping material. (Features may vary per model.)
Cub e
Crush Light
Filter ResetXtra I ce
√√
√√
√ See “Normal Operating Sights & Sounds” in the
Use & Care
Manual
so you understand the sounds you may hear once
your refrigerator is running.
√√
√√
√ Please read entire
Use & Care Manual
to become aware of
important safety instructions and to become familiar with your
new refrigerator.
√√
√√
√ Send in Registration card to register your refrigerator.
√√
√√
√ Congratulations! You are ready to enjoy your new refrigerator.
If you need to remove the doors to get your refrigerator in the house, please See
Door Removal Instructions
in your Use & Care Manual.
Ensure icemaker to turned ON. Check to see that the Ice & Water
Dispenser is operating correctly. (See Automatic Ice & Water
Dispenser Features in
Use & Care Manual
.)
Connect water supply - check for water leaks. Turn icemaker OFF
if water supply is not connected immediately. Connecting to a
reverse osmosis system is not recommended.
SHIPPING MATERIAL
8
Ice Water
P/N: 241570200
IF YOU ARE DISSATISFIED WITH THE INSTALLATION OF YOUR REFRIGERATOR, PLEASE CALL THE STORE YOU PURCHASED IT FROM.
(Vea otro lado para la versión del español.)
OFF
ON
3 PIECES OF TAPE
1 PIECE OF TAPE OR
2 BLUE SHIPPING CLIPS
1 PIECE OF TAPE
1 PIECE OF TAPE
1 PIECE OF TAPE
SHELF SPACER WITH TOE GRILLE
1 PIECE OF TAPE
1 PIECE OF FOAM
OR CARDBOARD
2 WIRE TIES
(All wire baskets
will have 2 wire
ties)
Page is loading ...
-
 1
1
-
 2
2


Ask a question and I''ll find the answer in the document
Finding information in a document is now easier with AI
in other languages
Related papers
-
Frigidaire FSC23F7TDS Installation guide
-
Frigidaire GLHS67ESFW Installation guide
-
Frigidaire GLHS38EJQ Installation guide
-
Frigidaire PHT219JKM Installation guide
-
Whirlpool FFHI2126LS Installation guide
-
Frigidaire PLHT189CSK Installation guide
-
Kenmore Elite CRSE234JQ1 Installation guide
-
Kenmore Elite 25357113601 Installation guide
-
Frigidaire GLHS269ZCQ Installation guide
-
Frigidaire GLHS68EGB Installation guide
Other documents
-
Kenmore 25355333600 User manual
-
Kenmore Pro 25344333603 Installation guide
-
Crosley CRT185ILB8 Owner's Care & Use Manual
-
Electrolux 241540201 User manual
-
White-Westinghouse 218954301 User manual
-
Admiral LTF2112ARZ Owner's manual
-
Maytag Top Freezer Refrigerator User manual
-
-
IKEA STJARNSTATUS Refrigerator Installation guide
-
Electrolux E23CS75DSS8 Installation guide