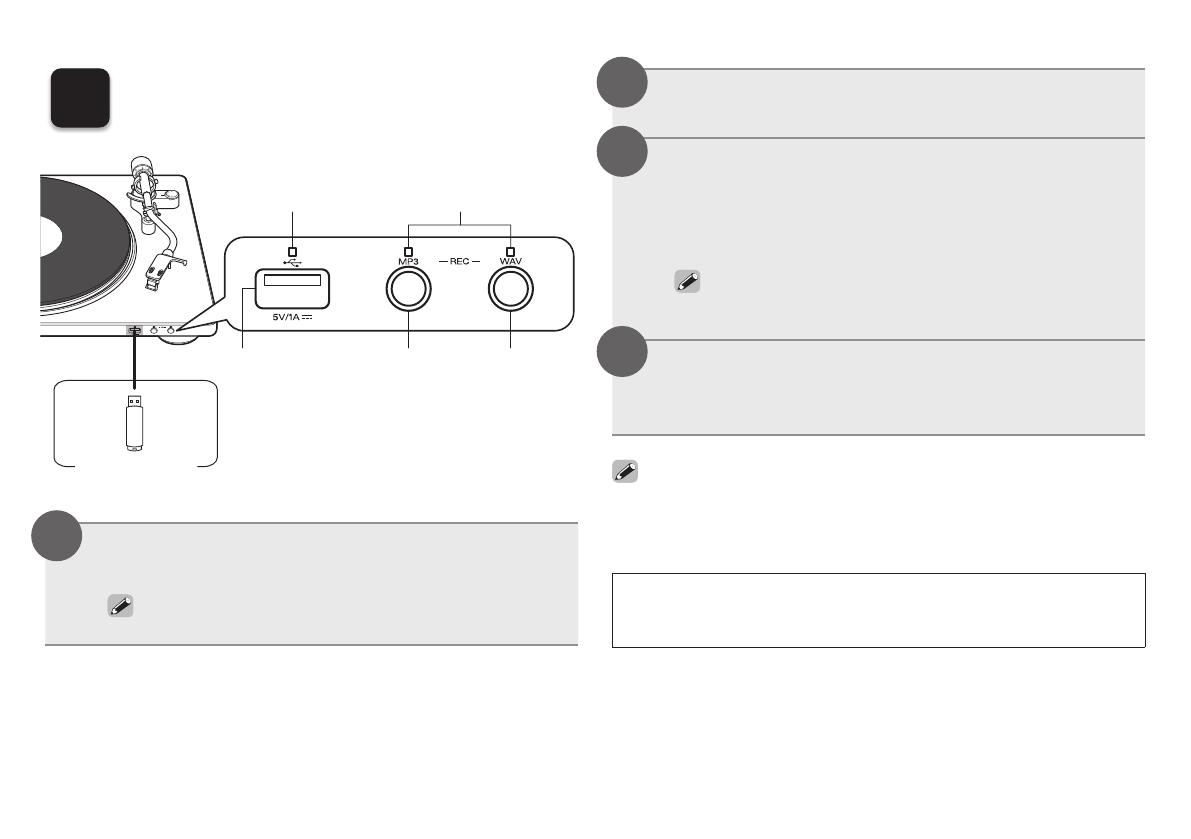
Denon DP-400 Owner's manual

Category
Audio turntables
Type
Owner's manual

This manual is also suitable for

ENGLISH
DEUTSCH
FRANÇAIS
ITALIANO
ESPAÑOL
NEDERLANDS
SVENSKA
РУССКИЙ
POLSKI
Bitte zuerst lesen... / Lisez-moi en premier.... / Nota preliminare.... /
Lea esto primero.... / Lees mij eerst... / Läs detta först... /
Прочитайте в первую очередь... / Przeczytaj to najpierw.... /
はじめにお読みください.... / 请先读我....
DP-450USB
TURNTABLE
Quick Start Guide
Read Me First....
Kurzanleitung / Guide de démarrage rapide / Guida di Avvio Rapido /
Guía de inicio rápido / Snelhandleiding / Snabbstartsguide /
Краткое руководство пользователя / Skrócona instrukcja obsługi /
かんたんスタートガイド / 快速入门指南
日本語
中文简体字
1.DP-450USBEM_ENG_QSG_180320.indd 1 2018/03/20 17:46:03
1
Before You Begin
What’s In the Box
Quick Start Guide
Turntable
Safety Instructions Turntable sheet
The main unit 45 rpm adaptor
AC adapter
PUSH
Head shell with
cartridge
AC adapter plugs
(5 pieces)
Counterweight
Dust cover Audio cable
Dust cover stand
Thank you for choosing this unit. This guide
provides step-by-step instructions for setting
up this unit.
Please do not return this unit to the store –
call for assistance.
If you need help… :
If you need additional help in solving problems,
contact Denon customer service in your area.
For details, see the Denon homepage.
www.denon.com
Welcome
1.DP-450USBEM_ENG_QSG_180320.indd 1 2018/03/20 17:46:04
2
There are fi ve steps to the setup process.
1
Assembly
2
Adjustments
3
Connections
4
Playback
5
Recording to a USB memory device
Setup
Required for Basic connections
Amplifi er Speaker systems Speaker cables
These drawings are for illustrative purposes only and may not represent
the actual product(s).
1.DP-450USBEM_ENG_QSG_180320.indd 2 2018/03/20 17:46:04
3
1
Assembly
n Mounting the turntable
Mount the hole in the center of the turntable
on the center spindle.
Turn the turntable until the roller of the
main unit is visible from the square hole on
the side with the ribbon tape.
Pull out the ribbon tape, and hang the belt
on the roller.
Remove the ribbon tape after hanging the belt.
Square hole
Belt
Roller
Ribbon tape
Take care not to twist the belt when hanging it.
Store the ribbon tape after use, as it is required when replacing
the belt.
2
1
3
Tone arm
Turntable sheet
Turntable
Ribbon tape
Counterweight
Head shell with cartridge
Center spindle
Stylus cover
Before use, attach the included parts to the main unit. Since
a record player is susceptible to vibrations and tilting, place
the main unit in a stable and fl at location in advance.
1.DP-450USBEM_ENG_QSG_180320.indd 3 2018/03/20 17:46:05
4
n Mounting the counterweight
n Mounting the head shell with cartridge
Insert the counterweight into the shaft on
the back of the tone arm, and turn it in the
direction of the arrow while gently pushing it.
0
3.5
3
0.5
1
0
3.5
3
0.5
1
Stylus pressure
adjustment ring
Mount the counterweight so that its stylus pressure
adjustment ring is facing the front.
1
Mount the turntable sheet on the turntable.
Mount the sheet with the side featuring the DENON logo facing down.
4
Insert the head shell into the tip of the tone arm.
Insert the head shell with its guide pin facing up and
aligned with the hole on the top of the tone arm.
Guide pin
Turn the lock nut in the direction of the
arrow to secure the head shell.
Lock nut
NOTE
Perform this operation with the stylus cover of the cartridge lowered to
protect the stylus tip.
1
2
1.DP-450USBEM_ENG_QSG_180320.indd 4 2018/03/20 17:46:05
5
2
Adjustments
Set the anti-skating dial to “0”.
Lower the lifter lever.
Release the lock on the armrest, grip the
nger lift on the head shell, and move the tone
arm over the turntable.
Finger lift
2.5
1.3
1
3.5
0.5
0
NOTE
Perform this operation with the stylus cover of the cartridge
lowered to protect the stylus tip.
2
1
3
n Adjusting the stylus pressure
0
3.5
3
0.5
1
Counterweight
ANTI-SKATING
dial
Armrest
Lifter lever
Tone arm
Head shell
Turntable
Stylus cover
1.DP-450USBEM_ENG_QSG_180320.indd 5 2018/03/20 17:46:05
6
Turn the anti-skating dial so
that it is lined up with “2”.
Turn twist the counterweight so that the tone
arm is oating parallel to the turntable.
Perform adjustment by turning the counterweight
gradually while periodically removing your hand to
check the position.
Parallel
Return the tone arm to the armrest.
Holding the counterweight with a nger so
that it does not move, turn the stylus pressure
adjustment ring so that its “0” mark is lined
up with the line on the tone arm.
Stylus pressure
adjustment ring
5
4
6
n Adjusting anti-skating
1
Turn the counterweight in the direction of
the arrow so that the “2” mark of the stylus
pressure adjustment ring is lined up with the
single line on the tone arm.
The appropriate stylus pressure for the cartridge included with
the main unit is 2.0 g (19.6 mN).
7
1.DP-450USBEM_ENG_QSG_180320.indd 6 2018/03/20 17:46:05
7
3
Connections
R
L
AUX IN
R
L
R
L
Household
power outlet
Amplifier/mini stereo system
without a PHONO input terminal
Audio cable
(supplied)
Phono equalizer ON/OFF
switch
Connect an AC adapter conversion plug suitable for the
power outlet you are using to the AC adapter.
PUSH
PUSH
It is recommended that the earth wire of the included audio cable is
kept out of the way by securing it with a tie such as the twist tie of the
audio cable.
If a device connected to this unit has an earth terminal, connect the
earth wire of the audio cable (supplied) to the earth terminal of this unit
(SIGNAL GND). This may reduce noise during playback.
When connecting to an amplifi er with a PHONO input terminal, set the
phono equalizer ON/OFF switch to “OFF”.
AC adapter
(supplied)
1.DP-450USBEM_ENG_QSG_180320.indd 7 2018/03/20 17:46:05
8
4
Playback
Place a record on the turntable.
For EP (“doughnut”) records, insert the included 45 rpm
adapter onto the center spindle.
Turn the power/rpm switch knob to match
the turntable rpm with the rpm of the record.
The turntable will start turning.
Power/rpm switch knob
You can select 33 1/3, 45, 78 rpm as the turntable speed per minute.
Raise the stylus cover of the cartridge.
Stylus cover
2
1
Release the arm rest lock and raise the lifter lever.
Lifter lever
Grip the  nger lift, and move the stylus tip directly
above the start position of the track to play.
Finger lift
2.5
1.5
2.5
2
Lower the lifter lever.
The tone arm slowly lowers, and playback starts
when the stylus tip reaches the record.
4
3
5
6
1.DP-450USBEM_ENG_QSG_180320.indd 8 2018/03/20 17:46:06
9
5
Recording to a USB
memory device
USB
indicator
Recording
indicators
Recording
button
REC MP3
Recording
button
(REC WAV)
USB port
USB memory
device
Recordings you have made should only be used for your personal
enjoyment, and as per copyright laws may not be used in other ways
without permission of the copyright holder.
Insert the USB memory device into the USB port.
The USB indicator lights up in white.
Prepare playback of the record for recording in advance.
1
Lower the stylus to a silent part of the record
for recording.
Before recording begins, press the recording
button for the  le format when recording
(REC MP3 or WAV).
The USB indicator flashes in white and recording starts.
The recording indicator for the button you pressed will light up
in blue.
When recording is complete, press the button
that you pressed in step 3 to stop recording.
The recording indicator goes out and recording stops.
The tracks that you have recorded to a USB memory device can be
edited on a computer with the “MusiCut for DENON” digital music fi le
editing software. For details, see the WEB manual.
2
4
3
1.DP-450USBEM_ENG_QSG_180320.indd 9 2018/03/20 17:46:06
10
PDF
Overview
Preparations
Connections
Playback/Recording
Tips
Appendix
PDF Download
TURNTABLE
TURNTABLE
WEB Manual
Copyright © 2018 D&M Holdings Inc. All Rights Reserved.
DP-450USB
Contents
English
Online Manual
Owner’s Manual
For more information, visit www.denon.com
Refer to the Online Manual for other functions
information and operation procedure details.
manuals.denon.com/DP450USB/ALL/EN/
Using the dust cover
Remove the dust cover before record playback.
Attach the dust cover to the included dust cover stand to use it as a
record stand.
Dust cover
(supplied)
Dust cover
stand
(supplied)
1.DP-450USBEM_ENG_QSG_180320.indd 10 2018/03/20 17:46:08
www.denon.com
Printed in China 5411 11695 00AD
Copyright © 2018 D&M Holdings Inc. All Rights Reserved.
12.DP-450USBEM_Backpage_QSG_180320.indd 1 2018/03/20 18:10:26
  • Page 1 1
  • Page 2 2
  • Page 3 3
  • Page 4 4
  • Page 5 5
  • Page 6 6
  • Page 7 7
  • Page 8 8
  • Page 9 9
  • Page 10 10
  • Page 11 11
  • Page 12 12

Denon DP-400 Owner's manual

Category
Audio turntables
Type
Owner's manual
This manual is also suitable for

Ask a question and I''ll find the answer in the document

Finding information in a document is now easier with AI