
Before using the security features, please read this guide
thoroughly and keep it at hand for future reference.
Antes de usar las funcionalidades de seguridad, lea
cuidadosamente esta guía y manténgala a mano para futuras
consultas.
Security Features Guide
Guía de características de
seguridad


3
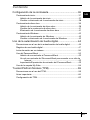
Contents
US
Setting the Password...........................................................6
Power-on Password .............................................................................. 7
Adding the Power-on Password...................................................... 7
Changing/Removing the Power-on Password ................................ 8
Hard Disk Password .............................................................................. 9
Adding the Hard Disk Password ..................................................... 9
Changing the Hard Disk Password ............................................... 11
Removing the Hard Disk Password .............................................. 11
Windows Password ............................................................................. 12
Adding the Windows Password .................................................... 12
Changing/Removing the Windows Password ............................... 12
Using Fingerprint Authentication .......................................14
Precautions on Using Fingerprint Authentication ................................ 15
Enrolling a Fingerprint ......................................................................... 17
Logging Onto Your System ................................................................. 20
Using the Password Bank ................................................................... 22
Adding an Entry to the Password Bank ........................................ 22
Using a Password Bank Entry to Access a Web Site ................... 22
Importing/Exporting Password Bank Entries................................. 23
Using the My Safe Folder.................................................................... 24
Trusted Platform Module (TPM) ........................................28
Precautions on Using the TPM............................................................ 28
Important Notice .................................................................................. 29
Configuring the TPM............................................................................ 31


Setting the Password

6
Setting the Password
You can use BIOS functions to set two types of passwords to protect your
computer: power-on password and hard disk password.
Once you have set the power-on password, you will have to enter the
password after the VAIO logo appears to start your computer. The
power-on password will allow you to protect your computer from
unauthorized access.
The hard disk password provides additional security for the data stored
on your hard disk. If you set the hard disk password, no other users will
be able to access the data without knowing the password, even if the
hard disk is installed in another computer.
You can substitute fingerprint authentication for entering these passwords. See "Using
Fingerprint Authentication" on page 14 for more information.

Setting the Password
7
Power-on Password
Adding the Power-on Password
Once you have set the power-on password, you cannot start the computer without entering
the password. Make sure not to forget the password. Write down your password and keep
it safe and private from other people.
If you forget the power-on password and need assistance to reset, a password reset fee will
be charged, and your computer may need to be sent in for depot service for password reset.
You can substitute fingerprint recognition for password entry when turning on the
computer. For more information, see "Using Fingerprint Authentication" on page 14.
To add the power-on password
1 Turn on the computer.
2 Press the F2 key when the VAIO logo appears.
The BIOS setup screen appears. If not, restart the computer and
press the F2 key several times when the VAIO logo appears.
3 Use the < or , key to select Security to display the Security tab,
select Set Machine Password, and then press the Enter key.
4 On the password entry screen, enter a new password, enter the
same password again for confirmation, and then press the Enter key.
The password can be up to 32 alphanumeric characters (including
spaces) long.
5 Select Password When Power ON under Security.
Press the space bar to change the setting from Disabled to Enabled.
6 Use the < or , key to select Exit and select Exit (Save Changes);
and then press the Enter key.
On the Setup Confirmation screen, make sure that Yes is selected
and then press the Enter key.

8
Changing/Removing the Power-on Password
To change or remove the power-on password
1 Turn on the computer.
2 Press the F2 key when the VAIO logo appears.
The BIOS setup screen appears. If not, restart the computer and
press the F2 key several times when the VAIO logo appears.
3 Enter the current password for Enter Password.
4 Use the < or , key to select Security to display the Security tab,
select Set Machine Password, and then press the Enter key.
5 On the password entry screen, enter the current password once,
enter a new password twice, and then press the Enter key.
To remove the password, leave the Enter New Password and
Confirm New Password fields blank and press the Enter key.
6 Use the < or , key to select Exit and then Exit (Save Changes);
and press the Enter key.
On the Setup Confirmation screen, make sure that Yes is selected
and then press the Enter key.

Setting the Password
9
Hard Disk Password
Adding the Hard Disk Password
In order to add the hard disk password, you must set both the master and
user passwords. The master password is provided for users with
administrator rights on the computer to reset the user password on the
BIOS setup screen. The user password is provided to lock your hard disk.
Once you have set the user password, you will have to enter the
password along with the power-on password (if set), after the VAIO logo
appears.
You cannot start the computer with the master password.
You cannot set the hard disk password on the optional 80GB HDD bay unit.
If you forget the master password or the keyboard fails, which is critical to password entry,
no bypass is possible and the data stored in the hard disk will not been accessible. There
is NO RESET of this password. You will have to replace the hard disk at your own expense
and lose all the data stored in the original hard disk. Make sure to write down the master
password and keep it safe and private from other people.
You can substitute fingerprint recognition for password entry when turning on the
computer. For more information, see "Using Fingerprint Authentication" on page 14.

10
To add the hard disk password
1 Turn on the computer.
2 Press the F2 key when the VAIO logo appears.
The BIOS setup screen appears. If not, restart the computer and
press the F2 key several times when the VAIO logo appears.
If you have set the power-on password, enter your power-on password.
3 Use the < or , key to select Security to display the Security tab,
select Hard Disk Password, and then press the Enter key.
The password entry screen appears.
On 17-inch LCD models, you can set a distinctive hard disk password on each of the two
hard disks. Select Hard Disk1 Password or Hard Disk2 Password in place of Hard Disk
Password above and press the Enter key.
4 Select Enter Master and User Passwords and press the Enter key.
5 Select Continue on the warning screen and press the Enter key.
6 Enter the master password twice and press the Enter key.
The password can be up to 32 alphanumeric characters (including
spaces) long.
7 Enter the user password twice and press the Enter key.
The password can be up to 32 alphanumeric characters (including
spaces) long.
8 Press the Enter key when the success message appears.

Setting the Password
11
Changing the Hard Disk Password
To change the hard disk password
1 Turn on the computer.
2 Press the F2 key when the VAIO logo appears.
The BIOS setup screen appears. If not, restart the computer and
press the F2 key several times when the VAIO logo appears.
If you have set the power-on password, enter your power-on password.
3 Use the < or , key to select Security to display the Security tab,
select Hard Disk Password, and then press the Enter key.
The password entry screen appears.
4 Select Change Master Password or Change User Password and
press the Enter key.
5 Enter the current password once and then a new password twice.
6 Press the Enter key.
7 Press the Enter key when the success message appears.
Removing the Hard Disk Password
To remove the hard disk password
1 Turn on the computer.
2 Press the F2 key when the VAIO logo appears.
The BIOS setup screen appears. If not, restart the computer and
press the F2 key several times when the VAIO logo appears.
If you have set the power-on password, enter your power-on password.
3 Use the < or , key to select Security to display the Security tab,
select Hard Disk Password, and then press the Enter key.
The password entry screen appears.
4 Select Enter Master and User Password and press the Enter key.
5 Enter the current password for Enter Current Hard Disk Master
Password and press the Enter key, leaving everything else blank.
6 Press the Enter key when the success message appears.

12
Windows Password
Adding the Windows Password
To add the Windows password
1 Click Start and then Control Panel.
2 Click the User Accounts icon.
3 Click your user account under or pick an account to change.
4 Click Create a password.
5 In the Type a new password and Type the new password again to
confirm fields, enter the password for your account.
6 Click Create Password.
See "Help and Support Center" for more information on the Windows password.
Changing/Removing the Windows Password
To change the Windows password
1 Click Start and then Control Panel.
2 Click the User Accounts icon.
3 Click your user account under or pick an account to change.
4 Click Change my password.
5 Enter the current password under Type your current password.
6 Enter a new password under Type a new password and the same
password under Type the new password again to confirm.
7 Click Change Password.
To remove the password
1 Click Start and then Control Panel.
2 Click the User Accounts icon.
3 Click your user account under or pick an account to change.
4 Click Remove my password.
5 Enter the current password that you want to remove.
6 Click Remove Password.

Using Fingerprint Authentication

14
Using Fingerprint Authentication
Your computer is equipped with a fingerprint reader to provide you with
additional convenience. A small horizontal bar located at the upper right of
the keyboard is the sensor of the fingerprint reader and will be referred to as
the fingerprint sensor hereinafter.
Once you have registered your fingerprint(s), the fingerprint authentication
functionality offers:
❑ A substitute for password entry
You can log onto your password-protected system without entering the
power-on, hard disk, and Windows passwords. If you share a computer
with other people, you can skip user selection as well.
❑ Quick web-site access
Once you have registered your user information (user accounts,
passwords, etc.) for web sites in the password bank, you can substitute
fingerprint authentication for entering required information and access
the password-protected web sites.
❑ Access to the encrypted (locked) My Safe folder
The My Safe folder is provided to protect your data against unauthorized
access. With the fingerprint authentication functionality, you can decrypt
(unlock) this folder to access your data.

Using Fingerprint Authentication
15
Precautions on Using Fingerprint
Authentication
❑ The fingerprint authentication technology does not assure 100%
verification.
Sony Corporation assumes no liabilities for any problems and damages
arising out of your use of or inability to use the fingerprint sensor.
❑ The fingerprint authentication technology does not assure complete
protection of your data and hardware.
Sony Corporation assumes no liabilities for any problems and damages
arising out of your use of or inability to use the fingerprint sensor.
❑ The fingerprint recognition rate depends on your operating conditions
and varies among individuals as well.
❑ Make sure to make a backup copy of the data stored in the hard disk,
especially in the My Safe folder, before sending your computer for repair.
Sony Corporation assumes no liabilities for any loss or modification of
your data that might have occurred during the course of repair.
❑ The hard disk may be initialized and returned after the repair work and,
in such a case, you will not be able to restore your fingerprint templates.
❑ The maintenance and management of data concerning fingerprint
authentication must be carried out at your own risk.
Sony Corporation assumes no liabilities for any defects arising out of
your data maintenance and management.
❑ When enrolling your fingerprint(s), keep the following in mind:
❑ Enroll more than one fingerprint in case of inability to recognize the
fingerprint due to injury.
❑ You may not be able to enroll your fingerprint(s) due to some
biological factors.
❑ Up to 10 fingerprints can be enrolled per person.
Note that up to 21 fingerprints can be enrolled on a first-com, first-
served basis for logging on to your system using the Boot Security
functionality. If you share your computer with other people, you may
not be able to use your enrolled fingerprint to log on to your system.

16
❑ When swiping your finger across the fingerprint sensor, keep the
following in mind:
❑ Place your fingertip flat in the center of the fingerprint sensor.
❑ Scan your fingerprint from the top joint of the finger to the fingertip.
❑ Swipe your finger perpendicularly across the fingerprint sensor.
❑ Keep your finger in contact with the fingerprint sensor while swiping.
❑ Let the fingerprint sensor take about one second to scan your
fingerprint.
❑ It may be hard to enroll or recognize your fingerprint if your finger is:
❑ dry or wet
❑ wrinkled
❑ injured
❑ dirty
❑ The soiled fingerprint sensor may cause poor recognition performance.
❑ Wipe off the fingerprint sensor regularly with a soft cloth.
❑ Use a lens cleaning cloth when the fingerprint sensor is extremely
soiled.
❑ Blow off dust with an air blower or a soft brush.

Using Fingerprint Authentication
17
Enrolling a Fingerprint
To use the fingerprint authentication functionality, you must enroll your
fingerprint(s) in your computer. Launch Windows to display the Welcome
window and follow the instructions described below.
Set the Windows password on your computer before enrollment. See "Adding the Windows
Password" on page 12 for detailed instructions.
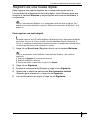
To enroll a fingerprint
Up to 21 fingerprints can be enrolled on a first-com, first-served basis for logging on to
your system using the Boot Security functionality. If you share your computer with other
people, you may not be able to use your enrolled fingerprint to log on to your system.
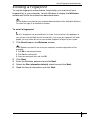
1 Click Enroll now on the Welcome window.
If the Windows password is not set on your computer, password registration will be
prompted.
1 Click OK on the prompt window.
2 Click Yes for confirmation.
3 Enter your password twice and click OK.
2 Click Next.
3 Enter the Windows password and click Next.
4 Select the Run interactive tutorial check box and click Next.
5 Read the tutorial information and click Next.

18
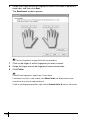
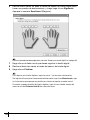
6 Swipe your finger across the fingerprint sensor four times to perform a
swipe test, and then click Next.
The Enrollment window appears.
See "To scan a fingerprint" on page 19 for the scan procedure.
7 Click on the finger of which fingerprint you want to enroll.
8 Swipe the finger across the fingerprint sensor three times.
9 Click Finish.
To enroll more fingerprints, repeat steps 7 and 8 above.
If enrollment scan fails in step 8 above, click Manual mode and follow the on-screen
instructions to try manual mode enrollment.
To edit or add fingerprint templates, right-click the Protector Suite QL icon on the taskbar.

Using Fingerprint Authentication
19
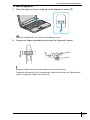
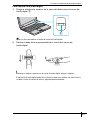
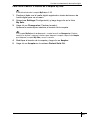
To scan a fingerprint
1 Place the top joint of your fingertip on the fingerprint sensor A.
Place your fingertip flat in the center of the fingerprint sensor.
2 Swipe your finger perpendicularly across the fingerprint sensor.
Keep your finger in contact with the fingerprint sensor while swiping.
Fingerprint enrollment may fail if you move your finger too fast or too slow. Take about one
second to swipe your finger across the sensor.

20
Logging Onto Your System
To use the fingerprint authentication functionality in place of password entry
to log onto your system, you need to set the power-on, hard disk, and
Windows passwords and configure your computer for fingerprint
authentication.
For setting the power-on and hard disk passwords, see "Setting the
Password" on page 6.
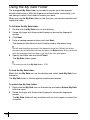
To log onto Windows
If your fingerprints are enrolled for your user account, you will be able to
substitute fingerprint recognition for password entry when logging on to
Windows.
1 Swipe the finger with the enrolled fingerprint across the fingerprint
sensor when the Windows log-on window appears.
Window is launched.
You can log onto to your user account just by swiping the finger with the enrolled
fingerprint even if your computer is shared by multiple users.
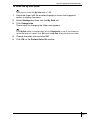
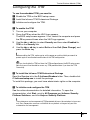
To configure the computer for fingerprint authentication
1 Swipe the finger with the enrolled fingerprint across the fingerprint
sensor to display the menu.
2 Select Settings.
The Protector Suite QL window appears.
3 Click the Boot Security tab.
The Boot Security tab is not displayed if you have not set the power-on and hard disk
passwords in advance.
4 Select the Enable boot security check box and the Automatically log
onto system after power-on authentication check box.
With the Automatically log onto system after power-on authentication check box
selected, you can start your system and launch Windows by swiping your finger only once.
If only the Enable boot security check box has been selected, you will be prompted to swipe
your finger or enter the password before Windows is launched.
Page is loading ...
Page is loading ...
Page is loading ...
Page is loading ...
Page is loading ...
Page is loading ...
Page is loading ...
Page is loading ...
Page is loading ...
Page is loading ...
Page is loading ...
Page is loading ...
Page is loading ...
Page is loading ...
Page is loading ...
Page is loading ...
Page is loading ...
Page is loading ...
Page is loading ...
Page is loading ...
Page is loading ...
Page is loading ...
Page is loading ...
Page is loading ...
Page is loading ...
Page is loading ...
Page is loading ...
Page is loading ...
Page is loading ...
Page is loading ...
Page is loading ...
Page is loading ...
Page is loading ...
Page is loading ...
Page is loading ...
Page is loading ...
Page is loading ...
Page is loading ...
Page is loading ...
Page is loading ...
Page is loading ...
Page is loading ...
Page is loading ...
Page is loading ...
-
 1
1
-
 2
2
-
 3
3
-
 4
4
-
 5
5
-
 6
6
-
 7
7
-
 8
8
-
 9
9
-
 10
10
-
 11
11
-
 12
12
-
 13
13
-
 14
14
-
 15
15
-
 16
16
-
 17
17
-
 18
18
-
 19
19
-
 20
20
-
 21
21
-
 22
22
-
 23
23
-
 24
24
-
 25
25
-
 26
26
-
 27
27
-
 28
28
-
 29
29
-
 30
30
-
 31
31
-
 32
32
-
 33
33
-
 34
34
-
 35
35
-
 36
36
-
 37
37
-
 38
38
-
 39
39
-
 40
40
-
 41
41
-
 42
42
-
 43
43
-
 44
44
-
 45
45
-
 46
46
-
 47
47
-
 48
48
-
 49
49
-
 50
50
-
 51
51
-
 52
52
-
 53
53
-
 54
54
-
 55
55
-
 56
56
-
 57
57
-
 58
58
-
 59
59
-
 60
60
-
 61
61
-
 62
62
-
 63
63
-
 64
64


Ask a question and I''ll find the answer in the document
Finding information in a document is now easier with AI
in other languages
Related papers
Other documents
-
Panasonic CF-H1CSLTG1M User manual
-
-
VAIO VJF141 User manual
-
Gigabyte GA-EP43-DS3R Owner's manual
-
Gigabyte GA-EP45-DQ6 Software Installation
-
 eSSL K31 User manual
-
Toshiba Canvio Connect HDTC715XR3C1 User guide
-
Toshiba Canvio Connect HDTC715XR3C1 User guide
-
Optima TPM Quick Reference Manual
-
Chamberlain 942FP User manual
