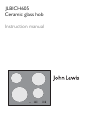
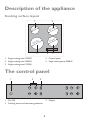
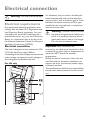
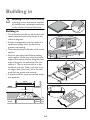
John Lewis JLBICH605 ceramic glass hob offers a precise and versatile cooking experience. Its four cooking zones, including a 2300W zone, provide rapid and efficient heating for various cooking tasks. The touch control sensor fields allow for intuitive operation and easy adjustment of heat settings. Safety features like the child safety device and residual heat indicators ensure a secure cooking environment. Additionally, the hob's sleek and modern design complements any contemporary kitchen.
John Lewis JLBICH605 ceramic glass hob offers a precise and versatile cooking experience. Its four cooking zones, including a 2300W zone, provide rapid and efficient heating for various cooking tasks. The touch control sensor fields allow for intuitive operation and easy adjustment of heat settings. Safety features like the child safety device and residual heat indicators ensure a secure cooking environment. Additionally, the hob's sleek and modern design complements any contemporary kitchen.


-
 1
1
-
 2
2
-
 3
3
-
 4
4
-
 5
5
-
 6
6
-
 7
7
-
 8
8
-
 9
9
-
 10
10
-
 11
11
-
 12
12
-
 13
13
-
 14
14
-
 15
15
-
 16
16
-
 17
17
-
 18
18
-
 19
19
-
 20
20


John Lewis JLBICH605 ceramic glass hob offers a precise and versatile cooking experience. Its four cooking zones, including a 2300W zone, provide rapid and efficient heating for various cooking tasks. The touch control sensor fields allow for intuitive operation and easy adjustment of heat settings. Safety features like the child safety device and residual heat indicators ensure a secure cooking environment. Additionally, the hob's sleek and modern design complements any contemporary kitchen.
Ask a question and I''ll find the answer in the document
Finding information in a document is now easier with AI
Related papers
-
John Lewis JLBICH602 77L User manual
-
-
-
-
-
-
John Lewis JLBICH605 User manual
-
-
-
Other documents
-
Aeg-Electrolux FM6520K-AN User manual
-
-
-
Aeg-Electrolux FM4513K-AN User manual
-
Electrolux EHS36020U User manual
-
-
-
Aeg-Electrolux FM7531K-AN User manual
-
-