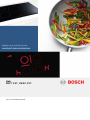
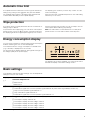
Bosch ELECTRIC COOKTOP: Experience culinary excellence with innovative features designed to make cooking easier, safer, and more enjoyable. Equipped with a range of hotplates, this cooktop offers flexible cooking zones and precise temperature control for every dish. The residual heat indicator ensures safety by warning you of hot surfaces, while the childproof lock prevents unintended activation. Discover the convenience of the electronic boil start control for faster boiling and energy-saving tips for efficient cooking.
Bosch ELECTRIC COOKTOP: Experience culinary excellence with innovative features designed to make cooking easier, safer, and more enjoyable. Equipped with a range of hotplates, this cooktop offers flexible cooking zones and precise temperature control for every dish. The residual heat indicator ensures safety by warning you of hot surfaces, while the childproof lock prevents unintended activation. Discover the convenience of the electronic boil start control for faster boiling and energy-saving tips for efficient cooking.


-
 1
1
-
 2
2
-
 3
3
-
 4
4
-
 5
5
-
 6
6
-
 7
7
-
 8
8
-
 9
9
-
 10
10
-
 11
11
-
 12
12
-
 13
13
-
 14
14
-
 15
15
-
 16
16


Bosch ELECTRIC COOKTOP: Experience culinary excellence with innovative features designed to make cooking easier, safer, and more enjoyable. Equipped with a range of hotplates, this cooktop offers flexible cooking zones and precise temperature control for every dish. The residual heat indicator ensures safety by warning you of hot surfaces, while the childproof lock prevents unintended activation. Discover the convenience of the electronic boil start control for faster boiling and energy-saving tips for efficient cooking.
Ask a question and I''ll find the answer in the document
Finding information in a document is now easier with AI
Related papers
-
Bosch PKE611F17E/01 User manual
-
Bosch NKF645B17G User manual
-
Bosch Ceramic Hob User manual
-
-
Bosch PKG775DB1Y User manual
-
-
-
-
-
Other documents
-
Siemens ELECTRIC COOKTOP User manual
-
-
Siemens ET975FG17E Installation guide
-
Siemens ET645HF17E User manual
-
Siemens ET651FF17E/01 User manual
-
Siemens ET651NF17Q User manual
-
Siemens ET845FC17C/01 User manual
-
Siemens ET375FFB1E/01 User manual
-
-
Siemens ET611FE17Q User manual